Bootstrap Table使用方法详解
作者:aozeahj 字体:[增加 减小] 类型:转载 时间:2016-08-01 我要评论
bootstrap-table使用总结
bootstrap-table是在bootstrap-table的基础上写出来的,专门用于显示数据的表格插件。而bootstrap是来自 Twitter,是目前最受欢迎的前端框架。Bootstrap 是基于 HTML、CSS、JAVASCRIPT 的,具有简便灵活,快速前端开发的优势。对与bootstrap在此就不在叙述。本文将着重讲解自己在项目中使用到bootstrap-table的一些理解和如何学习它。
首先交代一下,jquery ,bootstrap ,bootstrap-table 三者之间的关系。bootstrap很多部分代码涉及到了jquery的,也就是说 bootstrap是依赖jquery的,而我们要使用的bootstrap-table则是在bootstrap基础上创造出来的,所以在使用bootstrap-table之前必须引用 jquery 和bootstrap的相关js,css文件。
接着说,bootstrap-table的特点:与jquery-ui,jqgrid等表格显示插件而言,bootstrap-table扁平化,轻量级,对于一些轻量级的数据显示,他是绰绰有余,而对父子表等的支持也很好,最主要的是可以与bootstrap的其他标签无缝组合。
好了,简介的话就说到这,直接上代码和效果图之后,再做进一步的讨论。
|
1
2
3
4
5
6
7
8
9
10
11
12
13
14
15
16
17
18
19
20
21
22
23
24
25
26
27
28
29
30
31
32
33
34
35
36
37
38
39
40
41
42
43
44
45
46
47
48
49
50
51
52
53
54
55
56
|
<!DOCTYPE html PUBLIC "-//W3C//DTD XHTML 1.0 Strict//EN"
<
head
>
<
title
>bootstrap-table</
title
>
<
meta
http-equiv
=
"Content-Type"
content
=
"text/html; charset=utf-8"
/>
<
meta
name
=
"description"
content
=
""
/>
<
meta
name
=
"keywords"
content
=
""
/>
<
script
type
=
"text/javascript"
src
=
"./js/jquery-2.2.1.js"
></
script
>
<
script
type
=
"text/javascript"
src
=
"./bootstrap/js/bootstrap.min.js"
></
script
>
<
script
type
=
"text/javascript"
src
=
"./bootstrap-table/bootstrap-table-all.js"
></
script
>
<
script
type
=
"text/javascript"
src
=
"./bootstrap-table/locale/bootstrap-table-zh-CN.js"
></
script
>
<
link
rel
=
"stylesheet"
type
=
"text/css"
href
=
"./bootstrap/css/bootstrap.min.css"
>
<
link
rel
=
"stylesheet"
type
=
"text/css"
href
=
"./bootstrap-table/bootstrap-table.min.css"
>
</
head
>
<
script
language
=
"javascript"
>
</
script
>
<
body
>
<
div
class
=
"col-md-offset-3 col-md-6"
>
<
div
class
=
"panel panel-default"
>
<
div
class
=
"panel-heading"
>
<
h3
class
=
"panel-title text-center"
>已添加教师账号</
h3
>
</
div
>
<
div
class
=
"panel-body"
>
<
div
id
=
"toolbar"
class
=
"btn-group"
>
<
button
id
=
"btn_edit"
type
=
"button"
class
=
"btn btn-default"
>
<
span
class
=
"glyphicon glyphicon-pencil"
aria-hidden
=
"true"
></
span
>修改
</
button
>
<
button
id
=
"btn_delete"
type
=
"button"
class
=
"btn btn-default"
>
<
span
class
=
"glyphicon glyphicon-remove"
aria-hidden
=
"true"
></
span
>删除
</
button
>
</
div
>
<
table
id
=
"teacher_table"
data-toggle
=
"table"
data-url
=
"./data.php"
data-method
=
"post"
data-query-params
=
"queryParams"
data-toolbar
=
"#toolbar"
data-pagination
=
"true"
data-search
=
"true"
data-show-refresh
=
"true"
data-show-toggle
=
"true"
data-show-columns
=
"true"
data-page-size
=
"5"
>
<
thead
>
<
tr
>
<
th
data-field
=
"name"
>用户账号</
th
>
<
th
data-field
=
"pwd"
>用户密码</
th
>
<
th
data-field
=
"t_name"
>教师姓名</
th
>
</
tr
>
</
thead
>
</
table
>
</
div
>
</
div
>
</
div
>
</
body
>
|
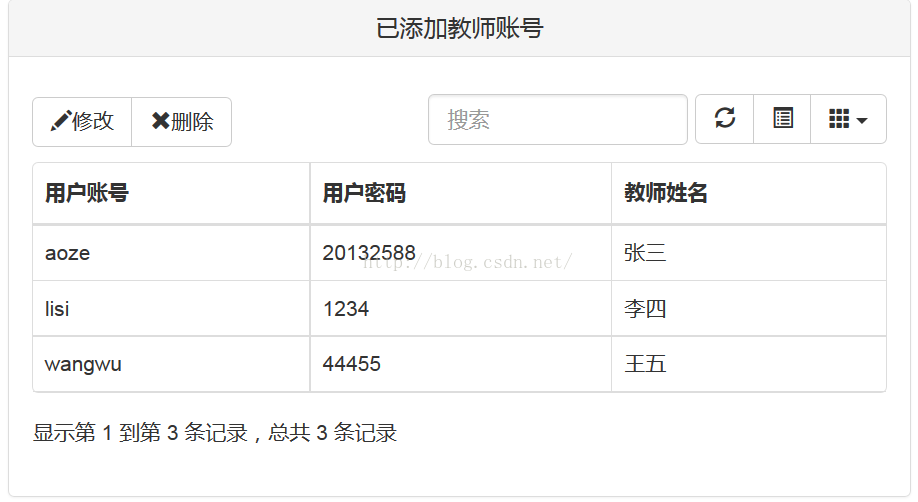
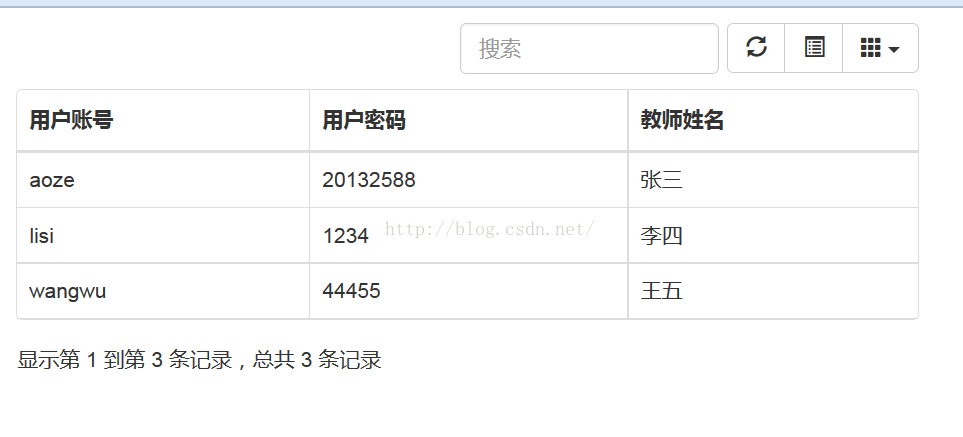
效果图:
好接下来我们 分步骤剖析一下上面的代码的含义。
1.首先我们需要去下载相应的 jquery bootstrap bootstrap-table的包,这些网上都有教程,在此不再叙述如何下载。
由上面<head>标签中引用js和css文件名可知我们必须引进这几个文件。
注意bootstrap,下载编译过的压缩包中只有三个文件夹 css ,fonts, js
1. jquery-2.2.1.js ---- 最新的jquery文件
2. bootstrap.min.js --- 最新的bootstrap/js中bootstrap.min.js 压缩文件
3.bootstrap.min.css ---最新的bootstrap/css中bootstrap.min.css 压缩文件
4.bootstrap-table-all.js ---最新bootstrap-table下的js文件
5.bootstrap-table-zh-CN.js ----最新bootstrap-table/locale下的中文初始文件
6.bootstrap-table.min.css ---最新的bootstrap-table下css压缩文件
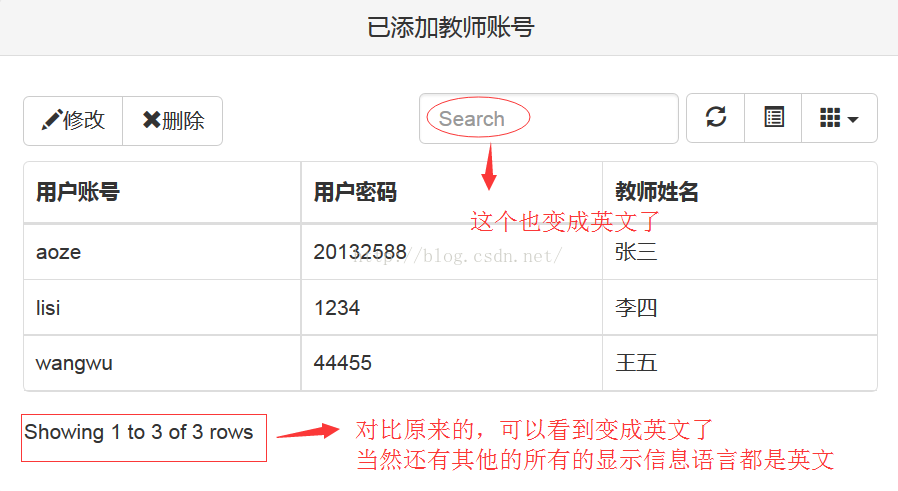
这六个必须配置,其中bootstrap-table-zh-CN.js是支持中文的js文件,只有加载了这个文件我们的一些表格显示信息才会被设置成中文。
我们来实验一下 将bootstrap-table-zh-CN.js去掉后的显示效果。
当然我们还可以把显示信息设置成其他语言,只要将bootstrap-table-zh-CN.js换成其他语言的js文件即可。bootstrap-table包中都有支持。
我们还可以看看这个文件中的源码,我们看一下,就知道这个文件干了什么了。
|
1
2
3
4
5
6
7
8
9
10
11
12
13
14
15
16
17
18
19
20
21
22
23
24
25
26
27
28
29
30
31
32
33
34
35
36
37
38
39
40
|
/**
* Bootstrap Table Chinese translation
* Author: Zhixin Wen<wenzhixin2010@gmail.com>
*/
(
function
($) {
'use strict'
;
$.fn.bootstrapTable.locales[
'zh-CN'
] = {
formatLoadingMessage:
function
() {
return
'正在努力地加载数据中,请稍候……'
;
},
formatRecordsPerPage:
function
(pageNumber) {
return
'每页显示 '
+ pageNumber +
' 条记录'
;
},
formatShowingRows:
function
(pageFrom, pageTo, totalRows) {
return
'显示第 '
+ pageFrom +
' 到第 '
+ pageTo +
' 条记录,总共 '
+ totalRows +
' 条记录'
;
},
formatSearch:
function
() {
return
'搜索'
;
},
formatNoMatches:
function
() {
return
'没有找到匹配的记录'
;
},
formatPaginationSwitch:
function
() {
return
'隐藏/显示分页'
;
},
formatRefresh:
function
() {
return
'刷新'
;
},
formatToggle:
function
() {
return
'切换'
;
},
formatColumns:
function
() {
return
'列'
;
}
};
$.extend($.fn.bootstrapTable.defaults, $.fn.bootstrapTable.locales[
'zh-CN'
]);
})(jQuery);
|
粗略一看就知道,引用该js文件后,在加载时,便祈祷了初始化的效果。将一些显示信息的内容转为相应的中内容。
2.接着我们来说相关的html代码,实际上与bootstrap-table有关的html代码只有这一部分
|
1
2
3
4
5
6
7
8
9
10
11
12
13
14
15
16
17
|
<
table
id
=
"teacher_table"
data-toggle
=
"table"
data-url
=
"./data.php"
data-method
=
"post"
data-query-params
=
"queryParams"
data-toolbar
=
"#toolbar"
data-pagination
=
"true"
data-search
=
"true"
data-show-refresh
=
"true"
data-show-toggle
=
"true"
data-show-columns
=
"true"
data-page-size
=
"5"
>
<
thead
>
<
tr
>
<
th
data-field
=
"name"
>用户账号</
th
>
<
th
data-field
=
"pwd"
>用户密码</
th
>
<
th
data-field
=
"t_name"
>教师姓名</
th
>
</
tr
>
</
thead
>
</
table
>
|
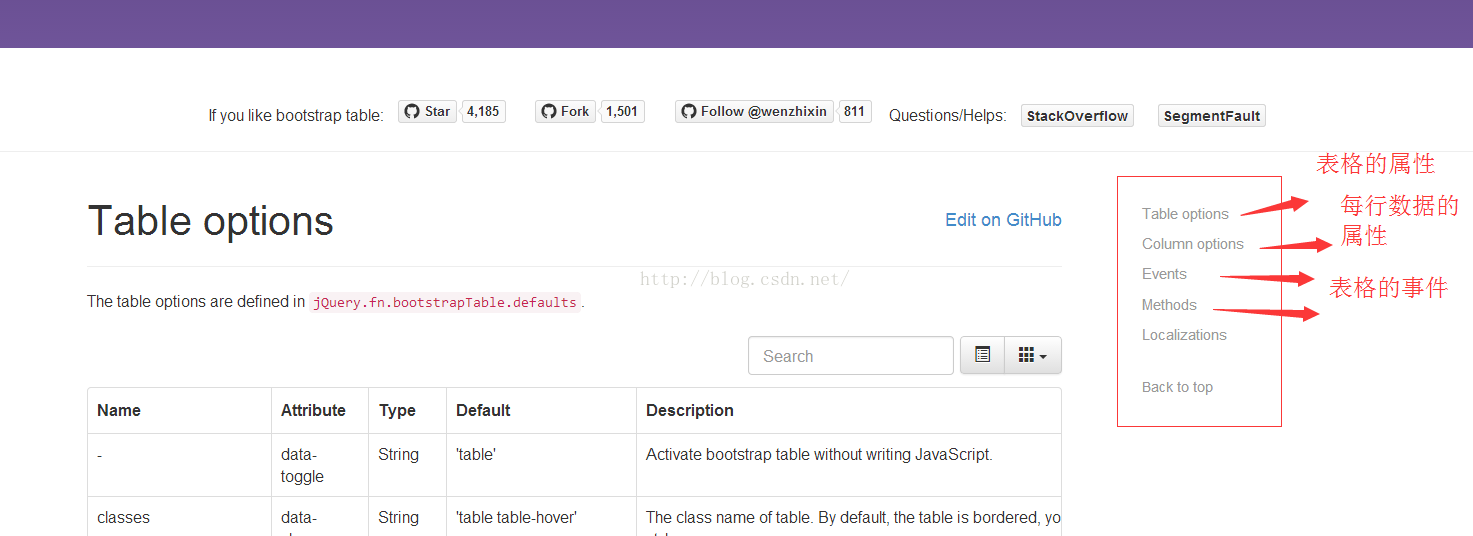
对,就只有一个table标签,再加上一大堆了 参数,而表格的展现形式就是通过这些在参数 来实现的。要知道有哪些样式和功能,光靠我列举肯定是九牛一毛,授人以鱼不如授人以渔,我告诉大家去哪查找这些类.class的含义。 我们可到bootstrap-table的专业网站上去查找 这有一个我用的链接,点击打开链接如果无效的可以 直接输入http://bootstrap-table.wenzhixin.net.cn/documentation
当然还可以在example中看一些例子
我们如何查看 相应的参数的含义呢? 看到上面这张图,最右边的是一些选项,可以选这可以设置的表格属性,行属性,以及可绑定的事件。
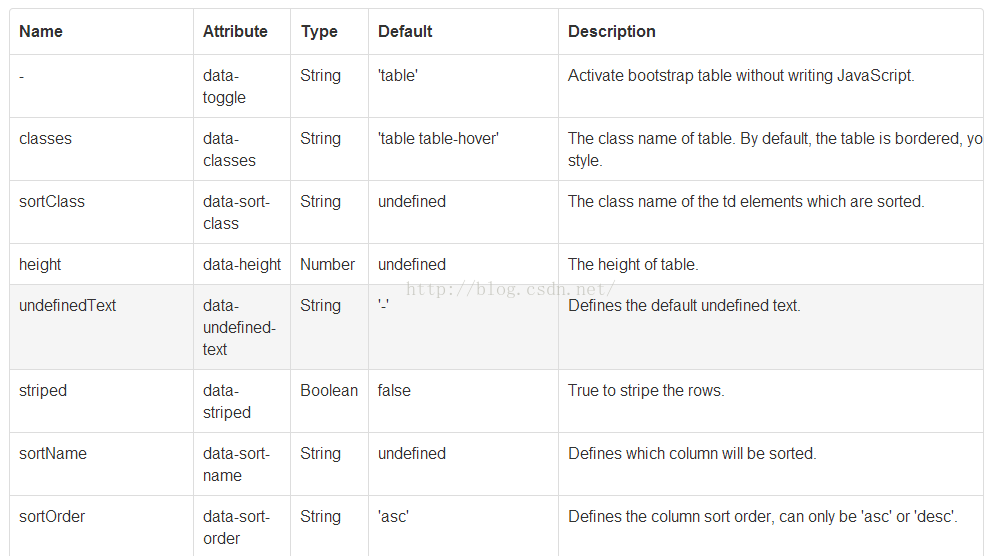
点击表格属性 Table options 显示如下图,首先看到标题Name用于js创建表格是使用,而Attribute是html创建表格使用的,
举几个例子在我们上面的代码中有这么几个 参数他们的意思是:
data-url:索取数据的url。
data-method:请求方式。
data-height:设置表格的高
data-query-params="queryParams" :设置
data-toolbar="#toolbar" :设置装按钮的容器为id为toolbar的。
data-pagination="true" :设置是否显示页码数
data-search="true" :设置search框
data-show-refresh="true" :设置刷新按钮
data-show-toggle="true" :设置数据显示格式
这下你该明白怎么样查看了吧!
注意其中下面段代码是核心,<tr>表示一行 <th>一个格,data-field="name"表示一行中一个格子中的数据名 你可以把 data-field理解成id,因为后台传送过来的数据就是根据data-field的来区分,那个数据发送给谁的。
|
1
2
3
4
5
6
7
|
<
thead
>
<
tr
>
<
th
data-field
=
"name"
>用户账号</
th
>
<
th
data-field
=
"pwd"
>用户密码</
th
>
<
th
data-field
=
"t_name"
>教师姓名</
th
>
</
tr
>
</
thead
>
|
对于不想用html静态生成,也可以使用js动态生成。给一个代码demo,要设置相关的参数只需要采用 上面讲的 Name:options 即可。例如在html中设置数据请求的目的文件 data-url:"./data.php" 在js中只要声明 url:"./data.php"
|
1
2
3
4
5
6
7
8
9
10
11
12
13
14
15
16
17
18
19
20
21
|
$(
'#table'
).bootstrapTable({
columns: [{
field:
'id'
,
title:
'Item ID'
}, {
field:
'name'
,
title:
'Item Name'
}, {
field:
'price'
,
title:
'Item Price'
}],
data: [{
id: 1,
name:
'Item 1'
,
price:
'$1'
}, {
id: 2,
name:
'Item 2'
,
price:
'$2'
}]
});
|
3.这样说,其他代码是干什么的,其中一部分代码是使用了 boostrap中的面板来设置格式,即将table镶嵌在面板中。 所去掉面板的代码后bootstrap-table的效果是这样的
仅仅是没有了面板而已。
4.传送数据的格式,bootstrap-table 接收的数据形式默认为json格式的
在上面可以看到请求的后台地址为:"./data.php",我们来看一下他的内容
|
1
2
3
4
5
6
7
8
|
<?php
$results
[0]=
array
(
"name"
=>
"aoze"
,
"pwd"
=>
"20132588"
,
"t_name"
=>
"张三"
);
$results
[1]=
array
(
"name"
=>
"lisi"
,
"pwd"
=>
"1234"
,
"t_name"
=>
"李四"
);
$results
[2]=
array
(
"name"
=>
"wangwu"
,
"pwd"
=>
"44455"
,
"t_name"
=>
"王五"
);
echo
json_encode(
$results
);
?>
|
很简单吧! 当然这只是我手写的一些测试数据,在项目中当然是从数据库中查找出来的。
5.当然仅仅使显示数据有时候还是不够的,我们需要和table进行一些互动,比如进行一些删除,修改的功能,这时就需要用到bootstrap-table 的一些事件了。在上面的案例中我在table的中镶嵌了两个button组件如图
这个镶嵌的实现办法是在在table的属性中 添加了这么一行 data-toolbar="#toolbar"
其意思就是在工具栏的一行添加 id为toolbar的标签。
在本人做到这个项目中,要通过这两个按钮对table中点击选中的行进行相应的操作。
编写相应的事件,首先为table绑定一个选中的触发事件,然后通过getSelectRow函数获得点击选中行的数据。
|
1
2
3
4
5
6
7
8
9
|
$(
'#teacher_table'
).on(
'click-row.bs.table'
,
function
(e, row, element)
{
$(
'.success'
).removeClass(
'success'
);
//去除之前选中的行的,选中样式
$(element).addClass(
'success'
);
//添加当前选中的 success样式用于区别
});
function
getSelectedRow()
{
var
index = $(
'#teacher_table'
).find(
'tr.success'
).data(
'index'
);
//获得选中的行
return
$(
'#teacher_table'
).bootstrapTable(
'getData'
)[index];
//返回选中行所有数据
}
|
如果大家还想深入学习,可以点击这里进行学习,再为大家附3个精彩的专题:




 3517
3517


 被折叠的 条评论
为什么被折叠?


