


1、创建vue项目
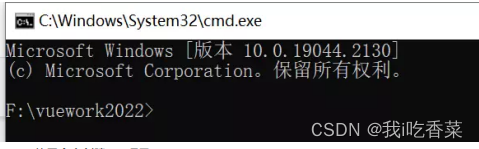
a.找到创建项目的工作空间
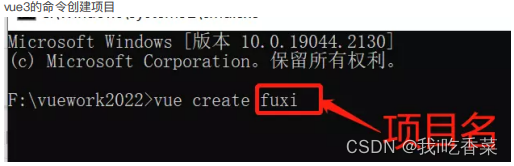
b.使用命令创建vue项目
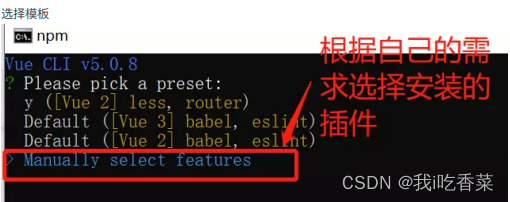
选择模板
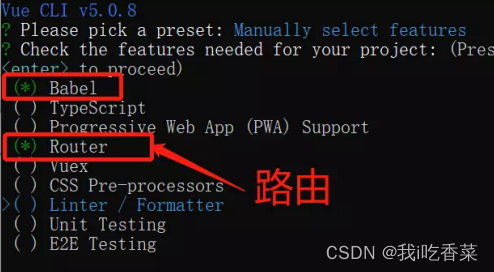
选择需要的插件
选择vue的版本

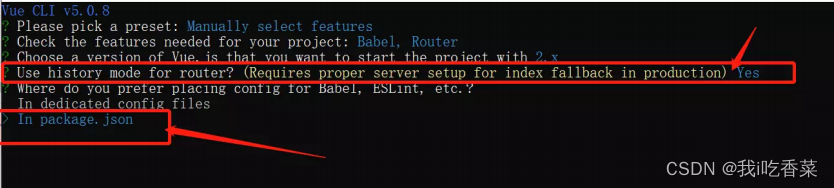
以后的选项直接选择 y 点击enter键即可
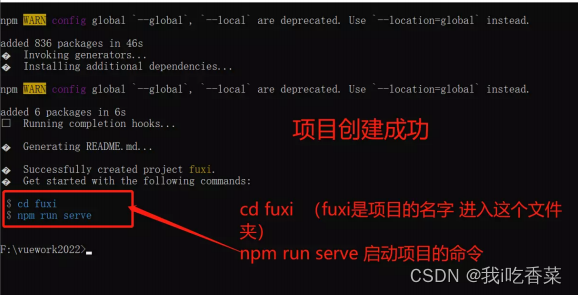
d.将这个项目导入到对应开发工具里面 步骤略
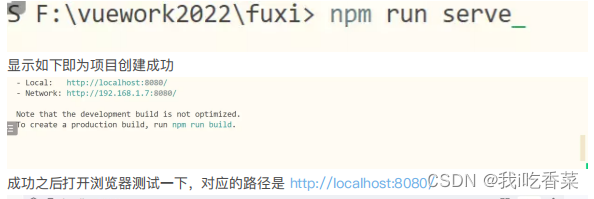
启动项目即可
2、安装插件
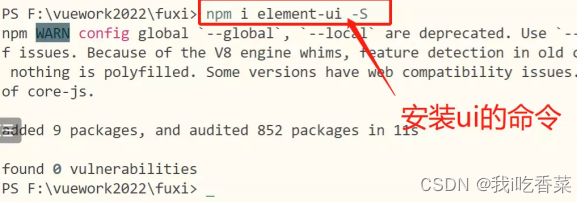
a.安装ui插件
npm i element-ui -S
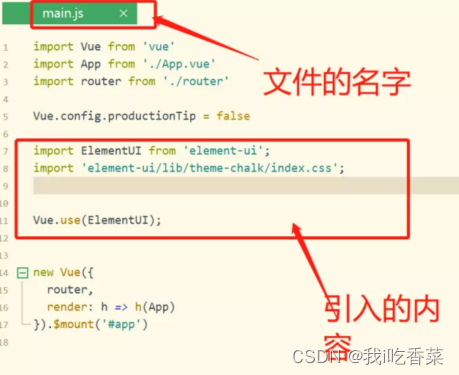
b.使用ui
在main.js里面使用ui
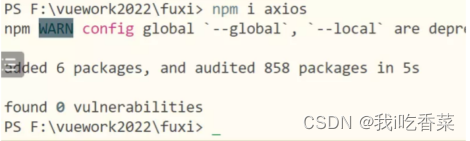
c.安装axios
前后台交互的
npm i axios
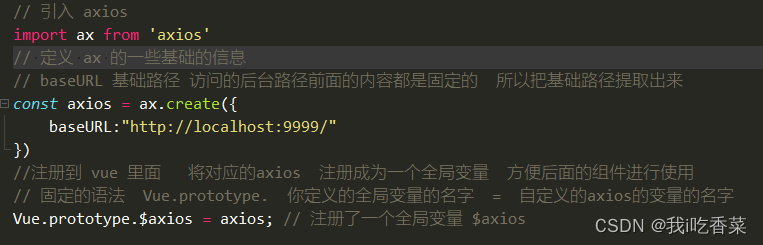
1.将axios注册成全局变量
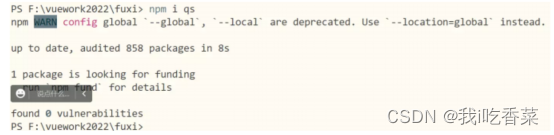
d.安装qs
发出post请求的时候对我们的数据进行处理
把传递到后台的数据作为参数拼接到路径的后面 ?username=xxx&password=1234&...
npm i qs
3、创建vue组件进行访问
a.创建组件
组件的内容 略 官网复制的
b.给组件一个路由

c.访问一下这个组件

4、和后台进行交互
a.创建后端项目
创建springboot项目 创建过程略
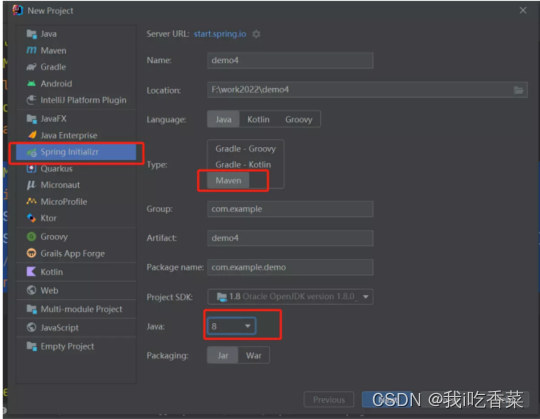
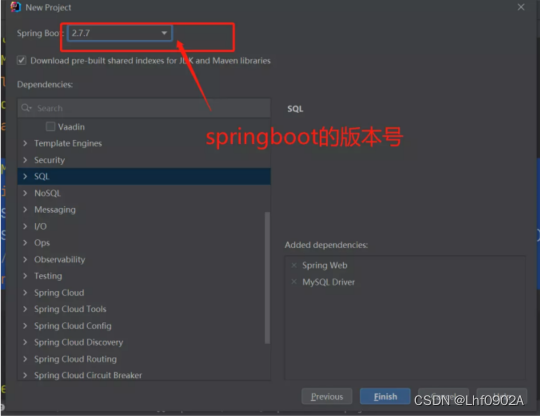
选择springboot的版本号
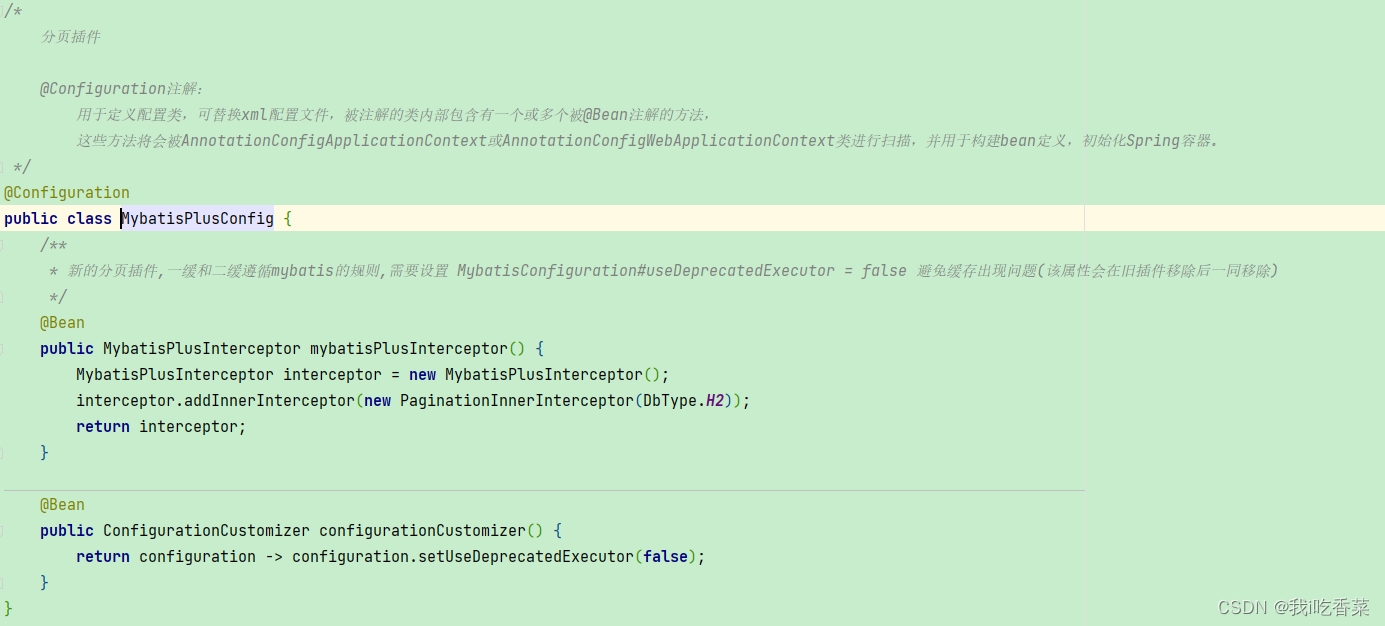
b.整合mp
1.加jar
pom文件
<!--手动加 jar 包-->
        <dependency>
            <groupId>com.baomidou</groupId>
            <artifactId>mybatis-plus-boot-starter</artifactId>
            <version>3.4.1</version>
        </dependency>

        <dependency>
            <groupId>com.baomidou</groupId>
            <artifactId>mybatis-plus-generator</artifactId>
            <version>3.4.1</version>
        </dependency>
        <dependency>
            <groupId>org.apache.velocity</groupId>
            <artifactId>velocity-engine-core</artifactId>
            <version>2.2</version>
        </dependency>
        <dependency>
            <groupId>org.projectlombok</groupId>
            <artifactId>lombok</artifactId>
        </dependency>
编写配置文件 application.properties
spring.datasource.driver-class-name=com.mysql.cj.jdbc.Driver
spring.datasource.url=jdbc:mysql://localhost:3306/yfbank?serverTimezone=UTC&useUnicode=true&characterEncoding=utf-8
spring.datasource.username=root
spring.datasource.password=lhf@123
# 时间
spring.jackson.date-format=yyyy-MM-dd HH:mm:ss
spring.jackson.time-zone=GMT+8
spring.jackson.serialization.write-date-keys-as-timestamps=false
#logging.level.com.baomidou.ant.test.dao=debug
#mybatis-plus _ U
mybatis-plus.configuration.map-underscore-to-camel-case=true
# 日志的输出
mybatis-plus.configuration.log-impl=org.apache.ibatis.logging.stdout.StdOutImpl
# 设置mapper文件的位置
mybatis-plus.mapper-locations=classpath:/mapper/*.xml
# 逻辑删除   删除之前的值是1 之后是2
# 1 代表的是正常的数据
mybatis-plus.global-config.db-config.logic-not-delete-value=1
# 2 代表的是删除掉的数据
mybatis-plus.global-config.db-config.logic-delete-value=2

server.port=9999
使用代码生成工具生成代码
/**
* <p>
* 读取控制台内容
* </p>
*/
public static String scanner(String tip) {
Scanner scanner = new Scanner(System.in);
StringBuilder help = new StringBuilder();
help.append("请输入" + tip + ":");
System.out.println(help.toString());
if (scanner.hasNext()) {
String ipt = scanner.next();
if (StringUtils.isNotBlank(ipt)) {
return ipt;
}
}
throw new MybatisPlusException("请输入正确的" + tip + "!");
}
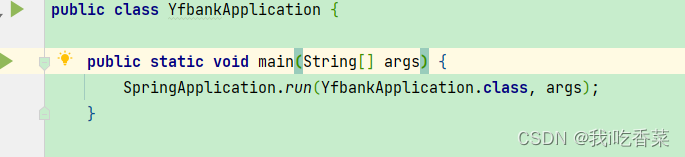
public static void main(String[] args) {
// 代码生成器
AutoGenerator mpg = new AutoGenerator();
// 全局配置
GlobalConfig gc = new GlobalConfig();
String projectPath = System.getProperty("user.dir");
gc.setOutputDir(projectPath + "/src/main/java");
gc.setAuthor("liuhongfei");
gc.setOpen(false);
// gc.setSwagger2(true); 实体属性 Swagger2 注解
mpg.setGlobalConfig(gc);
// 数据源配置
DataSourceConfig dsc = new DataSourceConfig();
dsc.setUrl("jdbc:mysql://localhost:3306/yfbank?serverTimezone=UTC&useUnicode=true&characterEncoding=utf-8&zeroDateTimeBehavior=convertToNull&useSSL=false&allowPublicKeyRetrieval=true");
// dsc.setSchemaName("public");
dsc.setDriverName("com.mysql.cj.jdbc.Driver");
dsc.setUsername("root");
dsc.setPassword("lhf@123");
mpg.setDataSource(dsc);
// 包配置
PackageConfig pc = new PackageConfig();
//pc.setModuleName(scanner("模块名"));
pc.setParent("com.example.mp");
//pc.setXml("");
pc.setEntity("entity");//实体的包
pc.setMapper("dao");//dao的包
pc.setService("service");//service的包
pc.setServiceImpl("service.impl");//实现类的包
mpg.setPackageInfo(pc);
// 自定义配置
InjectionConfig cfg = new InjectionConfig() {
@Override
public void initMap() {
// to do nothing
}
};
// 如果模板引擎是 freemarker
// String templatePath = "/templates/mapper.xml.ftl";
// 如果模板引擎是 velocity
String templatePath = "/templates/mapper.xml.vm";
// 自定义输出配置
List<FileOutConfig> focList = new ArrayList<>();
// 自定义配置会被优先输出
focList.add(new FileOutConfig(templatePath) {
@Override
public String outputFile(TableInfo tableInfo) {
// 自定义输出文件名 , 如果你 Entity 设置了前后缀、此处注意 xml 的名称会跟着发生变化!!
return projectPath + "/src/main/resources/mapper/" + tableInfo.getEntityName() + "Mapper" + StringPool.DOT_XML;
}
});
cfg.setFileOutConfigList(focList);
mpg.setCfg(cfg);
// 配置模板
//不在java文件夹下面写入mapper文件
TemplateConfig templateConfig = new TemplateConfig();
templateConfig.setXml(null);
mpg.setTemplate(templateConfig);
// 策略配置
StrategyConfig strategy = new StrategyConfig();
strategy.setNaming(NamingStrategy.underline_to_camel);// _ tab_user tabUser
strategy.setColumnNaming(NamingStrategy.underline_to_camel);
strategy.setEntityLombokModel(true);
strategy.setRestControllerStyle(true);
// 公共父类
// 写于父类中的公共字段
//strategy.setSuperEntityColumns("id");// id @TabId
//strategy.setInclude(scanner("表名,多个英文逗号分割").split(","));
strategy.setControllerMappingHyphenStyle(true);
strategy.setTablePrefix(pc.getModuleName() + "_");
mpg.setStrategy(strategy);
mpg.execute();
}只需要运行一下上面的类里面的main方法即可
d.配置dao接口
e.启动springboot项目即可
启动上面的main方法即可
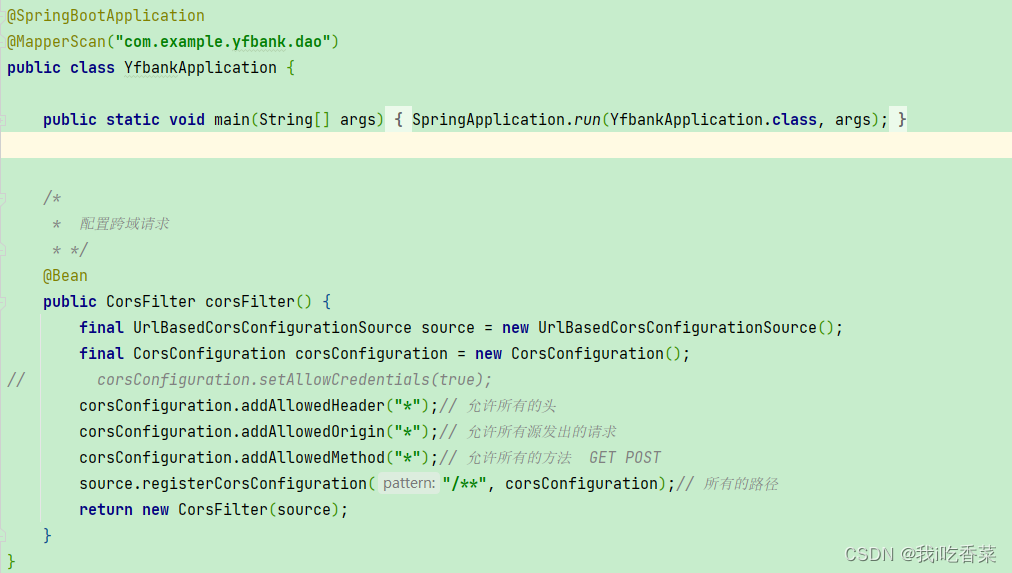
f.配置跨域请求
    /*
     *  配置跨域请求
     * */
    @Bean
    public CorsFilter corsFilter() {
        final UrlBasedCorsConfigurationSource source = new UrlBasedCorsConfigurationSource();
        final CorsConfiguration corsConfiguration = new CorsConfiguration();
//        corsConfiguration.setAllowCredentials(true);
        corsConfiguration.addAllowedHeader("*");// 允许所有的头
        corsConfiguration.addAllowedOrigin("*");// 允许所有源发出的请求
        corsConfiguration.addAllowedMethod("*");// 允许所有的方法  GET POST
        source.registerCorsConfiguration("/**", corsConfiguration);// 所有的路径
        return new CorsFilter(source);
} 
5、vue组件访问springboot
vue组件里面的内容解析

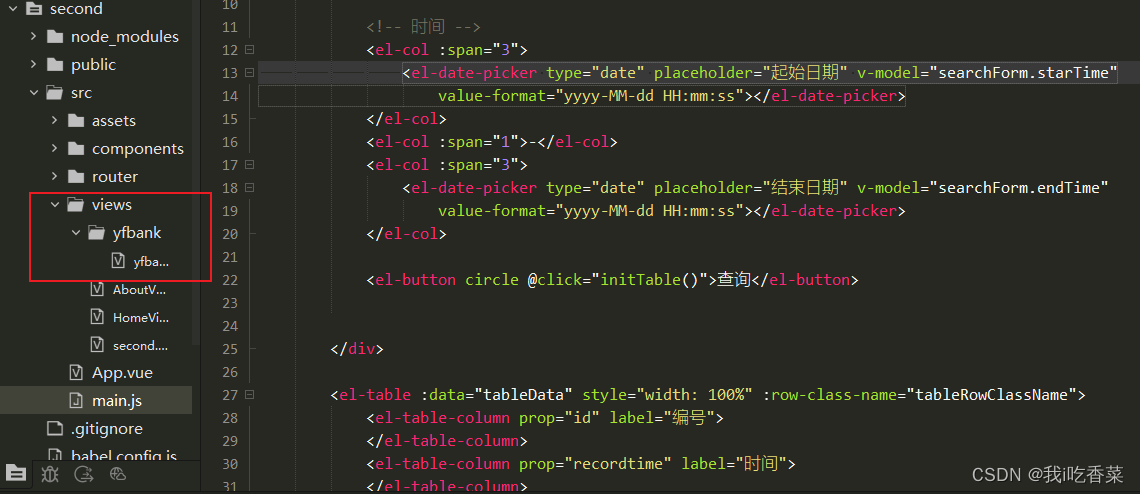
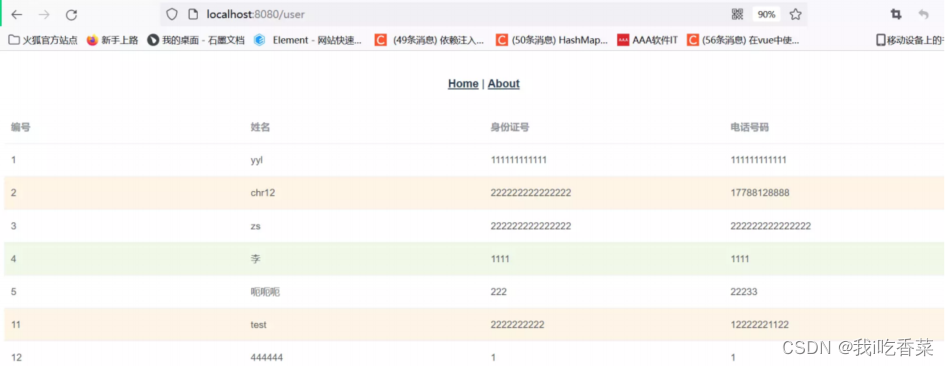
6、查询功能
a.给组件渲染数据
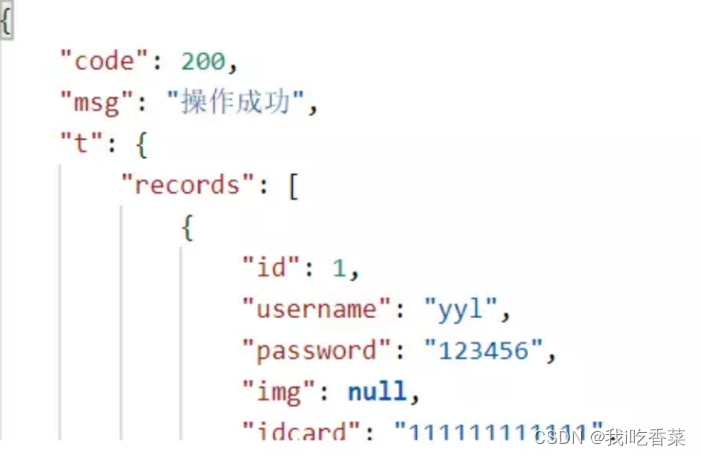
b.后端响应数据

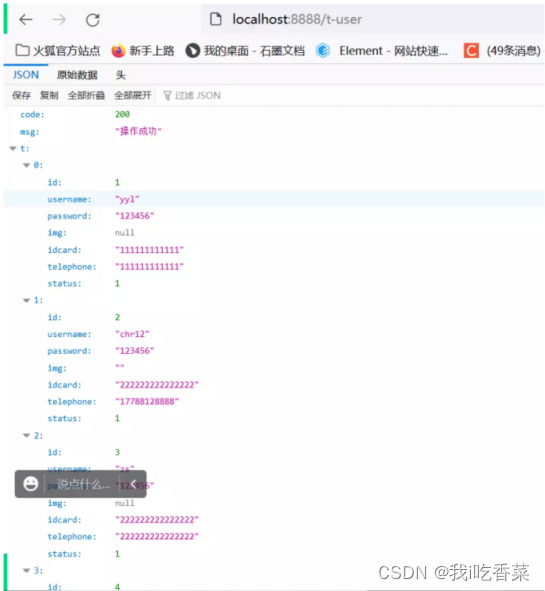
上图即为获取数据成功
c.前端接收数据
使用axios和后端进行交互
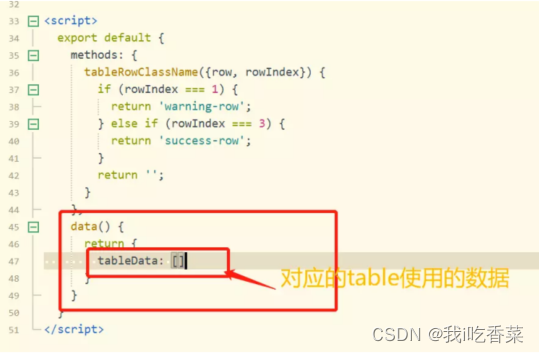
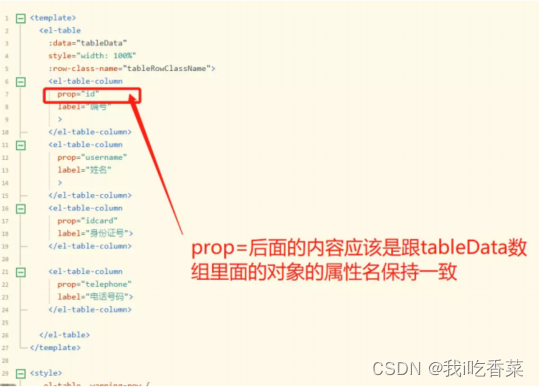
d.修改table里面列的内容
e.完整的vue代码
<template>
<el-table
:data="tableData"
style="width: 100%"
:row-class-name="tableRowClassName">
<el-table-column
prop="id"
label="编号"
>
</el-table-column>
<el-table-column
prop="username"
label="姓名"
>
</el-table-column>
<el-table-column
prop="idcard"
label="身份证号">
</el-table-column>
<el-table-column
prop="telephone"
label="电话号码">
</el-table-column>
</el-table>
</template>
<style>
.el-table .warning-row {
background: oldlace;
}
.el-table .success-row {
background: #f0f9eb;
}
</style>
<script>
export default {
methods: {
tableRowClassName({row, rowIndex}) {
if (rowIndex%4 === 1) {
return 'warning-row';
} else if (rowIndex%4 === 3) {
return 'success-row';
}
return '';
}
},
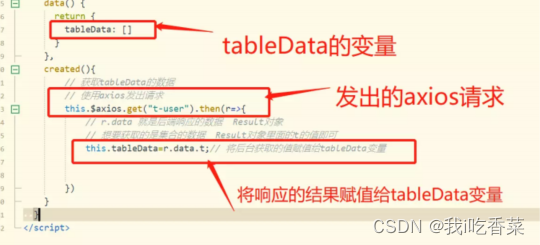
data() {
return {
tableData: []
}
},
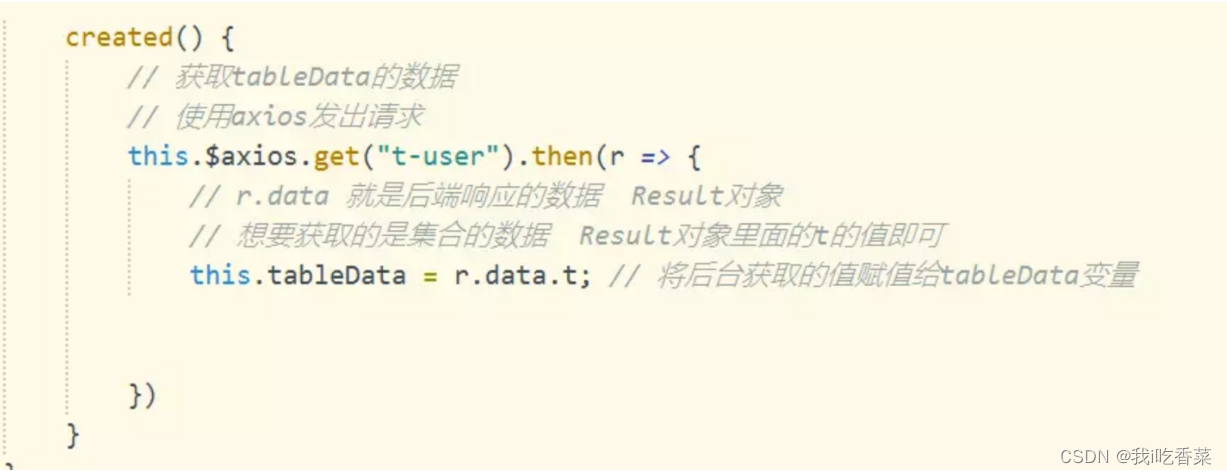
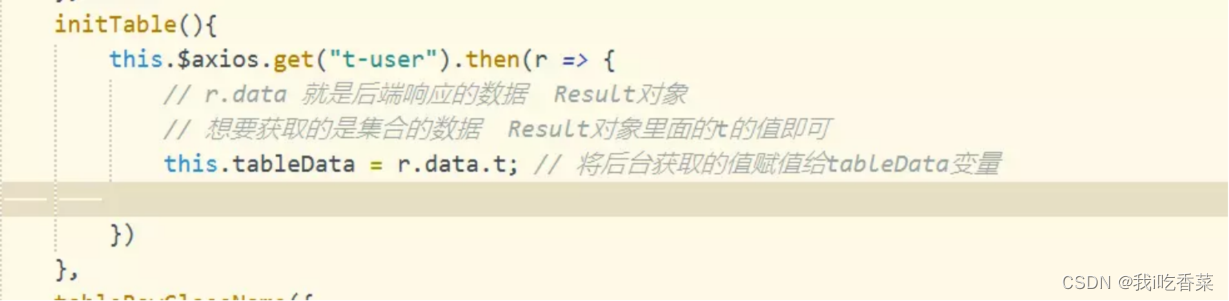
created(){
// 获取tableData的数据
// 使用axios发出请求
this.$axios.get("t-user").then(r=>{
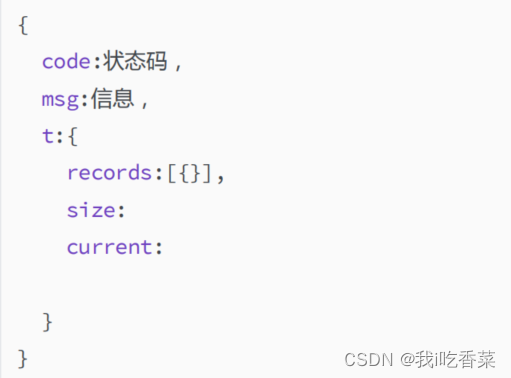
// r.data 就是后端响应的数据 Result对象
// 想要获取的是集合的数据 Result对象里面的t的值即可
this.tableData=r.data.t;// 将后台获取的值赋值给tableData变量
})
}
}
</script>7、删除
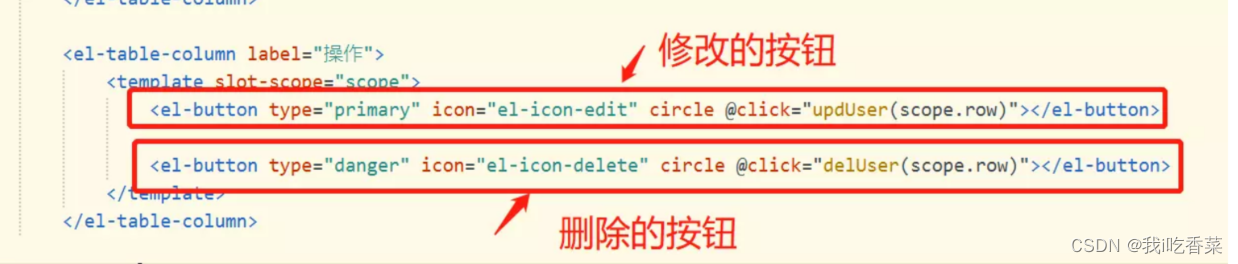
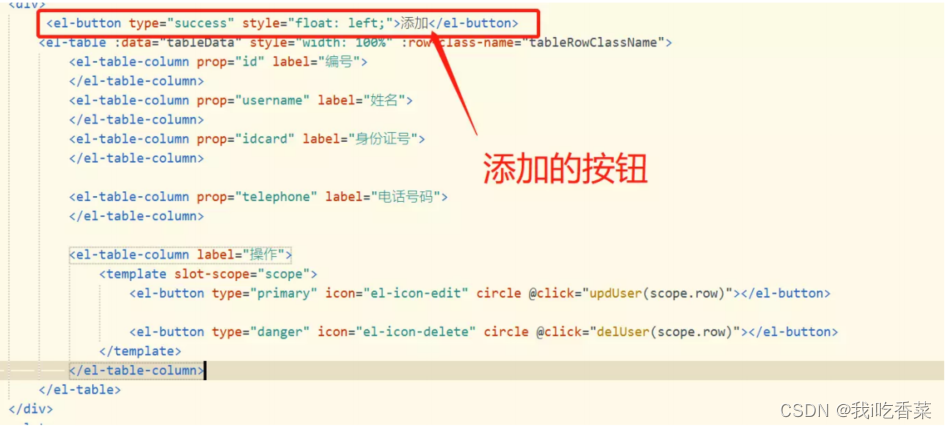
a.定义按钮
编写删除和修改之前先添加对应的按钮
b.定义函数

d. 提取该方法

g. 完整删除代码
export default {
methods: {
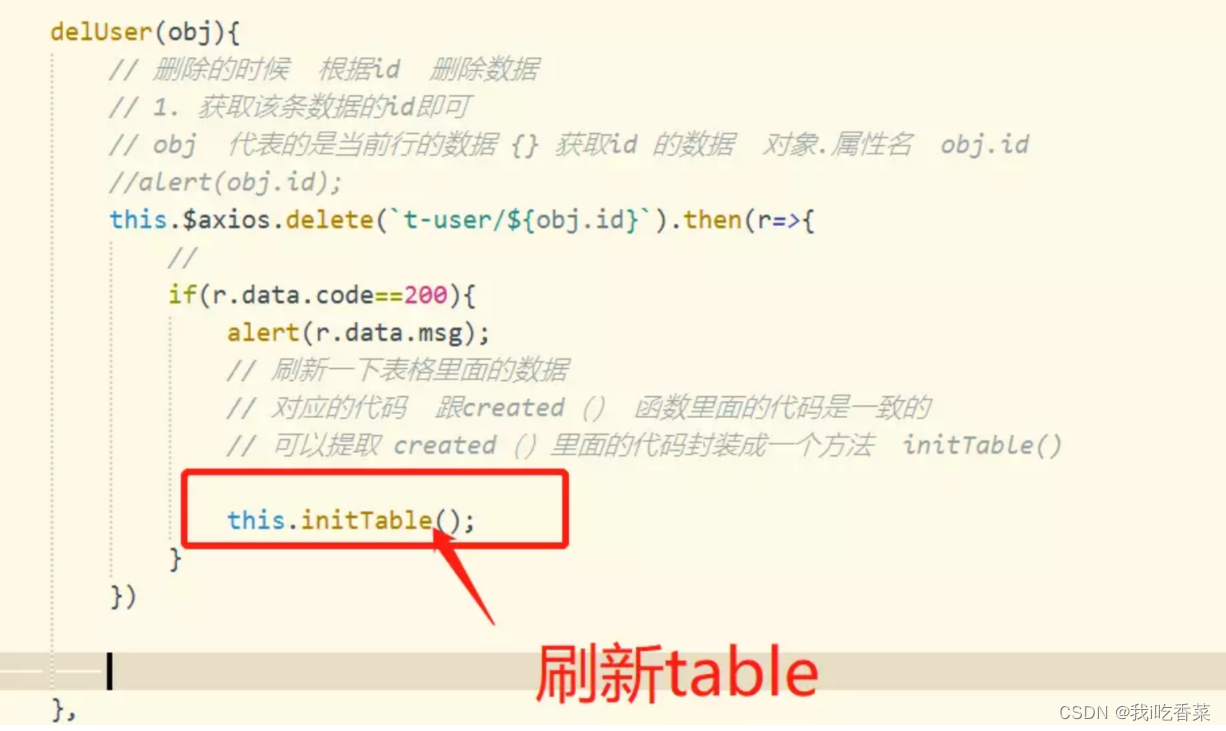
delUser(obj){
// 删除的时候 根据id 删除数据
// 1. 获取该条数据的id即可
// obj 代表的是当前行的数据 {} 获取id 的数据 对象.属性名 obj.i
//alert(obj.id);
this.$axios.delete(`t-user/${obj.id}`).then(r=>{
//
if(r.data.code==200){
alert(r.data.msg);
// 刷新一下表格里面的数据
// 对应的代码 跟created() 函数里面的代码是一致的
// 可以提取 created()里面的代码封装成一个方法 initTab
this.initTable();
}
})
},
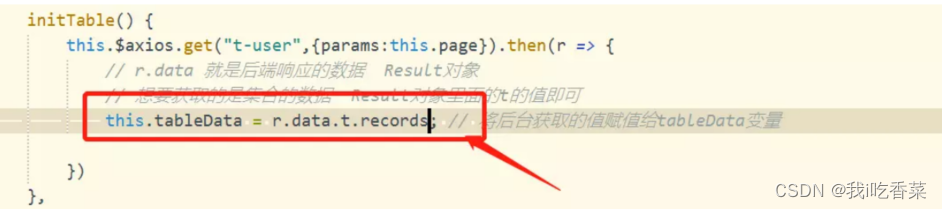
initTable(){
this.$axios.get("t-user").then(r => {
// r.data 就是后端响应的数据 Result对象
// 想要获取的是集合的数据 Result对象里面的t的值即可
this.tableData = r.data.t; // 将后台获取的值赋值给tableDat
})
},
data() {
return {
tableData: []
}
},
created() {
// 获取tableData的数据
// 使用axios发出请求
this.initTable();
}
}8. 添加
b. 定义事件的函数
点击添加按钮的事件并定义对应的函数

c. 编写函数addUser()


定义一下函数onSubmit

到此添加结束

b. 函数
 对应的提交以及后台代码和添加是一模一样的
10. 增删改查完整的vue代码
<template>
<div>
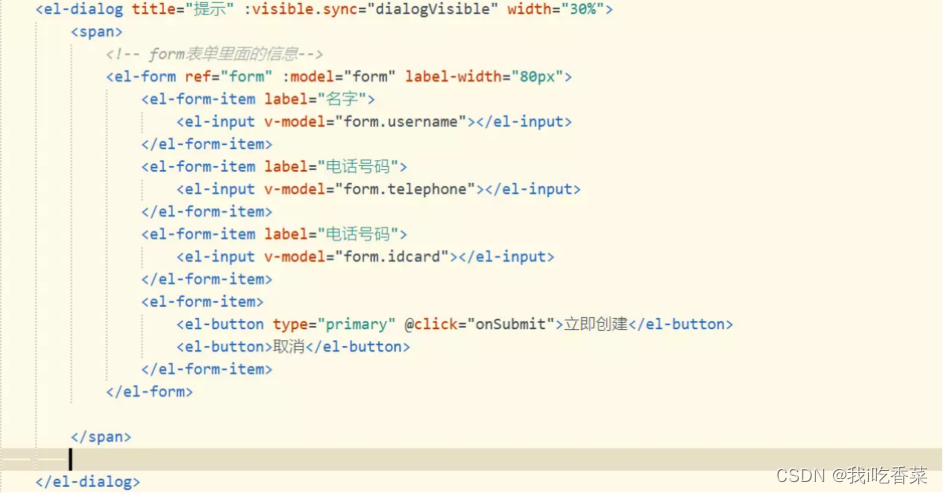
<el-dialog title="提示" :visible.sync="dialogVisible" width="30%">
<span>
<!-- form表单里面的信息-->
<el-form ref="form" :model="form" label-width="80px">
<el-form-item label="名字">
<el-input v-model="form.username"></el-input>
</el-form-item>
<el-form-item label="电话号码">
<el-input v-model="form.telephone"></el-input>
</el-form-item>
<el-form-item label="电话号码">
<el-input v-model="form.idcard"></el-input>
</el-form-item>
<el-form-item>
<el-button type="primary" @click="onSubmit">立即创建<
<el-button>取消</el-button>
</el-form-item>
</el-form>
</span>
</el-dialog>
<el-button type="success" style="float: left;" @click="addUser">添加
<el-table :data="tableData" style="width: 100%" :row-class-name="tab
<el-table-column prop="id" label="编号">
</el-table-column>
<el-table-column prop="username" label="姓名">
</el-table-column>
<el-table-column prop="idcard" label="身份证号">
</el-table-column>
<el-table-column prop="telephone" label="电话号码">
</el-table-column>
<el-table-column label="操作">
<template slot-scope="scope">
<el-button type="primary" icon="el-icon-edit" circle @cl
<el-button type="danger" icon="el-icon-delete" circle @c
</template>
</el-table-column>
</el-table>
</div>
</template>
<style>
.el-table .warning-row {
background: oldlace;
}
.el-table .success-row {
background: #f0f9eb;
}
</style>
<script>
import qs from 'qs'
export default {
methods: {
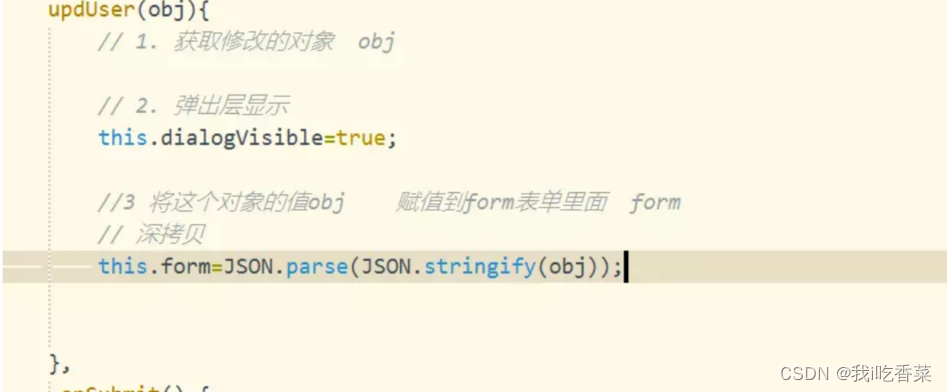
updUser(obj){
// 1. 获取修改的对象 obj
// 2. 弹出层显示
this.dialogVisible=true;
//3 将这个对象的值obj 赋值到form表单里面 form
// 深拷贝
this.form=JSON.parse(JSON.stringify(obj));
},
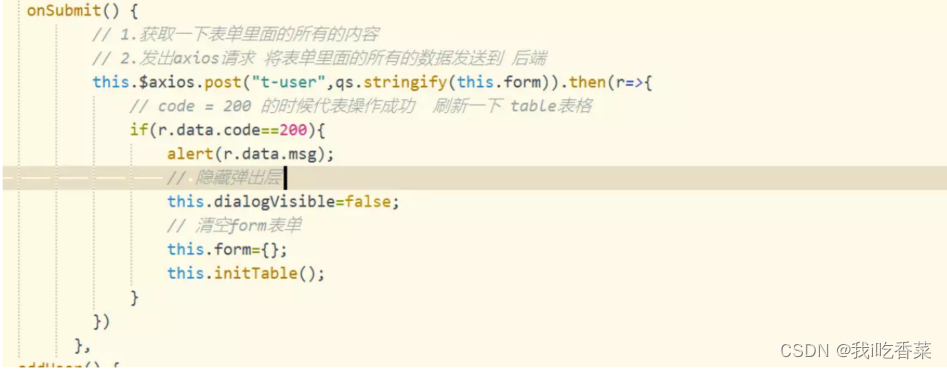
onSubmit() {
// 1.获取一下表单里面的所有的内容
// 2.发出axios请求 将表单里面的所有的数据发送到 后端
this.$axios.post("t-user",qs.stringify(this.form)).then(
// code = 200 的时候代表操作成功 刷新一下 table表格
if(r.data.code==200){
alert(r.data.msg);
// 隐藏弹出层
this.dialogVisible=false;
// 清空form表单
this.form={};
this.initTable();
}
})
},
addUser() {
// 1. 定义form表单 dialog里面
// 让 添加的表单显示出来
this.dialogVisible=true;
},
delUser(obj) {
// 删除的时候 根据id 删除数据
// 1. 获取该条数据的id即可
// obj 代表的是当前行的数据 {} 获取id 的数据 对象.属性名 obj.i
//alert(obj.id);
this.$axios.delete(`t-user/${obj.id}`).then(r => {
//
if (r.data.code == 200) {
alert(r.data.msg);
// 刷新一下表格里面的数据
// 对应的代码 跟created() 函数里面的代码是一致的
// 可以提取 created()里面的代码封装成一个方法 initTab
this.initTable();
}
})
},
initTable() {
this.$axios.get("t-user").then(r => {
// r.data 就是后端响应的数据 Result对象
// 想要获取的是集合的数据 Result对象里面的t的值即可
this.tableData = r.data.t; // 将后台获取的值赋值给tableDat
})
},
tableRowClassName({
row,
rowIndex
}) {
if (rowIndex % 4 === 1) {
return 'warning-row';
} else if (rowIndex % 4 === 3) {
return 'success-row';
}
return '';
}
},
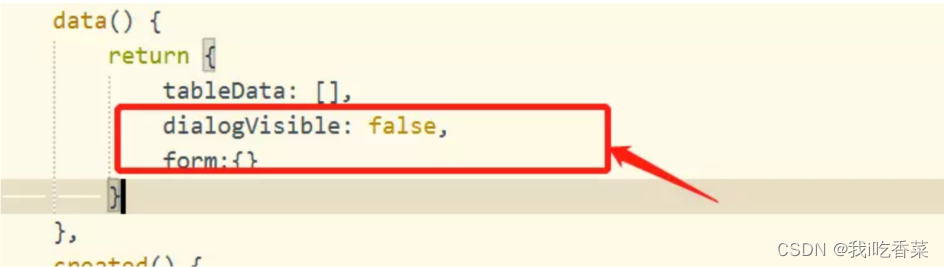
data() {
return {
tableData: [],
dialogVisible: false,
form:{}
}
},
created() {
// 获取tableData的数据
// 使用axios发出请求
this.initTable();
}
}
</script>11. 分页
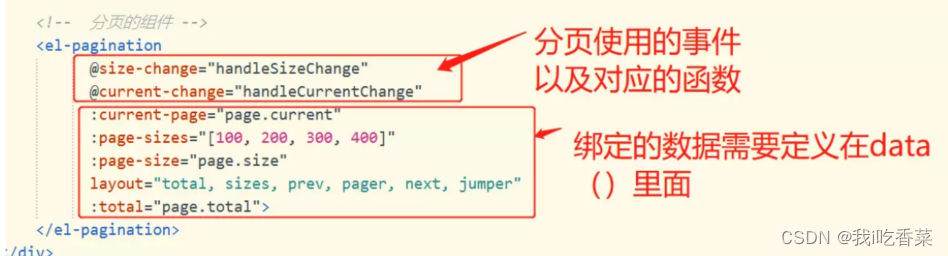
ii. 定义函数
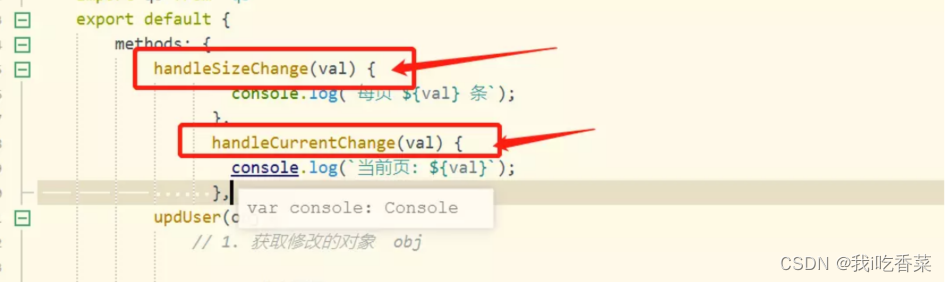
iii. 定义变量


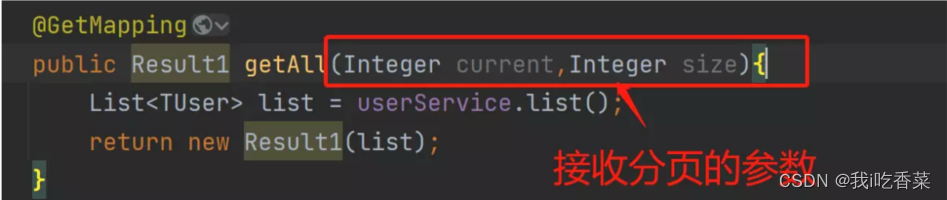
ii. 调用分页查询
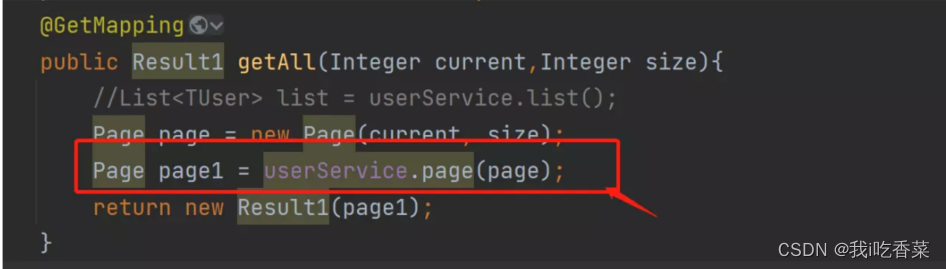
查看一下分页查询的结果
 格式:
格式:
数据的总条数 t里面的total
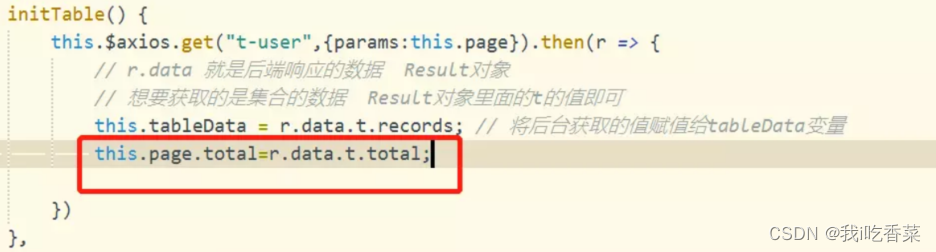

到此,分页查询就结束了
12. 模糊查询+分页

b. 定义变量修改函数
变量
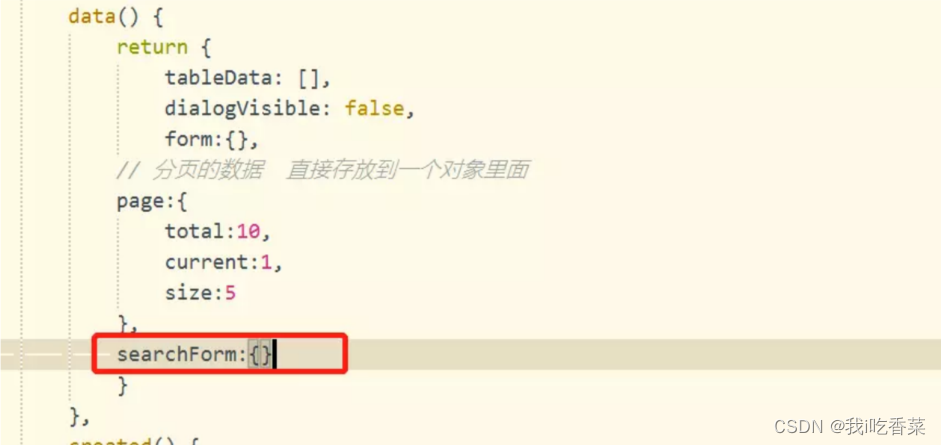
函数:
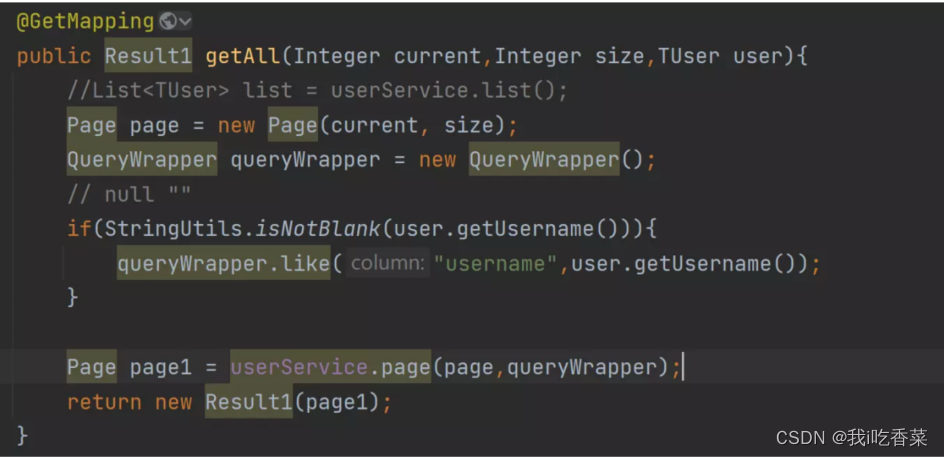
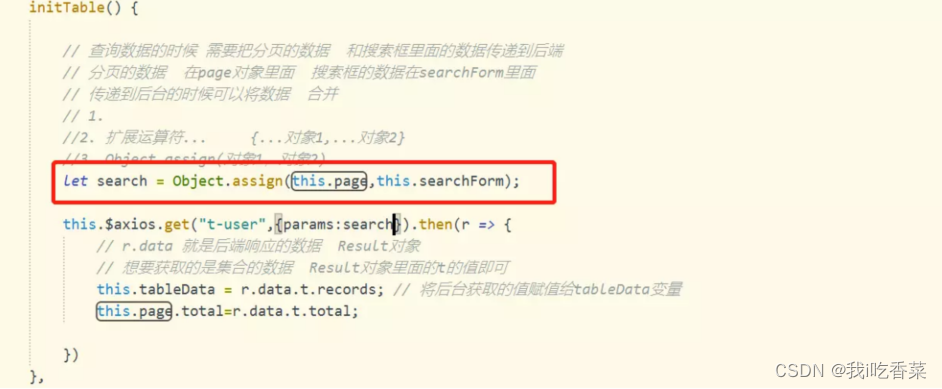 c. 修改后台代码


 1032
1032


 被折叠的 条评论
为什么被折叠?
被折叠的 条评论
为什么被折叠?
 到【灌水乐园】发言


