


文章目录
huawei euleros - 华为云服务器 + 手工安装nginx + 手工配置ssl证书
概述
上次, 用宝塔面板安装了nginx, http访问都很正常.
今天将买来的华为基础版的网站证书手工配置上, 无法访问https首页url.
用宝塔面板配置ssl证书, 无效. 有报错提示框, 但是消失的很快, 也不知道是个啥错误.
估计是我手工改了宝塔面板安装后的nginx配置文件引起的问题.
用第三方快速工具就这点不好, 如果好使, 那啥也不说了. 一旦出了问题, 不知道问题出在哪里…
当时看宝塔面板说明时, 没看到可以适配华为云服务器, 只看到在腾讯云和阿里云下好使.
决定自己手工装nginx, 手工配置ssl证书.
麻烦不到哪里去, 有问题, 自己找资料也比较容易.
在本地的huawei euleros 2.0 SP5的虚拟机中已经配置好了, 因为证书的域名和虚拟机的IP不匹配, 浏览器显示url不安全, 没其他问题. 但是https访问都是可以的, http重定向到https也是好使的.
现在准备在实际的华为云服务器上试试, 看看配置ssl证书是否好使.
笔记
先将华为云服务器设置重装操作系统, 回到干净的euleros 2.0 SP5出厂预装状态.
按照笔记, 回到用宝塔装系统之前的状态
这2个笔记, 做了少许工作:
- 添加了noroot用户
- 设置sudo权限
花10分钟就能搞定.
手工安装nginx, 从源码编译
安装前置软件
yum install gcc-c++
yum install -y pcre pcre-devel
yum install -y zlib zlib-devel
yum install -y openssl openssl-devel
yum install wget
去nginx官方下载页, 看看最新的稳定版本
https://nginx.org/en/download.html

当前稳定版本为 nginx-1.22.0, 复制链接为 https://nginx.org/download/nginx-1.22.0.tar.gz
用wget下载 nginx-1.22.0
# pwd
/root
# mkdir src_nginx
# cd src_nginx
# pwd
/root/src_nginx
# wget https://nginx.org/download/nginx-1.22.0.tar.gz
解压 nginx-1.22.0
tar xvf nginx-1.22.0.tar.gz
进入 nginx 源码目录
cd nginx-1.22.0
配置nginx编译选项(带SSL)
./configure --prefix=/usr/local/nginx --with-http_stub_status_module --with-http_ssl_module
编译nginx源码
make
安装编译好的nginx
make install
niginx安装后的路径
whereis nginx
nginx: /usr/local/nginx
设置nginx服务文件内容
# use vi /lib/systemd/system/nginx.service, create a new file, content below

# cat /lib/systemd/system/nginx.service
[Unit]
Description=nginx service
After=network.target

[Service]
Type=forking
ExecStart=/usr/local/nginx/sbin/nginx
ExecReload=/usr/local/nginx/sbin/nginx -s reload
ExecStop=/usr/local/nginx/sbin/nginx -s stop
PrivateTmp=true
[Install]
WantedBy=multi-user.target
将nginx服务文件加入开机启动
systemctl enable nginx.service
nginx.conf的位置
# find / -name nginx.conf
/root/src_nginx/nginx-1.22.0/conf/nginx.conf
/usr/local/nginx/conf/nginx.conf
可以看出 /usr/local/nginx/conf/nginx.conf 是nginx实例的配置文件
备份一下原始配置
cd /usr/local/nginx/conf
cp ./nginx.conf ./nginx.conf.v0
修改nginx配置
vi ./nginx.conf
修改的内容如下:
# cat ./nginx.conf

#user  nobody;

# 加入root 防止403报错
user root nobody;

worker_processes  1;

#error_log  logs/error.log;
#error_log  logs/error.log  notice;
#error_log  logs/error.log  info;

#pid        logs/nginx.pid;


events {
    worker_connections  1024;
}


http {
    include       mime.types;
    default_type  application/octet-stream;

    #log_format  main  '$remote_addr - $remote_user [$time_local] "$request" '
    #                  '$status $body_bytes_sent "$http_referer" '
    #                  '"$http_user_agent" "$http_x_forwarded_for"';

    #access_log  logs/access.log  main;

    sendfile        on;
    #tcp_nopush     on;

    #keepalive_timeout  0;
    keepalive_timeout  65;

    #gzip  on;

    server {
        listen       80;
        # 服务器的名字, 必须和证书的站点是一样的名字
        server_name  my_web_site_name;
        # http 重定向到 https
        return 301 https://$server_name$request_uri;

        #charset koi8-r;

        #access_log  logs/host.access.log  main;

        location / {
            root   html;
            index  index.html index.htm;
        }

        #error_page  404              /404.html;

        # redirect server error pages to the static page /50x.html
        #
        error_page   500 502 503 504  /50x.html;
        location = /50x.html {
            root   html;
        }

        # proxy the PHP scripts to Apache listening on 127.0.0.1:80
        #
        #location ~ \.php$ {
        #    proxy_pass   http://127.0.0.1;
        #}

        # pass the PHP scripts to FastCGI server listening on 127.0.0.1:9000
        #
        #location ~ \.php$ {
        #    root           html;
        #    fastcgi_pass   127.0.0.1:9000;
        #    fastcgi_index  index.php;
        #    fastcgi_param  SCRIPT_FILENAME  /scripts$fastcgi_script_name;
        #    include        fastcgi_params;
        #}

        # deny access to .htaccess files, if Apache's document root
        # concurs with nginx's one
        #
        #location ~ /\.ht {
        #    deny  all;
        #}
    }


    # another virtual host using mix of IP-, name-, and port-based configuration
    #
    #server {
    #    listen       8000;
    #    listen       somename:8080;
    #    server_name  somename  alias  another.alias;

    #    location / {
    #        root   html;
    #        index  index.html index.htm;
    #    }
    #}


    # HTTPS server
    #
    server {
        listen       443 ssl;
        # 服务器的名字, 必须和证书的站点是一样的名字
        server_name  my_web_site_name;

		# 证书必须拷贝到指定的位置, conf文件上一级目录的cert目录下
		# 买来的证书, 针对nginx, apache, ... 有不同的证书, 不要搞错了
        ssl_certificate      ../cert/cert.crt;
        ssl_certificate_key  ../cert/cert.key;

        ssl_session_cache    shared:SSL:1m;
        ssl_session_timeout  5m;

        ssl_ciphers  HIGH:!aNULL:!MD5;
        ssl_prefer_server_ciphers  on;

        location / {
            root   html;
            index  index.html index.htm;
        }
    }

}
拷贝证书到配置目录的上一级目录中的cert目录
先建立空目录cert
pwd
/usr/local/nginx/conf
cd ..
mkdir ./cert
cd cert
pwd
/usr/local/nginx/cert
在本地, 将买来的网站证书中的nginx目录中的2个证书改名为cert.crt, cert.key
打开SecureFXPortable.exe, noroot用户登录,连接到华为云服务器, 默认有权限的目录是 /home/noroot
将cert.crt, cert.key拖到 /home/noroot
到CloudShell中, 去cert目录, 将/home/noroot目录中的2个证书move过来.
# ls -l /home/noroot/
total 12
-rw------- 1 noroot noroot 4780 Sep 30 17:53 cert.crt
-rw------- 1 noroot noroot 1675 Sep 30 17:53 cert.key
# pwd
/usr/local/nginx/cert
# mv /home/noroot/cert.* .
# ls -l
total 12
-rw------- 1 noroot noroot 4780 Sep 30 17:53 cert.crt
-rw------- 1 noroot noroot 1675 Sep 30 17:53 cert.key
验证nginx配置是否正确
/usr/local/nginx/sbin/nginx -t
如果没有显示全是ok, success, 就要检查修正nginx.conf
报错时, 会提示哪行错了, 修正一下. 直到修正到0警告, 0报错
# /usr/local/nginx/sbin/nginx -t
nginx: the configuration file /usr/local/nginx/conf/nginx.conf syntax is ok
nginx: configuration file /usr/local/nginx/conf/nginx.conf test is successful
如果vi不显示行号, 进了vi, 用如下命令将行号打开
:set nu
重启nginx服务
systemctl restart nginx.service
查看nginx是否正常运行
# ps -aux | grep nginx
root     14452  0.0  0.0  46920  1164 ?        Ss   22:57   0:00 nginx: master process /usr/local/nginx/sbin/nginx
root     14453  0.0  0.0  47316  1912 ?        S    22:57   0:00 nginx: worker process
root     14597  0.0  0.0 112724   996 pts/0    S+   22:58   0:00 grep --color=auto nginx
用网页访问一下, 将http, https都试一下, 带域名访问.
在浏览器中打开2个页面, 分别测试下面的2个url
http://my_web_site_name
https://my_web_site_name
先看看https的效果
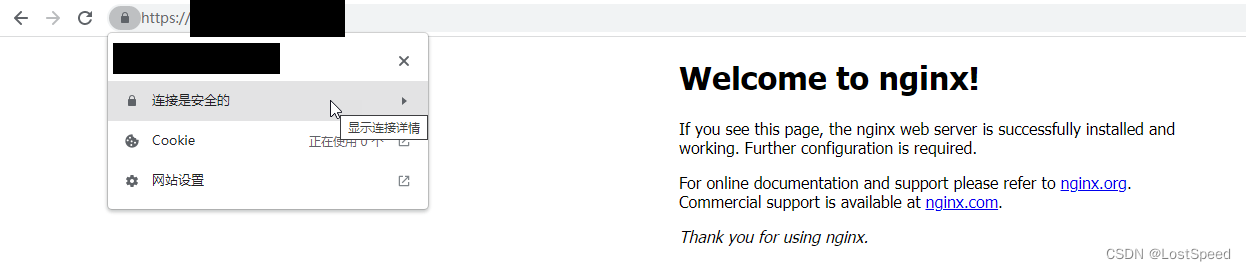
还不错, 点击url前面的提示图标, 显示连接是安全的, 说明https配置正确.
看看http的效果
在浏览器栏输入http://my_web_site_name, 被重定向到了https://my_web_site_name, 显示的https连接页面很正常, 非常不错.
看看nginx的www根目录在哪里?
打开nginx配置文件
# pwd
/usr/local/nginx/conf
# vi ./nginx.conf
#gzip  on;

    server {
        listen       80;
        server_name  kerunguangyuan.cn;
        return 301 https://$server_name$request_uri;

        #charset koi8-r;

        #access_log  logs/host.access.log  main;

        location / {
        	# 80端口的服务中, location节点内的root后面指定的就是nginx的www根目录位置
            root   html;
            index  index.html index.htm;
        }
可知, 安装后的nginx的www根目录在安装目录下的html目录. 去看一下.
# pwd
/usr/local/nginx
# ls -l
total 40
drwx------ 2 root root 4096 Oct  8 22:44 cert
drwx------ 2 root root 4096 Oct  8 22:53 client_body_temp
drwx------ 2 root root 4096 Oct  8 23:09 conf
drwx------ 2 root root 4096 Oct  8 22:53 fastcgi_temp
drwx------ 2 root root 4096 Oct  8 22:12 html
drwx------ 2 root root 4096 Oct  8 22:53 logs
drwx------ 2 root root 4096 Oct  8 22:53 proxy_temp
drwx------ 2 root root 4096 Oct  8 22:12 sbin
drwx------ 2 root root 4096 Oct  8 22:53 scgi_temp
drwx------ 2 root root 4096 Oct  8 22:53 uwsgi_temp
# cd html
# ls -l
total 8
-rw------- 1 root root 497 Oct  8 22:12 50x.html
-rw------- 1 root root 615 Oct  8 22:12 index.html
# pwd
/usr/local/nginx/html
可知, nginx的www根目录为 /usr/local/nginx/html
后续任务
用SecureFXPortable将网站素材传到noroot用户的home目录中, 然后在CloudShell中, 用命令将素材移动到 /usr/local/nginx/html
# cd /usr/local/nginx/html/
# rm ./*

# mv /home/noroot/* .
# ls
404.html  connect_us                enterprise_qualification.assets  material   product_introduction  search       sitemap.xml.gz
assets    enterprise_qualification  index.html                       overrides  resource_download     sitemap.xml  technical_article
# ls -l /home/noroot/
total 0
重启nginx (systemctl restart nginx.service)
然后就可以运行在本地测试好的网页了.
试了一下, 效果非常好. 搞定.
总结
第三方工具方便是方便, 可是出了问题, 可不好找(不确定他到底干了啥).
如果自己手工做任务, 出了问题, 找起来容易.


 6400
6400

 被折叠的 条评论
为什么被折叠?
被折叠的 条评论
为什么被折叠?
 到【灌水乐园】发言


