


引言
最近想把UITableView(表视图)全面熟悉一遍,接触到两个实例方法
- (void)beginUpdates;
- (void)endUpdates;经过一番研究后发现这两个方法除了用来批量操作Cell,还有改变动态更新行高的作用。官方文档给出了这样的说明:
You can also use this method followed by the endUpdates method to animate the change in the row heights without reloading the cell.
想起以前项目中经常会有这样的需求,例如单击一条评论,展开评论的所有内容,之前的做法通常是重新加载对应的Cell。听说beginUpdates和endUpdates方法可以不用重新加载cell来更新cell高度,于是决定对cell的展开和收缩一探究竟!
本篇整理了一下实现常规的Cell展开和收缩的方法,主要包括两大类。
- Cell内部展开收缩 例如一条评论的展开和收缩
- Cell外部的展开收缩 例如单击一个标题Cell,用另一个Cell来呈现相应的内容。
就方法而言,也就包括两类,一种是重新加载的方式,另一种则是通过beginUpdates和endUpdates来更新高度实现。
分析
数据模型层,关键是要设置一个用来标记该条数据的展开状态,然后在控制器中通过判断该变量值来做不同的处理,例如在heightForRowAtIndexPath方法判断是否展开来返回不同的高度。
就通过reload的方法来动态刷新高度而言,调用reloadRowsAtIndexPaths或reloadSections方法都会重新调用cellForRowAtIndexPath代理方法来重新加载row或者section,但是很多时候实际上没必要重新加载,而是只要重新调用heightForRowAtIndexPath方法刷新高度就好了。因此通过reload来动态刷新高度(即展开和收缩)通常会造成不必要的消耗。另外如果通过reloadData才重新加载整个表视图数据,造成很大性能浪费不说,过程还不会伴随动画,因此这种做法一般不被采用,这里也不做介绍。
通过beginUpdates和endUpdates方法(这两个方法成对调用)来动态刷新高度是比较理想的方法,因为这种方法不会重新加载row,即不会调用cellForRowAtIndexPath方法,但是会调用heightForRowAtIndexPath方法,这是非常符合期望的。
因此常规的思路是:在cell点击的时候更新对应数据模型的”是否展开”状态变量,然后调用刷新方法,触发heightForRowAtIndexPath来刷新高度,已实现点击cell实现展开收缩的效果。
事实上上面的思路是针对在cell内部展开收缩而言的,这种做法通常同于文本的展开收缩。现在假设有这样一种需求:有一个新闻标题列表,每条记录对应一条新闻,点击新闻标题,在相应的标题下直接显示新闻详情。这种需求通过cell内部展开来在一个cell内同时显示标题和详情是不合适的,更好的做法是在点击标题时在下方插入一个用于显示详情的cell。另外回忆一下用手机12306客户端订票的场景,点击一个班次,下方展出了相应线路上所有的站点信息,要的就是这种效果!
OK不BB了,下面将对cell内部展开收缩和外部展开收缩做详细介绍!
Cell内部展开
数据源
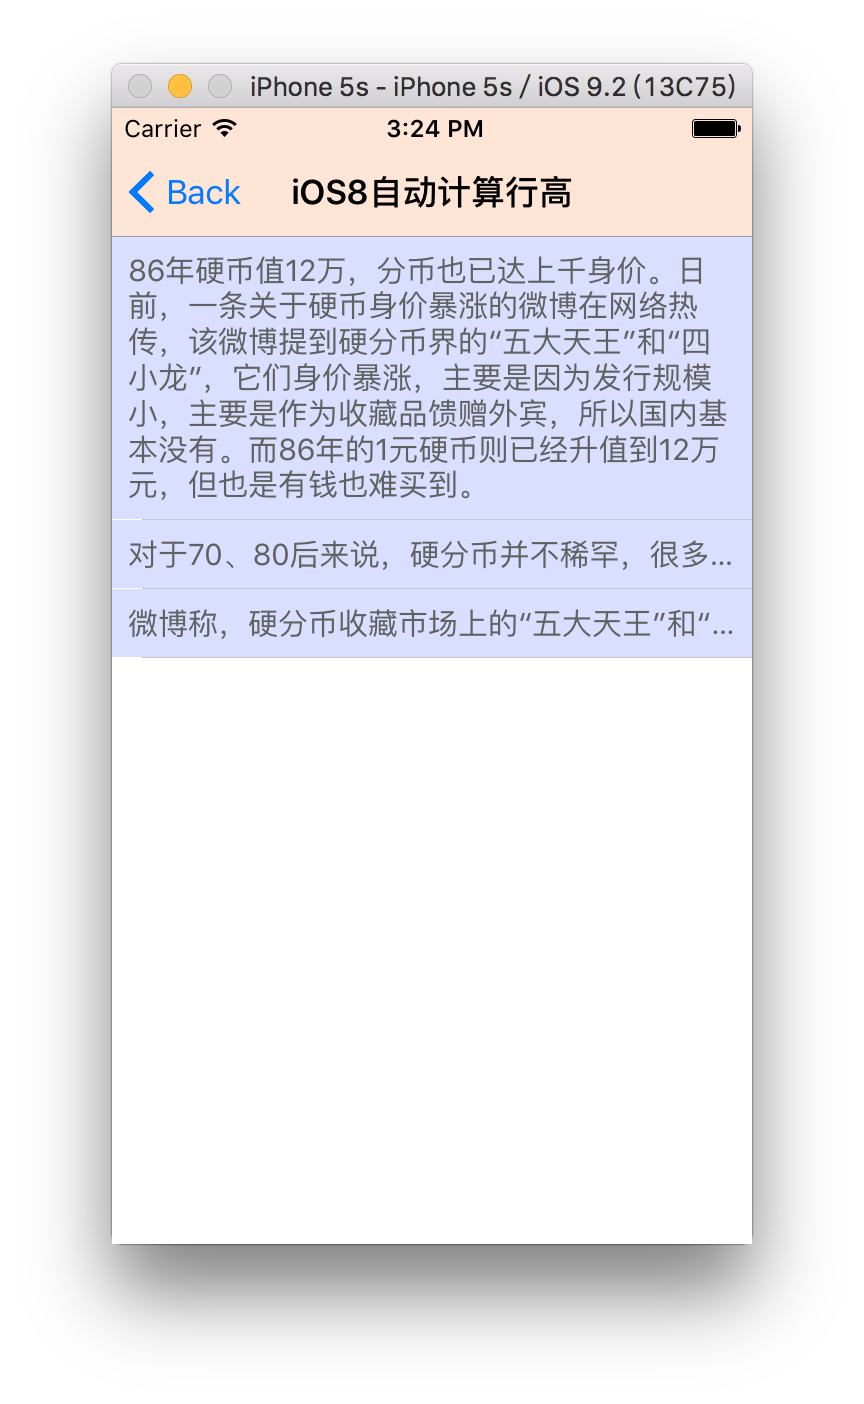
为简单起见,本例模拟的数据源异常简单,模型字段仅为用来展示的文本数据。为方便理解,先贴出最终的界面效果:单击任意cell都能对其展开或收缩(忽略导航栏标题)
数据源设置如下:
/*数据模型*/

//DataModel.h
@interface DataModel : NSObject
@property (nonatomic, strong) NSString *content;
@property (nonatomic, assign) BOOL isExtend;  //标记当前数据的展开状态
@end

//DataModel.m
#import "DataModel.h"
@implementation DataModel
- (instancetype)init
{
    self = [super init];
    if (self) {
        self.content = @"";
        self.isExtend = NO;
    }
    return self;
}
@end
/*数据源*/
//DataSource.h
@interface DataSource : NSObject
@property (nonatomic, strong) DataModel *model0;
@property (nonatomic, strong) DataModel *model1;
@property (nonatomic, strong) DataModel *model2;
@end
//DataSource.m
#import "DataSource.h"
@implementation DataSource
- (instancetype)init
{
self = [super init];
if (self) {
self.model0 = [[DataModel alloc]init];
self.model1 = [[DataModel alloc]init];
self.model2 = [[DataModel alloc]init];
self.model0.content = @"86年硬币值12万,分币也已达上千身价。日前,一条关于硬币身价暴涨的微博在网络热传,该微博提到硬分币界的“五大天王”和“四小龙”,它们身价暴涨,主要是因为发行规模小,主要是作为收藏品馈赠外宾,所以国内基本没有。而86年的1元硬币则已经升值到12万元,但也是有钱也难买到。";
self.model1.content = @"对于70、80后来说,硬分币并不稀罕,很多人家至今还能在角落里翻出一个积满灰尘的存钱罐,而存钱罐里满满当当装着的就是各种面值的硬分币。";
self.model2.content = @"微博称,硬分币收藏市场上的“五大天王”和“四小龙”最炙手可热。“五大天王”是指1981年的1分硬币,1980年的2分硬币,1979年、1980年、1981年的5分硬币,如今每枚的身价已经高达上千元,全套五枚已飙涨至万元以上。";
}
return self;
}
@endiOS8自动计算行高
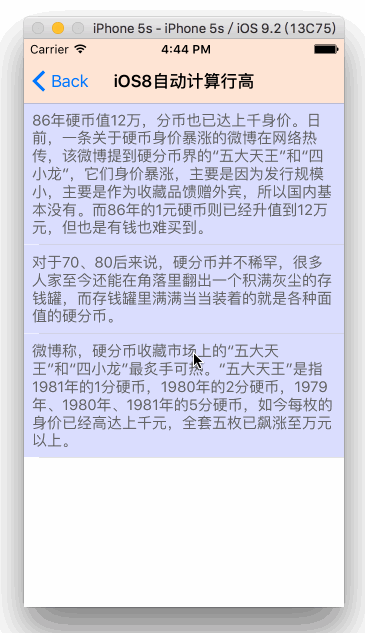
既然是动态刷新高度,关键是在cellForRowAtIndexPath方法中返回不同状态下的指定高度,因此这里计算cell高度又是关键。但在iOS8以后,提供为我们提供了自动计算cell行高的方法(Self-Sizing Cells),无需手动实现heightForRowAtIndexPath,系统会根据cell内容自动计算出行高,前提是对cell的内容控件进行了正确的自动布局!
因此在iOS8中进行cell的展开收缩是非常方便的。首先对cell进行自动布局,本例界面在storyboard中操作,若是纯代码可以通过Masonry框架进行布局。
PS关于storyboard的搭建以及自动布局,包括UITableView的设置不是本例的重点,因此不做介绍,以免分散注意力,有兴趣的同学可以自行下载源码查看,本例过程只对核心部分做介绍。搭建的cell界面如下,只关联了一个UILabel到接口文件中:
定义数据源并初始化
@property (nonatomic, strong) DataSource *dataSource;

self.dataSource = [[DataSource alloc]init];在控制器的viewDidLoad方法中添加下面两行代码,其作用是根据cell内容自动计算高度,因此无需实现heightForRowAtIndexPath方法。事实上若实现了heightForRowAtIndexPath方法,自动计算高度将会失效。
self.tableMain.estimatedRowHeight = 30;
self.tableMain.rowHeight = UITableViewAutomaticDimension;在didSelectRowAtIndexPath方法中添加一下代码:
iOS8ExtendCell *cell = [tableView cellForRowAtIndexPath:indexPath];
if (cell.labelContent.numberOfLines == 0) {
    cell.labelContent.numberOfLines = 1;
}else{
    cell.labelContent.numberOfLines = 0;
}
[self.tableMain beginUpdates];
[self.tableMain endUpdates];
最终实现效果如下:

过程分析:点击cell之后,首先修改对应cell的标签行数,然后调用刷新方法刷新。endUpdates调用完毕之后,系统根据检测cell的内容空间刷新高度,由于标签行数变了,因此高度被刷新。
可以看到在iOS8中通过配合系统提供的自动计算cell高度的方法来实现cell的展开收缩异常方便!但是..目前市场上APP大多依旧支持iOS7,因此该方便也暂时只能用来欣赏!
FDTemplateLayoutCell自动计算行高
如果无法自动计算行高,就得在heightForRowAtIndexPath方法中手动计算cell高度了是吗?别急,github上还有一个自动计算行高的神器–UITableView+FDTemplateLayoutCell!这家伙,平时配合自动布局计算行高简直不要太爽!
heightForRowAtIndexPath方法代码如下,其中fd_heightForCellWithIdentifier方法就是通过传入的控件参数自动计算行高的:
- (CGFloat)tableView:(UITableView *)tableView heightForRowAtIndexPath:(NSIndexPath *)indexPath
{
    DataModel *model = [self.dataSource valueForKey:[NSString stringWithFormat:@"model%zi",indexPath.row]];
    CGFloat height = [tableView fd_heightForCellWithIdentifier:@"ExtendInsideCell" configuration:^(id cell) {
        ExtendInsideCell *extendInsideCell = (ExtendInsideCell *)cell;
        //根据展开状态传入不同的参数以获取对应的高度
        if (model.isExtend) {
            extendInsideCell.labelContent.text = model.content;
        }else{
            extendInsideCell.labelContent.text = @" ";
        }
    }];
    return height;
}
点击cell调用:
DataModel *model = [self.dataSource valueForKey:[NSString stringWithFormat:@"model%zi",indexPath.row]];
model.isExtend = !model.isExtend;

[self.tableMain beginUpdates];
[self.tableMain endUpdates];
效果如下:
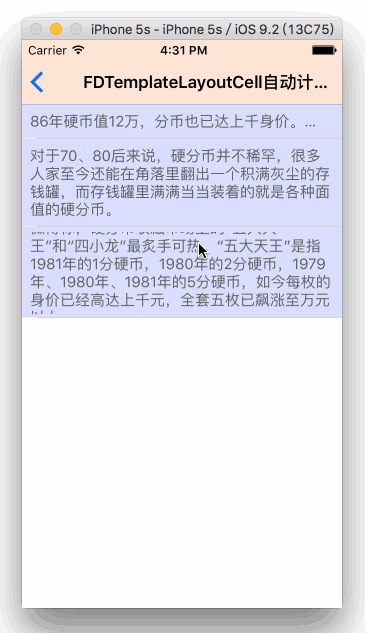
过程分析:很好理解,点击cell之后更新对应model的展开状态,然后更新视图。endUpdates调用之后会触发heightForRowAtIndexPath方法刷新cell高度,从而达到展开收缩的效果。
手动计算行高
虽然自动计算行高很好用,但是我们必须得上得了天堂下得了地狱啊!因此还是把手动计算cell高度的代码也贴出来。
- (CGFloat)tableView:(UITableView *)tableView heightForRowAtIndexPath:(NSIndexPath *)indexPath
{
    CGFloat height;
    DataModel *model = [self.dataSource valueForKey:[NSString stringWithFormat:@"model%zi",indexPath.row]];
    if (model.isExtend) {
        height = [model.content boundingRectWithSize:CGSizeMake(self.view.frame.size.width-16, CGFLOAT_MAX) options:NSStringDrawingUsesLineFragmentOrigin|NSStringDrawingUsesFontLeading|NSStringDrawingTruncatesLastVisibleLine attributes:@{NSFontAttributeName:[UIFont systemFontOfSize:15.0f]} context:nil].size.height;
    }else{
        height = [model.content sizeWithAttributes:@{NSFontAttributeName:[UIFont systemFontOfSize:15.0f]}].height;
    }
    height += 16;
    height += 1;  // Add an extra point to the height to account for the cell separator, which is added between the bottom of the cell's contentView and the bottom of the table view cell.
    return height;
}
点击cell的代码一致
DataModel *model = [self.dataSource valueForKey:[NSString stringWithFormat:@"model%zi",indexPath.row]];
model.isExtend = !model.isExtend;

[self.tableMain beginUpdates];
[self.tableMain endUpdates];最终效果和使用FDTemplateLayoutCell类别自动计算高度的效果一致。
通过 Reload Row
虽然beginUpdates和endUpdates方法能够刷新cell高度满足展开收缩的需求,但是重新加载cell也能实现这样的效果,只是在性能少稍差一些(PS要知道在此之前我都是这样做的!)。
点击cell:
DataModel *model = [self.dataSource valueForKey:[NSString stringWithFormat:@"model%zi",indexPath.row]];
model.isExtend = !model.isExtend;
//重新加载指定行的cell
[self.tableMain reloadRowsAtIndexPaths:@[indexPath] withRowAnimation:UITableViewRowAnimationAutomatic];
刷新高度:
- (CGFloat)tableView:(UITableView *)tableView heightForRowAtIndexPath:(NSIndexPath *)indexPath
{
    CGFloat height;
    DataModel *model = [self.dataSource valueForKey:[NSString stringWithFormat:@"model%zi",indexPath.row]];
    if (model.isExtend) {
        height = [model.content boundingRectWithSize:CGSizeMake(self.view.frame.size.width-16, CGFLOAT_MAX) options:NSStringDrawingUsesLineFragmentOrigin|NSStringDrawingUsesFontLeading|NSStringDrawingTruncatesLastVisibleLine attributes:@{NSFontAttributeName:[UIFont systemFontOfSize:15.0f]} context:nil].size.height;
    }else{
        height = [model.content sizeWithAttributes:@{NSFontAttributeName:[UIFont systemFontOfSize:15.0f]}].height;
    }
    height += 16+1;  //Add an extra point to the height to account for the cell separator, which is added between the bottom of the cell's contentView and the bottom of the table view cell.
    return height;
}
最终效果:
不同于beginUpdates和endUpdates方法,reloadRowsAtIndexPaths除了会调用heightForRowAtIndexPath重新计算高度,还会调用cellForRowAtIndexPath重新加载视图。对于展开收缩而言,重新加载做的是无用功,因为并不需要刷新cell内容,只是改变高度。因此这种方法不是首选之选!
Cell外部展开
数据源
本例实现的效果为点击标题在另一个cell中展开详情,模拟的数据模型字段为新闻标题和详情,模型如下:
//NewsModel.h
@interface NewsModel : NSObject
@property (nonatomic, strong) NSString *title;
@property (nonatomic, strong) NSString *content;
@property (nonatomic, assign) BOOL isExtend;  //标记当前数据的展开状态
@end

//NewsModel.m
#import "NewsModel.h"
@implementation NewsModel
- (instancetype)init
{
    self = [super init];
    if (self) {
        self.isExtend = NO; //默认不展开
    }
    return self;
}
@end
构思
方法一:
每一条数据对应一个分组(section),在不展开的情况下,numberOfrowsInSection返回1;展开情况下返回2。由于这种方法初始状态为收缩情况下并没有将详情相关的cell加载出来,因此只能通过reload的方法刷新,而不能用beginUpdates和endUpdates。
方法二:
每一条数据对应一个分组,每个分组两条记录,分别对应标题和新闻,标题cell始终显示;新闻cell根据展开状态设置不同高度:展开状态返回正常高度,收缩状态返回0。这种方法在首次加载的时候就已经将所有cell加载完毕了,因此可以通过beginUpdates和endUpdates实现动态刷新高度,即实现展开收缩效果。
外部展开方法一
在storyboard中创建两个cell样式,分别用于显示新闻和详情。
设置数据源
self.dataSource = [NSMutableArray array];
NewsModel *new1 = [[NewsModel alloc]init];
NewsModel *new2 = [[NewsModel alloc]init];
NewsModel *new3 = [[NewsModel alloc]init];
new1.title = @"86年硬币值12万 分币也已达上千身价";
new1.content = @"86年硬币值12万,分币也已达上千身价。日前,一条关于硬币身价暴涨的微博在网络热传,该微博提到硬分币界的“五大天王”和“四小龙”,它们身价暴涨,主要是因为发行规模小,主要是作为收藏品馈赠外宾,所以国内基本没有。而86年的1元硬币则已经升值到12万元,但也是有钱也难买到。";
new2.title = @"iPhone4/5s获救 苹果火速推iOS 9.3修正";
new2.content = @" 在iPhone SE发布的当天,苹果推送了新版的iOS 9.3系统,新增加的一些功能像Night Shift等都让很多人在第一时间升级。不过随之而来的却是坏消息,很多人表示通过OTA升级后,系统无法激活,反映该问题的主要集中在iPad 2、iPad Air、iPhone 4S、5等用户上。";
new3.title = @"路由器被蹭网后,我有被黑的风险吗?";
new3.content = @"最近路由安全沸沸扬扬,可以翻阅我微信公众号历史文章查看关于路由安全的文章以及央视当时的采访。鉴于天时地利人和,最后我成功的在现实生活中上演了这样一场精彩好戏,为了满足众人的欲望,我就写成故事。大家好好琢磨琢磨蹭网之后,我们还能做些什么?";
[self.dataSource addObject:new1];
[self.dataSource addObject:new2];
[self.dataSource addObject:new3];numberOfRowsInSection根据展开状态返回不同cell数
-(NSInteger)tableView:(UITableView *)tableView numberOfRowsInSection:(NSInteger)section
{
    NewsModel *model = self.dataSource[section];
    if (model.isExtend) {
        return 2;
    }else{
        return 1;
    }
}
其余几个数据源及代理方法该怎么写,不再赘述。点击cell方法如下:
    NewsModel *model = self.dataSource[indexPath.section];
    model.isExtend = !model.isExtend;
    //重新加载对应的section
    [self.tableMain reloadSections:[NSIndexSet indexSetWithIndex:indexPath.section] withRowAnimation:UITableViewRowAnimationAutomatic];
最终效果如下:

外部展开方法二
数据源设置和方法一中一致,不再赘述。这种方法需要在heightForRowAtIndexPath中做文章
- (CGFloat)tableView:(UITableView *)tableView heightForRowAtIndexPath:(NSIndexPath *)indexPath
{
    NewsModel *model = self.dataSource[indexPath.section];
    if (indexPath.row == 0) {
        return [tableView fd_heightForCellWithIdentifier:@"identiferidOriginalCell" configuration:^(id cell) {
            OriginalCell *originalCell = (OriginalCell *)cell;
            originalCell.labelTitle.text = model.title;
        }];
    }else{
        if (model.isExtend) {
            return [tableView fd_heightForCellWithIdentifier:@"identiferidExtendCell" configuration:^(id cell) {
                ExtendCell *extendCell = (ExtendCell *)cell;
                extendCell.labelContent.text = model.content;
            }];
        }else{
            return 0;  //详情收缩状态下高度返回0
        }
    }
}
点击cell:
if (indexPath.row == 0) {
    NewsModel *model = self.dataSource[indexPath.section];
    model.isExtend = !model.isExtend;
    [self.tableMain beginUpdates];
    [self.tableMain endUpdates];
}
效果如下:

单一展开
以上所有demo允许多个cell同时展开,实际中有时候只允许一个cell展开。本例在方法一的基础上实现,关键是在控制器中设置一个变量用来标记当前展开的cell。
@property (nonatomic, assign) NSInteger extendIndex; //标记当前展开项索引并将该标记初始为-1,同于表示当前没有展开项。
数据源同上。
点击cell根据不同情况做不同的刷新操作:
if (self.extendIndex == -1) {
    //情况一 没有任何展开项 刷新点击项所在分组
    self.extendIndex = indexPath.section;
    model.isExtend = YES;
    [self.tableMain reloadSections:[NSIndexSet indexSetWithIndex:indexPath.section] withRowAnimation:UITableViewRowAnimationAutomatic];
}else if (self.extendIndex == indexPath.section){
    //情况二 点击项为展开项 刷新点击项所在分组
    model.isExtend = NO;
    self.extendIndex = -1;
    [self.tableMain reloadSections:[NSIndexSet indexSetWithIndex:indexPath.section] withRowAnimation:UITableViewRowAnimationAutomatic];
}else{
    //情况三 点击项非展开项 同时刷新已展开项和点击项所在分组
    NewsModel *extendModel = self.dataSource[self.extendIndex];
    extendModel.isExtend = NO;
    model.isExtend = YES;
    NSIndexSet *resumeIndexSet = [NSIndexSet indexSetWithIndex:self.extendIndex];
    NSIndexSet *extendIndexSet = [NSIndexSet indexSetWithIndex:indexPath.section];
    self.extendIndex = indexPath.section;
    //批量reload操作
    [self.tableMain beginUpdates];
    [self.tableMain reloadSections:resumeIndexSet withRowAnimation:UITableViewRowAnimationAutomatic];
    [self.tableMain reloadSections:extendIndexSet withRowAnimation:UITableViewRowAnimationAutomatic];
    [self.tableMain endUpdates];
}
效果如下:

总结
实际中遇到需要对Cell进行展开收缩的需求是,首先判断是内部展开还是外部展开。展开的方法无非两种:①通过beginUpdates和endUpdates刷新高度;②重新加载对用行(row)或分组(section)。前者不会调用cellForRowAtIndexPath方法,因此不会重新加载cell;后者会调用。因此大多数情况下都能用前者方法实现,尽量只有在需要reload cell的时候用后者。
源码github地址:https://github.com/Lotheve/ExtendCellCemo


 1085
1085

 被折叠的 条评论
为什么被折叠?
被折叠的 条评论
为什么被折叠?
 到【灌水乐园】发言


