


目录
1. 使用场景
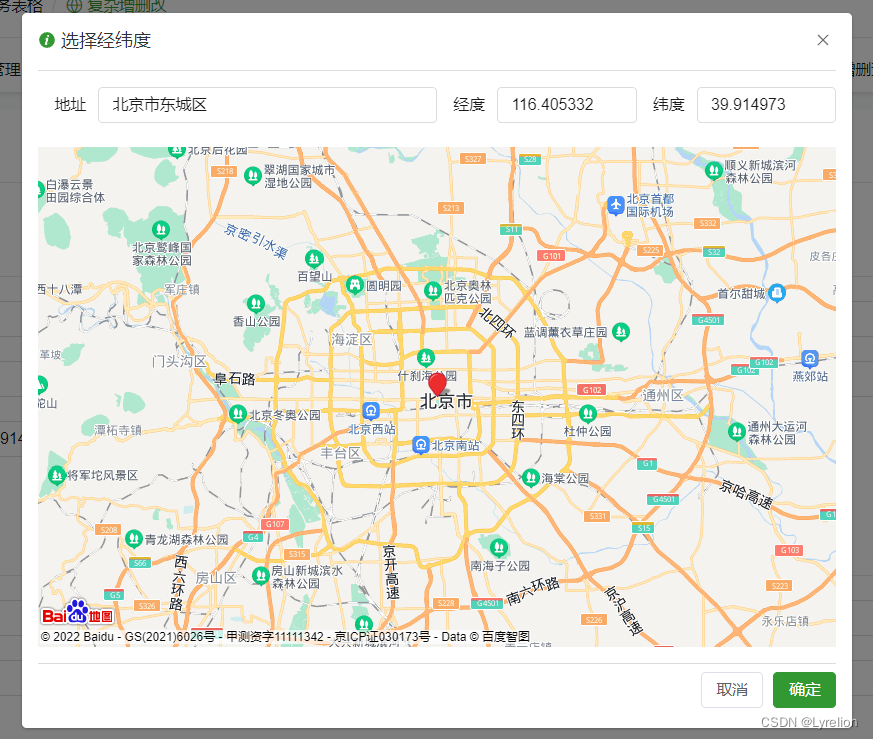
表格单条数据的 编辑页 中,存在一种业务 —— 拾取当前点位经纬度坐标

2. 实现过程
2.1 前期准备
2.1.1 申请 百度地图 关联当前项目的 AK 值
AK 值应只有当前项目使用(保证唯一),避免影响其他项目正常运行
2.1.2 在项目中引入 百度地图 资源
注意事项
- 需要在基座应用、微应用中都引入 百度地图 资源(如果基座不引入,会导致跨域问题)
- 基座应用中,还要调整 start 函数,指定部分特殊的 动态加载的 微应用资源(css / js) 不被 qiankun 劫持处理
基座应用
public/index.html 下,添加如下代码
<!-- 百度地图(每个项目需要单独申请地图的 AK 值,否则会影响其他项目) -->
<script ignore src="https://api.map.baidu.com/getscript?v=3.0&ak=x"></script>
还需要在 start() 函数中,忽略地图相关资源,避免被 qiankun 劫持,影响访问
// 初始化配置
start({
  // 指定部分微应用资源(css/js) ,防止被 qiankun 劫持处理
  excludeAssetFilter: (assetUrl) => {
    const whiteList: any = [];
    const whiteWords = ['baidu', 'map'];
    if (whiteList.includes(assetUrl)) { return true; }
    return whiteWords.some((w) => assetUrl.includes(w));
  },
});
微应用
public/index.html 下,添加如下代码
<!-- 百度地图(每个项目需要单独申请地图的 AK 值,否则会影响其他项目) -->
<script ignore src="https://api.map.baidu.com/getscript?v=3.0&ak=x"></script>
2.2 组件开发 —— 坐标拾取
2.2.1 添加页面模板
注意事项
- 地图容器 id,要保证唯一
- 地图容器,要设置 固定宽高(百分比不行),否则地图无法加载
<!--
 * @Description: 百度地图 - 拾取点位
 * @Author: lyrelion
 * @Date: 2022-09-27 09:04:07
 * @LastEditors: lyrelion
 * @LastEditTime: 2022-09-27 13:41:58
-->

<template>
  <el-row class="m-t-md">
    <!-- 地址 -->
    <el-col :span="12" class="el-form-item__content">
      <el-form label-width="60px">
        <el-form-item label="地址">
          <el-input v-model="addressState"></el-input>
        </el-form-item>
      </el-form>
    </el-col>
    <!-- 经度 -->
    <el-col :span="6">
      <el-form label-width="60px">
        <el-form-item label="经度">
          <el-input v-model="longitudeState"></el-input>
        </el-form-item>
      </el-form>
    </el-col>
    <!-- 纬度 -->
    <el-col :span="6">
      <el-form label-width="60px">
        <el-form-item label="纬度">
          <el-input v-model="latitudeState"></el-input>
        </el-form-item>
      </el-form>
    </el-col>
  </el-row>

  <!-- 地图容器 -->
  <div :id="myMapId" class="my-map"></div>

  <!-- 确定按钮 / 取消按钮 -->
  <div class="dialog-button-box m-t-md">
    <el-button size="small" @click="handleCancel">
      取消
    </el-button>
    <el-button size="small" type="primary" @click="handleSure">
      确定
    </el-button>
  </div>
</template>


<style lang="scss" scoped>
.my-map {
  // 一定要给 地图容器 设置宽高,否则地图无法加载
  width: 800px;
  height: 500px;
}
</style>
2.2.2 定义 接收/发送 的数据
  props: {
    // 地图初始化需要的数据
    options: {
      type: Object,
      default: () => {},
    },
    // 地址
    address: {
      type: String,
      default: '',
    },
    // 经度
    longitude: {
      type: Number,
      default: null,
    },
    // 纬度
    latitude: {
      type: Number,
      default: null,
    },
    // 地图级别
    level: {
      type: Number,
      default: 11,
    },
  },
  emits: ['click-sure', 'click-cancle'],
2.2.3 添加点位拾取弹框 确认/取消 事件
    /**
     * @description: 点击确定按钮
     */
    const handleSure = () => {
      emit('click-sure', {
        address: state.addressState,
        longitude: state.longitudeState,
        latitude: state.latitudeState,
      });
    };

    /**
     * 点击取消按钮
     */
    const handleCancel = () => {
      emit('click-cancle');
    };
2.2.4 关于 Bmap
(官方 api 会有改动,之前是 Bmap,后面 3.0 版本改为了 BMap)
    // 注意 (window as any),不然会报错

    const Bmap = (window as any).BMap;

    // console.log('window as any).BMap ===', Bmap);
2.2.5 添加点位图层、设置中心点及缩放级别
添加点位图层
    /**
     * @description: 添加点位图层
     * @param {*} lng 经度
     * @param {*} lat 纬度
     */
    const addPoint = (lng: number, lat: number) => {
      // 清除原有点位图层
      newMap.clearOverlays();
      // 新建点位对象
      const newPoint = new Bmap.Point(lng, lat);
      // 创建标注
      const marker = new Bmap.Marker(newPoint);
      // 将标注添加到地图中
      newMap.addOverlay(marker);
      // 让当前标记点 平滑的移动到 指定位置
      newMap.panTo(newPoint);
    };
设置中心点及缩放级别
    /**
     * @description: 设置中心点坐标和地图级别
     * @param {*} lng 经度
     * @param {*} lat 纬度
     * @param level 地图级别
     */
    const setCenterAndZoom = (lng: number, lat: number, level: number) => {
      // 初始化地图,设置中心点坐标和地图级别
      newMap.centerAndZoom(new Bmap.Point(lng, lat), level);
    };
2.2.6 地图初始化
创建 map 实例(ths-map 必须和 DOM 上的 ID 一致)
<script lang="ts">
import { defineComponent, onMounted, reactive, toRefs } from 'vue';

export default defineComponent({
  name: 'ChooseLocationMap',
  setup(props, { emit }) {
    // 响应式变量
    const state = reactive({
      // 地图唯一ID
      myMapId: `ths-map${new Date().getTime()}`,
      // 地址
      addressState: props.address || '',
      // 经度
      longitudeState: Number(props.longitude) || null,
      // 纬度
      latitudeState: Number(props.latitude) || null,
    });

    // 注意 (window as any),不然会报错(官方 api 会有改动,之前是 Bmap,后面 3.0 版本改为了 BMap)
    const Bmap = (window as any).BMap;
    // console.log('window as any).BMap ===', Bmap);

    // 地图实例
    let newMap: any = null;

    /**
     * @description: 初始化地图
     * @param {*} lng 经度
     * @param {*} lat 纬度
     */
    const initMap = (longitude: number, latitude: number, level: number) => {
      // 创建 map 实例(ths-map 必须和 DOM 上的 ID 一致)
      newMap = new Bmap.Map(state.myMapId);
      // 获取详细信息使用
      const myGeo = new Bmap.Geocoder();

      // 设置地图中心点(应该使用卫星图坐标,否则会找不到点位,一片白屏)
      setTimeout(() => {
        setCenterAndZoom(longitude, latitude, level);
      }, 100);

      // 开启鼠标滚轮缩放
      newMap.enableScrollWheelZoom(true);

      // 添加地图点击事件
      newMap.addEventListener('click', (e: any) => {
        // 经纬度
        state.longitudeState = Number(e.point.lng.toFixed(6));
        state.latitudeState = Number(e.point.lat.toFixed(6));

        if (state.longitudeState && state.latitudeState) {
          // 添加点位图层
          addPoint(state.longitudeState, state.latitudeState);

          // 获取详细地址信息
          const newPoint = new Bmap.Point(state.longitudeState, state.latitudeState);
          myGeo.getLocation(newPoint, (rs: any) => {
            const { address } = rs;
            state.addressState = address;
          });
        }
      });
    };

    onMounted(() => {
      if (props.options.longitude && props.options.latitude && props.options.level) {
        const { longitude, latitude, level } = props.options;
        // 初始化地图
        initMap(longitude, latitude, level);
      }
      if (props.longitude && props.latitude) {
        const { longitude, latitude, level } = props;
        // 经纬度
        state.longitudeState = Number(longitude);
        state.latitudeState = Number(latitude);
        setTimeout(() => {
          // 设置中心点及级别
          setCenterAndZoom(longitude, latitude, level);
          // 添加点位图层
          addPoint(longitude, latitude);
        }, 100);
      }
    });

    return {
      ...toRefs(state),
      handleSure,
      handleCancel,
    };
  },
});
</script>
2.2.7 使用组件
<!--
 * @Description: 打开 百度地图 - 拾取点位 弹框 的输入框
 * @Author: lyrelion
 * @Date: 2022-09-27 09:04:07
 * @LastEditors: lyrelion
 * @LastEditTime: 2022-09-27 14:16:30
-->

<template>
  <el-input
    v-model="inputValue"
    readonly
  >
    <template #append>
      <el-button size="small">
        <el-icon :size="13">
          <Place @click="visibleDialog = true" />
        </el-icon>
      </el-button>
    </template>
  </el-input>

  <!-- 地图弹框 -->
  <el-dialog
    v-if="visibleDialog"
    :model-value="true"
    :close-on-press-escape="false"
    width="830px"
    draggable
    @close="visibleDialog = false"
  >
    <!-- dialog 弹框标题 -->
    <template #title>
      <span>
        <el-icon :size="16">
          <info-filled />
        </el-icon>
        选择经纬度</span>
    </template>

    <!-- 地图组件 -->
    <choose-location-map
      :options="initOptions"
      :address="address"
      :longitude="longitude"
      :latitude="latitude"
      :level="level"
      @click-sure="handleSure"
      @click-cancle="visibleDialog = false"
    >
    </choose-location-map>
  </el-dialog>
</template>

<script lang="ts">
import { defineComponent, reactive, toRefs, computed } from 'vue';
// 地图组件
import ChooseLocationMap from './choose-location-map.vue';

export default defineComponent({
  name: 'ChooseLocationDialog',
  components: {
    ChooseLocationMap,
  },
  props: {
    // 经度
    longitude: {
      type: Number,
      default: 116.405332,
    },
    // 纬度
    latitude: {
      type: Number,
      default: 39.914973,
    },
    // 地址
    address: {
      type: String,
      default: '北京市东城区',
    },
  },
  setup(props) {
    // 响应式变量
    const state = reactive({
      // 弹框显隐
      visibleDialog: false,
      // 当前的地址
      address: props.address || '北京市东城区',
      /*
       * 经纬度
       * longitude: 104.04263635868074 as null|number,
       * latitude: 30.556100647961866 as null|number,
       */
      longitude: props.longitude || 116.405332 as null|number,
      latitude: props.latitude || 39.914973 as null|number,
      // 地图缩放级别,可不传,默认11
      level: 11,
      // 初始化地图的位置
      initOptions: {
        longitude: 116.405332,
        latitude: 39.914973,
        level: 11,
      },
    });
    // console.log('接收的经纬度 ===', state.longitude, state.latitude);

    // 字符串拼接而成的经纬度坐标
    const inputValue = computed(() => `(${state.longitude},${state.latitude})`);

    /**
     * @description: 点击确定
     * @param {*} address 地址
     * @param {*} longitude 经度
     * @param {*} latitude 纬度
     * @return {*}
     */
    const handleSure = ({ address, longitude, latitude }:{address:string, longitude:number, latitude:number}) => {
      // 关闭弹框
      state.visibleDialog = false;
      // 赋值
      state.address = address;
      state.longitude = longitude;
      state.latitude = latitude;
    };

    return {
      ...toRefs(state),
      inputValue,
      handleSure,
    };
  },
});
</script>

<style scoped lang="scss">
:deep(.el-input-group__append) {
  border-left: 1px solid var(--border-color1);
}

:deep(.el-input-group__append:hover) {
  border-left: 1px solid var(--theme-color);
}
</style>
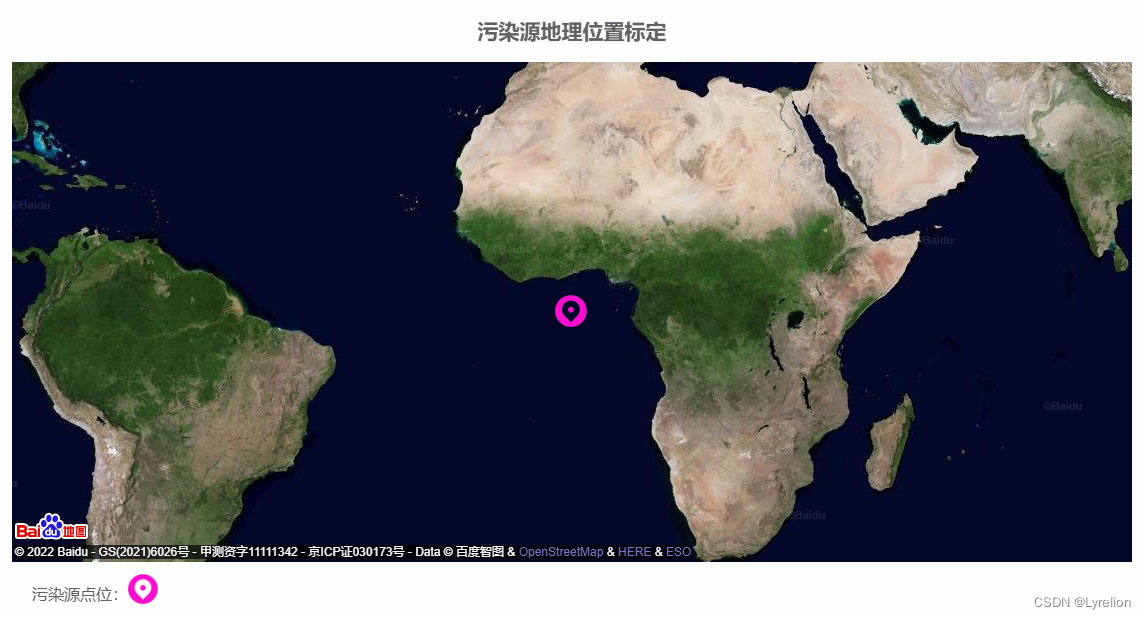
2.3 组件开发 —— 点位展示
2.3.1 添加点位展示组件
注意事项
- 此示例使用了 卫星图,因此传入的经纬度坐标,应该是卫星图上获取的
- 如果使用其他地图的坐标,或者缩放级别数值非常大,就会出现一片空白,定位到大洋的情况
<!--
 * @Description: 百度地图 - 展示点位
 * @Author: lyrelion
 * @Date: 2022-09-26 09:04:07
 * @LastEditors: lyrelion
 * @LastEditTime: 2022-09-27 13:33:29
-->

<template>
  <div class="ths-content">
    <h2 class="ths-content-title">
      {{ entername || '污染源地理位置标定' }}
    </h2>
    <!-- 地图容器(一定要设置宽高,否则无法渲染) -->
    <div :id="thsMapId" class="ths-map"></div>

    <!-- 图例 -->
    <div class="div-flex">
      <div v-for="item in myIcons" :key="item.index">
        <span>{{ item.msg }}:</span>
        <img :src="item.iconUrl" :alt="item.msg" width="30" />
      </div>
    </div>
  </div>
</template>

<script lang="ts">
import { defineComponent, onMounted, reactive, toRefs } from 'vue';

// 图标引入
import dqybpfkIcon from '@/assets/images/map-icon/dq-ybpfk.png';
import dqzypfkIcon from '@/assets/images/map-icon/dq-zypfk.png';
import fsybpfkIcon from '@/assets/images/map-icon/fs-ybpfk.png';
import fszypfkIcon from '@/assets/images/map-icon/fs-zypfk.png';
import xmwzIcon from '@/assets/images/map-icon/xmwz.png';

// 地图点位图标
const mapIcons = {
  xmwz: xmwzIcon,
  dqzypfk: dqzypfkIcon,
  dqybpfk: dqybpfkIcon,
  fszypfk: fszypfkIcon,
  fsybpfk: fsybpfkIcon,
};

// 地图 - 图例中的图标
const myIcons = [
  { index: 0, msg: '污染源点位', iconUrl: xmwzIcon },
  /*
   * { index: 1, msg: '废气-主要排放口', iconUrl: dqzypfkIcon },
   * { index: 2, msg: '废气-一般排放口', iconUrl: dqybpfkIcon },
   * { index: 3, msg: '废水-主要排放口', iconUrl: fszypfkIcon },
   * { index: 4, msg: '废水-一般排放口', iconUrl: fsybpfkIcon },
   */
];

export default defineComponent({
  name: 'ShowLocationMap',
  props: {
    // 污染源名称
    entername: {
      type: String,
      default: '',
    },
    // 经度
    latitude: {
      type: Number,
      default: 116.40834,
    },
    // 纬度
    longitude: {
      type: Number,
      default: 39.90114,
    },
  },
  setup(props) {
    // 响应式变量
    const state = reactive({
      thsMapId: `ths-map${new Date().getTime()}`,
    });

    // 注意 (window as any),不然会报错(官方 api 会有改动,之前是 Bmap,后面 3.0 版本改为了 BMap)
    const Bmap = (window as any).BMap;
    // console.log('window as any).BMap ===', Bmap);

    // 地图实例
    let newMap: any = null;

    /**
     * @description: 设置中心点坐标和地图级别
     * @param lng 经度
     * @param lat 纬度
     * @param level 地图级别
     */
    const setCenterAndZoom = (lng: number, lat: number, level: number) => {
      newMap.centerAndZoom(new Bmap.Point(lng, lat), level);
    };

    /**
     * 获取点位信息
     */
    const getPointData = () => {
      console.log('获取点位信息');
    };

    /**
     *  初始化页面
     */
    const initMap = async () => {
      // 获取点位信息
      await getPointData();

      // 创建 map 示例
      newMap = new Bmap.Map(state.thsMapId);
      // 设置地图为卫星图
      newMap.setMapType((window as any).BMAP_SATELLITE_MAP);
      // 开启鼠标滚轮缩放
      newMap.enableScrollWheelZoom(true);

      // 精度
      const lat = Number(props.latitude || 116.338728);
      // 维度
      const lon = Number(props.longitude || 39.907187);
      // 点位级别(级别越高,地图越详细)
      const MAP_LEVEL = 1;

      // 设置地图中心点(如果使用卫星图,则应该使用卫星图坐标,否则会找不到点位,一片白屏)
      setTimeout(() => {
        setCenterAndZoom(lon, lat, MAP_LEVEL);
      }, 100);

      // 中心点大小
      const MAP_CENTER_SIZE = 35;
      // 新建中心点对象
      const centerPointObj = new Bmap.Point(lon, lat);
      // 设置中心点大小
      const centerPointIcon = new Bmap.Icon(mapIcons.xmwz, new Bmap.Size(MAP_CENTER_SIZE, MAP_CENTER_SIZE));
      // 组装中心点
      const centerPoint = new Bmap.Marker(centerPointObj, { icon: centerPointIcon });
      // 中心点打点
      newMap.addOverlay(centerPoint);
    };

    onMounted(() => {
      // 初始化页面
      initMap();
    });

    return {
      myIcons,
      ...toRefs(state),
    };
  },
});
</script>

<style lang="scss" scoped>
.ths-map {
  // 一定要给 地图容器 设置宽高,否则地图无法加载
  width: 100%;
  height: 500px;
}
</style>
2.3.2 效果展示


 1836
1836


 被折叠的 条评论
为什么被折叠?
被折叠的 条评论
为什么被折叠?
 到【灌水乐园】发言


