


本项目参考自《Ray Tracing in One Weekend》系列。
上接《用两天学习光线追踪》,继续学习光线追踪。
项目链接:https://github.com/maijiaquan/ray-tracing-with-imgui
目录:
《用两天学习光线追踪》1.项目介绍和ppm图片输出
《用两天学习光线追踪》2.射线、简单相机和背景输出
《用两天学习光线追踪》3.球体和表面法向量
《用两天学习光线追踪》4.封装成类
《用两天学习光线追踪》5.抗锯齿
《用两天学习光线追踪》6.漫反射材质
《用两天学习光线追踪》7.反射向量和金属材质
《用两天学习光线追踪》8.折射向量和电介质
《用两天学习光线追踪》9.可放置相机
《用两天学习光线追踪》10.散焦模糊
《用一周学习光线追踪》1.动态模糊
《用一周学习光线追踪》2.BVH树、AABB相交检测
《用一周学习光线追踪》3.纯色纹理和棋盘纹理
《用一周学习光线追踪》4.柏林噪声
《用一周学习光线追踪》5.球面纹理贴图
《用一周学习光线追踪》6.光照和轴对齐矩形
《用一周学习光线追踪》7.长方体和平移旋转
本节将会新增自发光材质和轴对齐矩形,并渲染图形学教材中的经典场景Cornell Box。

自发光材质
首先,定义自发光材质,该材质不提供散射,仅提供一个发光函数emitted()
//material.h
class diffuse_light : public material  {
    public:
        texture *emit;
        diffuse_light(texture *a) : emit(a) {}
        virtual bool scatter(const ray& r_in, const hit_record& rec, vec3& attenuation, ray& scattered) const {
            return false;
        }
        virtual vec3 emitted(float u, float v, const vec3& p) const {
            return emit->value(u, v, p);
        }
};
material基类也加上emitted()函数:
//material.h
class material {
    public:
        virtual bool scatter(const ray& r_in, const hit_record& rec, vec3& attenuation, ray& scattered) const = 0;
        virtual vec3 emitted(float u, float v, const vec3& p) const {
            return vec3(0,0,0);
        }
};
修改color函数
新版的color函数修改如下:
vec3 color(const ray& r, hittable *world, int depth) {
    hit_record rec;
    if (world->hit(r, 0.001, MAXFLOAT, rec)) {
        ray scattered;
        vec3 attenuation;
        vec3 emitted = rec.mat_ptr->emitted(rec.u, rec.v, rec.p);
        if (depth < 50 && rec.mat_ptr->scatter(r, rec, attenuation, scattered))
             return emitted + attenuation*color(scattered, world, depth+1);
        else
            return emitted;
    }
    else
        return vec3(0,0,0);
}
新版color()函数,跟旧版color函数的区别如下:
1.取消了“天空盒”,当射线没有命中任何物体的时候,直接返回纯黑色(r,g,b均为0)。这也说明,之前的“天空盒”的本质,其实是一个铺满场景的巨型发光材质,将其取消了之后,四周一片漆黑。
2.如果递归深度超过50,或者命中点没有发生散射(例如射线命中发光材质了),则color返回发光材质emitted()函数的返回值(即发光材质表面某个被射线所命中的点,所对应的发射光的颜色),然后乘以attenuation,叠加到上一层递归的的emitted中(如果有emitted的话,即物体自发光的话),作为上一层color()的返回值。

以上图为例解释一下:我们看到场景中间的柏林噪声材质球体的右侧,明显被自发光矩形照亮了。假设一条射线从我们的眼睛为起点出发,第一次命中结果为P点,在P点发生了散射,产生第二条射线(图中绿色射线)进入下一层递归采样,并命中发光矩形,则该射线完整路径的color返回值递归展开伪代码为:
retColor = emittedPerlin + attenuationP*emittedRect
由于柏林噪声材质球体不发光,即emittedPerlin = 0,所以有
retColor = attenuationP*emittedRect
也就是之前所说的 光源照到物体表面材质的颜色 = 材质表面颜色(即各通道反射率)* 光源颜色
轴对齐矩形
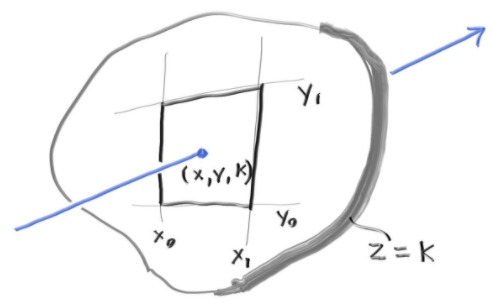
如上图所示,假设在xy平面有个一矩形,我们只需要一个z参数就能够确定该矩形的所在的平面,例如z=k,其边由以下4个变量确定:
- x = x 0 x=x_0 x=x0
- x = x 1 x=x_1 x=x1
- y = y 0 y=y_0 y=y0
- y = y 1 y=y_1 y=y1
判断一条射线是否命中一个xy平面上的轴对齐矩形,我们可以先计算该射线和该矩形所在的平面的交点。
射线方程为:
p
(
t
)
=
a
+
t
b
p(t) = a + tb
p(t)=a+tb
单独将z轴的分量抽离出来,则有
z
(
t
)
=
a
z
+
t
b
z
z(t) = a_z + tb_z
z(t)=az+tbz
将 z ( t ) = k z(t) = k z(t)=k 代入上式,有
t = ( k − a z ) / b z t = (k-a_z) / b_z t=(k−az)/bz
有了 t t t的值,可以计算出交点的 x x x和 y y y值:
x = a x + t b x x = a_x + tb_x x=ax+tbx
y = a y + t b y y = a_y + tb_y y=ay+tby
则有射线命中轴对齐矩形的判断条件为: x 0 < x < x 1 x_0 < x < x_1 x0<x<x1 且 y 0 < y < y 1 y_0 < y < y_1 y0<y<y1.
将xy平面的轴对齐矩形,写成代码如下:
//aarect.h
class xy_rect: public hittable  {
    public:
        xy_rect() {}
        xy_rect(float _x0, float _x1, float _y0, float _y1, float _k, material *mat) : x0(_x0), x1(_x1), y0(_y0), y1(_y1), k(_k), mp(mat) {};
        virtual bool hit(const ray& r, float t0, float t1, hit_record& rec) const;
        virtual bool bounding_box(float t0, float t1, aabb& box) const {
               box =  aabb(vec3(x0,y0, k-0.0001), vec3(x1, y1, k+0.0001));
               return true; }
        material  *mp;
        float x0, x1, y0, y1, k;
};

bool xy_rect::hit(const ray& r, float t0, float t1, hit_record& rec) const {
    float t = (k-r.origin().z()) / r.direction().z();
    if (t < t0 || t > t1)        return false;
    float x = r.origin().x() + t*r.direction().x();
    float y = r.origin().y() + t*r.direction().y();
    if (x < x0 || x > x1 || y < y0 || y > y1)         return false;
    rec.u = (x-x0)/(x1-x0);
    rec.v = (y-y0)/(y1-y0);
    rec.t = t;
    rec.mat_ptr = mp;
    rec.p = r.point_at_parameter(t);
    rec.normal = vec3(0, 0, 1);	//默认法线为(0,0,1),但会有潜在的朝向问题
    return true;
}
xz平面和yz平面的定义原理一样,详见代码。
在场景中使用diffuse_ligh材质定义一个发光的球和一个发光的轴对齐矩形:
hittable *simple_light() {
    vec3 lookfrom(13, 2, 3);
    vec3 lookat(0,2,0);
    cam.SetCamParams(lookfrom, lookat, vec3(0, 1, 0), 40, float(nx) / float(ny), 0.0, 10.0, 0.0, 1.0);
    texture *pertext = new noise_texture(4);
    hittable **list = new hittable*[4];
    int i = 0;
    list[i++] = new sphere(vec3(0,-1000, 0), 1000, new lambertian(new constant_texture(vec3(0.4, 0.2, 0.1))));
    list[i++] = new sphere(vec3(0, 2, 0), 2, new lambertian(pertext));
    list[i++] = new sphere(vec3(0, 7, 0), 2, new diffuse_light(new constant_texture(vec3(4,4,4))));
    list[i++] = new xy_rect(3, 5, 1, 3, -2, new diffuse_light(new constant_texture(vec3(4,4,4))));

    return new hittable_list(list,i);
}
效果如下:

Cornell Box
在场景中增加5个普通矩形,1个发光矩形:
hittable *cornell_box() {
    cam.SetCamParams(vec3(278, 278, -800), vec3(278,278,0), vec3(0, 1, 0), 40, float(nx) / float(ny), 0.0, 10.0, 0.0, 1.0);
    hittable **list = new hittable*[6];
    int i = 0;
    material *red = new lambertian(new constant_texture(vec3(0.65, 0.05, 0.05)));
    material *white = new lambertian(new constant_texture(vec3(0.73, 0.73, 0.73)));
    material *green = new lambertian(new constant_texture(vec3(0.12, 0.45, 0.15)));
    material *light = new diffuse_light(new constant_texture(vec3(15, 15, 15)));

    list[i++] = new yz_rect(0, 555, 0, 555, 555, green);
    list[i++] = new yz_rect(0, 555, 0, 555, 0, red);
    list[i++] = new xz_rect(213, 343, 227, 332, 554, light);
    list[i++] = new xz_rect(0, 555, 0, 555, 555, white);
    list[i++] = new xz_rect(0, 555, 0, 555, 0, white);
    list[i++] = new xy_rect(0, 555, 0, 555, 555, white);

    return new hittable_list(list,i);
}
结果出现了绿色矩形和2个白色矩形的缺失。原因是部分轴对齐矩形的法线朝向出错了(因为法线是写死在轴对齐矩形里面的)。
接下来定义一个新的hittable,作用是将另外一个hittable的法线置反。
class flip_normals : public hittable {
    public:
        flip_normals(hittable *p) : ptr(p) {}
        virtual bool hit(const ray& r, float t_min, float t_max, hit_record& rec) const {
            if (ptr->hit(r, t_min, t_max, rec)) {
                rec.normal = -rec.normal;
                return true;
            }
            else
                return false;
        }
        virtual bool bounding_box(float t0, float t1, aabb& box) const {
            return ptr->bounding_box(t0, t1, box);
        }
        hittable *ptr;
};
使用flip_normals,将缺失的3个矩形的法线置反:
hittable *cornell_box() {
    ns = 10000;
    cam.SetCamParams(vec3(278, 278, -800), vec3(278,278,0), vec3(0, 1, 0), 40, float(nx) / float(ny), 0.0, 10.0, 0.0, 1.0);
    hittable **list = new hittable*[6];
    int i = 0;
    material *red = new lambertian(new constant_texture(vec3(0.65, 0.05, 0.05)));
    material *white = new lambertian(new constant_texture(vec3(0.73, 0.73, 0.73)));
    material *green = new lambertian(new constant_texture(vec3(0.12, 0.45, 0.15)));
    material *light = new diffuse_light(new constant_texture(vec3(15, 15, 15)));

    list[i++] = new flip_normals(new yz_rect(0, 555, 0, 555, 555, green));
    list[i++] = new yz_rect(0, 555, 0, 555, 0, red);
    list[i++] = new xz_rect(213, 343, 227, 332, 554, light);
    list[i++] = new flip_normals(new xz_rect(0, 555, 0, 555, 555, white));
    list[i++] = new xz_rect(0, 555, 0, 555, 0, white);
    list[i++] = new flip_normals(new xy_rect(0, 555, 0, 555, 555, white));

    return new hittable_list(list,i);
}
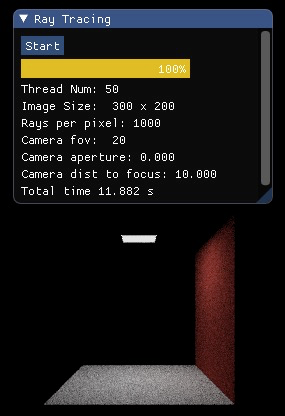
每像素采样1000次效果如下:

每像素采样1万次的高清无码渲染效果如下:
参考资料:https://raytracing.github.io/books/RayTracingTheNextWeek.html


 1799
1799

 被折叠的 条评论
为什么被折叠?
被折叠的 条评论
为什么被折叠?
 到【灌水乐园】发言


