


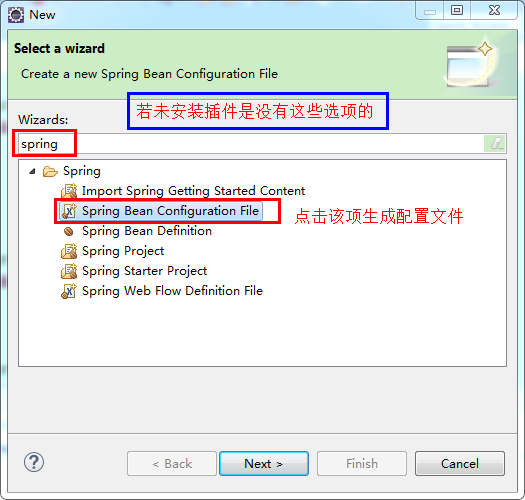
在eclipse配置Spring插件
eclipse安装spring插件方法步骤
1.【Help】-> 【Install New Software】
2.单击【Add】
出现对话框:填写如下
①:SpringSource Tool Suite
②:dist.springsource.com/release/TOOLS/update/e3.6,前面加上http://,即在线安装的地址
点击【OK】等待反应
之后选中:
1.aspectJ Development Tools(required)
1.【Help】-> 【Install New Software】
2.单击【Add】
出现对话框:填写如下
①:SpringSource Tool Suite
②:dist.springsource.com/release/TOOLS/update/e3.6,前面加上http://,即在线安装的地址
点击【OK】等待反应
之后选中:
1.aspectJ Development Tools(required)
2.aspect Development Tools Source(Optional)
3Other AJDI tools(Optional)
4.Core/spring IDE
4.Core/spring IDE
5.Extensions (Incubation)/Spring IDE
6.Extensions/Spring IDE
7.Integrations/Spring IDE
接着Next,一路Next
3.出现是否接受协议
选中第一项,然后Next
之后会出现对话框显示警告,无视,点OK继续
接着会出现一个重启Eclipse的对话框,Yes完成安装
配置xml文件
在classPath目录下创建,右击classPath→New→Other...
创建实体类
图书类
public class Book {

	private int bid;
	private String bname;
	private String author;
private float price;public class Student {
private int sid;
private String sname;
private String sex;
private String addr;配置文件(mybeans.xml)
<?xml version="1.0" encoding="UTF-8"?>
<beans xmlns="http://www.springframework.org/schema/beans"
		xmlns:xsi="http://www.w3.org/2001/XMLSchema-instance"
		xsi:schemaLocation="http://www.springframework.org/schema/beans
		http://www.springframework.org/schema/beans/spring-beans-4.2.xsd">
<!-- 定义第一个JavaBean对象
注意:在定义bean时scope的默认值为"singleton"(单例),如果每次都得到不同的对象可改为
"prototype"(原型)
-->
<!-- 1、使用构造方法赋值 -->
<bean id="first" class="com.mingde.po.Student" scope="prototype" >
<constructor-arg index="0" value="1001" ></constructor-arg>
<constructor-arg index="1" value="张三"></constructor-arg>
<constructor-arg index="2" value="男"></constructor-arg>
<constructor-arg index="3" value="上海"></constructor-arg>
</bean>
<!-- 2、使用setter注入方式 -->
<bean id="first2" class="com.mingde.po.Student" >
<property name="sid" value="1002"></property>
<property name="sname" value="李四"></property>
<property name="sex" value="男"></property>
<property name="addr" value="北京" ></property>
</bean>
</beans>测试类进行测试
public class Test {


	private ApplicationContext ac;

	@Before
	public void setUp()throws Exception{
		ac=new ClassPathXmlApplicationContext("mybeans.xml"); //读取全局上下文件,获取mybeans.xml的信息
	}

	@org.junit.Test
	public void test() {
		Student st=(Student) ac.getBean("first");
		System.out.println(st);
		Student st2=(Student) ac.getBean("first2");
		System.out.println(st2);
	}
}集合类型的注入
创建一个拥有list集合和map集合的类
public class ScondBean {

	private List<Student> st;
	private Map<String,Book> map;
配置文件mybeans.xml
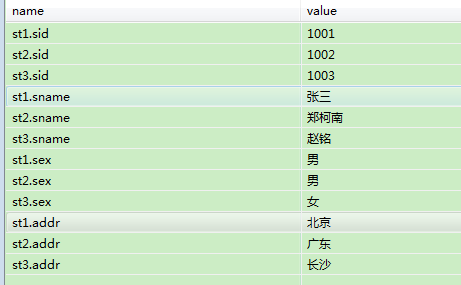
<!-- 定义一系列学生书信息 --> <bean id="st1" class="com.mingde.po.Student">
<property name="sid" value="1001"></property>
<property name="sname" value="张三"></property>
<property name="sex" value="男"></property>
<property name="addr" value="上海"></property>
</bean>
<bean id="st2" class="com.mingde.po.Student" >
<property name="sid" value="1002" ></property>
<property name="sname" value="李四"></property>
<property name="sex" value="女"></property>
<property name="addr" value="北京"></property>
</bean>
<bean id="st3" class="com.mingde.po.Student" >
<property name="sid" value="1003" ></property>
<property name="sname" value="王五"></property>
<property name="sex" value="男"></property>
<property name="addr" value="湖北"></property>
</bean> <!-- 定义一系列图书信息 --> <bean id="b1" class="com.mingde.po.Book">
<property name="bid" value="2001"></property>
<property name="bname" value="水浒传"></property>
<property name="author" value="施耐庵" ></property>
<property name="price" value="100" ></property>
</bean>
<bean id="b2" class="com.mingde.po.Book">
<property name="bid" value="2002"></property>
<property name="bname" value="西游记"></property>
<property name="author" value="吴承恩" ></property>
<property name="price" value="20" ></property>
</bean>
<bean id="b3" class="com.mingde.po.Book">
<property name="bid" value="2003"></property>
<property name="bname" value="红楼梦"></property>
<property name="author" value="曹雪芹" ></property>
<property name="price" value="80" ></property>
</bean>
<bean id="b4" class="com.mingde.po.Book" >
<property name="bid" value="2004"></property>
<property name="bname" value="三国演义"></property>
<property name="author" value="罗贯中" ></property>
<property name="price" value="56" ></property>
</bean>
<bean id="second" class="com.mingde.po.ScondBean"> <!-- 为list集合赋值 -->
<property name="st">
<list>
<ref bean="st1"/>
<ref bean="st2"/>
<ref bean="st3"/>
</list>
</property> <!-- 为map集合赋值 -->
<property name="map">
<map>
<entry key="水浒传" value-ref="b1"></entry>
<entry key="西游记" value-ref="b2"></entry>
<entry key="红楼梦" value-ref="b3"></entry>
<entry key="三国演义" value-ref="b4"></entry>
</map>
</property>
</bean>测试类测试
package com.minde.test;

import java.util.Locale;

import org.junit.Before;
import org.junit.Test;
import org.springframework.context.ApplicationContext;
import org.springframework.context.support.ClassPathXmlApplicationContext;

import com.minde.po.FirstBean;
import com.minde.po.SecondBean;

public class TestBean {

	private ApplicationContext ac;
	@Before
	public void setUp() throws Exception {
		ac = new ClassPathXmlApplicationContext("/mybeans3.xml");
	}
		@org.junit.Test
public void tes2() {
ScondBean s=(ScondBean) ac.getBean("second");
System.out.println(s);
}
}通过属性文件读取数据
属性文件:student.properties的内容
配置mybeans.xml文件
<?xml version="1.0" encoding="UTF-8" standalone="no"?>
<beans xmlns="http://www.springframework.org/schema/beans"
		xmlns:xsi="http://www.w3.org/2001/XMLSchema-instance"
		xsi:schemaLocation="http://www.springframework.org/schema/beans
		http://www.springframework.org/schema/beans/spring-beans-4.2.xsd">
<!-- 让系统自动读取指定位置处的属性文件 -->
<bean class="org.springframework.beans.factory.config.PropertyPlaceholderConfigurer">
	<property name="location" value="books.properties"/> <!-- 这里的value指定读取配置文件的位置和文件名 -->
</bean>
<bean id="st1" class="com.mingde.po.Student">
		<property name="sid" value="${st1.sid}"></property>
		<property name="sname" value="${st1.sname}"></property>
		<property name="sex" value="${st1.sex}"></property>
		<property name="addr" value="${st1.addr}"></property>
	</bean>
	<bean id="st2" class="com.mingde.po.Student">
		<property name="sid" value="${st2.sid}"></property>
		<property name="sname" value="${st2.sname}"></property>
		<property name="sex" value="${st2.sex}"></property>
		<property name="addr" value="${st2.addr}"></property>
	</bean>
	<bean id="st3" class="com.mingde.po.Student">
		<property name="sid" value="${st3.sid}"></property>
		<property name="sname" value="${st3.sname}"></property>
		<property name="sex" value="${st3.sex}"></property>
		<property name="addr" value="${st3.addr}"></property>
	</bean>

	<bean id="scond" class="com.mingde.po.ScondBean">
		<property name="st">
			<list>
				<ref bean="st1"/>
				<ref bean="st2"/>
				<ref bean="st3"/>
			</list>
		</property>
	</bean>

</beans>
测试类测试
import org.springframework.context.ApplicationContext;
import org.springframework.context.support.ClassPathXmlApplicationContext;

import com.mingde.po.ScondBean;
import com.mingde.po.Student;
public class Test {


	private ApplicationContext ac;

	@Before
	public void setUp()throws Exception{
		ac=new ClassPathXmlApplicationContext("mybeans3.xml");
	}
	@org.junit.Test
	public void tes3() {
		ScondBean s=(ScondBean) ac.getBean("scond");
		System.out.println(s);
	}
}
国际化

在Spring配置文件中引入国际化文件
<?xml version="1.0" encoding="UTF-8" standalone="no"?>
<beans xmlns="http://www.springframework.org/schema/beans"
		xmlns:xsi="http://www.w3.org/2001/XMLSchema-instance"
		xsi:schemaLocation="http://www.springframework.org/schema/beans
		http://www.springframework.org/schema/beans/spring-beans-4.2.xsd">
	<!-- 配置国际化资源文件的位置 -->
	<bean id="messageSource"
		  class="org.springframework.context.support.ResourceBundleMessageSource">
		<!-- 配置资源文件基本名 -->
		<property name="basename" value="msg"/>
	</bean>
</beans>
测试类测试
//测试国际化
	@Test
	public void test3() {
		//引用中文
		String message =
				ac.getMessage("hello", new Object[]{"张三","Spring"}, Locale.CHINA);
		System.out.println(message);
		//引用英文
		String message2 =
				ac.getMessage("hello", new Object[]{"张三","Spring"}, Locale.US);
		System.out.println(message2);

	}


 716
716

 被折叠的 条评论
为什么被折叠?
被折叠的 条评论
为什么被折叠?
 到【灌水乐园】发言


