


(一)概述
ImageView主要是用来显示图片的控件,可以对图片进行放大、缩小和旋转的功能。
(二)ImageView中src和BackGround属性的区别
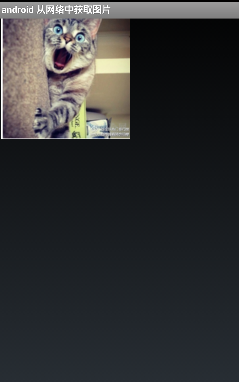
No.1 ——使用程序测试src与background属性的区别:
<?xml version="1.0" encoding="utf-8"?>
<LinearLayout xmlns:android="http://schemas.android.com/apk/res/android"
    android:layout_width="match_parent"
    android:layout_height="match_parent"
    android:orientation="vertical">

    <ImageView
        android:id="@+id/imageView1"
        android:layout_width="wrap_content"
        android:layout_height="wrap_content"
        android:src="@drawable/maomi" />
     <ImageView
        android:id="@+id/imageView2"
        android:layout_width="200dp"
        android:layout_height="wrap_content"
        android:src="@drawable/maomi" />

      <ImageView
        android:id="@+id/imageView3"
        android:layout_width="wrap_content"
        android:layout_height="wrap_content"
        android:background="@drawable/maomi" />


      <ImageView
        android:id="@+id/imageView4"
        android:layout_width="200dp"
        android:layout_height="wrap_content"
        android:background="@drawable/maomi" />

</LinearLayout>
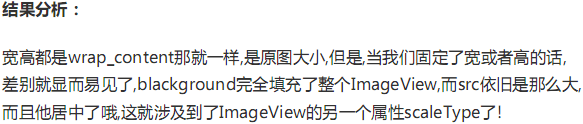
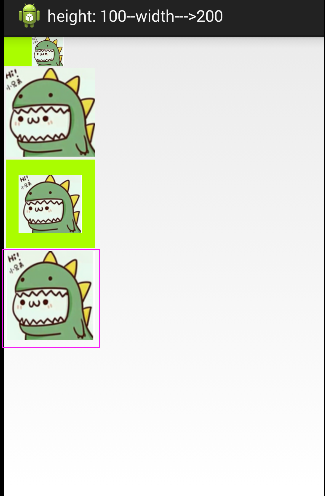
运行效果:
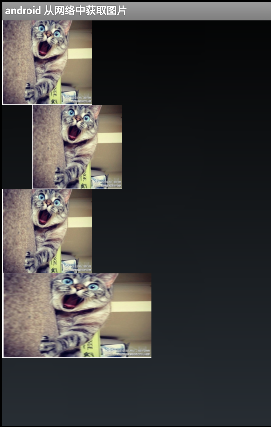
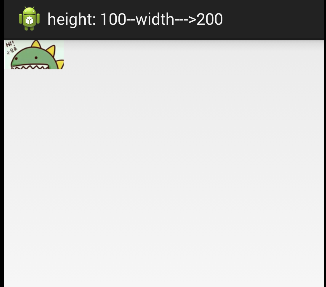
另外还有一点,我们只是设置了width或者height ,假如同时设置二者的值后,background则继续进行填充,而src的大小则可能发生改变!比如,试着运行下面的代码:
这就引出了ImageView的一个重要属性—–scaleType图片缩放的问题,这个问题内容比较多,我们放到后面,先解决下面的问题;
(三)解决blackground拉伸导致图片变形的方法
在前面的第4个效图中我们可以看到图片已经被拉伸变形了,正方形变成了长方形,显然这很不美观,有没有解决办法,有!目前有俩中比较常见的方法:
(1)这个适用于动态加载ImageView的代码也简单,只需要在添加View的时候,把大小写死了就ok了;

(2)

cat.xml
<?xml version="1.0" encoding="utf-8"?>
<bitmap xmlns:android="http://schemas.android.com/apk/res/android" >
        android:id="@id/cat_bg"
        android:gravity="top"
        android:src="@drawable/maomi"
        android:titleMode="disabled"
</bitmap>
动态:ibtnCat.setBackGroundResource(R.drawable.cat);
静态:android:backGround=”@drawable/cat”
(3)设置透明度的问题

(4)src和background结合的妙用
网上一张图:
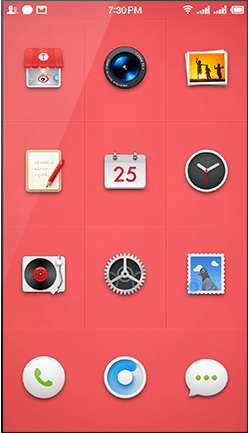
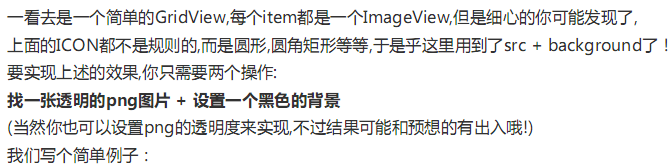
效果图如下:
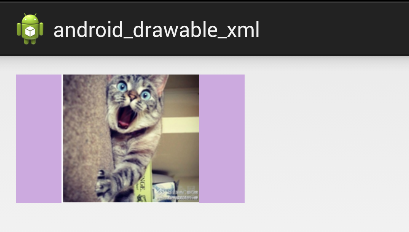
实现代码:
 <ImageView
        android:id="@+id/imageView1"
        android:layout_width="200dp"
        android:layout_height="wrap_content"
        android:src="@drawable/maomi"
        android:background="#CCAADF"/>
(5)代码中设置background和src属性

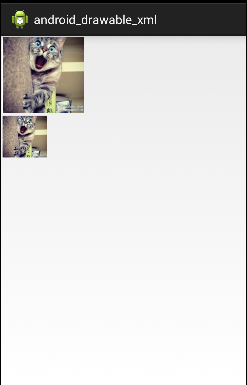
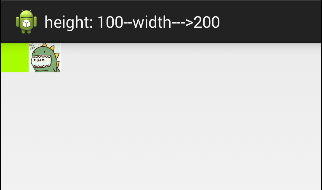
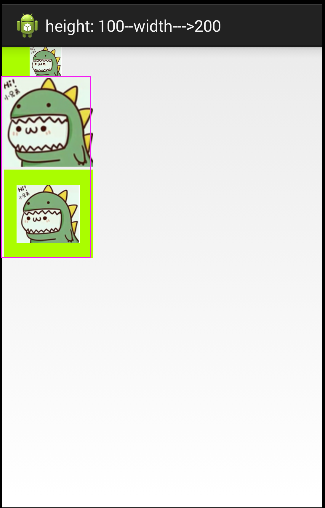
(四)adjustViewBounds设置缩放是否保存原图长宽比
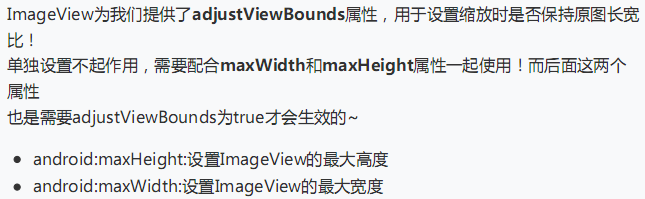
运行效果图:
<LinearLayout xmlns:android="http://schemas.android.com/apk/res/android"
    xmlns:tools="http://schemas.android.com/tools"
    android:layout_width="match_parent"
    android:layout_height="match_parent"
    android:orientation="vertical"
    tools:context="com.example.android_drawable_xml.MainActivity" >

    <!-- 正常的图片 -->

    <ImageView
        android:id="@+id/imageView1"
        android:layout_width="wrap_content"
        android:layout_height="wrap_content"
        android:layout_margin="5px"
        android:src="@drawable/maomi" />

    <!-- 限制了最大宽度和高度,并且设置了调整边界来保持所显示图像的长宽比 -->

    <ImageView
        android:id="@+id/imageView2"
        android:layout_width="wrap_content"
        android:layout_height="wrap_content"
        android:layout_margin="5px"
        android:adjustViewBounds="true"
        android:maxHeight="200px"
        android:maxWidth="200px"
        android:src="@drawable/maomi" />

</LinearLayout>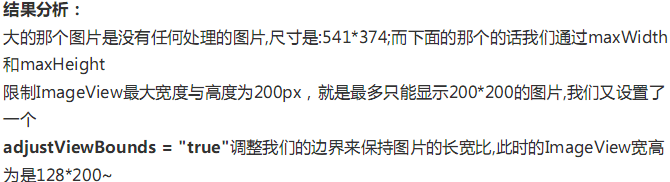
(五)scaleType设置图片的填充方式

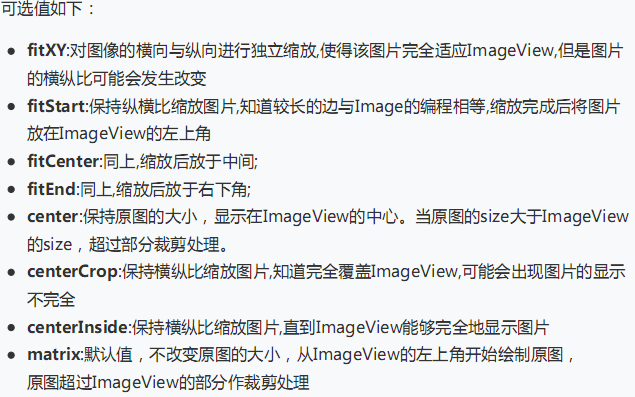
废话不多说~~~一幅图看懂他们几个:
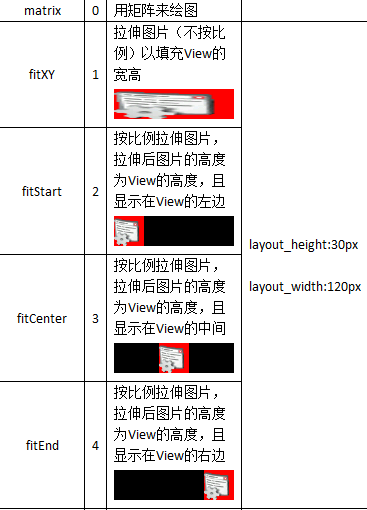
是不是瞬间豁然开朗了~~~下面一个一个做实验;
(1)fitEnd , fitStart , firCenter
这里以firEnd为例,其他俩个类类似:
运行效果:
实现代码:
<?xml version="1.0" encoding="utf-8"?>
<LinearLayout xmlns:android="http://schemas.android.com/apk/res/android"
android:layout_width="match_parent"
android:layout_height="match_parent"
android:orientation="vertical" >
<ImageView
android:id="@+id/imageview"
android:layout_width="300px"
android:layout_height="300px"
android:layout_margin="5px"
android:scaleType="fitEnd"
android:background="#AAFD00"
android:src="@drawable/mengchong" />
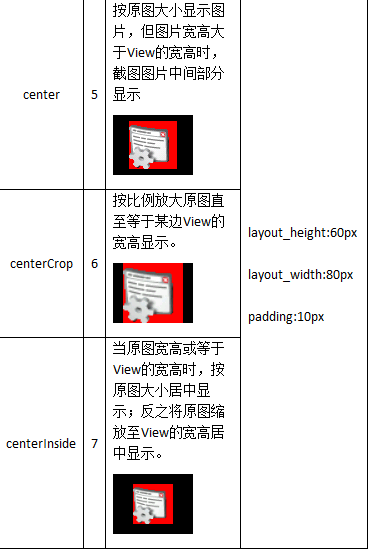
</LinearLayout>(2)centerCrop与centerInside

运行效果:
实现代码:
<ImageView
        android:id="@+id/imageview2"
        android:layout_width="300px"
        android:layout_height="300px"
        android:layout_margin="5px"
        android:scaleType="centerCrop"
        android:background="#AAFD00"
        android:src="@drawable/mengchong" />

      <ImageView
        android:id="@+id/imageview3"
        android:layout_width="300px"
        android:layout_height="300px"
        android:layout_margin="5px"
        android:scaleType="centerInside"
        android:background="#AAFD00"
        android:src="@drawable/mengchong" />
(3)fitXY

运行效果:
实现代码:
  <ImageView
        android:id="@+id/imageview4"
        android:layout_width="300px"
        android:layout_height="300px"
        android:layout_margin="5px"
        android:scaleType="fitXY"
        android:background="#AAFD00"
        android:src="@drawable/mengchong" />
我选择的图片比较小,所以View中X ,Y没有发生改变,若换乘X,Y比较大的图片则一定会发现图片会变“高瘦”或者“矮胖”;
(4)matrix—-相信接触过ImageView绘图的筒子们,一定很熟悉吧;

运行效果图:
实现代码:
    <ImageView
        android:id="@+id/imageview"
        android:layout_width="300px"
        android:layout_height="300px"
        android:layout_margin="5px"
        android:scaleType="matrix"
        android:background="#AAFD00"
        android:src="@drawable/mengchong" />
(5)center

运行效果:
实现代码:
 <ImageView
        android:id="@+id/imageview"
        android:layout_width="100px"
        android:layout_height="100px"
        android:layout_margin="5px"
        android:scaleType="center"
        android:background="#AAFD00"
        android:src="@drawable/meizi" />
完毕~~比较基础的一些内容,下篇我们进入实战应用!


 781
781

 被折叠的 条评论
为什么被折叠?
被折叠的 条评论
为什么被折叠?
 到【灌水乐园】发言


