


声明
- 微信公众号:阿里云开发者:原文地址:https://mp.weixin.qq.com/s/bBZFDx6WwRfTnfQS08Mesg
前言
前言
- 本文讲述在闲鱼同城模块中,针对二手车和租房等业务的商业化需求,设计和实现了一个基于Pipeline模式和幂等性控制的通用框架。
一、业务背景
闲鱼同城模块中有很多不同的业务,例如二手车、租房、本地租等等。
最近我和师兄在完成闲鱼同城的二手车商业化需求,发现租房的商业化需求也同步进行着,在对齐双方的功能时,发现有很多重合部分。
这里简单说明下我们的商业化方案(二手车、租房基本一致),下图为部分视觉稿。
-
买家:限制聊天的卖家数量,给予一定的额度初始值,超过阈值需要付费购买额度继续聊天。
-
卖家:限制发布商品的数量,超过一定额度,需要认证、开通会员解锁上限,针对会员提供一些额外的权益。

这里给出简单的流程,对于二手车和租房,两侧有一些共有的业务流程、也有业务侧特有的流程,如下图。
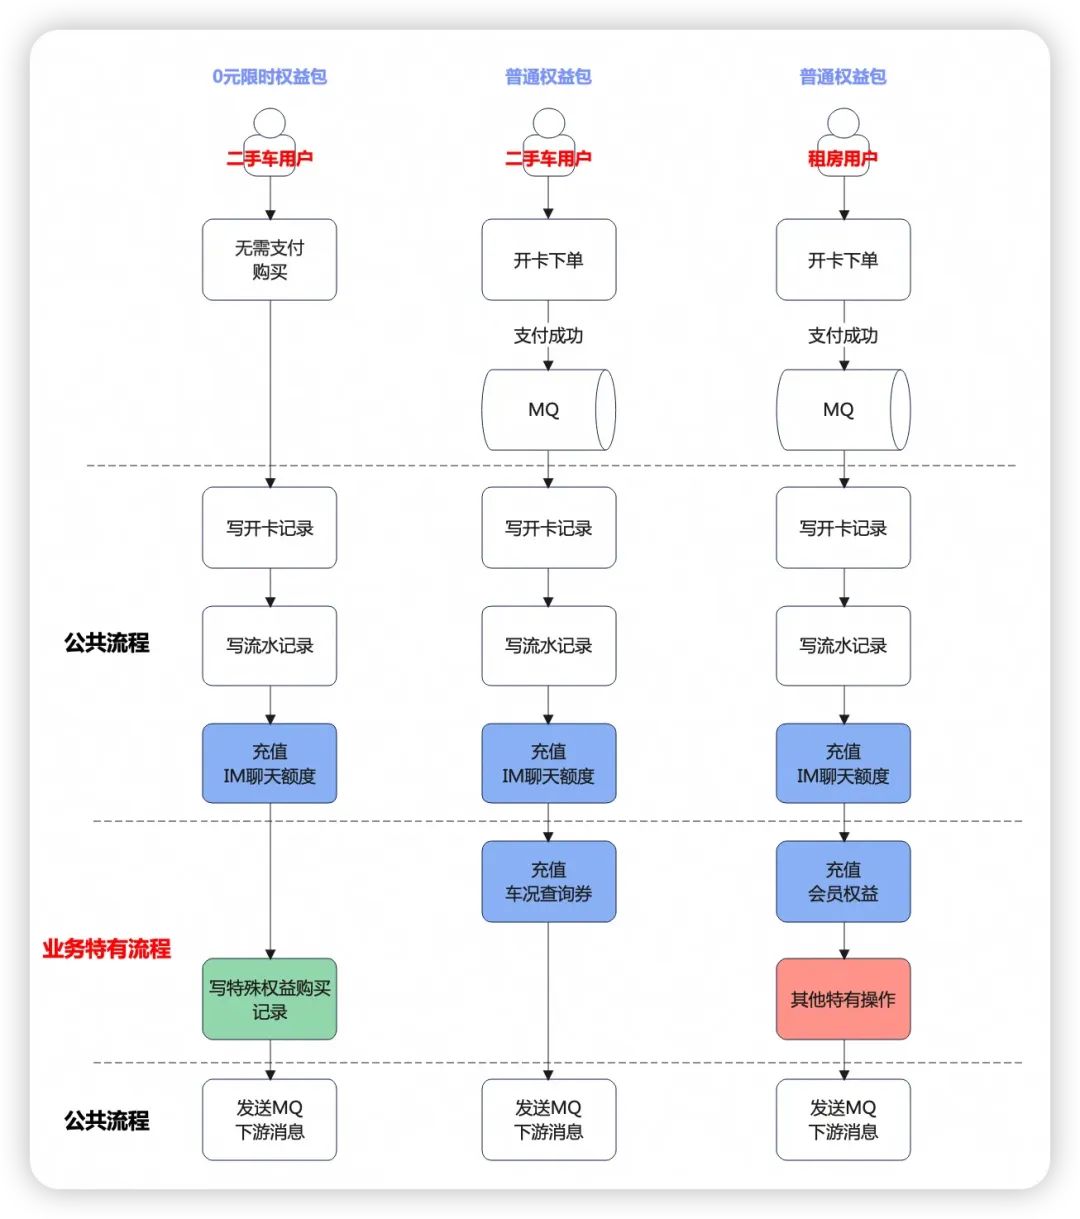
二手车这边除了普通权益包购买流程之外,额外有一个0元限时权益包的购买流程,即是无需用户支付付款的流程,而租房那边暂时没有这个流程。在上图蓝色块中,是双方充值权益的流程,有共有的【IM聊天额度】,也有特有的【会员权益】、【车况查询券】。
二、最初实现
2.1 思路
通过前面的业务背景介绍,很容易想到用模版方法的设计模式来抽象上述流程,给出一个抽象的模版类,拆分上面的执行流程,提供一个工厂类来组合这些方法供业务类去调用。
不同业务在实现时,只需要继承这个抽象类,重写里面的方法即可。
package com.alibaba.idle.service;

import com.alibaba.idle.local.service.IdleUserRightsService;
import lombok.RequiredArgsConstructor;

@RequiredArgsConstructor
public abstract class AbstractUserRightsTemplate {

    private final IdleUserRightsService userRightsService;

    /**
     * 1.前置流程
     */
    public abstract void beforeProcedure();

    /**
     * 2.公共流程
     */
    public void commonProcedure() {
        // 写权益卡
        userRightsService.writeRightsCard();

        // 写流水记录
        userRightsService.writeRightsHistory();

        // 充值IM权益
        userRightsService.rechargeIMRights();
    }

    /**
     * 3.业务特有流程
     */
    public abstract void specialProcedure();

    /**
     * 4.后置流程
     */
    public void afterProcedure() {
        // 发送MQ消息通知下游
        userRightsService.sendMetaQMessage();
    }
}
2.2 问题
模版方法里面的流程固定死了,不易变动和扩展。如果有一个新的业务方来了,不需要充值IM权益时,上述模版就不适用了,且如果其中部分方法执行失败时,无法做到幂等。因此我们需要一个可通用扩展的代码框架,并且保障局部失败重试时的幂等控制。
三、pipeline+幂等的设计与实现
3.1 Pipeline简介
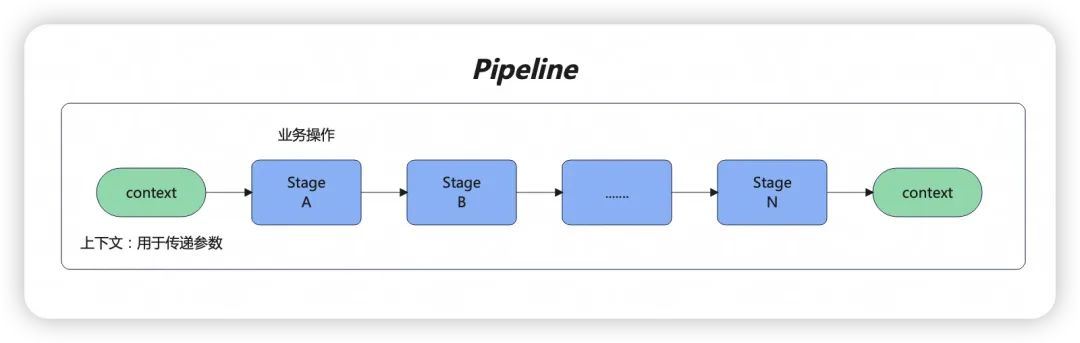
如果改用责任链模式的变体Pipeline来设计,将其中每一个方法视作Pipeline中的一个阶段(Stage),每个Stage都可以选择性的进行幂等控制,那么这样就实现了我们的框架需求。
如下图所示,Pipeline是一个执行链,其中的操作节点可以定义为Stage,还需要额外定一个context用于上下文传递使用。
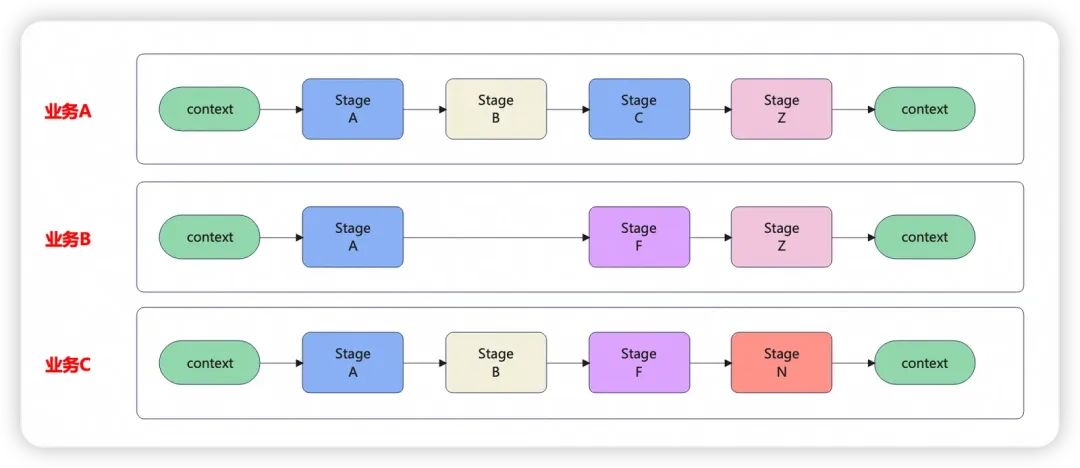
那么,如果有不同的业务时,就可以定义不同的Pipeline执行流程,对于其中共性的Stage方法,可以进行复用,也可以进行业务方特有的扩展。
如下图所示,A、B、C业务都有一个共性的Stage A需要执行,A和C有一个Stage B需要执行,依次类推。这样就可以实现灵活复用的一个框架。
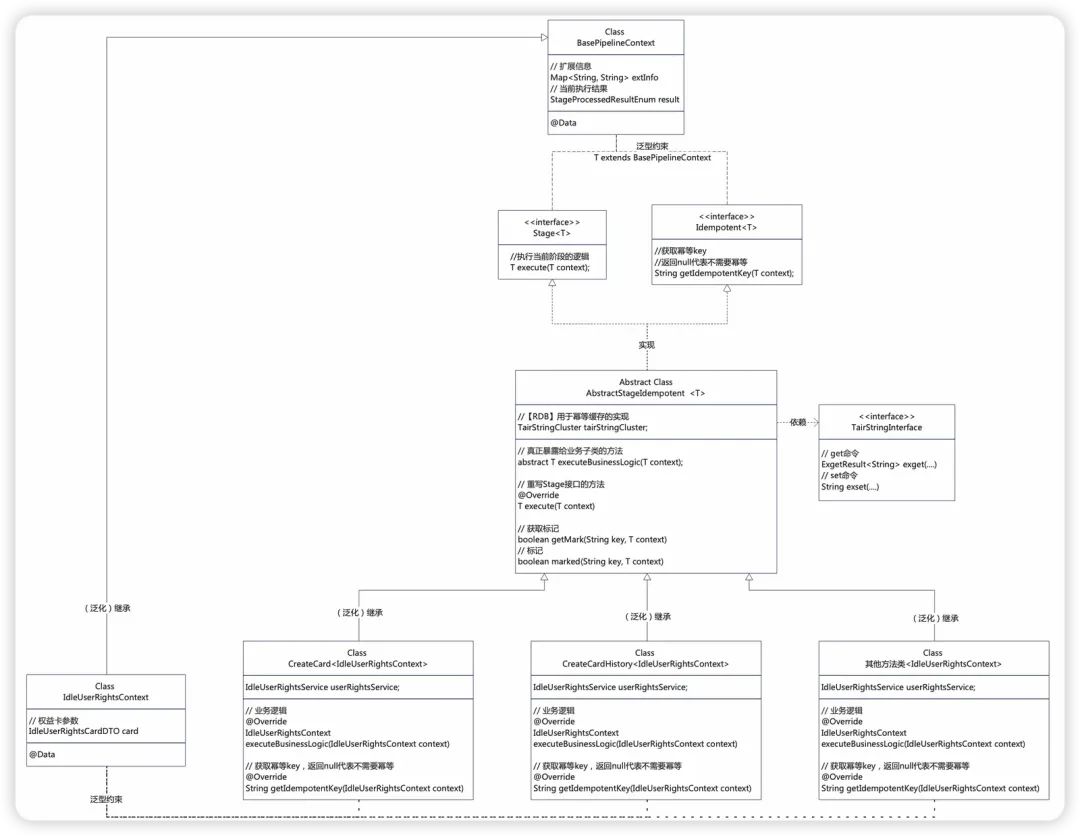
3.2 UML类图说明与代码实现
3.2.1 基本类、接口定义
1.定义上下文BasePipelineContext用于Pipeline中传递参数;
BasePipelineContext
@Data
public class BasePipelineContext implements Serializable {

    /**
     * 扩展信息
     */
    private Map<String, String> extInfo;

    /**
     * 处理结果
     */
    private StageProcessedResultEnum result;

}
2.定义Pipeline中的基本方法类为Stage接口,其中泛型T继承自BasePipelineContext类;
Stage
public interface Stage<T extends BasePipelineContext> {

    /**
     * 执行当前阶段的逻辑
     */
    T execute(T context);

}
3.定义Idempotent接口用于实现幂等操作;
Idempotent
public interface Idempotent<T extends BasePipelineContext> {

    /**
     * 获取幂等key,返回null代表不需要幂等
     * @param context 上下文
     * @return 幂等key
     */
    String getIdempotentKey(T context);
}
4.定义一个抽象的幂等模版类AbstractStageIdempotent,实现Stage、Idempotent接口,用于在Stage方法执行的前后加上幂等的校验,其中幂等的实现依赖于TairStringInterface接口;
AbstractStageIdempotent
@Slf4j
public abstract class AbstractStageIdempotent<T extends BasePipelineContext> implements Stage<T>, Idempotent<T> {
    public static final String APP_NAME = "***";

    /**
     * 【RDB】用于幂等缓存的实现
     */
    @Autowired
    private TairStringInterface tairStringInterface;
    /**
     * 提供一个用于子类处理业务逻辑的入口
     * @param context 上下文
     * @return 执行结果
     */
    protected abstract T executeBusinessLogic(T context);
    @Override
    public T execute(T context)
{
        // 拿到当前执行的Stage名称
        String simpleName = this.getClass().getSimpleName();
        String idempotentKey = getIdempotentKey(context);
        String key = TairKeysConstantsTools.generateKey(CommonCharEnum.MINUS.getValue(), APP_NAME, simpleName, idempotentKey);
        try {
            // 如果已经处理过,则无需执行业务逻辑,直接跳过当前流程
            if (idempotentKey != null && getMark(key, context)) {
                log.info(simpleName + " is already processed, the idempotent key:{}", key);
                return context;
            }
            // 执行业务逻辑
            context = executeBusinessLogic(context);
            // 标记为处理过(仅当业务执行成功时)
            if (idempotentKey != null && context.getResult() != null && context.getResult().isSuccess()) {
                if(!marked(key, context)) {
                    // 执行失败,则抛出异常
                    log.error(simpleName + " marked error, the idempotent key:{}", key);
                    context.setResult(StageProcessedResultEnum.IDEMPOTENT_FAIL);
                }
                log.info(simpleName + " execute success, marked idempotent key:{}", key);
            }
        } catch (Exception e) {
            log.error(simpleName + " execute error, the idempotent key:{}, context:{}", key, e, context);
            context.setResult(StageProcessedResultEnum.IDEMPOTENT_FAIL);
        }
        return context;
    }
    /**
     * 检查是否存在标记值
     * @param key 幂等key
     * @return 是否存在
     */
    private boolean getMark(String key, T context) {
        ExgetResult<String> result = tairStringInterface.exget(key);
        if (result != null && StringUtil.isNotEmpty(result.getValue())) {
            return "1".equals(result);
        }
        return false;
    }
    /**
     * 标记
     * @param key 幂等key
     * @return 标记结果
     */
    private boolean marked(String key, T context) {
        // 带上nx、ex参数
        ExsetParams params = new ExsetParams().nx().ex(SwitchConfigBiz.pipeLineIdempotentExpireTime);
        String reply = tairStringInterface.exset(key, "1", params);
        return "OK".equals(reply);
    }
}
5.定义业务自己的上下文类Context,业务的Stage方法类只需要继承自AbstractStageIdempotent,泛型参数T继承自BasePipelineContext的任何类即可,这里以我们自定义的一个IdleUserRightsContext(继承自BasePipelineContext)为例;
IdleUserRightsContext
@Data
public class IdleUserRightsContext extends BasePipelineContext {

    /**
     * 权益卡
     */
    private IdleUserRightsCardDTO card;

    /**
     * 构建返回结果
     */
    public IdleUserRightsContext ofResult(StageProcessedResultEnum result) {
        super.setResult(result);
        return this;
    }
}
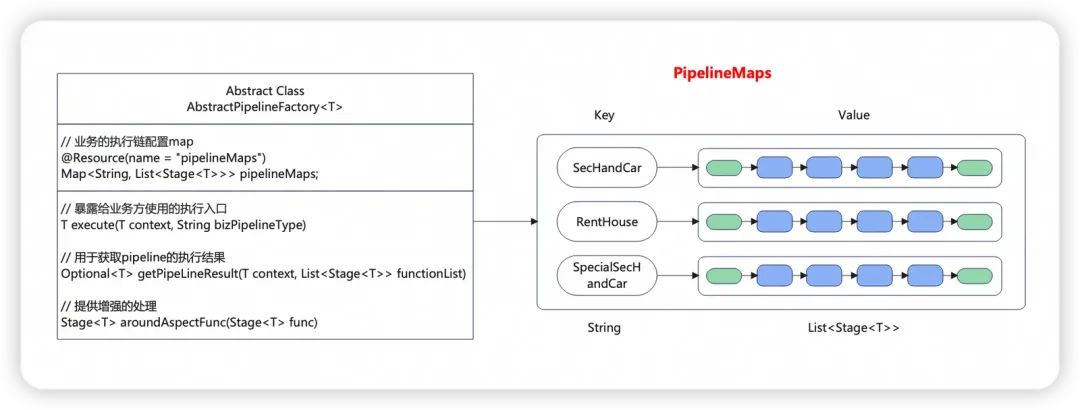
6.定义一个抽象的Pipeline执行工厂,用于暴露给业务方使用,工厂中完成pipeline的执行、前后的日志打印等操作;
AbstractPipelineFactory
@Slf4j
public abstract class AbstractPipelineFactory<T extends BasePipelineContext> {

    @Resource(name = "pipelineMaps")
    private Map<String, List<Stage<T>>> pipelineMaps;

    /**
     * 执行PipeLine策略
     * @return 执行结果
     */
    public T execute(T context, String bizPipelineType) {
        List<Stage<T>> executeChains = pipelineMaps.get(bizPipelineType);
        if(CollectionUtils.isEmpty(executeChains)) {
            log.error("PipelineFactory execute error executeChains is null, bizPipelineType:{}", bizPipelineType);
            return null;
        }

        log.info("PipelineFactory execute, bizPipelineType:{}, executeChains:{}", bizPipelineType, executeChains);
        // aroundAspectFunc()增强下
        List<Stage<T>> enhancedFunctionList = executeChains
                .stream()
                .map(this::aroundAspectFunc)
                .collect(Collectors.toList());

        // 获取执行结果
        return getPipeLineResult(context, enhancedFunctionList).orElse(context);
    }

    /**
     * Pipe执行器
     *
     * @param context      入参,类型I
     * @param functionList pipeLine方法列表,每个函数的输入类型为I,输出类型为O
     * @return 执行结果,类型O
     */
    private Optional<T> getPipeLineResult(T context, List<Stage<T>> functionList) {
        if (CollectionUtils.isEmpty(functionList)) {
            return Optional.empty();
        }

        // 执行每一个stage
        for (Stage<T> f : functionList) {
            if(Objects.isNull(context)) {
                return Optional.empty();
            }

            // 一些特殊ResultEnum处理,例如SKIP_ALL,直接跳过所有的流程,立即结束
            if(context.getResult() != null && context.getResult().equals(StageProcessedResultEnum.SKIP_ALL)) {
                break;
            }

            context = f.execute(context);
        }

        return Optional.ofNullable(context);
    }

    /**
     * Pipe环绕切面,apply -> function
     *
     * @param func 当前方法
     * @return 增强后的新方法
     */
    private Stage<T> aroundAspectFunc(Stage<T> func) {
        return req -> {
            StageConfig annotation = func.getClass().getAnnotation(StageConfig.class);
            String methodName = annotation.name();
            // 用于业务自定义的前置检查逻辑
            if(!preContextCheck(methodName, req)) {
                return null;
            }
            // 正式执行
            T result = func.execute(req);

            // 用于业务自定义的后置通知
            afterResult(methodName, result);
            return result;
        };
    }

    /**
     * 前置通知
     *
     * @param methodName 方法名
     * @param context 上下文
     * @return 是否通过
     */
    protected boolean preContextCheck(String methodName, T context) {
        if(context == null) {
            log.error("PipelineFactory.execute [{}] error, context is null", methodName);
            return false;
        }
        if(context.getResult() != null && !context.getResult().isSuccess()) {
            log.error("UserRightsPipelineFactory.execute [{}] error, pre method is failed with resultEnum:{}", methodName, context.getResult());
            return false;
        }
        log.info("PipelineFactory.execute [{}] start, context:{}", methodName, context);
        return true;
    }

    /**
     * 后置通知
     *
     * @param methodName 方法名
     * @param context 上下文
     */
    protected void afterResult(String methodName,T context) {
        log.info("PipelineFactory.execute [{}] end, context:{}", methodName, context);
    }
}
7.最后实现业务自己的Stage方法类。
CreateCard
@Slf4j
@StageConfig(name = "CreateCard")
@RequiredArgsConstructor
public class CreateCard extends AbstractStageIdempotent<IdleUserRightsContext> {

    private final IdleUserRightsService userRightsService;

    /**
     * 提供一个用于子类处理业务逻辑的入口
     *
     * @param context 上下文
     * @return 执行结果
     */
    @Override
    protected IdleUserRightsContext executeBusinessLogic(IdleUserRightsContext context) {
        IdleUserRightsCardDTO cardDTO = context.getCard();
        // 写权益卡记录
        Long cardId = userRightsService.createCard(cardDTO);
        // 写权益卡id字段,用于下游使用
        cardDTO.setId(cardId);
        return context.ofResult(cardId == null ? StageProcessedResultEnum.WRITE_USER_RIGHTS_RECORD_DB_FAIL : StageProcessedResultEnum.SUCCESS);
    }

    /**
     * 获取幂等key,返回null代表不需要幂等
     *
     * @param context 上下文
     * @return 幂等key
     */
    @Override
    public String getIdempotentKey(IdleUserRightsContext context) {
        IdleUserRightsCardDTO card = context.getCard();
        // 幂等key:idle-local-CreateCard-{bizCode}-{userId}-{ppPayId}
        return card.getIdempotentKey() != null ? card.getIdempotentKey() : TairKeysConstantsTools.generateKey(CommonCharEnum.MINUS.getValue(), String.valueOf(card.getUserId()), card.getBizCode(), card.getTemplateCode());
    }
}
CreateCardHistory
@Slf4j
@StageConfig(name = "CreateCardHistory")
@RequiredArgsConstructor
public class CreateCardHistory extends AbstractStageIdempotent<IdleUserRightsContext> {

    private final IdleUserRightsService userRightsService;

    private final IdleIMLimitQuotaDataService quotaDataService;

    /**
     * 提供一个用于子类处理业务逻辑的入口
     *
     * @param context 上下文
     * @return 执行结果
     */
    @Override
    protected IdleUserRightsContext executeBusinessLogic(IdleUserRightsContext context) {
        IdleUserRightsCardDTO card = context.getCard();
        IdleUserRightsCardHistoryDTO historyDTO = userRightsService.buildHistory(card);
        historyDTO.setPaidCntLeft(paidCntLeft + historyDTO.getCount());
        Long historyId = userRightsService.createHistory(historyDTO);
        return context.ofResult(historyId == null ? StageProcessedResultEnum.WRITE_USER_RIGHTS_FLOW_DB_FAIL : StageProcessedResultEnum.SUCCESS);
    }

    /**
     * 获取幂等key,返回null代表不需要幂等
     *
     * @param context 上下文
     * @return 幂等key
     */
    @Override
    public String getIdempotentKey(IdleUserRightsContext context) {
        IdleUserRightsCardDTO card = context.getCard();
        // 幂等key:idle-local-CreateCardHistory-{bizCode}-{userId}-{cardId}
        return card.getIdempotentKey() != null ? card.getIdempotentKey() : TairKeysConstantsTools.generateKey(CommonCharEnum.MINUS.getValue(), String.valueOf(card.getUserId()), String.valueOf(card.getId()));
    }
}
这里用了自定义注解来标记下每个Stage方法类,用于扫描加入进Spring的Bean容器里面,其他Stage类似上面2个即可。
StageConfig
@Target(ElementType.TYPE)
@Retention(RetentionPolicy.RUNTIME)
@Documented
@Component
public @interface StageConfig {
    String name();
}
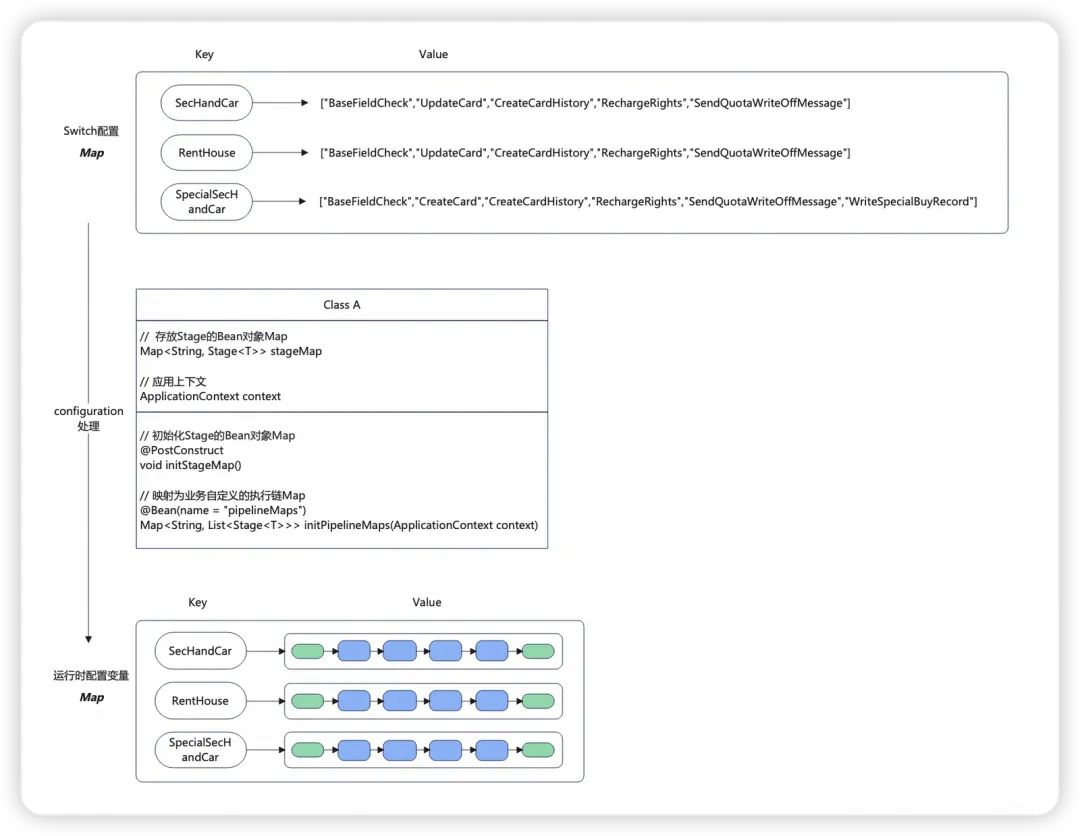
3.2.2 配置类
在上述图,还需要一个配置类来实现动态编排pipeline。
上面使用了自定义注解来标记每个Stage方法类,因此在运行时可以由Spring上下文扫描所有的注解类,加载为Bean对象,并放入Map中,然后进行配置的处理。这里以Switch上配置的Map为例子,配置类的作用主要是完成下图中Value值的处理,由配置的方法String[ ]转为List类型的执行链。
代码实现
PipelineConfiguration
@Configuration
public class PipelineConfiguration<T extends BasePipelineContext> {

    /**
     * key:StageConfig注解中的name
     * value:实现了Stage接口的实例Bean
     */
    private final Map<String, Stage<T>> stageMap = new ConcurrentHashMap<>();

    @Autowired
    private ApplicationContext context;

    /**
     * 在构造方法后执行,确保所有依赖注入完,初始化pipeline的Map
     */
    @PostConstruct
    private void initStageMap() {
        // 拿到带有@StageConfig注解的所有bean
        Map<String, Object> beansWithAnnotation = context.getBeansWithAnnotation(StageConfig.class);

        // 遍历带有StageConfig注解的所有实例bean
        for (Object bean : beansWithAnnotation.values()) {
            if (bean instanceof Stage) {
                // 拿到注解
                StageConfig annotation = bean.getClass().getAnnotation(StageConfig.class);
                // 放入Map
                stageMap.put(annotation.name(), (Stage<T>) bean);
            }
        }
    }

    /**
     * 初始化pipeline的Map
     * key:不同业务的pipeline类型标识,见枚举:com.alibaba.idle.local.common.constants.UserRightsBizCodeEnum
     * value:当前业务配置的执行链
     */
    @Bean(name = "pipelineMaps")
    public Map<String, List<Stage<T>>> initPipelineMaps(ApplicationContext applicationContext) {
        Map<String, List<Stage<T>>> pipelines = new ConcurrentHashMap<>();
        // 不同业务的pipeline执行链配置
        Map<String, List<String>> pipeLineBizExecuteChain = SwitchConfigBiz.pipeLineBizExecuteChain;
        // 填充进去
        for (String bizIdentify : pipeLineBizExecuteChain.keySet()) {
            // 执行链BeanName列表
            List<String> executeChainBeanNameList = pipeLineBizExecuteChain.get(bizIdentify);
            // 映射到对应的bean上
            List<Stage<T>> executeChains = executeChainBeanNameList.stream()
                    .map(stageMap::get)
                    .collect(Collectors.toList());
            pipelines.put(bizIdentify, executeChains);
        }
        return pipelines;
    }
}
3.3 使用
实际使用时,需要把业务流程中每一个操作或方法都写成一个Stage实现类,然后定义下执行链。
pipeLineBizExecuteChainConfig
@AppSwitch(des = "pipeline中不同业务的执行链路配置", level = Level.p2)
public static Map<String, List<String>> pipeLineBizExecuteChainConfig = new HashMap<String, List<String>>() {{
        put("IMLConsumeQuotaPipeline", Lists.newArrayList(
                // 创建权益卡
                "CreateCard"
                // 创建流水记录
                "CreateCardHistory",
                // ......
                "其他操作"
      ));
      ...其他不同的pipeline配置
}};
其次需要继承下AbstractPipelineFactory工厂,这里可以不用写其他代码了,只需替换掉其中的泛型约束即可。
IdleIMLPipelineFactory
@Component
public class IdleIMLPipelineFactory extends AbstractPipelineFactory<IdleIMLContext> {
}
在业务使用的地方,以属性注入的方式使用即可。
IdleIMLimitWriteService
@RequiredArgsConstructor
@Slf4j
public class IdleIMLimitWriteServiceImpl implements IdleIMLimitWriteService {
  private final IdleIMLPipelineFactory idleIMLPipelineFactory;

    @Override
    public IdleResult<Boolean> consumeQuota(String bizCode, Long userId, Long oppositeUserId, String messageId, Long itemId, Long sessionId) {

        IdleIMLContext context = new IdleIMLContext();
        context.setNow(lock.getLocalDateTime());
        context.setBizCode(UserRightsBizCodeEnum.map(bizCode));
        context.setUserId(userId);
        context.setOppositeUserId(oppositeUserId);
        context.setMessageId(messageId);
        context.setItemId(itemId);
        context.setSessionId(sessionId);

        log.info("IdleIMLimitWriteServiceImpl.consumeQuota start, context:{}", context);
        context = idleIMLPipelineFactory.execute(context, "IMLConsumeQuotaPipeline");
        log.info("IdleIMLimitWriteServiceImpl.consumeQuota end, context:{}, result:{}", context, context.getResult());

        return IdleResult.success(context.getResult().isSuccess());
    }
}
3.4 总结
最后给出总的执行流程顺序图:
1.通过一个IdleIMLPipelineFactory执行工厂来提供对业务的访问入口;
2.通过配置的PipelineMaps来选择对应的执行链;
3.通过对每个Stage进行前置、后置增强来打一些日志、当前执行结果判断等操作;
4.通过在业务执行方法前加上幂等校验的方法来实现部分Stage失败时的重试;
5.暴露一个executeBusinessLogic方法用于业务操作的实现;

使用到的设计模式:
1.pipeline(责任链模式的变体);
2.模版方法模式(体现在抽象幂等类的定义上,定义了一套模版);
3.装饰器模式(侧重于前后增强的日志打印等操作);
4.代理模式(侧重于幂等的实现,代理了Stage对象,进行了前后幂等处理);
5.策略模式(充值策略时,定义了一个策略接口,给出了多个策略实现类,充值时,根据业务方传入的类型,自动匹配对应的策略进行充值);
6.工厂方法模式(体现在pipeline执行工厂上);
四、不足和展望
1.幂等。上述实现的幂等过程中,强依赖于Tair的Redis接口来实现幂等,如果Redis不可用,会导致幂等失效,pipeline执行不断失败重试。且业务方法执行成功后,如果写Redis失败,那么下次重试时,业务方法会被反复执行,导致幂等失效。后续可以考虑使用其他方式来实现幂等,不过代码复杂度会有所提升。
2.pipeline执行流程目前不支持并行操作,一些业务操作可以并行处理的话(需要保障context不会被脏写),可以提高整体的执行效率。
五、结语
感谢各位大佬在这个需求中对我的指导和帮助,让我作为一个新人能够快速参与一个大需求的开发,并且针对其中的细节,师姐师兄都给予了很多改进性建议,让我学会了很多设计思想和技术知识。


 2926
2926

 被折叠的 条评论
为什么被折叠?
被折叠的 条评论
为什么被折叠?
 到【灌水乐园】发言


