


 本文介绍了ESP32-C6系列芯片如何通过UART接口(默认U0TXDGPIO16和U0RXDGPIO17)下载固件,包括Windows和Ubuntu环境下的操作步骤,以及进入下载模式和启动条件的要求。还提供了电源序列、硬件设计和故障排查指南。
ESP32-C6 downloads firmware via
U0TXD(GPIO16)andU0RXD(GPIO17)by default. Please refer to the ESP32-C6 Datasheet
-
On the Windows environment, you can use the Flash download tool to download the firmware (The bin file).

-
Run
flash_download_tool.exe

-
Choose
ChipTypeasESP32-C6,LoadModeasUART, then pressOK.

- Click to select the
.binfile to be flashed. - Enter the download address offset for the firmware to be flashed.
- Choose the COM port to which the development board is connected.
- Click “Start” at the bottom-left corner to begin the flashing process.
-
The green progress bar below will show the flashing progress, and it will be fully loaded when flashing is complete.

-
On the Ubuntu environment, you can use the esptool to download the firmware (The bin file). For example:
esptool.py -p /dev/ttyUSB0 write_flash 0x0 bootloader.bin 0x8000 partition-table.bin 0x10000 ssc.bin
esptool command instructions can be found in the “Esptool.py Documentation”
1、The following pins level requirements must be met when the ESP32-C6 series chips need enter the download mode:
VDD -> 3V3 (The Power Supply)
GND -> GND ("Common ground" with power supply)
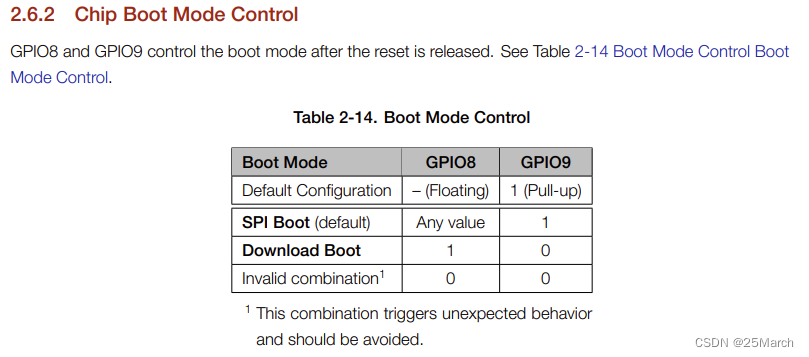
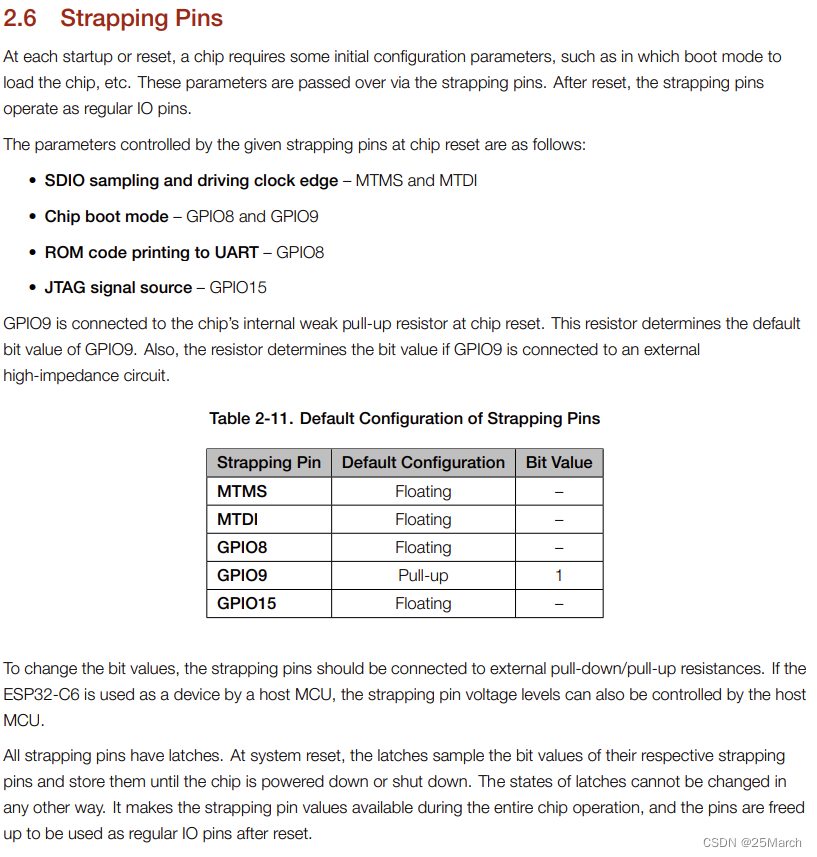
GPIO8 -> pull up (default floating)
GPIO9 -> pull down (default pull up)
EN -> pull up (Enables the Chip, Do not leave the `EN` pin floating)
TXD0 -> RX
RXD0 -> TX
After ensuring the correct wiring connections, you can proceed with the firmware programming
Note:
- The strapping combination of
GPIO8 = 0andGPIO9 = 0is invalid and will trigger unexpected behavior.- After powering up the chip/module, you can verify whether it has entered
Download Bootmode by using theUART0serial port.
- Please refer to the ESP32-C6 about “2.6.2 Chip Boot Mode Control” instructions.
- Please refer to the 《ESP32-C6 Datasheet》 about
"2.4 Strapping Pins"instructions
2、The following hardware conditions must be met for the ESP32-C6 chip to start:
-
The ESP32-C6 chip working voltage range is
3.0 V ~ 3.6 V;if you use a single power supply, the recommended voltage of the power supply for ESP32-C6 family is3.3 V, and its recommended output current is500 mAor more. -
When using ESP32-C6 series Chips, you need require an external
40 MHzcrystal oscillator for chip startup. If using the ESP32-C6 series modules , there is no longer need to external starting crystal oscillator. The hardware working conditions of ESP32-C6 chip can refer to the《ESP32-C6-WROOM-I》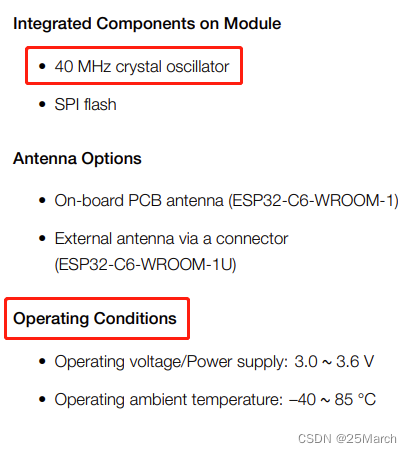
-
For more hardware design details, please refer to the 《ESP32-C6 Series Hardware Design Guidelines》.
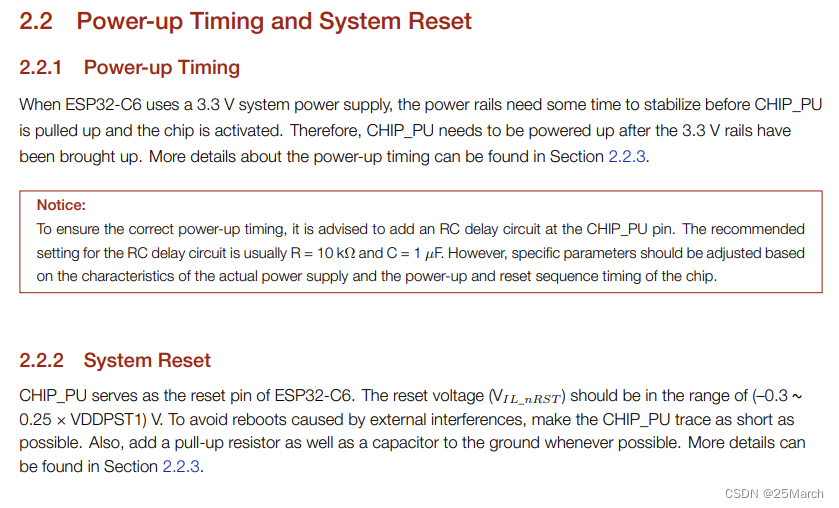
3、Poweron Sequence:
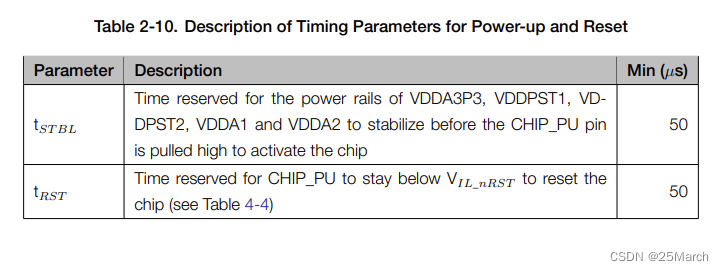
- The
Chip_ENpin can be enabled only after the power supply reaches50 usafter2.8 V. So whenVDDreaches2.8V, the voltage atENmust not exceed0.7V. Please refer to the ESP32-C6 Datasheet about"2.5.3 Power Scheme"
>
- For hardware design reference on
"Power-up Timing and System Reset", please refer to the 《ESP32-C6 Hardware Design Guidelines》

4、If the download fails, Please refer to the following methods for troubleshooting:
-
After the serial port tool is powered on, please pull down the
Chip_ENpin and reset it , the serial port will print logs. If print the “waiting for Download” logs , it proves that the chip is in download mode.ESP-ROM:esp32c6-20200918 Build:Sep 18 2020 rst:0x1 (POWERON),boot:0x4 (DOWNLOAD(USB/UART0/1)) waiting for download -
After entering the download mode, if the COM port is in waiting for Power-on synchronization state on the “Flash Download Tool” , please check whether the COM port is correctly selected or occupied. And whether the UART0 download interface is correctly connected.

Note:
- If you want to use ESP32-C6 module to design hardware automatic download circuit, please refer to the ESP32-C6-DevKitC-1 Schematics Diagram
- For more hardware design references , please refer to the 《ESP32-C6 Hardware Design Guidelines》
- If your computer environment does not recognize ESP32-C6 devices, Please refer to the Establish Serial Connection with ESP32-C6" guide


 1530
1530

 被折叠的 条评论
为什么被折叠?
被折叠的 条评论
为什么被折叠?
 到【灌水乐园】发言


