


ElasticSearch
#官网地址:https://www.elastic.co/cn/
# ElasticSearch7.6入门学习笔记
https://www.kuangstudy.com/bbs/1354069127022583809
- 所有的版本均为8.2.3
安装elasticsearch
jdk1.8以上,
下载地址:https://www.elastic.co/cn/downloads/
历史版本下载:https://www.elastic.co/cn/downloads/past-releases/
解压即可(尽量将ElasticSearch相关工具放在统一目录下)
访问地址: localhost:9200
问题: Elasticsearch报错:received plaintext http traffic on an https channel, closing connection Netty4HttpChannel。
原因是Elasticsearch在Windows下开启了安全认证,虽然started成功,但访问http://localhost:9200/失败。
找到config/目录下面的elasticsearch.yml配置文件,把安全认证开关从原先的true都改成false,实现免密登录访问即可,修改这两处都为false后:

解决跨域问题
#elasticsearch.yml 添加以下配置
# 开启跨域
http.cors.enabled: true
# 所有人访问
http.cors.allow-origin: "*"`
# 允许 elasticsearch-head 访问
http.cors.allow-headers: Authorization,X-Requested-With,Content-Type,Content-Length
linux下启动:
1.创建新用户  useradd elastic
2.输入 su elastic 登录elastic用户
3.进入elasticsearch bin 目录,输入 ./elasticsearch 启动elastic  -d 表示后台启动
`启动失败,权限不足`:切换到root账号下,添加权限,chown elastic elasticsearch -R
添加账号密码:
1.修改es的配置文件:elasticsearch.yml,添加如下配置
		xpack.security.enabled: true
		xpack.license.self_generated.type: basic
		xpack.security.transport.ssl.enabled: true
2.es的bin目录下,执行设置用户名和密码的命令
		./elasticsearch-setup-passwords interactive
	发现会报错,使用elasticsearch-reset-password 重置密码
		./bin/elasticsearch-reset-password -u elastic -i
	    -u表示需要修改的用户名
		-i 表示交互式,可以自己指定密码,默认的是系统自动分配。
	输入密码即可
[外链图片转存失败,源站可能有防盗链机制,建议将图片保存下来直接上传(img-RYhvxZny-1667804597636)(C:\Users\DELL\AppData\Roaming\Typora\typora-user-images\1661326353488.png)]
安装可视化界面
elasticsearch-head 需要提前安装nodejs
-
下载地址
https://github.com/mobz/elasticsearch-head
-
解压即可(尽量将ElasticSearch相关工具放在统一目录下)
-
启动
cd elasticsearch-head
# 安装依赖
npm install
# 启动
npm run start
# 访问
http://localhost:9100/
# elasticsearch 带密码
http://localhost:9100/?auth_user=账号&auth_password=密码
## **安装kibana**
1. `下载的版本需要与ElasticSearch版本对应 !`
https://www.elastic.co/cn/downloads/
历史版本下载:https://www.elastic.co/cn/downloads/past-releases/
解压即可使用
2. 解压即可(尽量将ElasticSearch相关工具放在统一目录下)
3. 启动
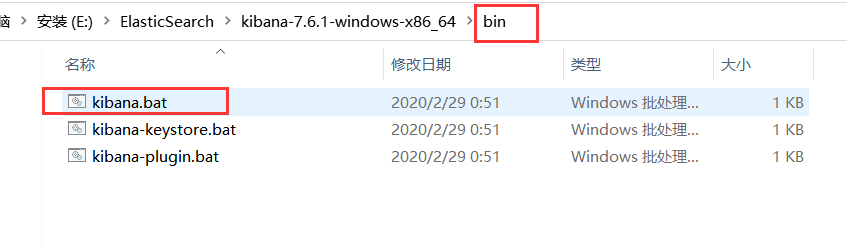
4. 默认访问地址`localhost:5601`
5. kibana 汉化
编辑器打开`kibana解压目录/config/kibana.yml`,添加
`i18n.locale: "zh-CN"`
6. 找到控制台->开发工具
==internal server error== 打开浏览器访问kibana[可视化](https://so.csdn.net/so/search?q=可视化&spm=1001.2101.3001.7020)面板时却报如下错误:
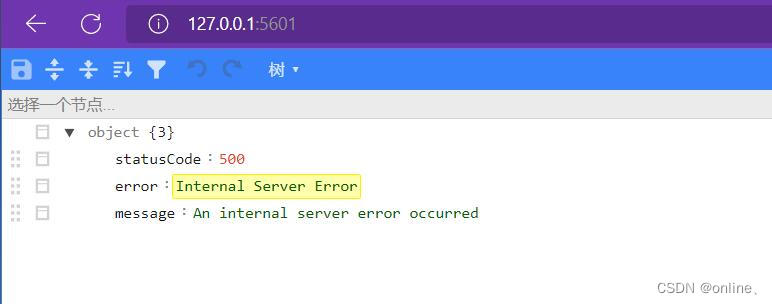
kibana.yml 配置文件中的server.name前面的注释去掉,这里主机名可以任意修改,重启kibana,打开浏览器成功访问

==访问不了kibana问题==:https://www.cnblogs.com/simendavid/p/15606122.html
* kibana 添加elasticsearch 账号密码
修改kibana的配置kibana.yml:
elasticsearch.username:“dudu”
elasticsearch.password:“dudu711”
## 安装Logstash

**Logstash是一个开源数据收集引擎,具有实时管道功能。Logstash可以动态地将来自不同数据源的数据统一起来,并将数据标准化到你所选择的目的地**

**同步方式:**

**1. 主键的新增方式**

**2.  update_time方式( 这里使用update_time方式,需要数据库有这种更新字段)**

1. 下载与es相同版本的**Logstash**

  https://www.elastic.co/cn/downloads/logstash

2. 解压,并进入目录,创建 jdbc 文件夹

3. 创建mysql.conf 文件
经纬度字段映射
-
新建索引 = type名称
PUT 索引名
{
“mappings”: {
“properties”: {
“location”: {
“type”: “geo_point”
}
}
}
}
2.logstash 脚本添加
filter {
mutate {
# 转换经纬度坐标的字段类型
convert => { “HISTLNG” => “float” }
convert => { “HISTLAT” => “float” }
}mutate { rename => { # 这里要注意一下 一定要lat在前 lon在后,因为es geo_point的格式就是[lat,lon] "lat" => "[location][HISTLAT]" "lon" => "[location][HISTLNG]" } }}
上边脚本中filter模块的第二个mutate中的rename中的配置;这个一定要lat在前,lon在后
* 单表同步配置
input {
stdin {}
jdbc {
type => “jdbc”
# 数据库连接地址
jdbc_connection_string => “jdbc:mysql://192.168.1.1:3306/TestDB?characterEncoding=UTF-8&autoReconnect=true&serverTimezone=UTC”
# 数据库连接账号密码;
jdbc_user => “username”
jdbc_password => “pwd”
# MySQL依赖包路径;
jdbc_driver_library => “mysql/mysql-connector-java-5.1.34.jar”
# the name of the driver class for mysql
jdbc_driver_class => “com.mysql.jdbc.Driver”
# 数据库重连尝试次数
connection_retry_attempts => “3”
# 判断数据库连接是否可用,默认false不开启
jdbc_validate_connection => “true”
# 数据库连接可用校验超时时间,默认3600S
jdbc_validation_timeout => “3600”
# 开启分页查询(默认false不开启);
jdbc_paging_enabled => “true”
# 单次分页查询条数(默认100000,若字段较多且更新频率较高,建议调低此值);
jdbc_page_size => “500”
# statement为查询数据sql,如果sql较复杂,建议配通过statement_filepath配置sql文件的存放路径;
# sql_last_value为内置的变量,存放上次查询结果中最后一条数据tracking_column的值,此处即为ModifyTime;
# statement_filepath => “mysql/jdbc.sql”
statement => “SELECT KeyId,TradeTime,OrderUserName,ModifyTime FROM DetailTab WHERE ModifyTime>= :sql_last_value order by ModifyTime asc”
# 是否将字段名转换为小写,默认true(如果有数据序列化、反序列化需求,建议改为false);
lowercase_column_names => false
# Value can be any of: fatal,error,warn,info,debug,默认info;
sql_log_level => warn
#
# 是否记录上次执行结果,true表示会将上次执行结果的tracking_column字段的值保存到last_run_metadata_path指定的文件中;
record_last_run => true
# 需要记录查询结果某字段的值时,此字段为true,否则默认tracking_column为timestamp的值;
use_column_value => true
# 需要记录的字段,用于增量同步,需是数据库字段
tracking_column => “ModifyTime”
# Value can be any of: numeric,timestamp,Default value is “numeric”
tracking_column_type => timestamp
# record_last_run上次数据存放位置;
last_run_metadata_path => “mysql/last_id.txt”
# 是否清除last_run_metadata_path的记录,需要增量同步时此字段必须为false;
clean_run => false
#
# 同步频率(分 时 天 月 年),默认每分钟同步一次;
schedule => “* * * * *”
}
}
filter {
json {
source => “message”
remove_field => [“message”]
}
# convert 字段类型转换,将字段TotalMoney数据类型改为float;
mutate {
convert => {
“TotalMoney” => “float”
}
}
}
output {
elasticsearch {
# host => “192.168.1.1”
# port => “9200”
# 配置ES集群地址
hosts => [“192.168.1.1:9200”, “192.168.1.2:9200”, “192.168.1.3:9200”]
# 索引名字,必须小写
index => “consumption”
# 数据唯一索引(建议使用数据库KeyID)
document_id => “%{KeyId}”
}
stdout {
codec => json_lines
}
}
* 多表同步配置

==多表配置和单表配置的区别在于input模块的jdbc模块有几个type,output模块就需对应有几个type==
input {
stdin {}
jdbc {
# 多表同步时,表类型区分,建议命名为“库名_表名”,每个jdbc模块需对应一个type;
type => “TestDB_DetailTab”
	 # 其他配置此处省略,参考单表配置
	 # ...
	 # ...
	 # record_last_run上次数据存放位置;
	last_run_metadata_path => "mysql\last_id.txt"
	 # 是否清除last_run_metadata_path的记录,需要增量同步时此字段必须为false;
	clean_run => false
	 #
	 # 同步频率(分 时 天 月 年),默认每分钟同步一次;
	schedule => "* * * * *"
}
jdbc {
	 # 多表同步时,表类型区分,建议命名为“库名_表名”,每个jdbc模块需对应一个type;
	type => "TestDB_Tab2"
	# 多表同步时,last_run_metadata_path配置的路径应不一致,避免有影响;
	 # 其他配置此处省略
	 # ...
	 # ...
}
}
filter {
json {
source => “message”
remove_field => [“message”]
}
}
output {
# output模块的type需和jdbc模块的type一致
if [type] == “TestDB_DetailTab” {
elasticsearch {
# host => “192.168.1.1”
# port => “9200”
# 配置ES集群地址
hosts => [“192.168.1.1:9200”, “192.168.1.2:9200”, “192.168.1.3:9200”]
# 索引名字,必须小写
index => “detailtab1”
# 数据唯一索引(建议使用数据库KeyID)
document_id => “%{KeyId}”
}
}
if [type] == “TestDB_Tab2” {
elasticsearch {
# host => “192.168.1.1”
# port => “9200”
# 配置ES集群地址
hosts => [“192.168.1.1:9200”, “192.168.1.2:9200”, “192.168.1.3:9200”]
# 索引名字,必须小写
index => “detailtab2”
# 数据唯一索引(建议使用数据库KeyID)
document_id => “%{KeyId}”
}
}
stdout {
codec => json_lines
}
}
4. 启动
cd /bin
【windows】logstash.bat -f ./jdbc/mysql.conf
【linux】nohup ./bin/logstash -f mysql/jdbc_jx_moretable.conf &
## IK分词器(elasticsearch插件)
分词:即把一段中文或者别的划分成一个个的关键字,我们在搜索时候会把自己的信息进行分词,会把数据库中或者索引库中的数据进行分词,然后进行一一个匹配操作,**默认的中文分词是将每个字看成一个词**
**IK提供了两个分词算法**: `ik_smart`和`ik_max_word` ,其中`ik_smart`为**最少切分**, `ik_max_word`为**最细粒度划分**!
1.下载
`版本要与ElasticSearch版本对应`
下载地址:https://github.com/medcl/elasticsearch-analysis-ik/releases
2.安装
下载后解压到 ElasticSearch的plugins目录ik文件夹下 (需自己创建ik文件夹)
3.重启ElasticSearch

4.添加自定义的词语到扩展文件中
elasticsearch目录/plugins/ik/config/IKAnalyzer.cfg.xml
[外链图片转存失败,源站可能有防盗链机制,建议将图片保存下来直接上传(img-9lh9UOKq-1667804597640)(C:\Users\DELL\AppData\Roaming\Typora\typora-user-images\1661241032286.png)]

[外链图片转存失败,源站可能有防盗链机制,建议将图片保存下来直接上传(img-cLNhYcH4-1667804597641)(C:\Users\DELL\AppData\Roaming\Typora\typora-user-images\1661241056137.png)]

[外链图片转存失败,源站可能有防盗链机制,建议将图片保存下来直接上传(img-qmiT6naX-1667804597641)(C:\Users\DELL\AppData\Roaming\Typora\typora-user-images\1661241099868.png)]

## 语法

`官网地址:https://www.elastic.co/guide/en/elasticsearch/client/java-api-client/8.2/installation.html`

### 索引操作

1. 注入ElasticsearchClient

   ```shell
   	// 创建一个客户端
       @Bean
       public ElasticsearchClient elasticsearchClient() {
           // Create the low-level client
           RestClient restClient = RestClient.builder(
                   new HttpHost("localhost", 9200)).build();
   		// Create the transport with a Jackson mapper
           ElasticsearchTransport transport = new RestClientTransport(
                   restClient, new JacksonJsonpMapper());
   		// And create the API client
           ElasticsearchClient client = new ElasticsearchClient(transport);
           return client;
       }
-
添加索引(index)
client.indices().create(c -> c.index("索引名称")); -
查询索引
client.indices().get(i -> i.index(INDEX_NAME)); -
判断索引 是否存在
client.indices().exists(e -> e.index(INDEX_NAME)); 返回boolean值 -
删除索引
client.indices().delete(d -> d.index(INDEX_NAME));
文档操作(document):
-
插入文档
client.index(i -> i .index(EsIndexService.INDEX_NAME) //设置id .id(test.getId().toString()) .document(object)); index: 需要操作的索引库 object: 文档对象 -
更新文档
client.update(u -> u .index(EsIndexService.INDEX_NAME) .id(test.getId().toString()) .doc(object) -
判断文档是否存在
client.exists(e -> e.index(EsIndexService.INDEX_NAME).id(id)) -
根据id,查询文档
client.get(g -> g .index(EsIndexService.INDEX_NAME) .id("1") , object.class); -
删除文档
client.delete(d -> d .index(EsIndexService.INDEX_NAME) .id("1")); -
批量插入
		List<BulkOperation> bulkOperationArrayList = new ArrayList<>();
        //遍历添加到bulk中
        for (Test test : testList) {
            bulkOperationArrayList.add(BulkOperation.of(o -> o.index(i -> 						i.document(test).id(test.getId().toString()))));
        }
        BulkResponse bulkResponse = client.bulk(b -> 			  		b.index(EsIndexService.INDEX_NAME).operations(bulkOperationArrayList));
复杂查询
参考文档:https://maimai.cn/article/detail?fid=1744761944&efid=4C4zcI79tmI0h5aTGq_LRA

est test : testList) {
bulkOperationArrayList.add(BulkOperation.of(o -> o.index(i -> i.document(test).id(test.getId().toString()))));
}
BulkResponse bulkResponse = client.bulk(b -> b.index(EsIndexService.INDEX_NAME).operations(bulkOperationArrayList));
#### **复杂查询**
参考文档:https://maimai.cn/article/detail?fid=1744761944&efid=4C4zcI79tmI0h5aTGq_LRA

#### bool 查询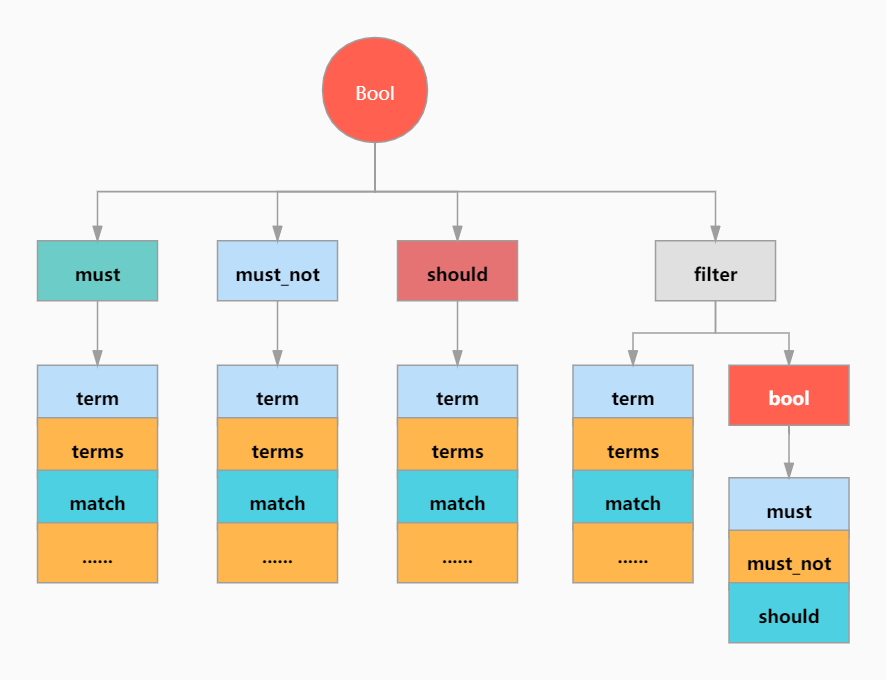


 3032
3032

 被折叠的 条评论
为什么被折叠?
被折叠的 条评论
为什么被折叠?
 到【灌水乐园】发言


