## 绘制阴影
CGContextRef context = UIGraphicsGetCurrentContext();
CGContextSetShadowWithColor(context, CGSizeMake(1.2, 1.2), 0, [UIColor lightGrayColor].CGColor);
[@"Hello" drawAtPoint:CGPointMake(20, 100)
withAttributes:@{ NSFontAttributeName: [UIFont systemFontOfSize:20]}];

## 绘制图片
UIImage* image = [UIImage imageNamed:@"02"];
[image drawAtPoint:CGPointMake(0, 0)];
[image drawInRect:CGRectMake(20.f, 20.0f, 320 / 2.f, 568 / 2.f)];

## 绘制屋顶

- (void)drawRect:(CGRect)rect
{
    [self drawRooftopAtTopPointof:CGPointMake(160.0f, 40.0f) textToDisplay:@"Miter" lineJoin:kCGLineJoinMiter];
    [self drawRooftopAtTopPointof:CGPointMake(160.0f, 180.0f) textToDisplay:@"Bevel" lineJoin:kCGLineJoinBevel];
    [self drawRooftopAtTopPointof:CGPointMake(160.0f, 320.0f) textToDisplay:@"Round" lineJoin:kCGLineJoinRound];
}

- (void)drawRooftopAtTopPointof:(CGPoint)paramTopPoint textToDisplay:(NSString * )paramText lineJoin:(CGLineJoin)paramLineJoin
{
    [[UIColor brownColor] set];
    CGContextRef currentContext = UIGraphicsGetCurrentContext();
    CGContextSetLineJoin(currentContext,paramLineJoin);
    CGContextSetLineWidth(currentContext, 20.0f);
    CGContextMoveToPoint(currentContext, paramTopPoint.x - 140, paramTopPoint.y + 100);
    CGContextAddLineToPoint(currentContext, paramTopPoint.x, paramTopPoint.y);
    CGContextAddLineToPoint(currentContext, paramTopPoint.x + 140, paramTopPoint.y + 100);
    CGContextStrokePath(currentContext);
    [[UIColor blackColor] set];
    [paramText drawAtPoint:CGPointMake(paramTopPoint.x - 40.0f, paramTopPoint.y + 60.0f) withFont:[UIFont boldSystemFontOfSize:30.0f]];
}

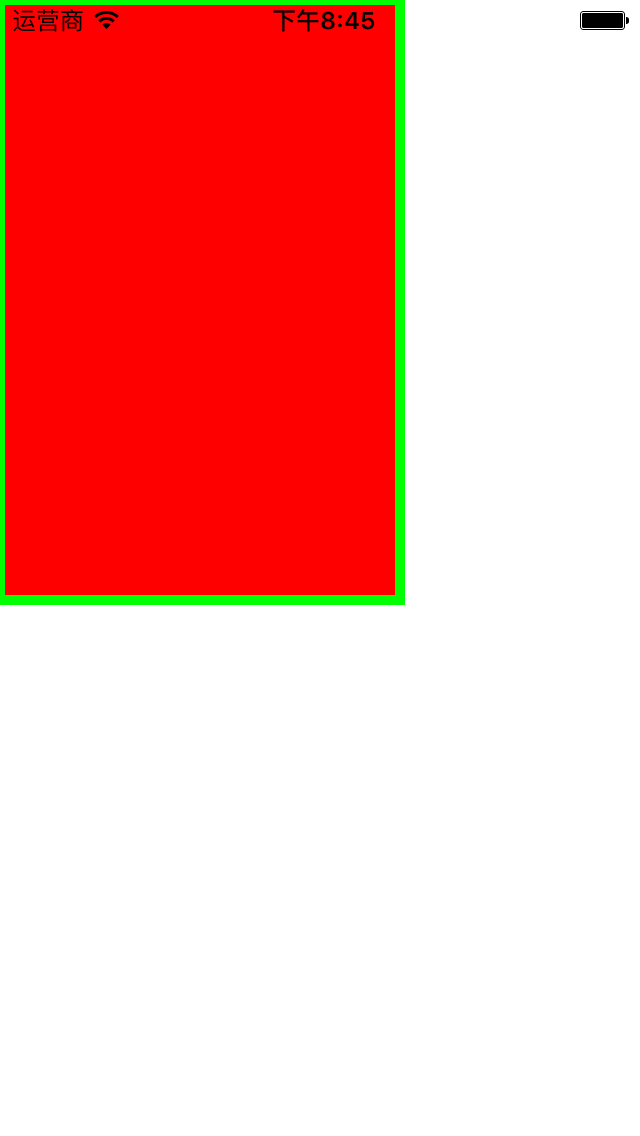
## 绘制矩形

CGContextRef context  = UIGraphicsGetCurrentContext();
CGMutablePathRef path = CGPathCreateMutable();

CGPathAddRect(path, NULL, CGRectMake(0, 0, 200, 300));
CGContextAddPath(context, path);

[[UIColor colorWithRed:1 green:0 blue:0 alpha:1] setFill];
[[UIColor greenColor] setStroke];
CGContextSetLineWidth(context, 5.0f);

CGContextDrawPath(context, kCGPathFillStroke);
CGPathRelease(path);
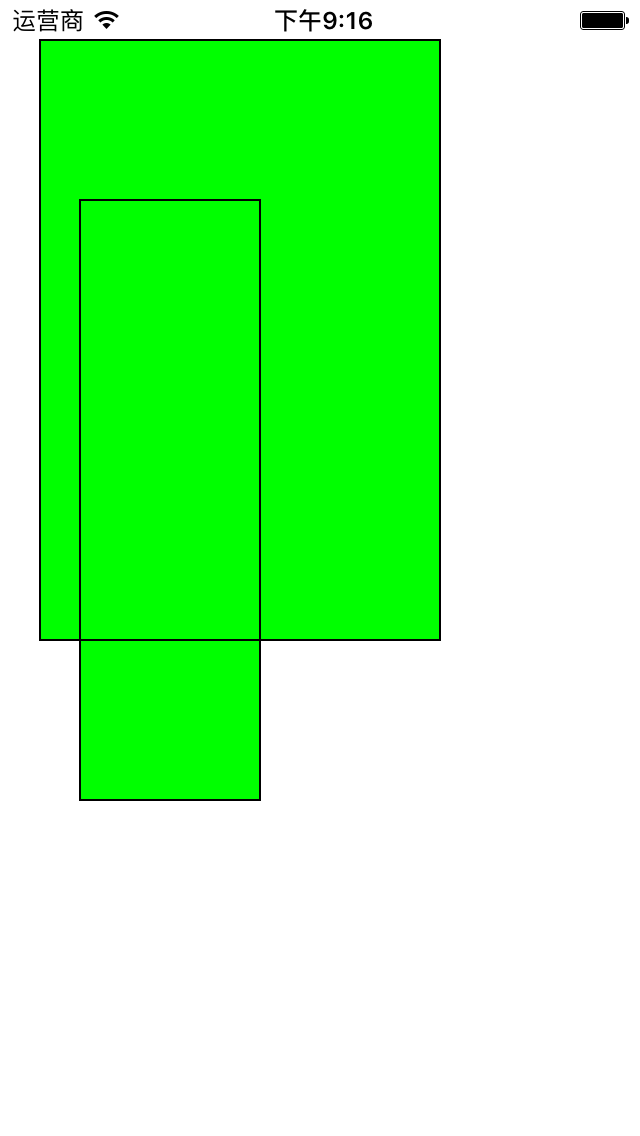
## 绘制多个矩形

CGContextRef context  = UIGraphicsGetCurrentContext();
CGMutablePathRef path = CGPathCreateMutable();

CGRect rectangle1 = CGRectMake(20.0f, 20.0f, 200.0f, 300.0f);
CGRect rectangle2 = CGRectMake(40.0f, 100.0f, 90.0f, 300.0f);
CGRect rectangles[2] = {rectangle1, rectangle2};

CGPathAddRects(path, NULL, (const CGRect *)&rectangles, 2);

CGContextAddPath(context, path);

[[UIColor colorWithRed:0 green:1 blue:0 alpha:1] setFill];
[[UIColor blackColor] setStroke];

CGContextDrawPath(context, kCGPathFillStroke);
CGPathRelease(path);
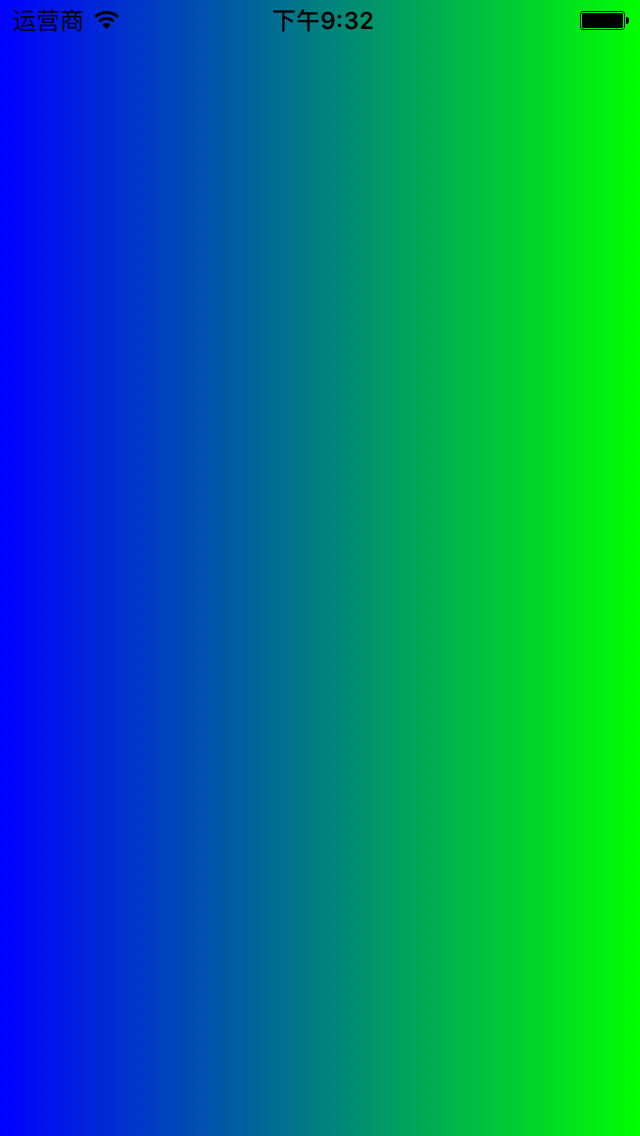
## 绘制渐变效果

CGColorSpaceRef colorSpace = CGColorSpaceCreateDeviceRGB();
UIColor * startColor = [UIColor blueColor];
CGFloat * startColorComponents = (CGFloat *)CGColorGetComponents([startColor CGColor]);
UIColor * endColor = [UIColor greenColor];
CGFloat * endColorComponents = (CGFloat *)CGColorGetComponents([endColor CGColor]);

CGFloat colorComponents[8] = {
    startColorComponents[0],
    startColorComponents[1],
    startColorComponents[2],
    startColorComponents[3],

    endColorComponents[0],
    endColorComponents[1],
    endColorComponents[2],
    endColorComponents[3]
};

CGFloat colorIndices[2] = {0.0f,1.0f};
CGGradientRef gradient = CGGradientCreateWithColorComponents(colorSpace, (const CGFloat *)&colorComponents, (const CGFloat *)&colorIndices, 2);
CGColorSpaceRelease(colorSpace);

CGRect screenBounds = [[UIScreen mainScreen] bounds];
CGPoint startPoint, endPoint;
startPoint = CGPointMake(0.0f, screenBounds.size.height/2.0f);
endPoint = CGPointMake(screenBounds.size.width, startPoint.y);

CGContextRef currentContext = UIGraphicsGetCurrentContext();
CGContextDrawLinearGradient(currentContext,gradient , startPoint, endPoint, 0);

CGGradientRelease(gradient);


 3846
3846

 被折叠的 条评论
为什么被折叠?
被折叠的 条评论
为什么被折叠?
 到【灌水乐园】发言


