


Maven常用总结
naven安装配置
unzip apache-maven-3.3.9-bin.zip -d /usr/local/

vim /etc/profile.d/maven_cfg.sh
export MAVEN_HOME=/usr/local/apache-maven-3.3.9
export PATH=${MAVEN_HOME}/bin:$PATH
scope依赖范围
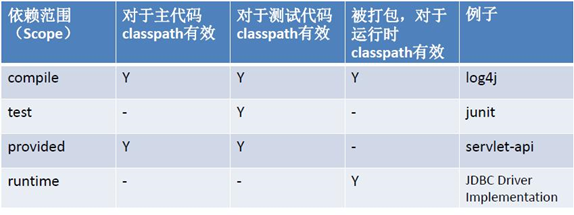
scope用来控制依赖、编译、测试、运行的classpath的关系.
主要的是三种依赖关系如下:
1.compile: 默认编译依赖范围。对于编译,测试,运行三种classpath都有效
2.test:测试依赖范围。只对于测试classpath有效
3.provided:已提供依赖范围。对于编译,测试的classpath都有效,但对于运行无效。因为由容器已经提供,例如servlet-api
4.runtime:运行时提供。例如:jdbc驱动
安装jar包到本地maven库
<dependency>
    <groupId>oracle.jdbc</groupId>
    <artifactId>ojdbc14</artifactId>
    <version>10.2</version>
</dependency>

mvn install:install-file -Dfile=jar包的位置 -DgroupId=jar包的groupId -DartifactId=jar包的artifactId -Dversion=jar包的version -Dpackaging=jar

mvn install:install-file -Dfile=jar包的位置 -DgroupId=oracle.jdbc -DartifactId=ojdbc14 -Dversion=10.2 -Dpackaging=jar
使用eclipse时创建Maven项目默认使用jdk1.8配置:
<profiles>
	<profile>
		<id>jdk-1.8</id>
		<activation>
			<activeByDefault>true</activeByDefault>
			<jdk>1.8</jdk>
		</activation>
		<properties>
			<maven.compiler.source>1.8</maven.compiler.source>
			<maven.compiler.target>1.8</maven.compiler.target>
			<maven.compiler.compilerVersion>1.8</maven.compiler.compilerVersion>
		</properties>
	</profile>
</profiles>
1、Maven构建过程的几个主要环节
①清理 :删除以前的编译结果,为重新编译做好准备。
②编译 :将 Java 源程序编译为字节码文件。
③测试 :针对项目中的关键点进行测试,确保项目在迭代开发过程中关键点的正确性。
④报告 :在每一次测试后以标准的格式记录和展示测试结果。
⑤打包 :将一个包含诸多文件的工程封装为一个压缩文件用于安装或部署。 Java 工程对应 jar 包, Web工程对应 war 包。
⑥安装 :在 Maven 环境下特指将打包的结果 jar 包或 war 包安装到本地仓库中。
⑦部署 :将打包的结果部署到远程仓库或将 war 包部署到服务器上运行。
2、Maven配置阿里云镜像
<mirrors>
	<mirror>
		<id>nexus-aliyun</id>
		<mirrorOf>central</mirrorOf>
		<name>Nexus aliyun</name>
		<url>http://maven.aliyun.com/nexus/content/groups/public</url>
	</mirror>
</mirrors>
3、Maven 核心概念
3.1 POM
3.2 约定的目录结构

3.3 坐标 gav
<groupId>com.michael.maven</groupId>
<artifactId>Hello</artifactId>
<version>0.0.1 SNAPSHOT</version>
3.4 依赖管理
<properties>
	<michael.helloproject.version>0.0.1SNAPSHOT</michael.helloproject.version>
	<project.build.sourceEncoding>UTF-8</project.build.sourceEncoding>
</properties>

<dependency>
	<groupId>com.xxx.yyy</groupId>
	<artifactId>HelloProject</artifactId>
	<version>${michael.helloproject.version}</version>
	<type>jar</type>
	<scope>compile</scope>
	<exclusions>
		<exclusion>
			<groupId>com.iii.jjj</groupId>
			<artifactId>Ppp</artifactId>
		</exclusion>
	</exclusions>
</dependency>
3.5 仓库管理
1)本地仓库:为当前电脑的所有maven工程服务。
2)远程仓库:
2.1)私服:架设在当前局域网环境下,为当前局域网范围内的所Maven 工程服务。
2.2)中央仓库:架设在 Internet 上,为全世界所有 Maven 工程服务。
2.3)中央仓库的镜像:架设在各个大洲,为中央仓库分担流量。减轻中央仓库的压力,同时更快的响应用户请求。

3.6 生命周期
Maven 有三套相互独立的生命周期,分别是:
3.6.1 Clean Lifecycle 在进行真正的构建之前进行一些清理工作。Clean生命周期一共包含了三个阶段:
① pre clean 执行一些需要在 clean 之前完成的工作
② clean 移除所有上一次构建生成的文件
③ post clean 执行一些需要在 clean 之后立刻完成的工作
3.6.2 Default Lifecycle 构建的核心部分,编译,测试,打包,安装,部署等等。
Default 生命周期是 Maven 生命周期中最重要的一个,绝大部分工作都发生在这个生命周期中。这里,只解释一些比较重要和常用的阶段:
validate
generate-sources
process-sources
generate-resources
process-resources 复制并处理资源文件,至目标目录,准备打包。
compile 编译项目的源代码。
process-classes
generate-test-sources
process-test-sources
generate-test-resources
process-test-resources 复制并处理资源文件,至目标测试目录。
test-compile 编译测试源代码。
process-test-classes
test 使用合适的单元测试框架运行测试。这些测试代码不会被打包或部署。
prepare-package
package 接受编译好的代码,打包成可发布的格式,如 jar 。
pre-integration-test
integration-test
post-integration-test
verify
install 将包安装至本地仓库,以让其它项目依赖。
deploy 将最终的包复制到远程的仓库,以让其它开发人员与项目共享或部署到服务器上运行。
3.6.3 Site Lifecycle 生成项目报告,站点,发布站点。
① pre site 执行一些需要在生成站点文档之前完成的工作
② site 生成项目的站点文档
③ post site 执行一些需要在生成站点文档之后完成的工作,并且为部署做准备
④ site deploy 将生成的站点文档部署到特定的服务器上这里经常用到的是site 阶段和 site deploy 阶段,用以生成和发布 Maven 站点,这可是 Maven 相当强大的功能, Manager 比较喜欢,文档及统计数据自动生成,很好看。
它们是相互独立的,你可以仅仅调用clean 来清理工作目录,仅仅调用 site 来生成站点。
当然你也可以直接运行 mvn clean install site 运行所有这三套生命周期。
几个基本的Maven命令:
mvn compile 编译
mvn clean 清理
mvn test 测试
mvn package 打包
※注意:运行Maven命令时一定要进入pom.xml文件所在的目录!
⑦ 插件和目标
● Maven 的核心仅仅定义了抽象的生命周期,具体的任务都是交由插件完成的。
● 每个插件都能实现多个功能,每个功能就是一个插件目标。
● Maven 的生命周期与插件目标相互绑定,以完成某个具体的构建务。
例如:
compile 就是插件 maven-compiler-plugin 的一个目标;
pre-clean 是插件 maven-clean-plugin 的一个目标。
⑧ 继承
将Parent 项目中的 dependencies 标签,用 dependencyManagement 标签括起来
<dependencyManagement>
	<dependencies>
		<dependency>
			<groupId>junit</groupId>
			<artifactId>junit</artifactId>
			<version>4.9</version>
			<scope>test</scope>
		</dependency>
	</dependencies>
</dependencyManagement>
在子项目中重新指定需要的依赖,删除范围和版本号
<dependencies>
	<dependency>
		<groupId>junit</groupId>
		<artifactId>junit</artifactId>
	</dependency>
</dependencies>
⑨ 聚合
将多个工程拆分为模块后, 需要手动逐个 安装 到仓库后依赖才能够生效。 修改源码后也需要逐个手动进行 clean 操作。 而使用了聚合之后就可以批量进行 Maven 工程的安装、清理工作。
<modules>
	<module>../Hello</module>
</modules>
<!--Gbase jar 包,本地-->
<dependency>
	<groupId>com.ndty</groupId>
	<artifactId>gbase</artifactId>
	<version>8.3</version>
	<scope>system</scope>
	<systemPath>${project.basedir}/src/main/resources/lib/gbase-connector-java-8.3-bin.jar</systemPath>
</dependency>
热启动
<project>
	<!-- 支持热启动 -->
	<dependencies>
		<dependency>
			<groupId>org.springframework.boot</groupId>
			<artifactId>spring-boot-devtools</artifactId>
			<optional>true</optional>
		</dependency>
	</dependencies>

	<!-- 配置插件 -->
	<build>
		<plugins>
			<plugin>
				<groupId>org.springframework.boot</groupId>
				<artifactId>spring-boot-maven-plugin</artifactId>
				<!-- 如果没有fork配置,devtools不起作用,即项目修改后不会重新启动 -->
				<configuration>
					<fork>true</fork>
				</configuration>
			</plugin>
		</plugins>
	</build>
</project>
<dependencyManagement>
	<dependencies>
		<dependency>
			<groupId>org.springframework.boot</groupId>
			<artifactId>spring-boot-dependencies</artifactId>
			<version>${spring-boot.version}</version>
			<type>pom</type>
			<scope>import</scope>
		</dependency>
		<dependency>
			<groupId>org.springframework.cloud</groupId>
			<artifactId>spring-cloud-dependencies</artifactId>
			<version>${spring-cloud.version}</version>
			<type>pom</type>
			<scope>import</scope>
		</dependency>
		<dependency>
			<groupId>com.alibaba.cloud</groupId>
			<artifactId>spring-cloud-alibaba-dependencies</artifactId>
			<version>${spring-cloud-alibaba.version}</version>
			<type>pom</type>
			<scope>import</scope>
		</dependency>
	</dependencies>
</dependencyManagement>
maven常用几个命令
# windows查看maven安装路径
echo %MAVEN_HOME%

# 检查是否安装了maven
mvn -v 或 mvn -version

# 打印出所有的java系统属性和环境变量
mvn help:system

# 清理输出目录默认target/
mvn clean

# 编译项目主代码,默认编译至target/classes目录下。
mvn clean compile

# maven测试
# 实际执行的命令有:clean:clean,resource:resources,compiler:compile, resources:testResources, compiler:testCompile;
# maven在执行test之前,会先自动执行项目主资源处理,主代码编译,测试资源处理,测试代码编译等工作,测试代码编译通过之后默认在target/test-calsses目录下生成二进制文件,紧接着surefile:test 任务运行测试,并输出测试报告,显示一共运行了多少次测试,失败成功等等。
mvn clean test

# maven打包
# maven会在打包之前默认执行编译,测试等操作,打包成功之后默认输出在target/目录中。
mvn celan package

# maven安装
# 让其他的项目直接引用这个项目
mvn clean install

# 查看当前项目中的已解析依赖
mvn dependency:list

# 查看当前项目的依赖树
mvn dependency:tree

# 查看当前项目中使用未声明的依赖和已声明但未使用的依赖
mvn dependency:analyse
mvn install:install-file "-Dfile=本地jar包所在路径" "-DgroupId=设置groupId" "-DartifactId=设置artifactId" "-Dversion=设置版本" "-Dpackaging=jar"
- 编译
mvn clean compile - 打包
mvn clean package
打包包含resource和java下的文件
<project>
	<!-- pom.xml -->

	<build>
	    <finalName>dockerfile-use</finalName>

	    <resources>
	        <!-- 项目打包时会将java目录中的*.xml文件也进行打包 -->
	        <resource>
	            <directory>src/main/java</directory>
	            <includes>
	                <include>**/*.xml</include>
	            </includes>
	            <filtering>false</filtering>
	        </resource>
	        <!--设置自己目录下的配置文件-->
	        <resource>
	            <!--下方resources的文件夹名字要和自己项目的文件夹名确认一致才行 很多人就是忽略了名字不一致 -->
	            <directory>src/main/resources</directory>
	            <includes>
	                <include>**/*</include>
	            </includes>
	        </resource>
	    </resources>

	    <plugins>

	        <plugin>
	            <groupId>org.apache.maven.plugins</groupId>
	            <artifactId>maven-compiler-plugin</artifactId>
	            <version>3.8.1</version>
	            <configuration>
	                <source>1.8</source>
	                <target>1.8</target>
	                <encoding>UTF-8</encoding>
	            </configuration>
	        </plugin>
	        <plugin>
	            <groupId>org.springframework.boot</groupId>
	            <artifactId>spring-boot-maven-plugin</artifactId>
	            <version>2.3.7.RELEASE</version>
	            <configuration>
	                <mainClass>com.michael.dockerfileuse.DockerBootApplication</mainClass>
	            </configuration>
	            <executions>
	                <execution>
	                    <id>repackage</id>
	                    <goals>
	                        <goal>repackage</goal>
	                    </goals>
	                </execution>
	            </executions>
	        </plugin>
	    </plugins>
	</build>
</project>
将Java项目及其依赖项打包成一个可执行的JAR文件
<build>
  <plugins>
    <plugin>
      <groupId>org.apache.maven.plugins</groupId>
      <artifactId>maven-assembly-plugin</artifactId>
      <version>3.3.0</version>
      <configuration>
        <archive>
          <manifest>
            <mainClass>com.example.Main</mainClass>
          </manifest>
        </archive>
        <descriptorRefs>
          <descriptorRef>jar-with-dependencies</descriptorRef>
        </descriptorRefs>
      </configuration>
      <executions>
        <execution>
          <id>make-assembly</id>
          <phase>package</phase>
          <goals>
            <goal>single</goal>
          </goals>
        </execution>
      </executions>
    </plugin>
  </plugins>
</build>


 124
124


 被折叠的 条评论
为什么被折叠?
被折叠的 条评论
为什么被折叠?
 到【灌水乐园】发言


