


 本文介绍veth-pair虚拟设备接口及其在网络连接中的应用,包括直接连接、通过Linux Bridge和OVS桥接的不同场景,并展示了如何配置实现两个namespace间的通信。
https://www.jb51.net/article/130486.htm
https://www.cnblogs.com/-xuan/p/10838052.html
https://blog.csdn.net/sld880311/article/details/77840343
https://blog.csdn.net/sinat_20184565/article/details/80852155
https://www.cnblogs.com/bakari/p/10613710.html
01 veth-pair 是什么
顾名思义,veth-pair 就是一对的虚拟设备接口,和 tap/tun 设备不同的是,它都是成对出现的。一端连着协议栈,一端彼此相连着。如下图所示:

正因为有这个特性,它常常充当着一个桥梁,连接着各种虚拟网络设备,典型的例子像“两个 namespace 之间的连接”,“Bridge、OVS 之间的连接”,“Docker 容器之间的连接” 等等,以此构建出非常复杂的虚拟网络结构,比如 OpenStack Neutron。
02 veth-pair 的连通性
我们给上图中的 veth0 和 veth1 分别配上 IP:10.1.1.2 和 10.1.1.3,然后从 veth0 ping 一下 veth1。理论上它们处于同网段,是能 ping 通的,但结果却是 ping 不通。
[root@localhost ~]# ip link add dev veth0  type veth peer name veth1
[root@localhost ~]# ip link show
1: lo: <LOOPBACK,UP,LOWER_UP> mtu 65536 qdisc noqueue state UNKNOWN mode DEFAULT group default qlen 1000
    link/loopback 00:00:00:00:00:00 brd 00:00:00:00:00:00
2: enp49s0f0: <BROADCAST,MULTICAST,UP,LOWER_UP> mtu 1500 qdisc mq state UP mode DEFAULT group default qlen 1000
    link/ether d4:5d:64:07:a8:ea brd ff:ff:ff:ff:ff:ff
3: enp49s0f1: <BROADCAST,MULTICAST> mtu 1500 qdisc noop state DOWN mode DEFAULT group default qlen 1000
    link/ether d4:5d:64:07:a8:eb brd ff:ff:ff:ff:ff:ff
4: enp49s0f0.10@enp49s0f0: <BROADCAST,MULTICAST,UP,LOWER_UP> mtu 1500 qdisc noqueue state UP mode DEFAULT group default qlen 1000
    link/ether d4:5d:64:07:a8:ea brd ff:ff:ff:ff:ff:ff
21: veth1@veth0: <BROADCAST,MULTICAST,M-DOWN> mtu 1500 qdisc noop state DOWN mode DEFAULT group default qlen 1000
    link/ether fa:4a:3d:16:c5:f1 brd ff:ff:ff:ff:ff:ff
22: veth0@veth1: <BROADCAST,MULTICAST,M-DOWN> mtu 1500 qdisc noop state DOWN mode DEFAULT group default qlen 1000
    link/ether fe:8f:db:a1:64:4a brd ff:ff:ff:ff:ff:ff
[root@localhost ~]# ip address add dev veth0 10.1.1.2/24
[root@localhost ~]# ip address add dev veth1 10.1.1.3/24
[root@localhost ~]# ip address show
1: lo: <LOOPBACK,UP,LOWER_UP> mtu 65536 qdisc noqueue state UNKNOWN group default qlen 1000
    link/loopback 00:00:00:00:00:00 brd 00:00:00:00:00:00
    inet 127.0.0.1/8 scope host lo
       valid_lft forever preferred_lft forever
    inet6 ::1/128 scope host
       valid_lft forever preferred_lft forever
2: enp49s0f0: <BROADCAST,MULTICAST,UP,LOWER_UP> mtu 1500 qdisc mq state UP group default qlen 1000
    link/ether d4:5d:64:07:a8:ea brd ff:ff:ff:ff:ff:ff
    inet 10.10.1.2/24 brd 10.10.1.255 scope global enp49s0f0
       valid_lft forever preferred_lft forever
    inet6 fe80::d65d:64ff:fe07:a8ea/64 scope link
       valid_lft forever preferred_lft forever
3: enp49s0f1: <BROADCAST,MULTICAST> mtu 1500 qdisc noop state DOWN group default qlen 1000
    link/ether d4:5d:64:07:a8:eb brd ff:ff:ff:ff:ff:ff
4: enp49s0f0.10@enp49s0f0: <BROADCAST,MULTICAST,UP,LOWER_UP> mtu 1500 qdisc noqueue state UP group default qlen 1000
    link/ether d4:5d:64:07:a8:ea brd ff:ff:ff:ff:ff:ff
    inet 10.10.1.105/24 brd 10.10.1.255 scope global enp49s0f0.10
       valid_lft forever preferred_lft forever
    inet6 fe80::d65d:64ff:fe07:a8ea/64 scope link
       valid_lft forever preferred_lft forever
21: veth1@veth0: <BROADCAST,MULTICAST,M-DOWN> mtu 1500 qdisc noop state DOWN group default qlen 1000
    link/ether fa:4a:3d:16:c5:f1 brd ff:ff:ff:ff:ff:ff
    inet 10.1.1.3/24 scope global veth1
       valid_lft forever preferred_lft forever
22: veth0@veth1: <BROADCAST,MULTICAST,M-DOWN> mtu 1500 qdisc noop state DOWN group default qlen 1000
    link/ether fe:8f:db:a1:64:4a brd ff:ff:ff:ff:ff:ff
    inet 10.1.1.2/24 scope global veth0
       valid_lft forever preferred_lft forever
[root@localhost ~]# ip link set dev veth0 up
[root@localhost ~]# ip link set dev veth1 up
[root@localhost ~]# ip address show
1: lo: <LOOPBACK,UP,LOWER_UP> mtu 65536 qdisc noqueue state UNKNOWN group default qlen 1000
    link/loopback 00:00:00:00:00:00 brd 00:00:00:00:00:00
    inet 127.0.0.1/8 scope host lo
       valid_lft forever preferred_lft forever
    inet6 ::1/128 scope host
       valid_lft forever preferred_lft forever
2: enp49s0f0: <BROADCAST,MULTICAST,UP,LOWER_UP> mtu 1500 qdisc mq state UP group default qlen 1000
    link/ether d4:5d:64:07:a8:ea brd ff:ff:ff:ff:ff:ff
    inet 10.10.1.2/24 brd 10.10.1.255 scope global enp49s0f0
       valid_lft forever preferred_lft forever
    inet6 fe80::d65d:64ff:fe07:a8ea/64 scope link
       valid_lft forever preferred_lft forever
3: enp49s0f1: <BROADCAST,MULTICAST> mtu 1500 qdisc noop state DOWN group default qlen 1000
    link/ether d4:5d:64:07:a8:eb brd ff:ff:ff:ff:ff:ff
4: enp49s0f0.10@enp49s0f0: <BROADCAST,MULTICAST,UP,LOWER_UP> mtu 1500 qdisc noqueue state UP group default qlen 1000
    link/ether d4:5d:64:07:a8:ea brd ff:ff:ff:ff:ff:ff
    inet 10.10.1.105/24 brd 10.10.1.255 scope global enp49s0f0.10
       valid_lft forever preferred_lft forever
    inet6 fe80::d65d:64ff:fe07:a8ea/64 scope link
       valid_lft forever preferred_lft forever
21: veth1@veth0: <BROADCAST,MULTICAST,UP,LOWER_UP> mtu 1500 qdisc noqueue state UP group default qlen 1000
    link/ether fa:4a:3d:16:c5:f1 brd ff:ff:ff:ff:ff:ff
    inet 10.1.1.3/24 scope global veth1
       valid_lft forever preferred_lft forever
    inet6 fe80::f84a:3dff:fe16:c5f1/64 scope link
       valid_lft forever preferred_lft forever
22: veth0@veth1: <BROADCAST,MULTICAST,UP,LOWER_UP> mtu 1500 qdisc noqueue state UP group default qlen 1000
    link/ether fe:8f:db:a1:64:4a brd ff:ff:ff:ff:ff:ff
    inet 10.1.1.2/24 scope global veth0
       valid_lft forever preferred_lft forever
    inet6 fe80::fc8f:dbff:fea1:644a/64 scope link
       valid_lft forever preferred_lft forever
[root@localhost ~]# ping -I veth0 10.1.1.3
PING 10.1.1.3 (10.1.1.3) from 10.1.1.2 veth0: 56(84) bytes of data.
^C
--- 10.1.1.3 ping statistics ---
16 packets transmitted, 0 received, 100% packet loss, time 15353ms
#ping 不通,修改如下参数 且BROADCAST,MULTICAST,UP,LOWER_UP也有up状态了

[root@localhost ~]# echo 1 > /proc/sys/net/ipv4/conf/veth0/accept_local
[root@localhost ~]# echo 1 > /proc/sys/net/ipv4/conf/veth1/accept_local
[root@localhost ~]# echo 0 > /proc/sys/net/ipv4/conf/all/rp_filter
[root@localhost ~]# echo 0 > /proc/sys/net/ipv4/conf/veth0/rp_filter
[root@localhost ~]# echo 0 > /proc/sys/net/ipv4/conf/veth1/rp_filter
[root@localhost ~]# ping -I veth0 10.1.1.3 -c 2
PING 10.1.1.3 (10.1.1.3) from 10.1.1.2 veth1: 56(84) bytes of data.
64 bytes from 10.1.1.3: icmp_seq=1 ttl=64 time=0.059 ms
64 bytes from 10.1.1.3: icmp_seq=2 ttl=64 time=0.019 ms
64 bytes from 10.1.1.3: icmp_seq=3 ttl=64 time=0.015 ms
64 bytes from 10.1.1.3: icmp_seq=4 ttl=64 time=0.017 ms
64 bytes from 10.1.1.3: icmp_seq=5 ttl=64 time=0.021 ms
^C
--- 10.0.0.3 ping statistics ---
5 packets transmitted, 5 received, 0% packet loss, time 4127ms
rtt min/avg/max/mdev = 0.015/0.026/0.059/0.016 ms
抓个包看看,tcpdump -nnt -i veth1
[root@localhost ~]#tcpdump -nnt -i veth1
tcpdump: verbose output suppressed, use -v or -vv for full protocol decode
listening on veth0, link-type EN10MB (Ethernet), capture size 262144 bytes
ARP, Request who-has 10.1.1.3 tell 10.1.1.2, length 28
ARP, Request who-has 10.1.1.3 tell 10.1.1.2, length 28
可以看到,由于 veth0 和 veth1 处于同一个网段,且是第一次连接,所以会事先发 ARP 包,但 veth1 并没有响应 ARP 包。
经查阅,这是由于假如使用 Ubuntu 系统内核中一些 ARP 相关的默认配置限制所导致的,需要修改一下配置项:
echo 1 > /proc/sys/net/ipv4/conf/veth1/accept_local
echo 1 > /proc/sys/net/ipv4/conf/veth0/accept_local
echo 0 > /proc/sys/net/ipv4/conf/all/rp_filter
echo 0 > /proc/sys/net/ipv4/conf/veth0/rp_filter
echo 0 > /proc/sys/net/ipv4/conf/veth1/rp_filter
完了再 ping 就行了。
[root@localhost ~]# ping -I veth0 10.1.1.3 -c 2
PING 10.1.1.3 (10.1.1.3) from 10.1.1.2 veth0: 56(84) bytes of data.
64 bytes from 10.1.1.3: icmp_seq=1 ttl=64 time=0.047 ms
64 bytes from 10.1.1.3: icmp_seq=2 ttl=64 time=0.064 ms

--- 10.1.1.3 ping statistics ---
2 packets transmitted, 2 received, 0% packet loss, time 3008ms
rtt min/avg/max/mdev = 0.047/0.072/0.113/0.025 ms
我们对这个通信过程比较感兴趣,可以抓包看看。
对于 veth0 口:
[root@localhost ~]# tcpdump -nnt -i veth0
tcpdump: verbose output suppressed, use -v or -vv for full protocol decode
listening on veth0, link-type EN10MB (Ethernet), capture size 262144 bytes
ARP, Request who-has 10.1.1.3 tell 10.1.1.2, length 28
ARP, Reply 10.1.1.3 is-at 5a:07:76:8e:fb:cd, length 28
IP 10.1.1.2 > 10.1.1.3: ICMP echo request, id 2189, seq 1, length 64
IP 10.1.1.2 > 10.1.1.3: ICMP echo request, id 2189, seq 2, length 64
IP 10.1.1.2 > 10.1.1.3: ICMP echo request, id 2189, seq 3, length 64
IP 10.1.1.2 > 10.1.1.3: ICMP echo request, id 2244, seq 1, length 64
对于 veth1 口:
[root@localhost ~]# tcpdump -nnt -i veth1
tcpdump: verbose output suppressed, use -v or -vv for full protocol decode
listening on veth1, link-type EN10MB (Ethernet), capture size 262144 bytes
ARP, Request who-has 10.1.1.3 tell 10.1.1.2, length 28
ARP, Reply 10.1.1.3 is-at 5a:07:76:8e:fb:cd, length 28
IP 10.1.1.2 > 10.1.1.3: ICMP echo request, id 2189, seq 1, length 64
IP 10.1.1.2 > 10.1.1.3: ICMP echo request, id 2189, seq 2, length 64
IP 10.1.1.2 > 10.1.1.3: ICMP echo request, id 2189, seq 3, length 64
IP 10.1.1.2 > 10.1.1.3: ICMP echo request, id 2244, seq 1, length 64
奇怪,我们并没有看到 ICMP 的 echo reply 包,那它是怎么 ping 通的?
其实这里 echo reply 走的是 localback 口,不信抓个包看看:
[root@localhost ~]# tcpdump -nnt -i lo
tcpdump: verbose output suppressed, use -v or -vv for full protocol decode
listening on lo, link-type EN10MB (Ethernet), capture size 262144 bytes
IP 10.1.1.3 > 10.1.1.2: ICMP echo reply, id 2244, seq 1, length 64
IP 10.1.1.3 > 10.1.1.2: ICMP echo reply, id 2244, seq 2, length 64
IP 10.1.1.3 > 10.1.1.2: ICMP echo reply, id 2244, seq 3, length 64
IP 10.1.1.3 > 10.1.1.2: ICMP echo reply, id 2244, seq 4, length 64
为什么?
我们看下整个通信流程就明白了。
- 首先 ping 程序构造 ICMP
echo request,通过 socket 发给协议栈。 - 由于 ping 指定了走 veth0 口,如果是第一次,则需要发 ARP 请求,否则协议栈直接将数据包交给 veth0。
- 由于 veth0 连着 veth1,所以 ICMP request 直接发给 veth1。
- veth1 收到请求后,交给另一端的协议栈。
- 协议栈看本地有 10.1.1.3 这个 IP,于是构造 ICMP reply 包,查看路由表,发现回给 10.1.1.0 网段的数据包应该走 localback 口,于是将 reply 包交给 lo 口(会优先查看路由表的 0 号表,
ip route show table 0查看)。 - lo 收到协议栈的 reply 包后,啥都没干,转手又回给协议栈。
- 协议栈收到 reply 包之后,发现有 socket 在等待包,于是将包给 socket。
- 等待在用户态的 ping 程序发现 socket 返回,于是就收到 ICMP 的 reply 包。
整个过程如下图所示:
03 两个 namespace 之间的连通性
namespace 是 Linux 2.6.x 内核版本之后支持的特性,主要用于资源的隔离。有了 namespace,一个 Linux 系统就可以抽象出多个网络子系统,各子系统间都有自己的网络设备,协议栈等,彼此之间互不影响。
如果各个 namespace 之间需要通信,怎么办呢,答案就是用 veth-pair 来做桥梁。
根据连接的方式和规模,可以分为“直接相连”,“通过 Bridge 相连” 和 “通过 OVS 相连”。
3.1 直接相连#
直接相连是最简单的方式,如下图,一对 veth-pair 直接将两个 namespace 连接在一起。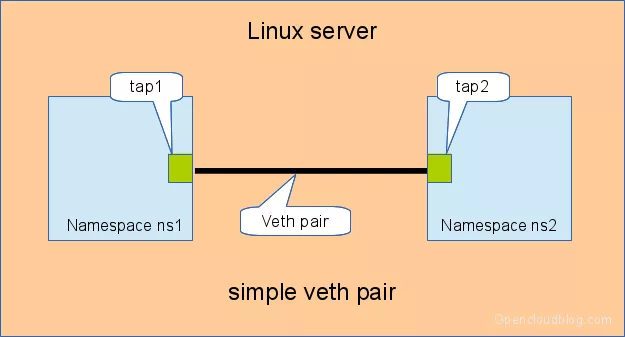
给 veth-pair 配置 IP,测试连通性
linux ip netns 使用见:https://blog.csdn.net/Michaelwubo/article/details/110224269
# 创建 namespace
[root@localhost ~]# ip netns add ns1
[root@localhost ~]# ip netns add ns2
[root@localhost ~]# ip netns list
ns2
ns1
# 创建一对 veth-pair veth0 veth1
[root@localhost ~]# ip link add veth0 type veth peer name veth1
意思就是创建一对(veth0和veth1)虚拟网络“peer”的意思就是对等的意思。veth0和veth1除了名字不一样,其余功能,使用都一样

# 将 veth0 veth1 分别加入两个 ns
[root@localhost ~]# ip link set veth0 netns ns1
[root@localhost ~]# ip link set veth1 netns ns2
[root@localhost ~]# ip netns list
ns2 (id: 1)
ns1 (id: 0)
[root@localhost ~]# ls /var/run/netns/
ns1  ns2
# 给两个 veth0 veth1 配上 IP 并启用
[root@localhost ~]#  ip netns exec ns1 ip address add 10.1.1.2/24 dev veth0
[root@localhost ~]#  ip netns exec ns1 ip link set veth0 up
[root@localhost ~]#  ip netns exec ns2 ip address add 10.1.1.3/24 dev veth1
[root@localhost ~]#  ip netns exec ns2 ip link set veth1 up

# 从 veth0 ping veth1
[root@localhost ~]# ip netns exec ns1 ping 10.1.1.3
PING 10.1.1.3 (10.1.1.3) 56(84) bytes of data.
64 bytes from 10.1.1.3: icmp_seq=1 ttl=64 time=0.081 ms
64 bytes from 10.1.1.3: icmp_seq=2 ttl=64 time=0.020 ms
64 bytes from 10.1.1.3: icmp_seq=3 ttl=64 time=0.013 ms
64 bytes from 10.1.1.3: icmp_seq=4 ttl=64 time=0.016 ms
^C
--- 10.1.1.3 ping statistics ---
4 packets transmitted, 4 received, 0% packet loss, time 3094ms
rtt min/avg/max/mdev = 0.013/0.032/0.081/0.028 ms
3.2 通过 Bridge 相连#
Linux Bridge 相当于一台交换机,可以中转两个 namespace 的流量,我们看看 veth-pair 在其中扮演什么角色。
如下图,两对 veth-pair 分别将两个 namespace 连到 Bridge 上。
同样给 veth-pair 配置 IP,测试其连通性:
# 首先创建 bridge br0
[root@localhost ~]# ip link add br0 type bridge  或 brctl addbr br0 一样
[root@localhost ~]# ip link set br0 up
[root@localhost ~]# ip link show
1: lo: <LOOPBACK,UP,LOWER_UP> mtu 65536 qdisc noqueue state UNKNOWN mode DEFAULT group default qlen 1000
    link/loopback 00:00:00:00:00:00 brd 00:00:00:00:00:00
2: enp49s0f0: <BROADCAST,MULTICAST,UP,LOWER_UP> mtu 1500 qdisc mq state UP mode DEFAULT group default qlen 1000
    link/ether d4:5d:64:07:a8:ea brd ff:ff:ff:ff:ff:ff
3: enp49s0f1: <BROADCAST,MULTICAST> mtu 1500 qdisc noop state DOWN mode DEFAULT group default qlen 1000
    link/ether d4:5d:64:07:a8:eb brd ff:ff:ff:ff:ff:ff
4: enp49s0f0.10@enp49s0f0: <BROADCAST,MULTICAST,UP,LOWER_UP> mtu 1500 qdisc noqueue state UP mode DEFAULT group default qlen 1000
    link/ether d4:5d:64:07:a8:ea brd ff:ff:ff:ff:ff:ff
23: br0: <BROADCAST,MULTICAST,UP,LOWER_UP> mtu 1500 qdisc noqueue state UNKNOWN mode DEFAULT group default qlen 1000
    link/ether c6:7c:d8:09:56:dd brd ff:ff:ff:ff:ff:ff

# 然后创建两对 veth-pair
[root@localhost ~]# ip link add veth0 type veth peer name br-veth0
[root@localhost ~]# ip link add veth1 type veth peer name br-veth1
[root@localhost ~]# ip link show
1: lo: <LOOPBACK,UP,LOWER_UP> mtu 65536 qdisc noqueue state UNKNOWN mode DEFAULT group default qlen 1000
    link/loopback 00:00:00:00:00:00 brd 00:00:00:00:00:00
2: enp49s0f0: <BROADCAST,MULTICAST,UP,LOWER_UP> mtu 1500 qdisc mq state UP mode DEFAULT group default qlen 1000
    link/ether d4:5d:64:07:a8:ea brd ff:ff:ff:ff:ff:ff
3: enp49s0f1: <BROADCAST,MULTICAST> mtu 1500 qdisc noop state DOWN mode DEFAULT group default qlen 1000
    link/ether d4:5d:64:07:a8:eb brd ff:ff:ff:ff:ff:ff
4: enp49s0f0.10@enp49s0f0: <BROADCAST,MULTICAST,UP,LOWER_UP> mtu 1500 qdisc noqueue state UP mode DEFAULT group default qlen 1000
    link/ether d4:5d:64:07:a8:ea brd ff:ff:ff:ff:ff:ff
23: br0: <BROADCAST,MULTICAST,UP,LOWER_UP> mtu 1500 qdisc noqueue state UNKNOWN mode DEFAULT group default qlen 1000
    link/ether c6:7c:d8:09:56:dd brd ff:ff:ff:ff:ff:ff
24: br-veth0@veth0: <BROADCAST,MULTICAST,M-DOWN> mtu 1500 qdisc noop state DOWN mode DEFAULT group default qlen 1000
    link/ether 42:1f:cb:a5:f6:68 brd ff:ff:ff:ff:ff:ff
25: veth0@br-veth0: <BROADCAST,MULTICAST,M-DOWN> mtu 1500 qdisc noop state DOWN mode DEFAULT group default qlen 1000
    link/ether 52:f6:bc:e1:bf:f6 brd ff:ff:ff:ff:ff:ff
26: br-veth1@veth1: <BROADCAST,MULTICAST,M-DOWN> mtu 1500 qdisc noop state DOWN mode DEFAULT group default qlen 1000
    link/ether f6:e7:2b:58:72:9d brd ff:ff:ff:ff:ff:ff
27: veth1@br-veth1: <BROADCAST,MULTICAST,M-DOWN> mtu 1500 qdisc noop state DOWN mode DEFAULT group default qlen 1000
    link/ether 56:d4:fb:8f:9c:7f brd ff:ff:ff:ff:ff:ff

# 分别将两对 veth-pair 加入两个 ns 和 br0
[root@localhost ~]# ip link set veth0 netns ns1
RTNETLINK answers: Invalid argument 说明有相同名字的veth了删除后改名字
[root@localhost ~]# ip netns exec ns1 ip a 查看是否有相同的名字
1: lo: <LOOPBACK> mtu 65536 qdisc noop state DOWN group default qlen 1000
    link/loopback 00:00:00:00:00:00 brd 00:00:00:00:00:00
22: veth0@if21: <BROADCAST,MULTICAST,UP,LOWER_UP> mtu 1500 qdisc noqueue state UP group default qlen 1000
    link/ether fe:8f:db:a1:64:4a brd ff:ff:ff:ff:ff:ff link-netnsid 1
    inet 10.1.1.2/24 scope global veth0
       valid_lft forever preferred_lft forever
    inet6 fe80::fc8f:dbff:fea1:644a/64 scope link
       valid_lft forever preferred_lft forever
[root@localhost ~]# ip netns exec ns2 ip a
1: lo: <LOOPBACK> mtu 65536 qdisc noop state DOWN group default qlen 1000
    link/loopback 00:00:00:00:00:00 brd 00:00:00:00:00:00
21: veth1@if22: <BROADCAST,MULTICAST,UP,LOWER_UP> mtu 1500 qdisc noqueue state UP group default qlen 1000
    link/ether fa:4a:3d:16:c5:f1 brd ff:ff:ff:ff:ff:ff link-netnsid 0
    inet 10.1.1.3/24 scope global veth1
       valid_lft forever preferred_lft forever
    inet6 fe80::f84a:3dff:fe16:c5f1/64 scope link
       valid_lft forever preferred_lft forever

[root@localhost ~]# ip netns delete ns1
[root@localhost ~]# ip netns delete ns2
[root@localhost ~]# ip netns add ns1
[root@localhost ~]# ip netns add ns2
[root@localhost ~]# ip link set veth0 netns ns1
[root@localhost ~]# ip link set br-veth0 master br0 或者brctl addif br0 br-veth0
[root@localhost ~]# ip link set br-veth0 up

[root@localhost ~]# ip link set veth1 netns ns2
[root@localhost ~]# ip link set br-veth1 master br0 或者brctl addif br0 br-veth1
[root@localhost ~]# ip link set br-veth1 up

# 给两个 ns 中的 veth 配置 IP 并启用
[root@localhost ~]# ip netns exec ns1 ip address add 10.1.1.2/24 dev veth0
[root@localhost ~]# ip netns exec ns1 ip link set veth0 up
[root@localhost ~]# ip netns exec ns2 ip address add 10.1.1.3/24 dev veth1
[root@localhost ~]# ip netns exec ns2 ip link set veth1 up
[root@localhost ~]# ip link show
1: lo: <LOOPBACK,UP,LOWER_UP> mtu 65536 qdisc noqueue state UNKNOWN mode DEFAULT group default qlen 1000
    link/loopback 00:00:00:00:00:00 brd 00:00:00:00:00:00
2: enp49s0f0: <BROADCAST,MULTICAST,UP,LOWER_UP> mtu 1500 qdisc mq state UP mode DEFAULT group default qlen 1000
    link/ether d4:5d:64:07:a8:ea brd ff:ff:ff:ff:ff:ff
3: enp49s0f1: <BROADCAST,MULTICAST> mtu 1500 qdisc noop state DOWN mode DEFAULT group default qlen 1000
    link/ether d4:5d:64:07:a8:eb brd ff:ff:ff:ff:ff:ff
4: enp49s0f0.10@enp49s0f0: <BROADCAST,MULTICAST,UP,LOWER_UP> mtu 1500 qdisc noqueue state UP mode DEFAULT group default qlen 1000
    link/ether d4:5d:64:07:a8:ea brd ff:ff:ff:ff:ff:ff
30: br0: <BROADCAST,MULTICAST,UP,LOWER_UP> mtu 1500 qdisc noqueue state UP mode DEFAULT group default qlen 1000
    link/ether 06:d5:cb:8f:b9:c2 brd ff:ff:ff:ff:ff:ff
31: br-veth0@if32: <BROADCAST,MULTICAST,UP,LOWER_UP> mtu 1500 qdisc noqueue master br0 state UP mode DEFAULT group default qlen 1000
    link/ether 82:37:d6:bd:d5:d7 brd ff:ff:ff:ff:ff:ff link-netnsid 0
33: br-veth1@if34: <BROADCAST,MULTICAST,UP,LOWER_UP> mtu 1500 qdisc noqueue master br0 state UP mode DEFAULT group default qlen 1000
    link/ether 06:d5:cb:8f:b9:c2 brd ff:ff:ff:ff:ff:ff link-netnsid 1
[root@localhost ~]# ip address  show
[root@localhost ~]# ip address  show
1: lo: <LOOPBACK,UP,LOWER_UP> mtu 65536 qdisc noqueue state UNKNOWN group default qlen 1000
    link/loopback 00:00:00:00:00:00 brd 00:00:00:00:00:00
    inet 127.0.0.1/8 scope host lo
       valid_lft forever preferred_lft forever
    inet6 ::1/128 scope host
       valid_lft forever preferred_lft forever
2: enp49s0f0: <BROADCAST,MULTICAST,UP,LOWER_UP> mtu 1500 qdisc mq state UP group default qlen 1000
    link/ether d4:5d:64:07:a8:ea brd ff:ff:ff:ff:ff:ff
    inet 10.10.1.2/24 brd 10.10.1.255 scope global enp49s0f0
       valid_lft forever preferred_lft forever
    inet6 fe80::d65d:64ff:fe07:a8ea/64 scope link
       valid_lft forever preferred_lft forever
3: enp49s0f1: <BROADCAST,MULTICAST> mtu 1500 qdisc noop state DOWN group default qlen 1000
    link/ether d4:5d:64:07:a8:eb brd ff:ff:ff:ff:ff:ff
4: enp49s0f0.10@enp49s0f0: <BROADCAST,MULTICAST,UP,LOWER_UP> mtu 1500 qdisc noqueue state UP group default qlen 1000
    link/ether d4:5d:64:07:a8:ea brd ff:ff:ff:ff:ff:ff
    inet 10.10.1.105/24 brd 10.10.1.255 scope global enp49s0f0.10
       valid_lft forever preferred_lft forever
    inet6 fe80::d65d:64ff:fe07:a8ea/64 scope link
       valid_lft forever preferred_lft forever
30: br0: <BROADCAST,MULTICAST,UP,LOWER_UP> mtu 1500 qdisc noqueue state UP group default qlen 1000
    link/ether 06:d5:cb:8f:b9:c2 brd ff:ff:ff:ff:ff:ff
    inet6 fe80::d4ee:2ff:fe1c:67ce/64 scope link
       valid_lft forever preferred_lft forever
31: br-veth0@if32: <BROADCAST,MULTICAST,UP,LOWER_UP> mtu 1500 qdisc noqueue master br0 state UP group default qlen 1000
    link/ether 82:37:d6:bd:d5:d7 brd ff:ff:ff:ff:ff:ff link-netnsid 0
    inet6 fe80::8037:d6ff:febd:d5d7/64 scope link
       valid_lft forever preferred_lft forever
33: br-veth1@if34: <BROADCAST,MULTICAST,UP,LOWER_UP> mtu 1500 qdisc noqueue master br0 state UP group default qlen 1000
    link/ether 06:d5:cb:8f:b9:c2 brd ff:ff:ff:ff:ff:ff link-netnsid 1
    inet6 fe80::4d5:cbff:fe8f:b9c2/64 scope link
       valid_lft forever preferred_lft forever
# veth0 ping veth1
[root@localhost ~]# ip netns exec ns1 ping 10.1.1.3
PING 10.1.1.3 (10.1.1.3) 56(84) bytes of data.
64 bytes from 10.1.1.3: icmp_seq=1 ttl=64 time=0.093 ms
64 bytes from 10.1.1.3: icmp_seq=2 ttl=64 time=0.026 ms
64 bytes from 10.1.1.3: icmp_seq=3 ttl=64 time=0.017 ms
^C
--- 10.1.1.3 ping statistics ---
3 packets transmitted, 3 received, 0% packet loss, time 2047ms
rtt min/avg/max/mdev = 0.017/0.045/0.093/0.034 ms
3.3 通过 OVS 相连#
OVS 是第三方开源的 Bridge,功能比 Linux Bridge 要更强大,对于同样的实验,我们用 OVS 来看看是什么效果。
如下图所示:
同样测试两个 namespace 之间的连通性:
# 用 ovs 提供的命令创建一个 ovs bridge
ovs-vsctl add-br ovs-br

# 创建两对 veth-pair
ip link add veth0 type veth peer name ovs-veth0
ip link add veth1 type veth peer name ovs-veth1

# 将 veth-pair 两端分别加入到 ns 和 ovs bridge 中
ip link set veth0 netns ns1
ovs-vsctl add-port ovs-br ovs-veth0
ip link set ovs-veth0 up

ip link set veth1 netns ns2
ovs-vsctl add-port ovs-br ovs-veth1
ip link set ovs-veth1 up

# 给 ns 中的 veth 配置 IP 并启用
ip netns exec ns1 ip link add10.1.1.2/24 dev veth0
ip netns exec ns1 ip link set veth0 up

ip netns exec ns2 ip link add 10.1.1.3/24 dev veth1
ip netns exec ns2 ip link set veth1 up

# veth0 ping veth1
[root@localhost ~]# ip netns exec ns1 ping 10.1.1.3
PING 10.1.1.3 (10.1.1.3) 56(84) bytes of data.
64 bytes from 10.1.1.3: icmp_seq=1 ttl=64 time=0.311 ms
64 bytes from 10.1.1.3: icmp_seq=2 ttl=64 time=0.087 ms
^C
--- 10.1.1.3 ping statistics ---
2 packets transmitted, 2 received, 0% packet loss, time 999ms
rtt min/avg/max/mdev = 0.087/0.199/0.311/0.112 ms总结#
veth-pair 在虚拟网络中充当着桥梁的角色,连接多种网络设备构成复杂的网络。
veth-pair 的三个经典实验,直接相连、通过 Bridge 相连和通过 OVS 相连。
======================================================================================================================================================
Switching in software on Linux is one of the important parts when using virtualization technologies like KVM or LXC. Typical hosts do not provide one or more physical adapters for each NIC of a virtual machine in KVM or per container when using LXC. Something else must take the part to interconnect the virtual network interfaces.
The software switching classical tool is the linuxbridge, which is available in the Linux kernel for a long time. The frontend to manage the linuxbridge is brctl. The newer tool is the Openvswitch (at http://openvswitch.org/). The main frontend is ovs-vsctl.
In this post I will show multiple solutions to interconnect Linux namespaces using a software based switch. A performance analysis of these solutions will be discussed in another article later. Starting with network namespaces helps to understand the more complex situations when using KVM or LXC.
tap interfaces
Linux tap interfaces created with ip tuntap cannot be used to attach network namespaces to linuxbridges or the openvswitch.
veth pair
The simple solution to connect two network namespaces is the usage of one veth pair. This has been discussed in a previous artice.
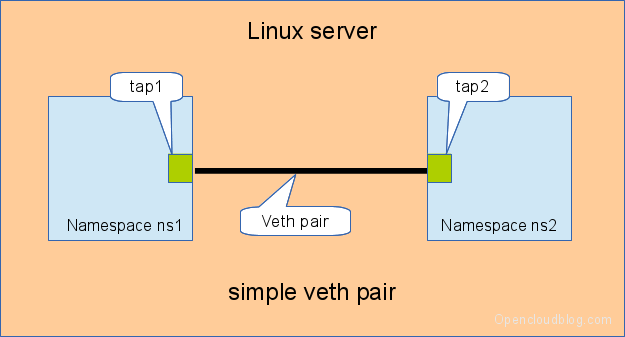
Connecting namespaces using a veth pair
The command sequence has been discussed in a previous article, but we show the commands here again
veth pair
Shell
| 1 2 3 4 5 6 7 8 9 10 11 12 | # add the namespaces ip netns add ns1 ip netns add ns2 # create the veth pair ip link add tap1 type veth peer name tap2 # move the interfaces to the namespaces ip link set tap1 netns ns1 ip link set tap2 netns ns2 # bring up the links ip netns exec ns1 ip link set dev tap1 up ip netns exec ns2 ip link set dev tap2 up # now assign the ip addresses |
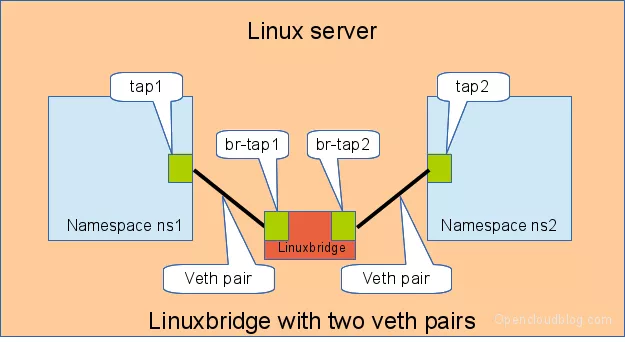
linux bridge and two veth pairs
When more than two network namespaces (or KVM or LXC instances) must be connected a switch should be used. Linux offers as one solution the well known linux bridge.
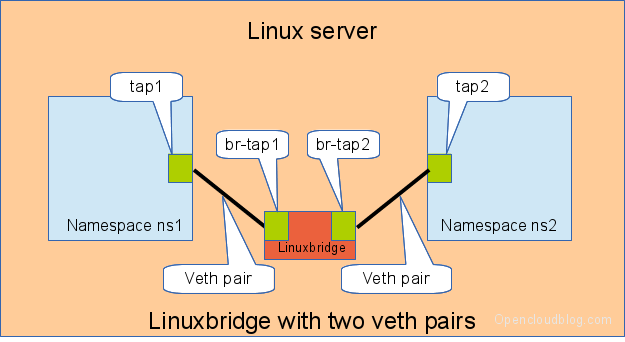
Connecting namespaces using a linux bridge and two veth pairs
We need for this setup one switch, and two connectors. In this setup we use a linuxbridge and two veth pairs.
The commands to create this setup are:
linuxbridge and two veth pairs
Shell
| 1 2 3 4 5 6 7 8 9 10 11 12 13 14 15 16 17 18 19 20 21 22 23 24 25 26 27 28 29 30 31 | # add the namespaces ip netns add ns1 ip netns add ns2 # create the switch BRIDGE=br-test brctl addbr $BRIDGE brctl stp $BRIDGE off ip link set dev $BRIDGE up # #### PORT 1 # create a port pair ip link add tap1 type veth peer name br-tap1 # attach one side to linuxbridge brctl addif br-test br-tap1 # attach the other side to namespace ip link set tap1 netns ns1 # set the ports to up ip netns exec ns1 ip link set dev tap1 up ip link set dev br-tap1 up # #### PORT 2 # create a port pair ip link add tap2 type veth peer name br-tap2 # attach one side to linuxbridge brctl addif br-test br-tap2 # attach the other side to namespace ip link set tap2 netns ns2 # set the ports to up ip netns exec ns2 ip link set dev tap2 up ip link set dev br-tap2 up # |
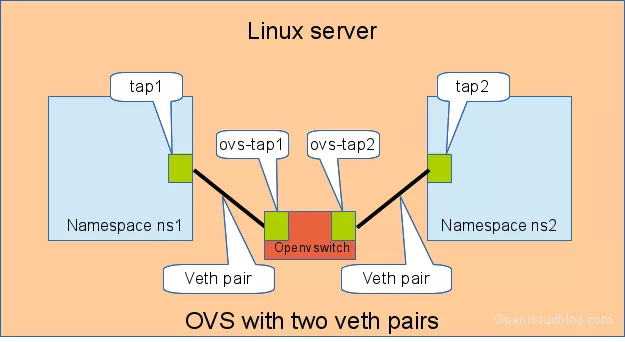
openvswitch and two veth pairs
Another solution is to use the openvswitch instead of the „old“ linuxbrige. The configuration is nearly the same as for the linuxbridge.
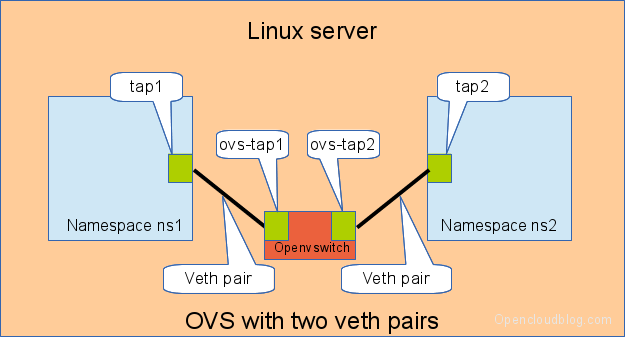
Connecting namespaces using the openvswitch and two veth pairs
We need for this setup one switch, and two connectors. In this setup we use an openvswitch and two veth pairs.
The commands to create this setup are:
openvswitch and two veth pairs
Shell
| 1 2 3 4 5 6 7 8 9 10 11 12 13 14 15 16 17 18 19 20 21 22 23 24 25 26 27 28 29 | # add the namespaces ip netns add ns1 ip netns add ns2 # create the switch BRIDGE=ovs-test ovs-vsctl add-br $BRIDGE # #### PORT 1 # create a port pair ip link add tap1 type veth peer name ovs-tap1 # attach one side to ovs ovs-vsctl add-port $BRIDGE ovs-tap1 # attach the other side to namespace ip link set tap1 netns ns1 # set the ports to up ip netns exec ns1 ip link set dev tap1 up ip link set dev ovs-tap1 up # #### PORT 2 # create a port pair ip link add tap2 type veth peer name ovs-tap2 # attach one side to ovs ovs-vsctl add-port $BRIDGE ovs-tap2 # attach the other side to namespace ip link set tap2 netns ns2 # set the ports to up ip netns exec ns2 ip link set dev tap2 up ip link set dev ovs-tap2 up # |
openvswitch and two openvswitch ports
Another solution is to use the openvswitch and make use of the openvswitch internal ports. This avoids the usage of the veth pairs, which must be used in all other solutions.
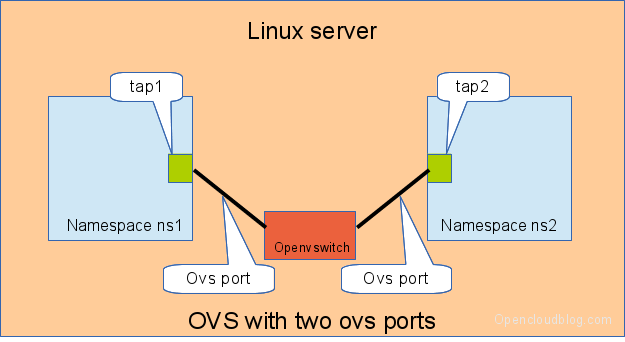
Connecting namespaces using the openvswitch and two openvswitch ports
We need for this setup one switch, and two connectors. In this setup we use an openvswitch and two openvswitch ports.
The commands to create this setup are:
openvswitch and two openvswitch internal ports
Shell
| 1 2 3 4 5 6 7 8 9 10 11 12 13 14 15 16 17 18 19 20 21 22 | # add the namespaces ip netns add ns1 ip netns add ns2 # create the switch BRIDGE=ovs-test ovs-vsctl add-br $BRIDGE # #### PORT 1 # create an internal ovs port ovs-vsctl add-port $BRIDGE tap1 -- set Interface tap1 type=internal # attach it to namespace ip link set tap1 netns ns1 # set the ports to up ip netns exec ns1 ip link set dev tap1 up # #### PORT 2 # create an internal ovs port ovs-vsctl add-port $BRIDGE tap2 -- set Interface tap2 type=internal # attach it to namespace ip link set tap2 netns ns2 # set the ports to up ip netns exec ns2 ip link set dev tap2 up |
Performance
In another article I will show some performance numbers for the four presented solutions. There are noticeable differences with respect to throughput and CPU usage.
感谢
http://www.opencloudblog.com/?p=66
https://www.cnblogs.com/bakari/p/10613710.html
https://segmentfault.com/a/1190000009251098


 500
500

 被折叠的 条评论
为什么被折叠?
被折叠的 条评论
为什么被折叠?
 到【灌水乐园】发言


