


文章目录
1 WSL Ubuntu 中挂载 U 盘(SDCard)
Linux 驱动开发需要给 SDCard 烧写 u-boot,kernal,rootfs 等内容。如果我们要使用 wsl(这里的 wsl 指的是 WSL 2.x 版本,下同) 进行 Linux 驱动开发,那么我们首先要将 SDCard 挂载到 wsl 中。
-
参考:
- https://zhuanlan.zhihu.com/p/661175117
- https://zhuanlan.zhihu.com/p/607493975
-
sdcard 无法挂载到 wsl 有 2 个原因:
- wsl 是虚拟机,无法直接访问宿主机的 USB 设备。这个问题通过一个叫 usbipd 的桥接工具解决
- wsl 内核没有加入 USB 存储设备的驱动。这个问题通过重新编译 wsl 内核镜像解决
2 usbipd 搭建虚拟机与宿主机 USB 通信桥梁
usbipd 在 OSI 的网络层(IP)、传输层(TCP)之间建立 USB 设备与虚拟机的通信,即 IP 网络共享 USB 设备。
- 1)安装 usbipd 工具
# 可以通过以下命令下载安装(我这里可能因为网络原因失败了)
winget install --interactive --exact dorssel.usbipd-win

# 也可以直接去其 github 分发地址下载,下载完成后双击安装即可。
https://github.com/dorssel/usbipd-win/releases
- 2)回到 wsl ubuntu 中安装 usbipd 工具:
sudo apt install linux-tools-generic hwdata
sudo update-alternatives --install /usr/local/bin/usbip usbip /usr/lib/linux-tools/*-generic/usbip 20
- 3)根据要求重启宿主机。
3 WSL 内核添加 USB 设备驱动
与 Linux 驱动开发的流程一样:配置驱动,编译内核。
3.1 编译 WSL Linux 内核
- 1)编译工具库准备
sudo apt install libncurses-dev libgmp-dev  \
    build-essential flex bison libssl-dev libelf-dev dwarves
- 2)源码准备:
# 克隆源码
git clone https://github.com/microsoft/WSL2-Linux-Kernel.git

# 选择合适的分支检出(原来这里我选择 6.6.y 版本,却没有六六大顺 ^_^)
git branch -a
git tag

git checkout linux-msft-wsl-5.15.y
-
3)内核配置文件编辑:
make menuconfig KCONFIG_CONFIG=Microsoft/config-wsl-
(1)进入 Device Drivers -> USB Support
-
(2)找到 Support for Host-side USB,键入 “y”
-
(3)找到 USB/IP Support -> VCHI hcd.
-

-
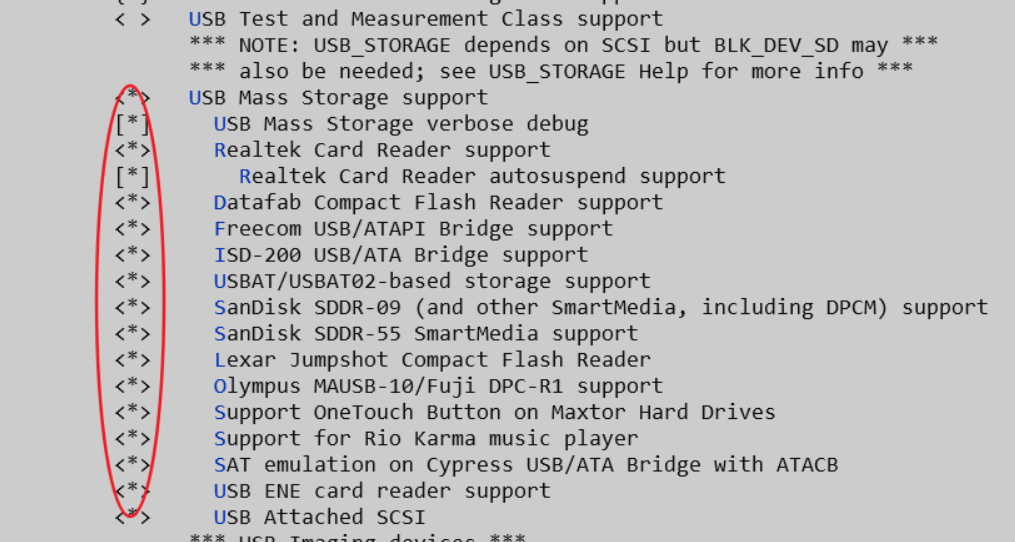
(4)找到 USB Mass Storage support,将其子条目全部选中
-
-
-
4)编译 wsl linux 内核:(如果中途有询问选项,直接回车即可)
make -j$(nproc) bzImage KCONFIG_CONFIG=Microsoft/config-wsl

# 结果查询:
find -name bzImage -exec ls -lh {} \;

lrwxrwxrwx 1 root root 22 Sep 11 16:24  ./arch/x86_64/boot/bzImage -> ../../x86/boot/bzImage
-rw-r--r-- 1 root root 16M Sep 11 16:24 ./arch/x86/boot/bzImage
3.2 挂载 USB(SDCard) 设备
-
1)打开用户目录(如 C:\Users\[username],可在资源管理器中输入 %UserProfile% 打开该目录),将 bzImage 拷贝进去
-
2)新建名为 .wslconfig 的配置文件,并输入以下内容:
[wsl2] kernel=C:\\Users\\[Username]\\bzImage # 替换上述 [Username] -
3)重启 wsl ubuntu。
# 在 PowerShell 中输入以下命令
# 终止运行
wsl -t Ubuntu-22.04-cb2
# 以 root 用户启动
wsl -d Ubuntu-22.04-cb2 -u root

# 在 ubuntu 中输入
$ uname -r
5.15.153.1-microsoft-standard-WSL2+
- 4)连接:
PS C:\Users\Chris> usbipd list
Connected:
BUSID  VID:PID    DEVICE                                                        STATE
1-19   067b:2731  USB 大容量存储设备                                            Not shared

Persisted:
GUID                                  DEVICE

PS C:\Users\Chris> usbipd bind -b 1-19
PS C:\Users\Chris> usbipd attach -a --wsl --busid 1-19
usbipd: info: Using WSL distribution 'Ubuntu-22.04-cb2' to attach; the device will be available in all WSL 2 distributions.
usbipd: info: Using IP address 172.22.48.1 to reach the host.
usbipd: info: Starting endless attach loop; press Ctrl+C to quit.
WSL Attached
- 5)连接结果:
$ lsusb
Bus 002 Device 002: ID 067b:2731 Prolific Technology, Inc. USB SD Card Reader
Bus 002 Device 001: ID 1d6b:0003 Linux Foundation 3.0 root hub
Bus 001 Device 001: ID 1d6b:0002 Linux Foundation 2.0 root hub

$ lsblk
NAME MAJ:MIN RM   SIZE RO TYPE MOUNTPOINTS
sda    8:0    0 388.6M  1 disk
sdb    8:16   0     2G  0 disk [SWAP]
sdc    8:32   0     1T  0 disk /snap
                               /mnt/wslg/distro
                               /
sdd    8:48   1  29.1G  0 disk
- 6)问题日志:
# 情况 1:
usbipd attach -a --wsl --busid 1-19
usbipd: error: Device is not shared; run 'usbipd bind --busid 1-19' as administrator first.
这种情况需要先使用 usbipd bind -b 1-19 命令将 STATE 的状态变成 Shared

# 情况 2:
usbipd attach -a --wsl --busid 1-19
usbipd: info: Using WSL distribution 'Ubuntu-22.04-cb2' to attach; the device will be available in all WSL 2 distributions.
usbipd: info: Loading vhci_hcd module.
usbipd: error: Loading vhci_hcd failed.
这种情况可以先去 wsl ubuntu 中输入 modprobe vhci_hcd 指令查看 vhci_hcd 模块是否安装,
如果没有安装,需要在 make menuconfig 时设置 Device Drivers -> USB Support -> USB/IP Support -> VHCI hcd

# 情况3:
usbipd list
WARNING: usbipd not found for kernel 6.6.36.6-microsoft

  You may need to install the following packages for this specific kernel:
    linux-tools-6.6.36.6-microsoft-standard-WSL2+
    linux-cloud-tools-6.6.36.6-microsoft-standard-WSL2+

  You may also want to install one of the following packages to keep up to date:
    linux-tools-standard-WSL2+
    linux-cloud-tools-standard-WSL2+
这个命令应该在 wsl 中执行,而不是 wsl ubuntu 的命令行
附录:WSL 操作命令
- 参考:https://blog.csdn.net/weixin_38103659/article/details/125135074
wsl -l [--running]  # 列出当前 WSL [运行中] Linux 子系统
wsl -t [wsl_name]   # 终止名为 wsl_name 的 Linux 子系统

# 打开新 WSL 实例
wsl -d UbuntuRuby               # 仅打开指定版本
wsl -d UbuntuRuby -u username   # 以指定用户启动

# 备份与恢复
wsl --export Ubuntu-22.04                 D:\Workspace\WSL_Bak\Ubuntu-22.04-20240908.tar
wsl --import Ubuntu-22.04 D:\Software\WSL D:\Workspace\WSL_Bak\Ubuntu-22.04-20240908.tar
附录:git 仓库检出
# 1)我们想要操作的是远程【分支】,以 wsl linux 仓库为例:
$ git branch -a
remotes/origin/HEAD -> origin/linux-msft-wsl-6.6.y
remotes/origin/linux-msft-wsl-4.19.y
remotes/origin/linux-msft-wsl-5.10.y
remotes/origin/linux-msft-wsl-5.15.y
remotes/origin/linux-msft-wsl-5.4.y
remotes/origin/linux-msft-wsl-6.1.y
remotes/origin/linux-msft-wsl-6.6.y
remotes/origin/master
## (1)先创建本地分支,再检出
git branch linux-msft-wsl-5.15.y remotes/origin/linux-msft-wsl-5.15.y
git checkout linux-msft-wsl-5.15.y
## (2)直接检出远程分支,并创建一个与之关联的本地分支
git checkout -b linux-msft-wsl-6.6.y remotes/origin/linux-msft-wsl-6.6.y
# (3)在本地新建一个同名分支,系统会自动关联其同名远程分支
git checkout linux-msft-wsl-6.6.y

# 2)我们想要操作的是【标签】,以 linux 仓库为例
$ git tag | grep v6.0
v6.0
v6.0-rc1
v6.0-rc2
v6.0-rc3
v6.0-rc4
v6.0-rc5
v6.0-rc6
v6.0-rc7
# (1)先创建分支,再切换
git branch v6.0-rc7 v6.0-rc7
git checkout v6.0-rc7
# (2)直接创建
git checkout -b v6.0-rc7 v6.0-rc7


 1264
1264

 被折叠的 条评论
为什么被折叠?
被折叠的 条评论
为什么被折叠?
 到【灌水乐园】发言


