


 超级会员免费看
📌 本文将介绍如何在 Vue 3 中使用 OpenLayers 实现:
1)用户可在地图上绘制矩形;
2)自动截取该区域地图为图片;
3)一键保存为本地 PNG 图片。
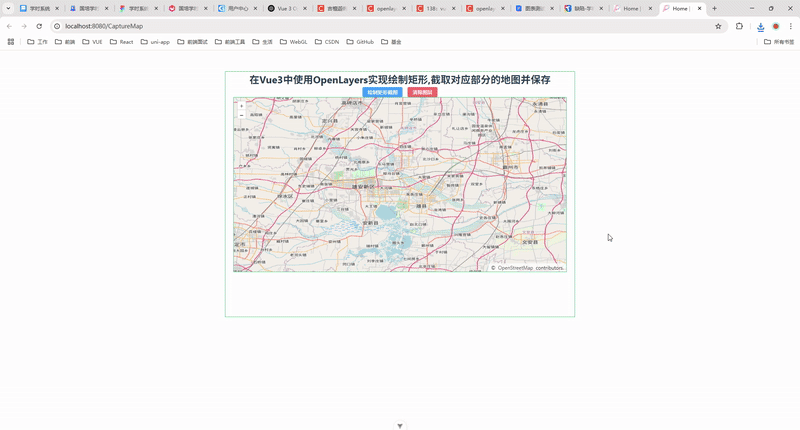
✨效果如下图所示
🧠一、前言
在地图类 Web 应用中,我们经常有这样的需求:
-
想截取某个区域的地图;
-
想让用户自由框选区域后下载;
-
或作为报告附图、图片处理的输入。
本文就带大家用 Vue 3 + OpenLayers 来实现“绘制矩形并截图保存”功能,完整、实用、即插即用。
🔧二、核心技术栈
| 技术 | 说明 |
|---|---|
| Vue 3 | 前端框架,使用 Composition API |
| OpenLayers | 地图引擎,支持绘制、图层操作等 |
| Element Plus | UI 组件库,用于按钮控制 |
📦三、项目初始化
推荐使用 Vite 快速构建 Vue 3 项目:
npm create vite@latest vue3-openlayers-demo --template vue
cd vue3-openlayers-demo
npm install
安装必要依赖:
npm install ol element-plus在 main.js 中引入 Element Plus:
import ElementPlus from 'element-plus' import 'element-plus/dist/index.css' app.use(ElementPlus)✍️四、完整实现代码(Composition API 写法)
我们将完整功能封装在一个组件中,以下为 MapScreenshot.vue 代码:
<!--
 * @Author: 彭麒
 * @Date: 2025/5/15
 * @Email: 1062470959@qq.com
 * @Description: 此源码版权归吉檀迦俐所有,可供学习和借鉴或商用。
 -->
<template>
  <div class="container">
    <div class="w-full flex justify-center flex-wrap">
      <div class="font-bold text-[24px]">在Vue3中使用OpenLayers实现绘制矩形,截取对应部分的地图并保存</div>
    </div>
    <h4>
      <el-button type="primary" size="small" @click="drawBox">绘制矩形截图</el-button>
      <el-button type="danger" size="small" @click="clearSource">清除图层</el-button>
    </h4>
    <div id="vue-openlayers"></div>
  </div>
</template>

<script setup>
import { onMounted, ref } from 'vue'

import 'ol/ol.css'
import { Map, View } from 'ol'
import TileLayer from 'ol/layer/Tile'
import VectorLayer from 'ol/layer/Vector'
import OSM from 'ol/source/OSM'
import VectorSource from 'ol/source/Vector'
import Draw, { createBox } from 'ol/interaction/Draw'
import { Style, Fill, Stroke } from 'ol/style'

// 创建响应式引用
const map = ref(null)
const draw = ref(null)
const source = new VectorSource({ wrapX: false })

// 初始化地图
const initMap = () => {
  const raster = new TileLayer({
    source: new OSM(),
  })

  const vector = new VectorLayer({
    source,
    style: new Style({
      fill: new Fill({
        color: 'rgba(0,0,0,0)',
      }),
      stroke: new Stroke({
        color: 'darkgreen',
        width: 2,
      }),
    }),
  })

  map.value = new Map({
    target: 'vue-openlayers',
    layers: [raster, vector],
    view: new View({
      projection: 'EPSG:4326',
      center: [116.1206, 39.034996],
      zoom: 10,
    }),
  })
}

// 清除图层
const clearSource = () => {
  source.clear()
}

// 绘制矩形并截图保存
const drawBox = () => {
  if (draw.value) {
    map.value.removeInteraction(draw.value)
  }

  draw.value = new Draw({
    source,
    type: 'Circle',
    geometryFunction: createBox(),
  })

  map.value.addInteraction(draw.value)

  draw.value.on('drawend', (e) => {
    if (draw.value) {
      map.value.removeInteraction(draw.value)
    }

    map.value.renderSync()
    const extent = e.feature.getGeometry().getExtent()

    const leftTop = map.value.getPixelFromCoordinate([extent[0], extent[3]])
    const bottomRight = map.value.getPixelFromCoordinate([extent[2], extent[1]])

    const width = Math.abs(bottomRight[0] - leftTop[0])
    const height = Math.abs(bottomRight[1] - leftTop[1])

    const minx = leftTop[0]
    const miny = leftTop[1]

    const mapCanvas = document.getElementsByClassName('ol-layer')[0].children[0]
    const ctx = mapCanvas.getContext('2d')
    const imageData = ctx.getImageData(minx, miny, width, height)

    const canvas = document.createElement('canvas')
    canvas.width = width
    canvas.height = height
    canvas.getContext('2d').putImageData(imageData, 0, 0)

    const dataUrl = canvas.toDataURL()
    const link = document.createElement('a')
    link.download = '我的图片.png'
    link.href = dataUrl
    link.click()
  })
}

onMounted(() => {
  initMap()
})
</script>

<style scoped>
.container {
  width: 840px;
  height: 590px;
  margin: 50px auto;
  border: 1px solid #42B983;
}
#vue-openlayers {
  width: 800px;
  height: 420px;
  margin: 0 auto;
  border: 1px solid #42B983;
  position: relative;
}
</style>
🎁五、功能说明
| 功能 | 说明 |
|---|---|
| 绘制矩形 | 鼠标在地图拖动绘制一个矩形区域 |
| 截图区域 | 自动计算该区域对应的 canvas 像素范围 |
| 保存图片 | 提取该 canvas 区域内容,生成 PNG 并下载 |
| 清除图层 | 一键清空绘制的图形,保持地图干净 |
🧩六、关键技术解析
✅ createBox() 与 Draw
import { createBox } from 'ol/interaction/Draw'-
createBox()是一个 geometryFunction,配合type: 'Circle'使用时,会把圆形绘制转换为矩形绘制。 -
非常巧妙地实现了“绘制矩形”的能力!
✅ getPixelFromCoordinate() 实现截图区域定位
将地理坐标转换为像素坐标,才能从 canvas 中精确提取图像:
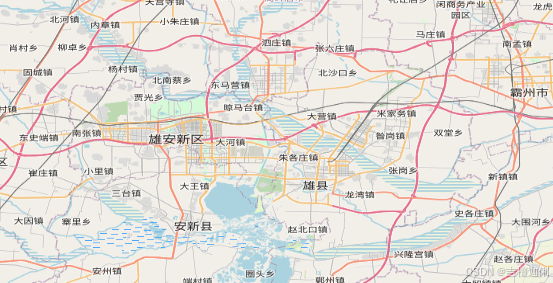
map.getPixelFromCoordinate([x, y])🧪七、实测效果截图
🔚八、总结
本文介绍了如何在 Vue 3 中集成 OpenLayers,并实现一个非常实用的截图保存功能。通过绘制矩形,可以对地图任意区域进行截图提取,非常适合:
-
地图分析应用;
-
地理标注报告;
-
自定义地图素材裁剪;
📎九、联系方式
🧑💻作者:彭麒
📧Email:1062470959@qq.com
📌CSDN主页:欢迎点赞 + 收藏 + 关注
如本文对你有帮助,欢迎留言交流!


 169
169

 被折叠的 条评论
为什么被折叠?
被折叠的 条评论
为什么被折叠?
 到【灌水乐园】发言


