


 本文介绍如何使用setTheme方法实现Android应用的日间与夜间模式切换,包括定义颜色、主题及布局,以及通过recreate方法更新界面。
1、使用 setTheme 的方法让 Activity 重新设置主题;
2、设置 Android Support Library 中的 UiMode 来支持日间/夜间模式的切换;
3、通过资源 id 映射,回调自定义 ThemeChangeListener 接口来处理日间/夜间模式的切换。
一、使用 setTheme 方法
我们先来看看使用 setTheme 方法来实现日间/夜间模式切换的方案。这种方案的思路很简单,就是在用户选择夜间模式时,Activity 设置成夜间模式的主题,之后再让 Activity 调用 recreate() 方法重新创建一遍就行了。
那就动手吧,在 colors.xml 中定义两组颜色,分别表示日间和夜间的主题色:
<?xml version="1.0" encoding="utf-8"?>
<resources>
 <color name="colorPrimary">#3F51B5</color>
 <color name="colorPrimaryDark">#303F9F</color>
 <color name="colorAccent">#FF4081</color>

 <color name="nightColorPrimary">#3b3b3b</color>
 <color name="nightColorPrimaryDark">#383838</color>
 <color name="nightColorAccent">#a72b55</color>
</resources>
<resources>

 <!-- Base application theme. -->
 <style name="AppTheme" parent="Theme.AppCompat.Light.DarkActionBar">
  <!-- Customize your theme here. -->
  <item name="colorPrimary">@color/colorPrimary</item>
  <item name="colorPrimaryDark">@color/colorPrimaryDark</item>
  <item name="colorAccent">@color/colorAccent</item>
  <item name="android:textColor">@android:color/black</item>
  <item name="mainBackground">@android:color/white</item>
 </style>

 <style name="NightAppTheme" parent="Theme.AppCompat.Light.DarkActionBar">
  <!-- Customize your theme here. -->
  <item name="colorPrimary">@color/nightColorPrimary</item>
  <item name="colorPrimaryDark">@color/nightColorPrimaryDark</item>
  <item name="colorAccent">@color/nightColorAccent</item>
  <item name="android:textColor">@android:color/white</item>
  <item name="mainBackground">@color/nightColorPrimaryDark</item>
 </style>

</resources>mainBackground
属性是我们自定义的属性,用来表示背景色:
<?xml version="1.0" encoding="utf-8"?>
<resources>
 <attr name="mainBackground" format="color|reference"></attr>
</resources>
<?xml version="1.0" encoding="utf-8"?>
<RelativeLayout xmlns:android="http://schemas.android.com/apk/res/android"
 xmlns:tools="http://schemas.android.com/tools"
 android:layout_width="match_parent"
 android:layout_height="match_parent"
 android:background="?attr/mainBackground"
 android:paddingBottom="@dimen/activity_vertical_margin"
 android:paddingLeft="@dimen/activity_horizontal_margin"
 android:paddingRight="@dimen/activity_horizontal_margin"
 android:paddingTop="@dimen/activity_vertical_margin"
 tools:context="com.yuqirong.themedemo.MainActivity">

 <Button
  android:id="@+id/btn_theme"
  android:layout_width="match_parent"
  android:layout_height="wrap_content"
  android:text="切换日/夜间模式" />

 <TextView
  android:id="@+id/tv"
  android:layout_below="@id/btn_theme"
  android:layout_width="match_parent"
  android:layout_height="wrap_content"
  android:gravity="center_horizontal"
  android:text="通过setTheme()的方法" />

</RelativeLayout>android:background
属性中,我们使用 "?attr/mainBackground" 来表示,这样就代表着
RelativeLayout
的背景色会去引用在主题中事先定义好的
mainBackground
属性的值。这样就实现了日间/夜间模式切换的换色了。
最后就是 MainActivity 的代码:
public class MainActivity extends AppCompatActivity {

 // 默认是日间模式
 private int theme = R.style.AppTheme;

 @Override
 protected void onCreate(Bundle savedInstanceState) {
  super.onCreate(savedInstanceState);
 // 判断是否有主题存储
  if(savedInstanceState != null){
   theme = savedInstanceState.getInt("theme");
   setTheme(theme);
  }
  setContentView(R.layout.activity_main);

  Button btn_theme = (Button) findViewById(R.id.btn_theme);
  btn_theme.setOnClickListener(new View.OnClickListener() {
   @Override
   public void onClick(View v) {
    theme = (theme == R.style.AppTheme) ? R.style.NightAppTheme : R.style.AppTheme;
    MainActivity.this.recreate();
   }
  });
 }

 @Override
 protected void onSaveInstanceState(Bundle outState) {
  super.onSaveInstanceState(outState);
  outState.putInt("theme", theme);
 }

 @Override
 protected void onRestoreInstanceState(Bundle savedInstanceState) {
  super.onRestoreInstanceState(savedInstanceState);
  theme = savedInstanceState.getInt("theme");
 }
}
在 MainActivity 中有几点要注意一下:
1、调用 recreate() 方法后 Activity 的生命周期会调用 onSaveInstanceState(Bundle outState) 来备份相关的数据,之后也会调用 onRestoreInstanceState(Bundle savedInstanceState) 来还原相关的数据,因此我们把 theme 的值保存进去,以便 Activity 重新创建后使用。
2、我们在 onCreate(Bundle savedInstanceState) 方法中还原得到了 theme 值后,setTheme() 方法一定要在 setContentView() 方法之前调用,否则的话就看不到效果了。
3、recreate() 方法是在 API 11 中添加进来的,所以在 Android 2.X 中使用会抛异常。
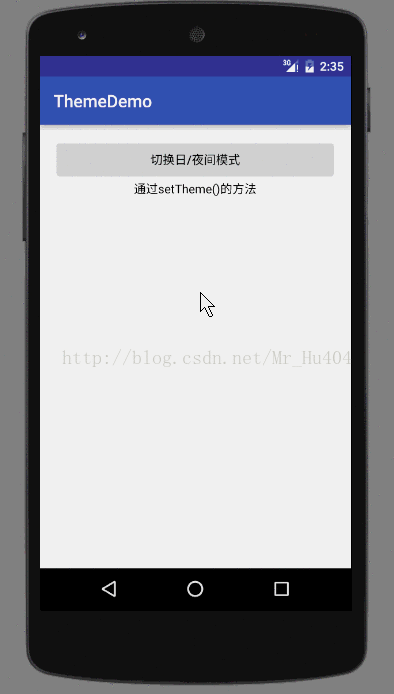
贴完上面的代码之后,我们来看一下该方案实现的效果图:


 3725
3725

 被折叠的 条评论
为什么被折叠?
被折叠的 条评论
为什么被折叠?
 到【灌水乐园】发言


