


1. 准备工作
前提条件
- 已阅读 Ray 新手村任务,了解 Ray 框架的基础知识
- 已阅读 使用 Ray 开发万能面板,了解 Ray 面板开发的基础知识
构建内容
在此 Codelab 中,您将利用面板小程序及 Three.js 的能力开发构建出一个支持支持 3D 模型展示的智能风扇面板。
学习内容
- 如何创建一个小家电风扇产品
- 如何使用 3D 模板快速初始化一个面板小程序项目
- 如何实现在面板小程序中加载 3D 模型并渲染
- 如何实现在面板小程序中获取 3D 内部的事件并回调到业务层
- 如何实现在面板小程序中实现风扇的开关、风速等相关控制
- 如何实现在面板小程序中实现风扇的定时。
所需条件
详见 面板小程序 - 搭建环境
- 智能生活 App
- Tuya MiniApp Tools
- NVM 及 Node 开发环境(建议使用 16.x 系列版本)
- Yarn 依赖管理工具
2. 需求分析
产品名称:智能风扇
需求原型
- 支持
3d模型显示与视角转换 - 支持
实时风速调节功能(开关,风速控制等) - 支持
灯光开关功能 - 支持
定时功能

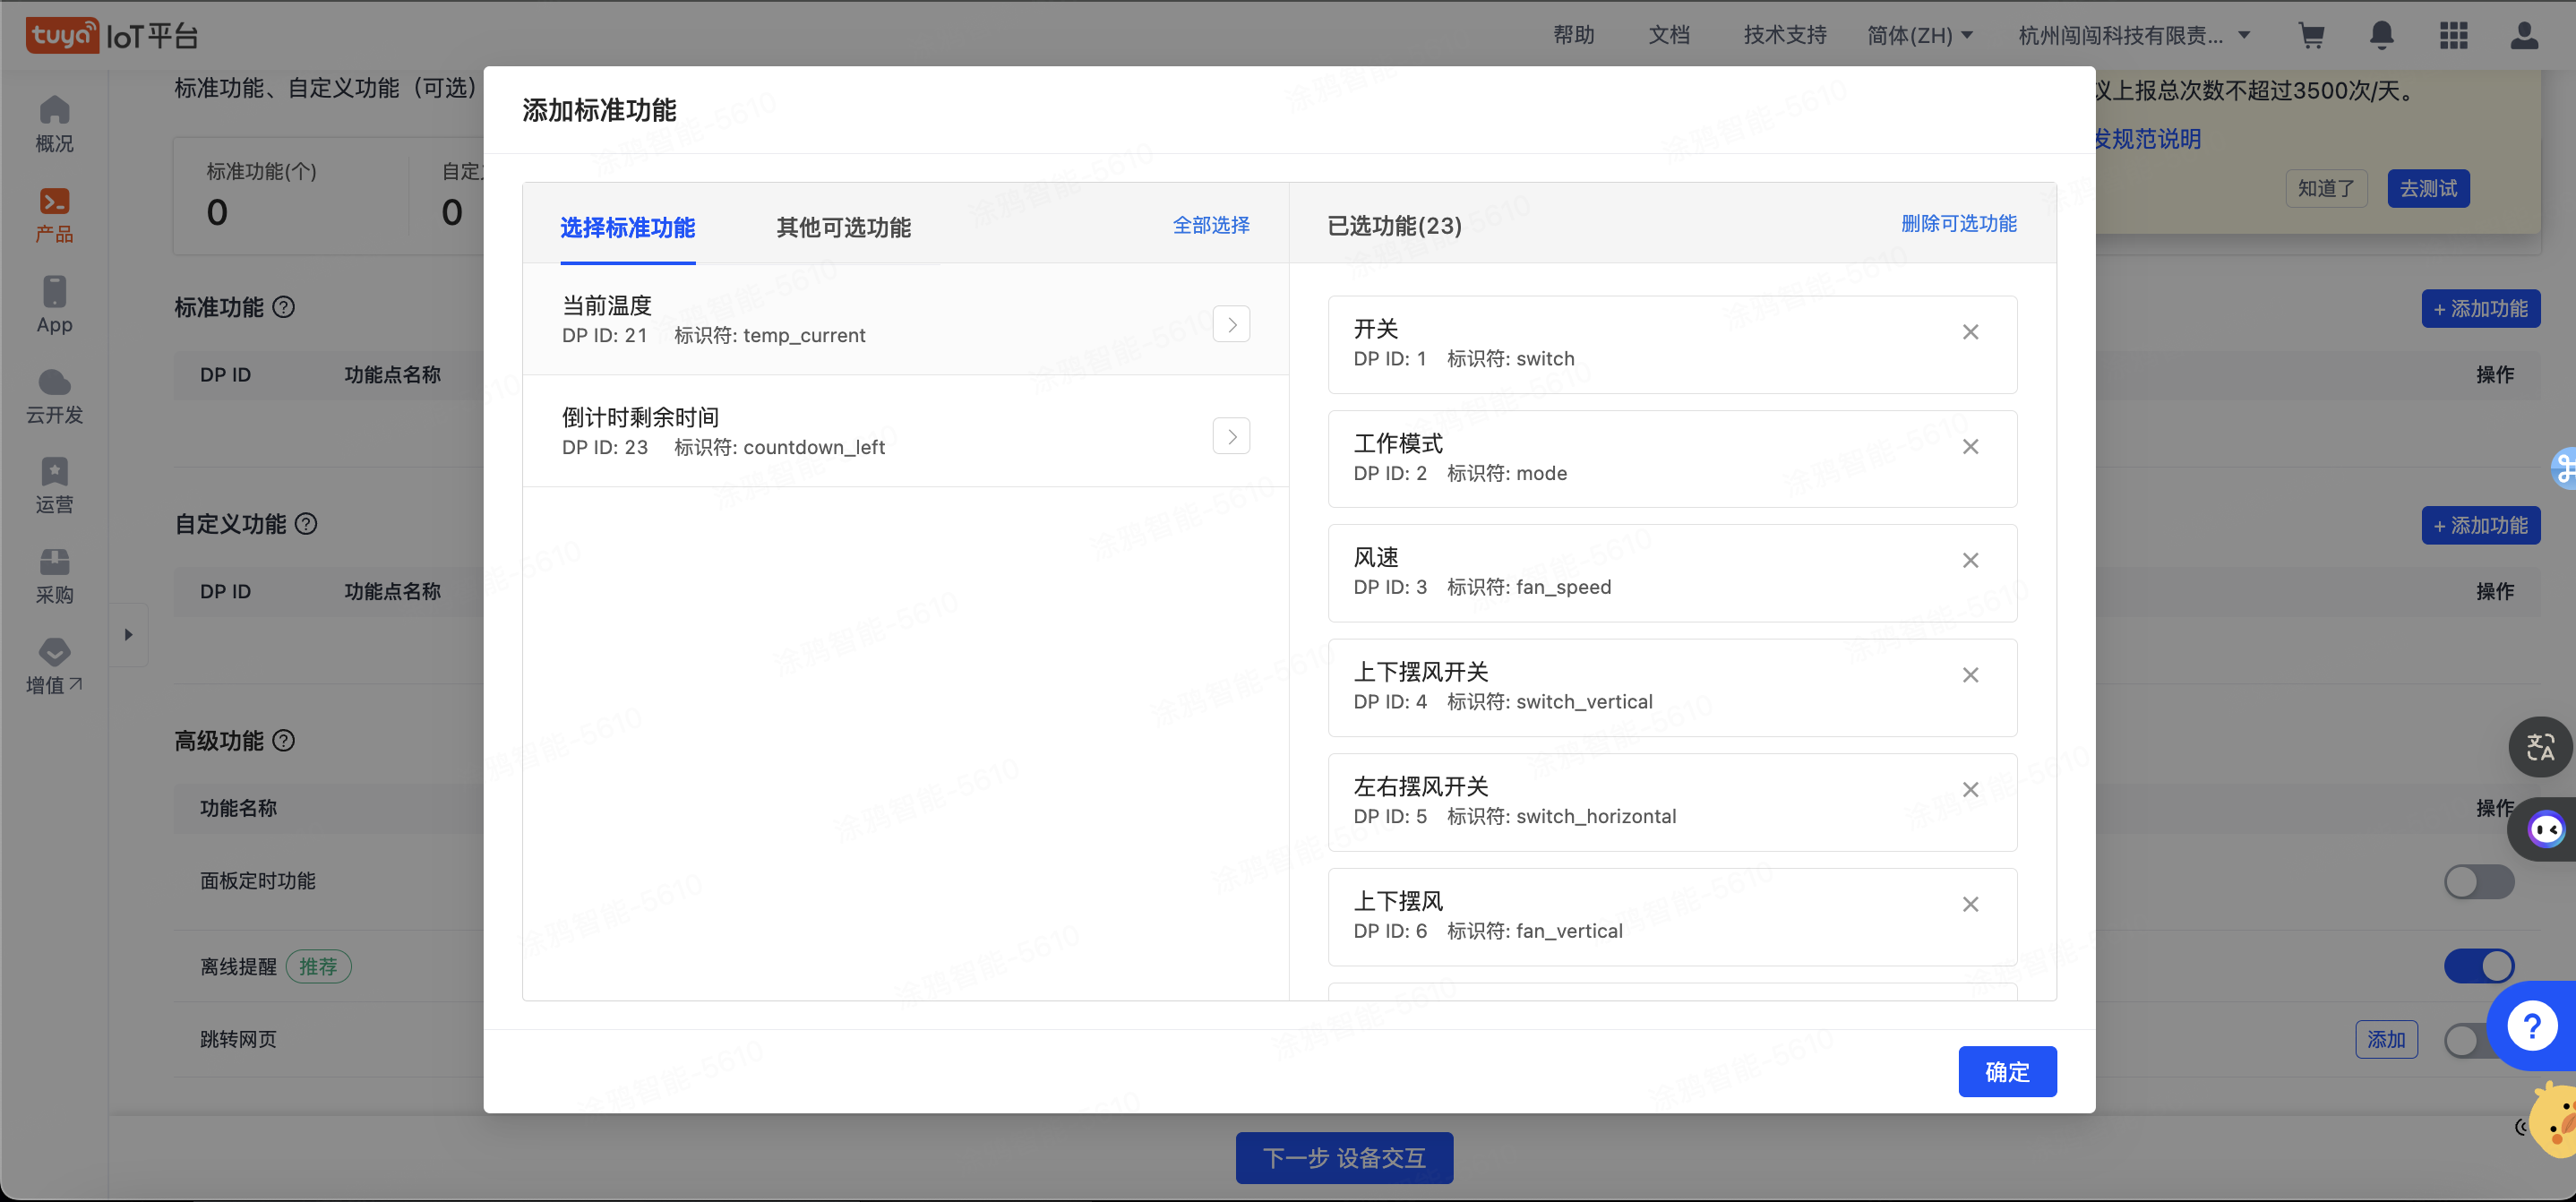
3. 创建产品
首先需要创建一个家电类产品,定义产品有哪些功能点,然后面板中再根据这些功能点一一实现。
进入IoT 平台,点击左侧产品菜单,产品开发,创建产品,选择标准类目 -> 小家电 -> 风扇:
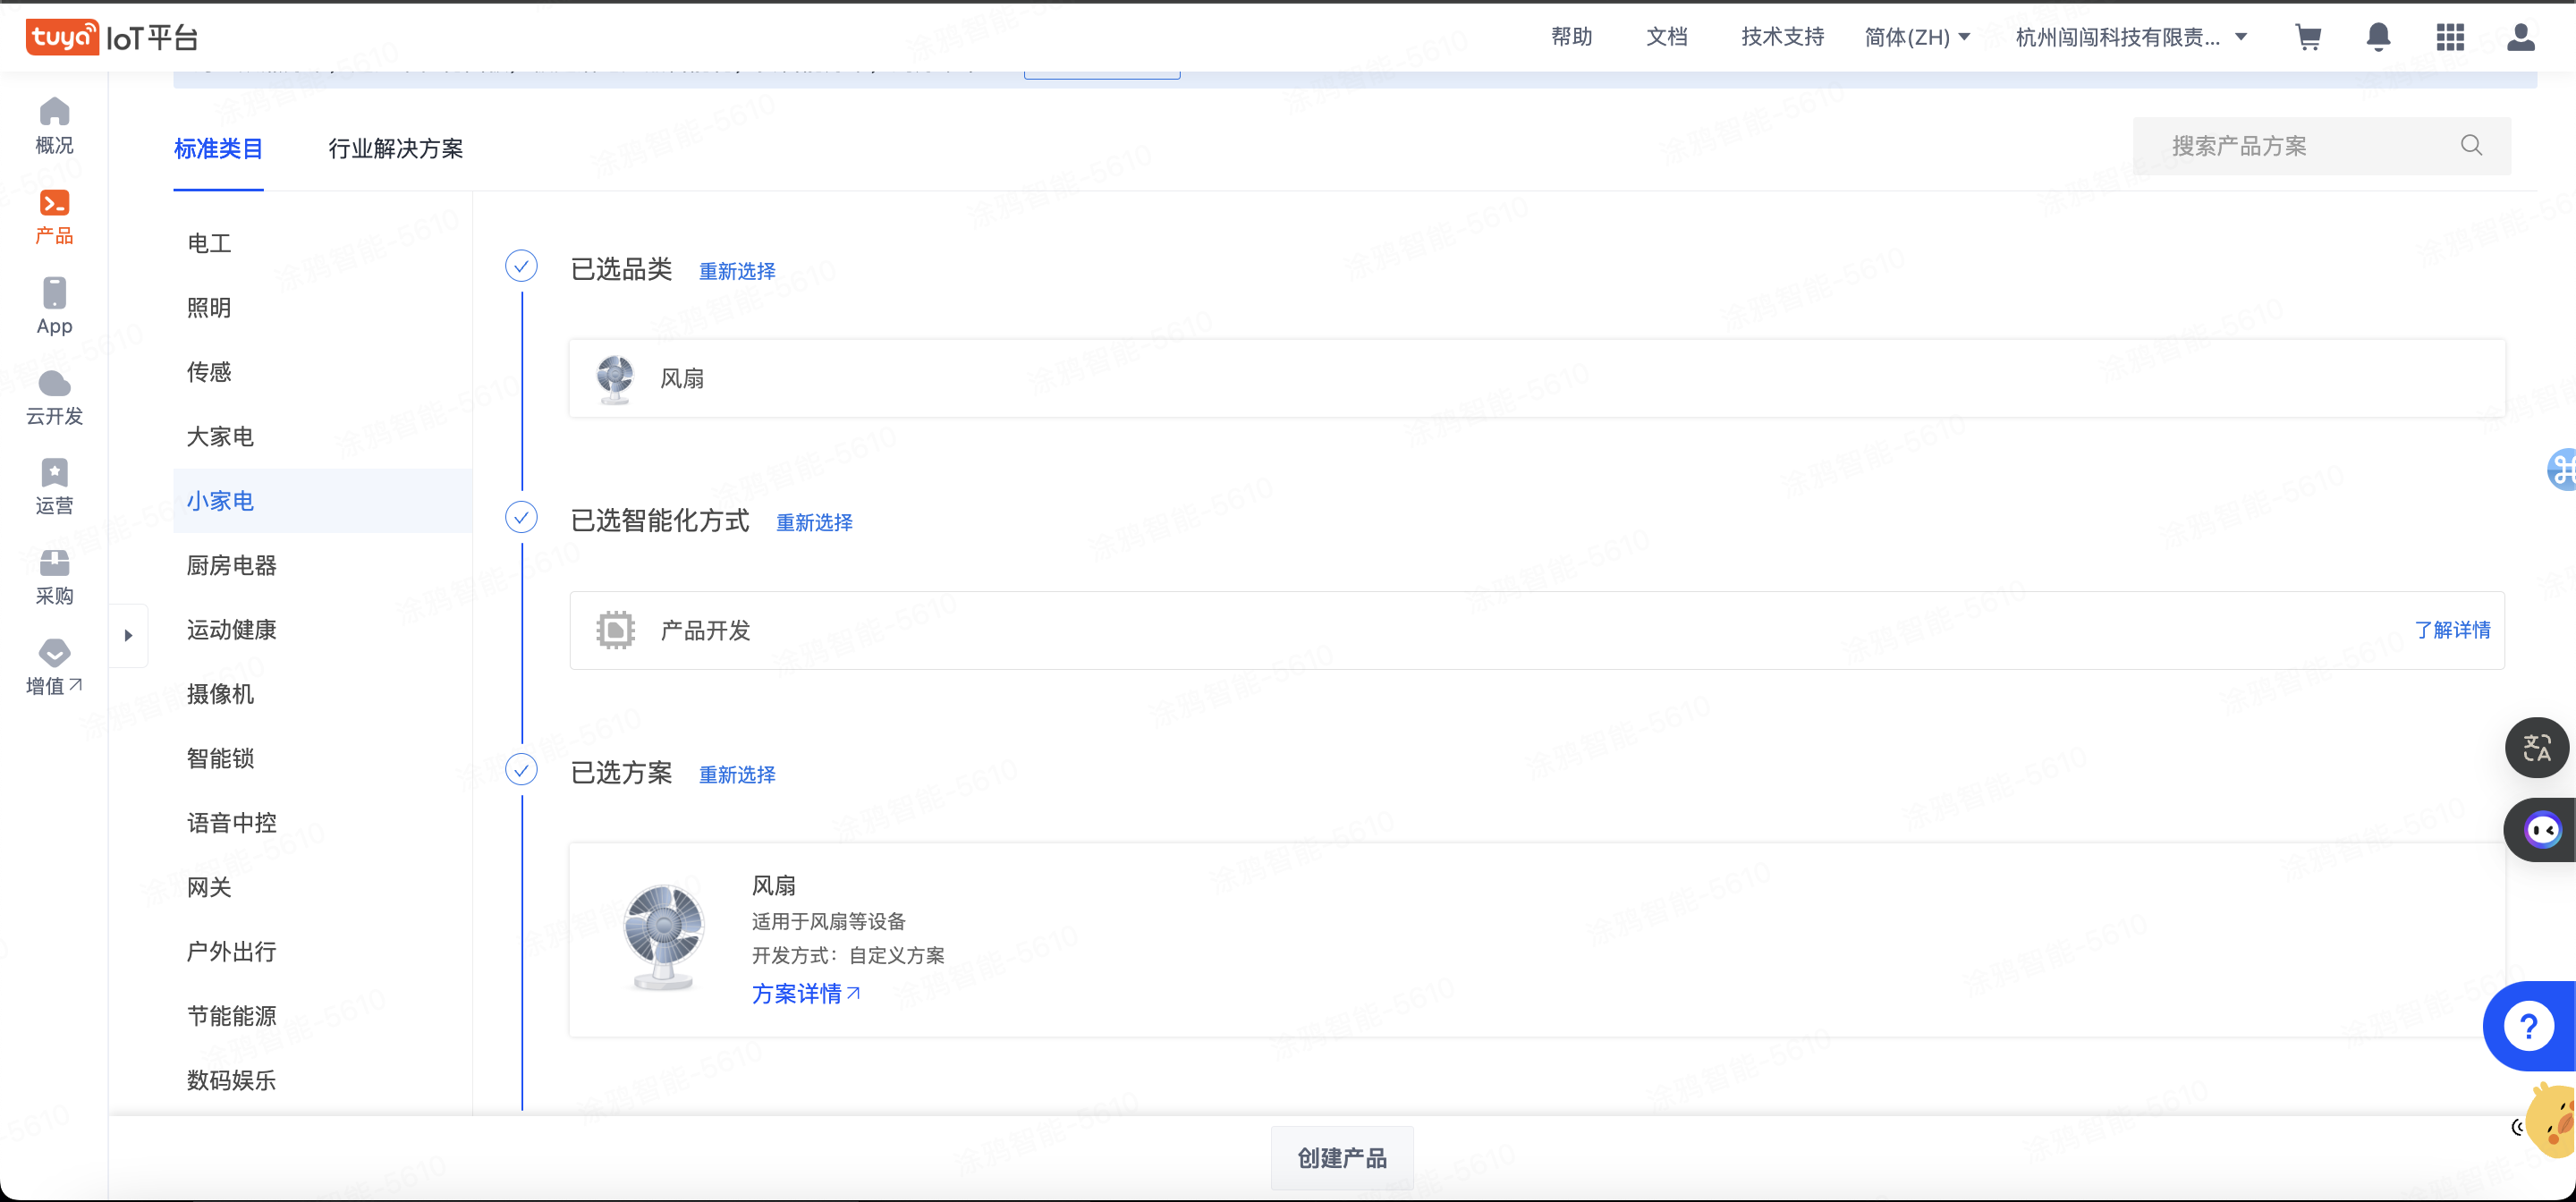
选择功能点,这里根据自己需求选择即可,这些功能未选择不影响视频预览。
🎉 在这一步,我们创建了一个名为 Fan的智能风扇产品。
4. 创建项目
开发者平台创建面板小程序
这部分我们在 小程序开发者 平台上进行操作,注册登录 小程序开发者平台。
拉取并运行模板项目
拉取项目
git clone https://github.com/Tuya-Community/tuya-ray-demo.git进入 panel-d3 模板,直接通过 IDE 导入源码目录,并关联到创建的小程序。
cd ./examples/panel-d3导入项目到 IDE,并关联到已经创建的面板小程序与产品。
5. 核心功能
模型加载
1. 环境配置
因为小程序环境的一些限制,我们要使用3d功能需要引入three.js 并在工程中配置,使用rjs进行开发
配置文档可见:
https://developer.tuya.com/cn/miniapp/develop/miniapp/framework/plugin/intro
2. 3D模型加载
- 支持gltf, glb 模型格式
模型加载可以透过CDN 进行加载,需要您先将模型上传至CDN上。
 // 模型的URL 支持glb, gltf格式, 需要为线上地址,可以透过CDN上传
 // domain + uri  如: https://xxx.xxx.com/smart/miniapp/static/bay1591069675815HNkH/17109234773d561a0f716.gltf
  const modelUrl = useRef(
    `${domain}/smart/miniapp/static/bay1591069675815HNkH/17109234773d561a0f716.gltf`
  ).current;
1. 引入D3-Component
import React, { FC, useCallback, useEffect, useMemo, useRef } from 'react';
import { useSelector } from 'react-redux';
import { View } from '@ray-js/components';
import { selectDpStateByCode } from '@/redux/modules/dpStateSlice';
import { fanSpeedCode, switchCode } from '@/config/dpCodes';
import { ComponentView, ComponentApi, ComponentConst } from '@/components/D3Component';

import styles from './index.module.less';
import Temperature from './Temperature';
import CountdownTips from './CountdownTips';

type Props = {
  disabledAnimation?: boolean;
};

const Fan: FC<Props> = ({ disabledAnimation = false }) => {
  const componentId = useRef(`component_${new Date().getTime()}`).current;
  const isAppOnBackground = useRef(false);
 // 模型的URL 支持glb, gltf格式, 需要为线上地址,可以透过CDN上传
 // domain + uri  如: https://xxx.xxx.com/smart/miniapp/static/bay1591069675815HNkH/17109234773d561a0f716.gltf
  const modelUrl = useRef(
    `${domain}/smart/miniapp/static/bay1591069675815HNkH/17109234773d561a0f716.gltf`
  ).current;
  const dpSwitch = useSelector(selectDpStateByCode(switchCode));
  const dpFanSpeed = useSelector(selectDpStateByCode(fanSpeedCode));

  const animationEnable = !disabledAnimation && dpSwitch;

  useEffect(() => {
    if (!animationEnable) {
      ComponentApi.setFanAnimation(componentId, { fanSpeed: ComponentConst.FAN_LEVEL.stop });
    }
  }, [animationEnable]);

  useEffect(() => {
    updateFanSpeed();
  }, [dpFanSpeed, dpSwitch]);

  const updateFanSpeed = useCallback(() => {
    if (dpSwitch) {
      if (dpFanSpeed < 33) {
        ComponentApi.setFanAnimation(componentId, { fanSpeed: ComponentConst.FAN_LEVEL.low });
      } else if (dpFanSpeed > 33 && dpFanSpeed < 66) {
        ComponentApi.setFanAnimation(componentId, { fanSpeed: ComponentConst.FAN_LEVEL.mid });
      } else if (dpFanSpeed > 66 && dpFanSpeed < 80) {
        ComponentApi.setFanAnimation(componentId, { fanSpeed: ComponentConst.FAN_LEVEL.hight });
      } else if (dpFanSpeed > 80) {
        ComponentApi.setFanAnimation(componentId, { fanSpeed: ComponentConst.FAN_LEVEL.max });
      }
    } else {
      ComponentApi.setFanAnimation(componentId, { fanSpeed: ComponentConst.FAN_LEVEL.stop });
    }
  }, [dpFanSpeed, dpSwitch]);

  const onComponentLoadEnd = useCallback((data: { infoKey: string; progress: number }) => {
    if (data.progress === 100) {
      ComponentApi.startAnimationFrame(componentId, { start: true });
      updateFanSpeed();
    }
  }, []);

  const onGestureChange = useCallback((start: boolean) => {
    if (start) {
      console.log('onGestureChange', start);
    }
  }, []);

  const onResetControl = useCallback((success: boolean) => {
    console.log('onResetControl', success);
  }, []);

  /**
   * 进入后台时断开对应动画渲染
   */
  const onEnterBackground = () => {
    ty.onAppHide(() => {
      isAppOnBackground.current = true;
      // 停止整个场景渲染
      ComponentApi.startAnimationFrame(componentId, { start: false });
    });
  };

  /**
   * 进入前台时开启相关动画渲染
   */
  const onEnterForeground = () => {
    ty.onAppShow(() => {
      ComponentApi.startAnimationFrame(componentId, { start: true });
      isAppOnBackground.current = false;
    });
  };

  /**
   * 卸载整个组件
   */
  const unmount = () => {
    ComponentApi.setFanAnimation(componentId, { fanSpeed: ComponentConst.FAN_LEVEL.stop });
    ComponentApi.disposeComponent(componentId);
  };

  useEffect(() => {
    onEnterBackground();
    onEnterForeground();
    return () => {
      unmount();
    };
  }, []);

  return (
    <View className={styles.container}>
      <View className={styles.view}>
        <ComponentView
          eventProps={{
            onComponentLoadEnd,
            onGestureChange,
            onResetControl,
          }}
          componentId={componentId}
          modelUrl={modelUrl}
        />
      </View>
      <Temperature />
      <CountdownTips />
    </View>
  );
};

export default Fan;
- 👉 立即免费领取开发资源,体验涂鸦 MiniApp 小程序开发。
ComponentApi
ComponentApi 封装的是一个可以从业务层与3d组件进行通信的api function, 参考该设计,为您自定义出您如何从业务层来向3d模型发出指令。您需要根据自己的需要,来构建对应的能力
如本模板中的设置是否启动风扇
我们先在componentApi中 定义一个Function,并透过事件分发的方式分发的视图层中
示例文件为 src/components/D3Component/api/index.ts
/**
 * 控制风扇是否转动和设置它的转速
 * @param componentId
 * @param opts fanSpeed: FAN_LEVEL
 * @param cb
 * @returns
 */
const setFanAnimation = (
  componentId: string,
  opts: { fanSpeed: number },
  cb?: (data: IEventData) => void
) => {
  NotificationCenter.pushNotification(`${componentId}${propsEventCallee}`, {
    method: 'setFanAnimation',
    componentId,
    calleeProps: {
      timestamp: new Date().getTime(),
      ...opts,
    },
  });
  if (typeof cb !== 'function') {
    return new Promise((resolve, reject) => {
      onLaserApiCallback(`${componentId}_setFanAnimation`, (eventData: IEventData) =>
        normalResolve(eventData, resolve, reject)
      );
    });
  }

  onLaserApiCallback(`${componentId}_setFanAnimation`, cb);
  return null;
};
接着我们在小程序组件js中定义一个接收该事件的方法,并透过deconstructApiProps 分发到RJS 视图层
示例文件为 /src/components/D3Component/components/rjs-component/index.js
/**
 * @language zh-CN
 * @description 小程序组件
 */
import { actions, store } from '../../redux';
import Render from './index.rjs';
import { NotificationCenter } from '../../notification';
import { propsEventCallee } from '../../api';

const componentOptions = {
  options: {
    pureDataPattern: /^isInitial$/,
  },
  data: {
    isInitial: true,
  },
  properties: {
    componentId: String,
    modelUrl: String,
  },

  lifetimes: {
    created() {
      this.instanceType = 'rjs';
      this.render = new Render(this);
    },
    ready() {
      // 注册api方法调用事件
      this.registerApiCallee();
      if (this.render) {
        this.render.initComponent(this.data.componentId, this.data.modelUrl);
        this.storeComponent();
        this.setData({ isInitial: false });
      }
    },
    detached() {
      this.clearComponent();
      this.removeComponentApiCallee();
      this.render = null;
    },
  },
  pageLifetimes: {},
  methods: {
    storeComponent() {
      store.dispatch(
        actions.component.initComponent({
          componentId: this.data.componentId,
          instanceType: this.instanceType,
        })
      );
    },
    clearComponent() {
      this.render.disposeComponent();
      store.dispatch(actions.component.willUnmount({ componentId: this.data.componentId }));
    },
    registerApiCallee() {
      if (!this.data.componentId) {
        return;
      }
      NotificationCenter.addEventListener(`${this.data.componentId}${propsEventCallee}`, data => {
        if (data && data.method) {
          if (this.render) {
            this.render.deconstructApiProps(data);
          }
        }
      });
    },
    removeComponentApiCallee() {
      NotificationCenter.removeEventListener(`${this.data.componentId}${propsEventCallee}`);
    },
    onComponentApiCallee(data) {
      if (data && data.componentId && data.method) {
        const results = {
          componentId: data.componentId,
          results: data,
        };
        NotificationCenter.pushNotification(`${data.componentId}_${data.method}`, results);
      }
    },
    /**
     * @language zh-CN
     * @description 以下方法都是绑定小程序原生组件和ray组件之间的通信
     * @param {*} data
     */
    onComponentLoadEnd(data) {
      this.triggerEvent('oncomponentloadend', data);
    },
    onGestureChange(data) {
      this.triggerEvent('ongesturechange', data);
    },
    onResetControl(data) {
      this.triggerEvent('onresetcontrol', data);
    },
  },
};

Component(componentOptions);
最后我们在RJS 中定义执行这个方法的具体函数,就实现了从业务层如何触发到视图层地图的3d模块
示例文件为 /src/components/D3Component/components/rjs-component/index.rjs
import _ from 'lodash';
import { KTInstance } from '../../lib/KTInstance';
import { getLocalUrl } from '../../lib/utils/Functions.ts';
import { ELECTRIC_FAN } from '../../lib/models';

export default Render({
  _onComponentLoadEnd(data) {
    this.callMethod('onComponentLoadEnd', data);
  },

  _onGestureChange(data) {
    this.callMethod('onGestureChange', data);
  },

  _onResetControl(data) {
    this.callMethod('onResetControl', data);
  },

  _onComponentApiCallee(data) {
    this.callMethod('onComponentApiCallee', data);
  },

  // 透过_onComponentApiCallee把Api执行结果回调给业务层
  _resolveSuccess(methodName, results) {
    const timeEnd = new Date().getTime();
    const timeStart = results.props.timestamp;
    this._onComponentApiCallee({
      method: methodName,
      componentId: this.componentId,
      status: true,
      communicationTime: timeEnd - timeStart,
      timestamp: timeEnd,
      props: results.props,
      values: results.values,
    });
  },

  // 透过_onComponentApiCallee 把Api执行结果回调给业务层
  _resolveFailed(methodName, results) {
    const timeEnd = new Date().getTime();
    const timeStart = results.props.timestamp;
    this._onComponentApiCallee({
      method: methodName,
      componentId: this.componentId,
      status: false,
      communicationTime: timeEnd - timeStart,
      timestamp: timeEnd,
      props: results.props,
      values: results.values,
    });
  },

  /** initComponent
   * 初始化
   * @param sysInfo
   * @param newValue
   */
  async initComponent(componentId, pixelRatio, modelUrl) {
    try {
      const canvas = await getCanvasById(componentId);
      const THREE = await requirePlugin('rjs://three').catch(err => {
        console.log('usePlugins occur an error', err);
      });
      const { GLTFLoader } = await requirePlugin(
        'rjs://three/examples/jsm/loaders/GLTFLoader'
      ).catch(err => {
        console.log('usePlugins occur an error', err);
      });
      this._GLTFLoader = GLTFLoader;
      this.componentId = componentId;

      await this.instanceDidMount(canvas, pixelRatio, modelUrl);
    } catch (e) {
      console.log('initComponent occur an error', e);
    }
  },

  async instanceDidMount(canvas, pixelRatio, modelUrl) {
    this.fanModelList = [];
    const params = {
      canvas: canvas,
      antialias: true,
      pixelRatio: pixelRatio,
      logarithmicDepthBuffer: true,
      preserveDrawingBuffer: true,
      onComponentLoadEnd: this._onComponentLoadEnd,
      onGestureChange: this._onGestureChange,
      onResetControl: this._onResetControl,
      onClickInfoWindow: this._onClickInfoWindow,
      GLTFLoader: this._GLTFLoader,
    };
    this.kTInstance = new KTInstance(params);

    // 这里兜底一个模型
    const url = modelUrl || getLocalUrl(ELECTRIC_FAN);
    const model = await this.kTInstance.loadModelLayer({
      infoKey: 'model',
      uri: url,
    });

    if (model) {
      this.layer = model.scene;
      this.animations = model.animations;
      // 准备一个关键帧
      this.animationMixer = this.kTInstance.kTComponent.createAnimationMixer(this.layer);
      this.clipAnimation = this.animations.map(item => {
        return this.animationMixer.clipAction(item);
      });

      // 根据不同的模型做调整
      this.layer.scale.set(0.4, 0.4, 0.4);
      this.kTInstance.putLayerIntoScene(this.layer);
      this.setFanModel();
    }
  },

  /**
   * 解构对应的API
   * @param opts
   */
  deconstructApiProps(opts) {
    if (typeof this[opts.method] === 'function') {
      this[opts.method](opts.calleeProps);
    }
  },

  /**
   * 从模型中找到对应的风扇叶片
   */
  setFanModel() {
    this.fanModel = this.kTInstance.getChildByNameFromObject(this.layer, '组080')[0];
  },

  /**
   * 启动风扇运转动画
   * @param speed
   */
  startFanAnimate(fanSpeed) {
    this.stopFanAnimate();
    this.fanAnimationIdList = [this.fanModel].map(item =>
      this.kTInstance.startRotateAnimationOnZ(item, fanSpeed)
    );
  },

  /**
   * 停止风扇运转动画
   */
  stopFanAnimate() {
    if (this.fanAnimationIdList) {
      this.fanAnimationIdList.map(item => this.kTInstance.stopAnimation(item));
    }
  },

  /**
   * 开启动画渲染
   * @param start
   */
  startAnimationFrameVision(start) {
    if (this.kTInstance.kTComponent) {
      this.kTInstance.kTComponent.animateStatus = start;
    }
  },
  /**
   * 控制风扇是否转动和设置它的转速
   * @param opts
   */
  setFanAnimation(opts) {
    const methodName = 'setFanAnimation';
    if (opts) {
      const results = {
        props: opts,
        values: {},
      };
      const { fanSpeed = 0.1 } = opts;
      if (this.kTInstance) {
        if (fanSpeed !== 0) {
          this.startFanAnimate(fanSpeed);
        } else {
          this.stopFanAnimate();
        }
        this._resolveSuccess(methodName, results);
      } else {
        this._resolveFailed(methodName, results);
      }
    }
  },

  /**
   * 开启场景渲染
   * @param opts
   */
  startAnimationFrame(opts) {
    const methodName = 'startAnimationFrame';
    if (opts) {
      const results = {
        props: opts,
        values: {},
      };
      const { start } = opts;
      if (this.kTInstance) {
        this.startAnimationFrameVision(start);
        this._resolveSuccess(methodName, results);
      } else {
        this._resolveFailed(methodName, results);
      }
    }
  },

  /**
   * 注销3D组件
   * @param opts
   */
  disposeComponent() {
    const methodName = 'disposeComponent';
    const results = {
      props: {},
      values: {},
    };
    if (this.kTInstance) {
      this.kTInstance.kTComponent.disposeComponent();
      this._resolveSuccess(methodName, results);
    } else {
      this._resolveFailed(methodName, results);
    }
  },
});
👉 立即免费领取开发资源,体验涂鸦 MiniApp 小程序开发。
Callbacks
Callbacks 模块用来在3D内部触发模型事件之后,将事件结果回调给业务层
我们需要先在组件上使用bind 方法绑定对应的事件
示例文件为 /src/components/D3Component/view/index.tsx
import React from 'react';
import { View } from '@ray-js/ray';
import RjsView from '../components/rjs-component';
import { IProps, defaultProps } from './props';
import { getRayRealCallbacksName } from '../callbacks';
import styles from './index.module.less';

const Component: React.FC<IProps> = (props: IProps) => {
  const { componentId = `component_${new Date().getTime()}`, modelUrl, eventProps } = props;
  /**
   * 触发指定的事件
   */
  const onEvent = (evt: { type: string; detail: any }) => {
    const { detail, type } = evt;
    eventProps[getRayRealCallbacksName(type)]?.(detail);
  };
  return (
    <View className={styles.view}>
      <RjsView
        componentId={componentId}
        modelUrl={modelUrl}
        bindoncomponentloadend={onEvent}
        bindongesturechange={onEvent}
        bindonresetcontrol={onEvent}
      />
    </View>
  );
};

Component.defaultProps = defaultProps;
Component.displayName = 'Component';

export default Component;
接着在小程序组件中定义触发该事件的triggerEvent
示例文件为/src/components/D3Component/components/rjs-component/index.js
/**
 * @language zh-CN
 * @description 以下方法都是绑定小程序原生组件和ray组件之间的通信
 * @param {*} data
 */
onComponentLoadEnd(data) {
  this.triggerEvent('oncomponentloadend', data);
},
onGestureChange(data) {
  this.triggerEvent('ongesturechange', data);
},
onResetControl(data) {
  this.triggerEvent('onresetcontrol', data);
},
接着在视图层定义触发的实际触发函数
示例文件为/src/components/D3Component/components/rjs-component/index.rjs
export default Render({

  _onComponentLoadEnd(data) {
    this.callMethod('onComponentLoadEnd', data);
  },

  _onGestureChange(data) {
    this.callMethod('onGestureChange', data);
  },

  _onResetControl(data) {
    this.callMethod('onResetControl', data);
  },

  _onComponentApiCallee(data) {
    this.callMethod('onComponentApiCallee', data);
  },
})
控制开关及风速
控制设备的开关及风速,需要根据 DP 状态和 和 DP 的定义来获取及下发对应的 DP 值
如您需要将风扇打开,则按照如下操作,从 hooks 中取出对应开关的状态,并根据开关状态来下发您对应的数据
import React, { FC, useState } from "react";
import clsx from "clsx";
import { Text, View } from "@ray-js/components";
import { useDispatch, useSelector } from "react-redux";
import { selectDpStateByCode, updateDp } from "@/redux/modules/dpStateSlice";
import { useThrottleFn } from "ahooks";
import { TouchableOpacity } from "@/components";
import Strings from "@/i18n";
import styles from "./index.module.less";

type Props = {};
const Control: FC<Props> = () => {
	const dispatch = useDispatch();
	// 获取到当前的设备开关状态
	const dpSwitch = useSelector(selectDpStateByCode(switchCode));

	const [panelVisible, setPanelVisible] = useState(false);

	// 绑定按钮点击事件,并使用节流函数进行节流
	const handleSwitch = useThrottleFn(
		() => {
			setPanelVisible(false);
			// 更新DP状态
			dispatch(updateDp({ [switchCode]: !dpSwitch }));
			ty.vibrateShort({ type: "light" });
		},
		{ wait: 600, trailing: false }
	).run;

	return (
		<View className={styles.container}>
			<TouchableOpacity
				className={styles.item}
				activeOpacity={1}
				onClick={handleSwitch}
			>
				<View
					className={clsx(
						styles.controlButton,
						styles.controlButtonSwitch,
						dpSwitch && "active"
					)}
				>
					<Text
						className="iconfontpanel icon-panel-power"
						style={{ color: "#fff" }}
					/>
				</View>
				<Text className={styles.itemText}>{Strings.getLang("dsc_switch")}</Text>
			</TouchableOpacity>
		</View>
	);
};
定时
如果您需要在合适的时间,让您的设备固定去执行对应的逻辑,比如说开关,您则可以使用定时 API 进行。
通常来讲定时涉及到了获取定时列表,添加定时,修改定时 和删除定时 4 个主要功能
主要涉及到的接口有如下
// 获取定时列表
export const fetchTimingsApi = async (
	category = DEFAULT_TIMING_CATEGORY,
	isGroup = false
) => {
	try {
		const response = await apiRequest<IQueryTimerTasksResponse>({
			api: "m.clock.dps.list",
			version: "1.0",
			data: {
				bizType: isGroup ? "1" : "0",
				bizId: getDevId(),
				category,
			},
		});
		return response;
	} catch (err) {
		return Promise.reject(err);
	}
};

// 添加定时
export const addTimingApi = async (params: IAndSingleTime) => {
	try {
		const response = await apiRequest<EntityId>({
			api: "m.clock.dps.add",
			version: "1.0",
			data: params,
		});
		return response;
	} catch (err) {
		return Promise.reject(err);
	}
};
// 更新定时
export const updateTimingApi = async (params: IModifySingleTimer) => {
	try {
		const response = await apiRequest<boolean>({
			api: "m.clock.dps.update",
			version: "1.0",
			data: params,
		});
		return response;
	} catch (err) {
		return Promise.reject(err);
	}
};

// 删除定时
export const updateStatusOrDeleteTimingApi = async (param: {
	ids: string;
	status: 0 | 1 | 2;
}) => {
	const { groupId: devGroupId, devId } = getDevInfo();
	const defaultParams = {
		bizType: devGroupId ? "1" : "0",
		bizId: devId,
	};
	try {
		const response = await apiRequest<boolean>({
			api: "m.clock.batch.status.update",
			version: "1.0",
			data: { ...defaultParams, ...param },
		});
		return response;
	} catch (err) {
		return Promise.reject(err);
	}
};
👉 立即免费领取开发资源,体验涂鸦 MiniApp 小程序开发。
通常来讲,我们会把定时 API 与 Redux 结合到一起,来进行对应的 API 数据的更新
具体可以参考 timingSlice 的内容
import {
	addTimingApi,
	fetchTimingsApi,
	updateStatusOrDeleteTimingApi,
	updateTimingApi,
} from "@/api";
import {
	createAsyncThunk,
	createEntityAdapter,
	createSlice,
	EntityId,
} from "@reduxjs/toolkit";
import { DEFAULT_TIMING_CATEGORY } from "@/constant";
import moment from "moment";
import { ReduxState } from "..";
import { kit } from "@ray-js/panel-sdk";

const { getDevInfo } = kit;

type Timer = IAndSingleTime & {
	time: string;
	id: EntityId;
};

type AddTimerPayload = {
	dps: string;
	time: string;
	loops: string;
	actions: any;
	aliasName?: string;
};

const timingsAdapter = createEntityAdapter<Timer>({
	sortComparer: (a, b) =>
		moment(a.time, "HH:mm").isBefore(moment(b.time, "HH:mm")) ? -1 : 1,
});

export const fetchTimings = createAsyncThunk<Timer[]>(
	"timings/fetchTimings",
	async () => {
		const { timers } = await fetchTimingsApi();

		return timers as unknown as Timer[];
	}
);

export const addTiming = createAsyncThunk<Timer, AddTimerPayload>(
	"timings/addTiming",
	async (param) => {
		const { groupId: devGroupId, devId } = getDevInfo();
		const defaultParams = {
			bizId: devGroupId || devId,
			bizType: devGroupId ? "1" : "0",
			isAppPush: false,
			category: DEFAULT_TIMING_CATEGORY,
		};
		const params = { ...defaultParams, ...param };
		const id = await addTimingApi(params);
		return { id, status: 1, ...params };
	}
);

export const updateTiming = createAsyncThunk(
	"timings/updateTiming",
	async (param: AddTimerPayload & { id: EntityId }) => {
		const { groupId: devGroupId, devId } = getDevInfo();
		const defaultParams = {
			bizId: devGroupId || devId,
			bizType: devGroupId ? "1" : "0",
			isAppPush: false,
			category: DEFAULT_TIMING_CATEGORY,
		};
		const params = { ...defaultParams, ...param };
		await updateTimingApi(params);
		return { id: param.id, changes: param };
	}
);

export const deleteTiming = createAsyncThunk<EntityId, EntityId>(
	"timings/deleteTiming",
	async (id) => {
		// status 2 --- 删除
		await updateStatusOrDeleteTimingApi({ ids: String(id), status: 2 });
		return id;
	}
);

export const updateTimingStatus = createAsyncThunk(
	"timings/updateTimingStatus",
	async ({ id, status }: { id: EntityId; status: 0 | 1 }) => {
		// status 0 --- 关闭  1 --- 开启
		await updateStatusOrDeleteTimingApi({ ids: String(id), status });
		return { id, changes: { status: status ?? 0 } };
	}
);

/**
 * Slice
 */
const timingsSlice = createSlice({
	name: "timings",
	initialState: timingsAdapter.getInitialState(),
	reducers: {},
	extraReducers(builder) {
		builder.addCase(fetchTimings.fulfilled, (state, action) => {
			timingsAdapter.upsertMany(state, action.payload);
		});
		builder.addCase(addTiming.fulfilled, (state, action) => {
			timingsAdapter.upsertOne(state, action.payload);
		});
		builder.addCase(deleteTiming.fulfilled, (state, action) => {
			timingsAdapter.removeOne(state, action.payload);
		});
		builder.addCase(updateTimingStatus.fulfilled, (state, action) => {
			timingsAdapter.updateOne(state, action.payload);
		});
		builder.addCase(updateTiming.fulfilled, (state, action) => {
			timingsAdapter.updateOne(state, action.payload);
		});
	},
});

/**
 * Selectors
 */
const selectors = timingsAdapter.getSelectors(
	(state: ReduxState) => state.timings
);
export const {
	selectIds: selectAllTimingIds,
	selectAll: selectAllTimings,
	selectTotal: selectTimingsTotal,
	selectById: selectTimingById,
	selectEntities: selectTimingEntities,
} = selectors;

export default timingsSlice.reducer;
您只需要按照与 DP 类似的操作,从 redux 获取并更新 redux 及可操作与云端的接口交互
例如添加定时
import React, { FC, useMemo, useState } from "react";
import clsx from "clsx";
import { EntityId } from "@reduxjs/toolkit";
import {
	PageContainer,
	ScrollView,
	Switch,
	Text,
	View,
} from "@ray-js/components";
import TimePicker from "@ray-js/components-ty-time-picker";
import { useSelector } from "react-redux";
import { DialogInput, TouchableOpacity, WeekSelector } from "@/components";
import Strings from "@/i18n";
import { WEEKS } from "@/constant";
import { checkDpExist, getDpIdByCode } from "@/utils";
import { lightCode, switchCode } from "@/config/dpCodes";
import {
	addTiming,
	selectTimingById,
	updateTiming,
} from "@/redux/modules/timingsSlice";
import { ReduxState, useAppDispatch } from "@/redux";

import styles from "./index.module.less";

type Props = {
	visible: boolean;
	onClose: () => void;
	id?: EntityId;
};

const TimingAdd: FC<Props> = ({ id, visible, onClose }) => {
	const dispatch = useAppDispatch();
	const { language } = useMemo(() => ty.getSystemInfoSync(), []);

	// 编辑时的初始值
	const currentTiming = useSelector((state: ReduxState) =>
		id ? selectTimingById(state, id) : null
	);

	const [timeState, setTimeState] = useState(() => {
		if (currentTiming) {
			const [h, m] = currentTiming?.time.split(":");
			return {
				hour: Number(h),
				minute: Number(m),
			};
		}

		return {
			hour: new Date().getHours(),
			minute: new Date().getMinutes(),
		};
	});

	const dpsObject = useMemo(() => {
		return currentTiming?.dps ? JSON.parse(currentTiming.dps) : {};
	}, [currentTiming]);

	const [loops, setLoops] = useState(
		(currentTiming?.loops ?? "0000000").split("")
	);
	const [dialogVisible, setDialogVisible] = useState(false);
	const [remark, setRemark] = useState(currentTiming?.aliasName ?? "");
	const [fanSwitch, setFanSwitch] = useState(
		() => dpsObject?.[getDpIdByCode(switchCode)] ?? false
	);
	const [lightSwitch, setLightSwitch] = useState(
		() => dpsObject?.[getDpIdByCode(lightCode)] ?? false
	);

	const handleSave = async () => {
		const { hour, minute } = timeState;
		const time = `${String(hour).padStart(2, "0")}:${String(minute).padStart(
			2,
			"0"
		)}`;

		const dps = {
			[getDpIdByCode(switchCode)]: fanSwitch,
			[getDpIdByCode(lightCode)]: lightSwitch,
		};

		try {
			if (id) {
				await dispatch(
					updateTiming({
						id,
						time,
						loops: loops.join(""),
						aliasName: remark,
						dps: JSON.stringify(dps),
						actions: JSON.stringify({
							time,
							dps,
						}),
					})
				).unwrap();
			} else {
				await dispatch(
					addTiming({
						time,
						loops: loops.join(""),
						aliasName: remark,
						dps: JSON.stringify(dps),
						actions: JSON.stringify({
							time,
							dps,
						}),
					})
				).unwrap();
			}

			ty.showToast({
				title: Strings.getLang(id ? "dsc_edit_success" : "dsc_create_success"),
				icon: "success",
			});

			onClose();
		} catch (err) {
			ty.showToast({
				title: err?.message ?? Strings.getLang("dsc_error"),
				icon: "fail",
			});
		}
	};

	const handleTimeChange = (newTime) => {
		setTimeState(newTime);
		ty.vibrateShort({ type: "light" });
	};

	const handleFilterChange = (newLoops: string[]) => {
		setLoops(newLoops);
	};

	return (
		<PageContainer
			show={visible}
			customStyle="backgroundColor: transparent"
			position="bottom"
			overlayStyle="background: rgba(0, 0, 0, 0.1);"
			onLeave={onClose}
			onClickOverlay={onClose}
		>
			<View className={styles.container}>
				<View className={styles.header}>
					<TouchableOpacity className={styles.headerBtnText} onClick={onClose}>
						{Strings.getLang("dsc_cancel")}
					</TouchableOpacity>
					<Text className={styles.title}>
						{Strings.getLang(id ? "dsc_edit_timing" : "dsc_add_timing")}
					</Text>
					<TouchableOpacity
						className={clsx(styles.headerBtnText, "active")}
						onClick={handleSave}
					>
						{Strings.getLang("dsc_save")}
					</TouchableOpacity>
				</View>
				<View className={styles.content}>
					<TimePicker
						columnWrapClassName={styles.pickerColumn}
						indicatorStyle={{ height: "60px", lineHeight: "60px" }}
						wrapStyle={{
							width: "400rpx",
							height: "480rpx",
							marginBottom: "64rpx",
						}}
						is24Hour={false}
						value={timeState}
						fontSize="52rpx"
						fontWeight="600"
						unitAlign={language.includes("zh") ? "left" : "right"}
						onChange={handleTimeChange}
						amText={Strings.getLang("dsc_am")}
						pmText={Strings.getLang("dsc_pm")}
					/>
					<WeekSelector
						value={loops}
						texts={WEEKS.map((item) =>
							Strings.getLang(`dsc_week_full_${item}`)
						)}
						onChange={handleFilterChange}
					/>
					<View className={styles.featureRow}>
						<Text className={styles.featureText}>
							{Strings.getLang("dsc_remark")}
						</Text>
						<TouchableOpacity
							className={styles.featureBtn}
							onClick={() => setDialogVisible(true)}
						>
							<Text className={styles.remark}>{remark}</Text>
							<Text className="iconfontpanel icon-panel-angleRight" />
						</TouchableOpacity>
					</View>
					{checkDpExist(switchCode) && (
						<View className={styles.featureRow}>
							<Text className={styles.featureText}>
								{Strings.getDpLang(switchCode)}
							</Text>
							<Switch
								color="#6395f6"
								checked={fanSwitch}
								onChange={() => {
									setFanSwitch(!fanSwitch);
									ty.vibrateShort({ type: "light" });
								}}
							/>
						</View>
					)}
					{checkDpExist(lightCode) && (
						<View className={styles.featureRow}>
							<Text className={styles.featureText}>
								{Strings.getDpLang(lightCode)}
							</Text>
							<Switch
								color="#6395f6"
								checked={lightSwitch}
								onChange={() => {
									setLightSwitch(!lightSwitch);
									ty.vibrateShort({ type: "light" });
								}}
							/>
						</View>
					)}
				</View>
			</View>
			<DialogInput
				defaultValue={remark}
				onChange={setRemark}
				visible={dialogVisible}
				onClose={() => setDialogVisible(false)}
			/>
		</PageContainer>
	);
};

export default TimingAdd;
6. 国际化
上传多语言时需将相应的多语言一并上传,字段信息在/src/i18n目录下。 i18n 中, 我们建议至少配置两种类型的语言。 一种中文,一种英文。 建议所有的多语言字段按照 dsc开头,并在每个单词中间使用作为分隔。如果是 dp 多语言,则以 dp开头,并在每个单词中间使用作为分隔。
使用一般多语言, 您可以使用
import Strings from "@/i18n";

const text = Strings.getLang("dsc_cancel");
如果存在类似于一个 DP 状态,有多个枚举值,每个枚举的状态对应的多语言不同, 您可以如下使用
import Strings from "@/i18n";

//dpCode 为DP的标识符, dpValue 为DP的值
const text = Strings.getDpLang(dpCode, dpValue);- 👉 立即免费领取开发资源,体验涂鸦 MiniApp 小程序开发。


 2084
2084

 被折叠的 条评论
为什么被折叠?
被折叠的 条评论
为什么被折叠?
 到【灌水乐园】发言


