


1. 选择Clangd的原因
在C/C++的Extensions中,官方提供了C/C++ Extension Pack扩展包,对于不想麻烦的朋友只需要安装官方提供的一套扩展就可以搭建好C/C++的开发环境。
(当然你事先要在centos上安装gcc、g++、cmake等工具)
如下图所示

然而,这套扩展虽然能用,对比Clangd扩展来说体验不佳。
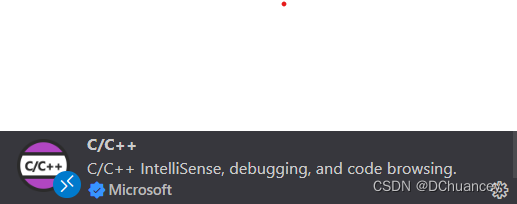
至于Clangd好在哪,现在火热的Jetbrains公司的Clion以及Vim上的Youcompleteme插件现在都在用它。代码的自动补全准确度、quix fix解决方案等等都完虐C/C++扩展。微软自己搞的这一个C/C++扩展,属实比不上clangd。所谓的这一个C/C++扩展大家应该很熟悉,就是下图这位:
2. Centos7环境的配置
CentOS7的配置与Ubuntu的配置难度完全不同,在Ubuntu 20.04LTS上只需要安装Clangd一个插件,即可完成环境的配置。Centos7难在哪呢?
2.1 llvm的编译安装
Centos7的gcc、libstdc++.so都太老了,gcc版本才4.8、安装clangd后,会提示glibc 2.18未安装。
有朋友可能会说,通过scl源安装新版的不就可以了?但事实没有那么简单,安装高版本的gcc编译器仍然解决不了glibc的问题,编译gblic 2.18需要gcc的版本高于7.0这一个条件可以通过安装scl的gcc 7.x版本解决,但是glibc是不能轻易替换的,否则服务器中跑的程序有可能直接跑不起来了。
因此:另辟蹊径。
参考大佬的文章,可以编译LLVM(其中包含了clangd)低版本的:Centos7 打造 C/C++ 开发环境_thewangcj的博客-CSDN博客_centos7 安装c++环境l
但是在实操过程中还是遇到了编译不了的情况,最后发现大佬的文章,是直接编译高版本的llvm,不考虑低版本gcc的兼容性,实测clangd作为一个server与gcc编译的项目关系不大,而且很好用。
Centos7上源码编译安装llvm 11.0.0 - 知乎
编译过程简述如下:
1. 通过scl安装新版的gcc 7.3
2. 将bash环境切换到gcc 7.3
3. 编译安装llvm 11.0.0
cmake -DCMAKE_BUILD_TYPE=Release -DLLVM_ENABLE_RTTI=ON -DLLVM_ENABLE_PROJECTS="clang;libcxx;libcxxabi" -G "Unix Makefiles" ../llvm注意:上面的"Unix Makfiles"可以换成Ninja,-DLLVM_ENABEL_PROJECT后面可以加上自己想要的,比如lldb;clang-tools-extra等。
3. clangd插件的安装
在完成clangd的安装之后,才可以安装clangd插件(否则它会自己下载不能运行的clangd程序)
如果你之前一直在用C/C++插件,突然换成了clangd,可能会出现代码不知名的错误,建议删除~/.vscode目录,再将插件重新安装
4. 结束
Enjoy!
5. 后续使用更新
前面主要介绍了llvm的编译安装,最近尝试在Centos7中用低版本的clang编译器(上面编译的llvm11.0)编译安装了llvm 15.0 最新版本。(理论上yum安装的clang也能编译新版的llvm15.0)
编译过程简述如下:
1. 去llvm官网下载最新的源代码,然后解压出来,一般是叫llvm-project-xxx
2. 进入解压后的目录,建立一个build目录,在build目录中执行:
cmake -DCMAKE_BUILD_TYPE=Release -DLLVM_ENABLE_RTTI=ON -DLLVM_ENABLE_PROJECTS="clang;libcxx;libcxxabi;lldb;clang-tools-extra" -G "Unix Makefiles" -DCMAKE_CXX_COMPILER=clang++ -DCMAKE_C_COMPILER=clang ../llvm(注意上面我指定了编译器为clang和clang++,也可以以绝对路径指定编译器)
2022-11-13更新:上面编译的指令不太好用,针对官方文档做出如下修改
# 1. 在源码根目录中执行如下命令,非build文件夹

cmake -S llvm -B build -G Ninja -DCMAKE_BUILD_TYPE=Release -DLLVM_ENABLE_PROJECTS="clang;lldb;clang-tools-extra" -DLLVM_ENABLE_RUNTIMES="libcxx;libcxxabi" -DCMAKE_INSTALL_PREFIX=/usr/local -DLLVM_ENABLE_ASSERTIONS=On

# 2. 上面命令是生成ninja编译文件,如果没有ninja,可以pip install ninja。下面使用ninja编译,注意替换/path/to为你的当前目录
cmake --build /path/to/build

# 3. 安装
sudo cmake --install
3. 然后make,sudo make install即可 ,此时centos上的clangd环境就更新到最新版本。
4. vscode使用clangd作为LSP只需要安装clangd一个插件,有一个叫做clang-tidy的插件千万不要装!非常非常垃圾的插件!
clangd插件本身提供了对clang-tidy的支持,且提供了两种配置方式:(只介绍第二种)
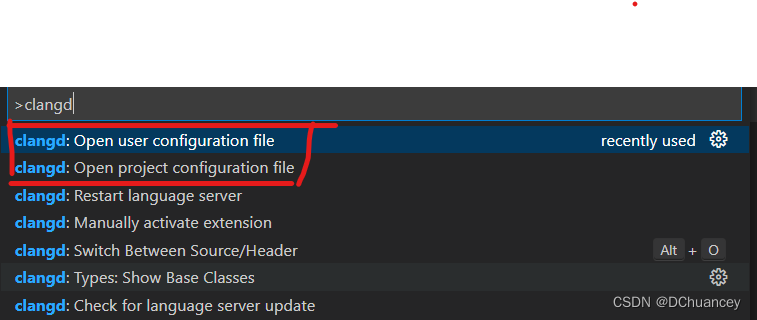
两种方式,分别针对用户级、project级。
针对project级的方式,目前(2022.9.16)还没在clangd插件上更新(即不能通过open project configuration file)的方式配置,需要自己在项目中新建一个 .clang-tidy 的文件。
笔者参考谷歌的项目,针对个人的喜好,做出了如下修改:(可以直接放在项目根目录)
---
# Configure clang-tidy for this project.

# Here is an explanation for why some of the checks are disabled:
#
#  -google-readability-namespace-comments: the *_CLIENT_NS is a macro, and
#      clang-tidy fails to match it against the initial value.
#
#  -modernize-use-trailing-return-type: clang-tidy recommends using
#      `auto Foo() -> std::string { return ...; }`, we think the code is less
#      readable in this form.
#
#  -modernize-return-braced-init-list: We think removing typenames and using
#      only braced-init can hurt readability.
#
#  -performance-move-const-arg: This warning requires the developer to
#      know/care more about the implementation details of types/functions than
#      should be necessary. For example, `A a; F(std::move(a));` will trigger a
#      warning IFF `A` is a trivial type (and therefore the move is
#      meaningless). It would also warn if `F` accepts by `const&`, which is
#      another detail that the caller need not care about.
#
#  -readability-redundant-declaration: A friend declaration inside a class
#      counts as a declaration, so if we also declare that friend outside the
#      class in order to document it as part of the public API, that will
#      trigger a redundant declaration warning from this check.
#
Checks: >
  -*,
  bugprone-*,
  cert-*
  concurrency-*
  google-*,
  misc-*,
  modernize-*,
  mpi-*,
  openmp-use-default-none,
  performance-*,
  portability-*,
  readability-*,
  fuchsia-multiple-inheritance,
  hicpp-exception-baseclass,
  hicpp-multiway-paths-covered,
  hicpp-no-assembler,

  -google-readability-braces-around-statements,
  -google-readability-namespace-comments,
  -google-runtime-references,
  -misc-non-private-member-variables-in-classes,
  -modernize-return-braced-init-list,
  -performance-move-const-arg,
  -readability-named-parameter,
  -modernize-use-trailing-return-type,
  -readability-braces-around-statements,
  -readability-redundant-declaration
  -modernize-avoid-c-arrays
# Turn all the warnings from the checks above into errors.
# WarningsAsErrors: "*"

# TODO(#205) - Enable clang-tidy checks in our headers.
#    HeaderFilterRegex: "google/cloud/.*"

# 命名规范:
# CamelCase(大驼峰命名法)
# camelBack(小驼峰命名法)
# lower_case(小写命名法)

# 命名规范记录
# 1. 命名空间namespcase:lower_space
# 2. class/struct的名称:CamelCase
# 3. template参数:CamelCase
# 4. 普通变量:camelBack
# 5. class成员变量: 带有m前缀的CamleCase,例如 int mValue;
# 6. 函数/方法:camelBack
# 7. 宏定义: UPPER_CASE
# 8. 枚举/常量/constexpr/static常量:带有k前缀的CamelCase,例如 enum{ kFirst,kSecon}
# 9.

CheckOptions:
  - { key: readability-identifier-naming.NamespaceCase,          value: lower_case }
  - { key: readability-identifier-naming.ClassCase,              value: CamelCase  }
  - { key: readability-identifier-naming.StructCase,             value: CamelCase  }
  - { key: readability-identifier-naming.TemplateParameterCase,  value: CamelCase  }
  # - { key: readability-identifier-naming.FunctionCase,           value: aNy_CasE  }
  - { key: readability-identifier-naming.VariableCase,           value: camelBack }
  # - { key: readability-identifier-naming.MemberPrefix,           value: m         }
  # - { key: readability-identifier-naming.MemberCase,             value: CamelCase }
  - { key: readability-identifier-naming.ClassMemberPrefix,      value: m         }
  - { key: readability-identifier-naming.ClassMemberCase,        value: CamelCase }
  - { key: readability-identifier-naming.FunctionCase,           value: camelBack }
  - { key: readability-identifier-naming.ClassMethodCase,        value: camelBack }
  - { key: readability-identifier-naming.MethodCase,             value: camelBack }


  # - { key: readability-identifier-naming.ClassMemberSuffix,      value: _          }
  # - { key: readability-identifier-naming.PrivateMemberSuffix,    value: _          }
  # - { key: readability-identifier-naming.ProtectedMemberSuffix,  value: _          }
  - { key: readability-identifier-naming.MacroDefinitionCase,    value: UPPER_CASE }
  - { key: readability-identifier-naming.EnumConstantCase,         value: CamelCase }
  - { key: readability-identifier-naming.EnumConstantPrefix,       value: k         }
  - { key: readability-identifier-naming.ConstexprVariableCase,    value: CamelCase }
  - { key: readability-identifier-naming.ConstexprVariablePrefix,  value: k         }
  - { key: readability-identifier-naming.GlobalConstantCase,       value: CamelCase }
  - { key: readability-identifier-naming.GlobalConstantPrefix,     value: k         }
  - { key: readability-identifier-naming.MemberConstantCase,       value: CamelCase }
  - { key: readability-identifier-naming.MemberConstantPrefix,     value: k         }
  - { key: readability-identifier-naming.StaticConstantCase,       value: CamelCase }
  - { key: readability-identifier-naming.StaticConstantPrefix,     value: k         }
  - { key: readability-implicit-bool-conversion.AllowIntegerConditions,  value: 1   }
  - { key: readability-implicit-bool-conversion.AllowPointerConditions,  value: 1   }


 2849
2849


 被折叠的 条评论
为什么被折叠?
被折叠的 条评论
为什么被折叠?
 到【灌水乐园】发言


