


Android为我们提供了很多种优秀的布局比如说LinearLayout, RelativeLayout等,我们可以用他们通过在xml中写入就可以呈现我们想要的布局,但是我们总会遇到一些布局我们需要嵌入好几层才能完美的呈现UI设计上的效果图,比如说如何的UI:

我们拿到这UI脑子想到既要适配不同分辨率的手机,自然而然就想到先给头像、按钮先分配空间然后剩余的都给中间的,如何我们用到LinearLayout的话就会用到layout_weight来分配如下:
<LinearLayout
    android:layout_width="match_parent"
    android:layout_height="wrap_content">

    <ProfilePhoto
        android:layout_width="40dp"
        android:layout_height="40dp"/>

    <LinearLayout
        android:layout_width="0dp"
        android:layout_height="wrap_content"
        android:layout_weight="1"
        android:orientation="vertical">

        <Title
            android:layout_width="match_parent"
            android:layout_height="wrap_content"/>

        <Subtitle
            android:layout_width="match_parent"
            android:layout_height="wrap_content"/>

    </LinearLayout>

    <Menu
        android:layout_width="20dp"
        android:layout_height="20dp"/>

</LinearLayout>
在这种情况下我们分别在ProfilePhoto,Title,Menu控件的onMeasure分别打印一个log你会发现ProfilePhoto和Menu调用了一次但是中间的LinearLayout会被调用三次也就是说里面的View也分别被调用了三次,这是为什么呢?
答:因为ProfilePhoto和Menu的layout_width以及layout_height都是确定的也就是MeasureSpec.EXACTLY所以系统知道大小了就直接measure一次就好了,但是中间的LinearLayout不确定大小只有等其他两个都onMeasure后才measure,这样就存在了额外的性能消费。
那我们采用RelativeLayout来做布局的话呢?
<RelativeLayout
    android:layout_width="match_parent"
    android:layout_height="wrap_content">

    <ProfilePhoto
        android:layout_width="40dp"
        android:layout_height="40dp"
        android:layout_alignParentTop="true"
        android:layout_alignParentLeft="true"/>

    <Menu
        android:layout_width="20dp"
        android:layout_height="20dp"
        android:layout_alignParentTop="true"
        android:layout_alignParentRight="true"/>

    <Title
        android:layout_width="wrap_content"
        android:layout_height="wrap_content"
        android:layout_toRightOf="@id/profile_photo"
        android:layout_toLeftOf="@id/menu"/>

    <Subtitle
        android:layout_width="wrap_content"
        android:layout_height="wrap_content"
        android:layout_below="@id/title"
        android:layout_toRightOf="@id/profile_photo"
        android:layout_toLeftOf="@id/menu"/>

</RelativeLayout>
由于在LinearLayout没有亲自体验一下所以没有log输出,但是RelativeLayout有亲自验证了一次,对应的log输出如下:
可以看出来布局中每个View都被画了两次,这种方式相对LinearLayout的三次性能上更好一点,当然我们就会在想是否可以只onMeasure一次就好了。
自定义一个布局集成ViewGroup我给取名为FaceBookViewGroup
public class FaceBookViewGroup extends ViewGroup {

    private static final String TAG = "FaceBookViewGroup";

    private FaceBookImageView mHeadImageView;
    private FaceBookImageView mMemuImageView;
    private FaceBookTextView mTopTextView;
    private FaceBookTextView mBottomTextView;

    public FaceBookViewGroup(Context context) {
        super(context);
        iniView();
    }

    public FaceBookViewGroup(Context context, AttributeSet attrs) {
        super(context, attrs);

        iniView();
    }

    private void iniView() {
        LayoutInflater.from(getContext()).inflate(R.layout.facebook_item_layout, this, true);
        mHeadImageView = (FaceBookImageView) findViewById(R.id.image);
        mMemuImageView = (FaceBookImageView) findViewById(R.id.menu);
        mTopTextView = (FaceBookTextView) findViewById(R.id.text);
        mBottomTextView = (FaceBookTextView) findViewById(R.id.bottomtext);
    }

    @Override
    protected void onMeasure(int widthMeasureSpec, int heightMeasureSpec) {
//        super.onMeasure(widthMeasureSpec, heightMeasureSpec);

        Log.w(TAG, "FaceBookViewGroup -> onMeasure");

        int widthUsed = getPaddingLeft() + getPaddingRight();
        int heightUsed = getPaddingBottom() + getPaddingTop();
        int width = 0;
        int height = 0;

        // mHeadImageView的measure计算
        measureChildWithMargins(mHeadImageView, widthMeasureSpec, widthUsed, heightMeasureSpec, heightUsed);
        width += mHeadImageView.getMeasuredWidth();
        height = Math.max(height, mHeadImageView.getMeasuredHeight());
        widthUsed += widthUsed + mHeadImageView.getMeasuredWidth();

        // mMenuImageView的measure计算
        measureChildWithMargins(mMemuImageView, widthMeasureSpec, widthUsed, heightMeasureSpec, heightUsed);
        width += mMemuImageView.getMeasuredWidth();
        height = Math.max(height, mMemuImageView.getMeasuredHeight());
        widthUsed += widthUsed + mMemuImageView.getMeasuredWidth();

        int verticalWidthMeasureSpec = MeasureSpec.makeMeasureSpec(MeasureSpec.getSize(widthMeasureSpec) - widthUsed, MeasureSpec.getMode(widthMeasureSpec));
        int verticalHeightMeasureSpec = MeasureSpec.makeMeasureSpec(MeasureSpec.getSize(heightMeasureSpec) - heightUsed, MeasureSpec.getMode(heightMeasureSpec));
        measureChildWithMargins(mTopTextView, verticalWidthMeasureSpec, 0, verticalHeightMeasureSpec, 0);
        measureChildWithMargins(mBottomTextView, verticalWidthMeasureSpec, 0, verticalHeightMeasureSpec, mTopTextView.getMeasuredHeight());

        width += Math.max(mTopTextView.getMeasuredWidth(), mBottomTextView.getMeasuredWidth());
        height = Math.max(height, mTopTextView.getMeasuredHeight() + mBottomTextView.getMeasuredHeight());

        setMeasuredDimension(resolveSize(width, widthMeasureSpec), resolveSize(height, heightMeasureSpec));
    }

    @Override
    protected void onLayout(boolean changed, int l, int t, int r, int b) {
        int width = mHeadImageView.getMeasuredWidth();
        mHeadImageView.layout(0, 0, width, mHeadImageView.getMeasuredHeight());
        mTopTextView.layout(width, 0, width + mTopTextView.getMeasuredWidth(), mTopTextView.getMeasuredHeight());
        mBottomTextView.layout(width, mTopTextView.getMeasuredHeight(), width + mBottomTextView.getMeasuredWidth(), mBottomTextView.getMeasuredHeight() + mTopTextView.getMeasuredHeight());
        width += Math.max(mTopTextView.getMeasuredWidth(), mBottomTextView.getMeasuredWidth());
        mMemuImageView.layout(width,
                0, width + mMemuImageView.getMeasuredWidth(), mMemuImageView.getMeasuredHeight());
    }
    @Override
    public LayoutParams generateLayoutParams(AttributeSet attrs) {
        return new MarginLayoutParams(getContext(), attrs);
    }

    @Override
    protected LayoutParams generateDefaultLayoutParams() {
        return new MarginLayoutParams(LayoutParams.WRAP_CONTENT, LayoutParams.WRAP_CONTENT);
    }

    @Override
    protected LayoutParams generateLayoutParams(ViewGroup.LayoutParams p) {
        return new MarginLayoutParams(p);
    }
}
通过在onMeasure来调用
measureChildWithMargins(view, widthMeasureSpec, widthUsed, heightMeasureSpec, heightUsed);分别把ViewGroup中的View全部都各自调用一遍onMeasure且只会调用一次,不会存在RelativeLayout和LinearLayout出现的多次问题,当然前提我们要了解为什么只调用一次呢?因为每一个View都是通过onMeasure来确定自身的大小,但是系统因为一开始对应的宽度或者高度是MeasureSpec.AT_MOST或者是MeasureSpec.UNSPECIFIED导致只能等其他的view调用完onMeasure后才能知道剩余多少空间给自己,但是我们自定义的View完全可以知道大小从而绕过多余等别得View完成之后才measure,所以整体性能上优先了RelativeLayout和LinearLayout。
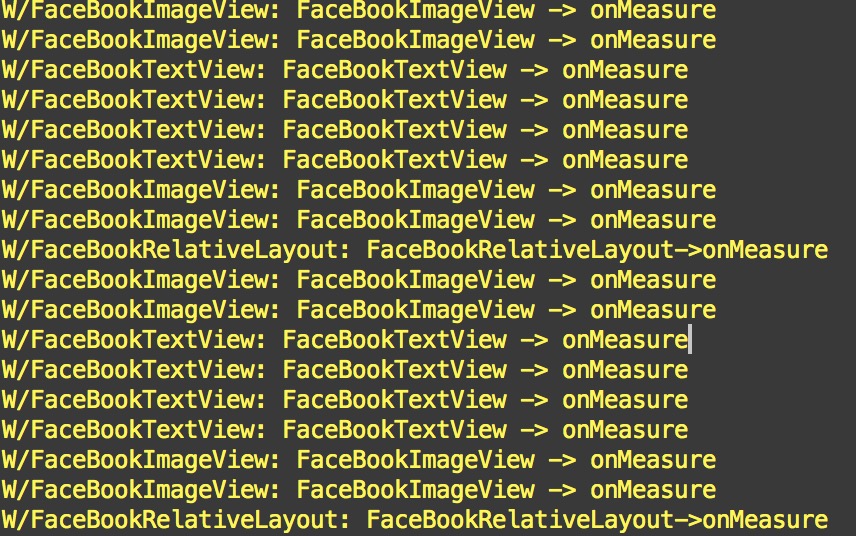
优化后的ViewGroup的输出log如下(ps:两个FaceBookImageView和两个FaceBookTextView而不是输出两次)

看完之后我们可以总结了一下如何选一个正确的布局了
1.如果LinearLayout独立一层就可以解决的优先考虑LinearLayout
2.LinearLayout中的layout_weight会measure两次
3.RelativeLayout布局会measure两次
4.如果有类似上面的UI建议采用自定义ViewGroup
5.布局文件不要嵌套太多层次
6.布局可以使用merge、include来进行层次连接
7.可以使用Viewstub加载非马上显示的布局,如空白页布局时,减少内存占用


 7734
7734

 被折叠的 条评论
为什么被折叠?
被折叠的 条评论
为什么被折叠?
 到【灌水乐园】发言


