


目录
1. 互斥量(互斥锁)
1.1 互斥锁类型:
创建一把锁: pthread_mutex_t mutex;
1.2 互斥锁的特点:
多个线程访问共享数据的时候是串行的
1.3 使用互斥锁缺点:
效率低
1.4 互斥锁使用的步骤:
创建互斥锁: pthread_mutex_t mutex;

初始化:pthread_mutex_init(&mutex,NULL); -- mutex = 1

找到线程共同操作的共享数据
    加锁:操作共享资源之前加锁,pthread_mutex_lock(&mutex); //阻塞 --mutex = 0
    pthread_mutex_trylock(&mutex); // 如果锁上锁直接返回,不阻塞
        XXXXXX共享数据操作 //临界区 ,越小越好
    解锁:pthread_mutex_unlock(&mutex); // -- mutex = 1
        阻塞在锁上的线程会被唤醒

销毁:pthread_mutex_destory(&mutex);
1.5 互斥锁相关函数
初始化互斥锁:
pthread_mutex_init(pthread_mutex_t* restrict mutex,
const pthread_mutexattr_t* restrict attr);

销毁互斥锁:
pthread_mutex_destory(pthread_mutex_t* mutex );

加锁:
pthread_mutex_lock(pthread_mutex* mutex);

没有被锁上:当前线程会将这把锁锁上。被锁上了:当前线程阻塞,
锁被打开之后,线程解除阻塞。尝试加锁,失败返回,不阻塞

pthread_mutex_trylock(pthread_mutex_t* mutex);
没有锁上:当前线程会被这把锁加锁
如果锁上了:不会阻塞,返回
返回0:加锁 成功。没锁上:返回错误号

解锁:
pthread_mutex_unlock(pthread_mutex_t* mutex);
if( pthread_mutex_trylock(& mutex)==0)
{
//尝试加锁,并且成功了
//访问共享资源
XXXXXXXX
}
else
{
//错误处理
//或者等待,再次尝试加锁
}1.6 互斥锁代码案例 pthread_mutex.c
#include <pthread.h>
#include <stdio.h>
#include <unistd.h>

#define MAX 10000
int number; // 全局变量默认初始化为0
// create mutex
pthread_mutex_t mutex;

// 线程 A 处理函数
void *funA(void *arg)
{
	for (int i = 0; i < MAX; i++)
	{
		// Lock
		pthread_mutex_lock(&mutex);

		number++;
		int ret = number;
		printf("funA id = %ld, A_number = %d\n", pthread_self(), number);

		// Unlock
		pthread_mutex_unlock(&mutex);
		usleep(10);
	}
}

// 线程 B 处理函数
void *funB(void *arg)
{
	for (int i = 0; i < MAX; i++)
	{
		// Lock
		pthread_mutex_lock(&mutex);

		number++;
		int ret = number;
		printf("funB id = %ld, B_number = %d\n", pthread_self(), number);

		// Unlock
		pthread_mutex_unlock(&mutex);
		usleep(10);
	}
}

int main()
{
	// Init mutex
	pthread_mutex_init(&mutex, NULL); // 创建互斥锁
	pthread_t pth1, pth2;

	// 创建线程
	pthread_create(&pth1, NULL, funA, NULL);
	pthread_create(&pth2, NULL, funB, NULL);

	// 等待线程结束
	pthread_join(pth1, NULL);
	pthread_join(pth2, NULL);

	// 销毁互斥锁
	pthread_mutex_destroy(&mutex);

	return 0;
}
2. 读写锁
2.1 读写锁概念:
- 读写锁是一把锁,而不是两把
- pthread_rwlock_t lock;
2.2 读写锁的类型
- 读锁-对内存做读操作
- 写锁-对内存做写操作
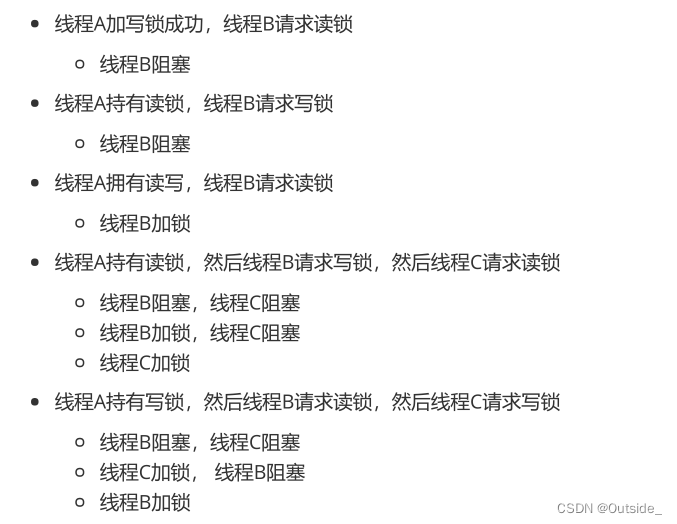
2.3 读写锁的特性

2.4 读写锁场景练习
2.5 读写锁的适用场景

2.6 主要操作函数
初始化读写锁:
    pthread_rwlock_init(pthread_rwlock_t* restrict rwlock,
    const pthread_rwlockattr_t* restrict attr );

销毁读写锁:
    pthread_rwlock_destroy(pthread_rwlock_t* rwlock):

加读锁:
    pthread_rwlock_rdlock(pthread_rwlock_t* rdlock);
阻塞:之前对这把锁加的是写锁的操作

尝试加读锁:
    pthread_rwlock_tryrdlock(pthread_rwlock_t* rwlock);
加锁成功:返回0
失败:返回错误号

加写锁:
    pthread_rwlock_wrlock(pthread_rwlock_t* rwlock);
阻塞:上一次加写锁还没解锁
阻塞:上一次加读锁还没解锁

尝试加写锁:
    pthread_rwlock_trywrlock(pthread_rwlock_t* rwlock);

解锁:
    pthread_rwlock_unlock(pthread_rwlock_t* rwlock)
2.7 练习
三个线程不定时写同一个全局变量,五个线程不定时期读同一全局资源
2.7.1 代码 pthread_rwlock.c
#include <pthread.h>
#include <stdio.h>
#include <unistd.h>

int number;
// create rwlock
pthread_rwlock_t lock;

void *write_func(void *arg)
{
	while (number < 5000)
	{
		pthread_rwlock_wrlock(&lock); // 加写锁
		number++;
		printf("write: %ld, %d\n", pthread_self(), number);
		pthread_rwlock_unlock(&lock); // 解写锁
		usleep(500);
	}
}

void *read_func(void *arg)
{
	while (number < 5000)
	{
		pthread_rwlock_rdlock(&lock); // 加读锁
		printf("read: %ld, %d\n", pthread_self(), number);
		pthread_rwlock_unlock(&lock); // 解读锁
		usleep(500);
	}
}

int main()
{
	pthread_rwlock_init(&lock, NULL);
	pthread_t p[8];

	// 前三个线程是写线程
	for (int i = 0; i < 3; i++)
	{
		pthread_create(&p[i], NULL, write_func, NULL);
	}

	// 后五个线程是读线程
	for (int i = 3; i < 8; i++)
	{
		pthread_create(&p[i], NULL, read_func, NULL);
	}

	// 等待八个线程结束
	for (int i = 0; i < 8; i++)
	{
		pthread_join(p[i], NULL);
	}

	// 销毁读写锁
	pthread_rwlock_destroy(&lock);
	return 0;
}
运行结果:
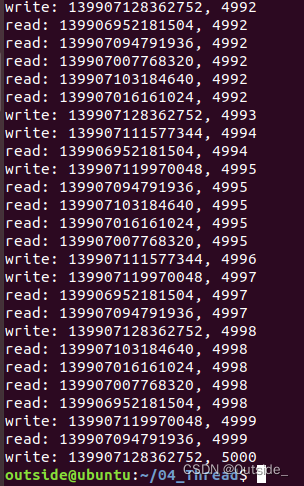
写操作的时候只能一个线程操作,但是读操作的时候可以多个线程同时读取共享资源,读出的值是同一个,比互斥锁效率更高。


 1900
1900


 被折叠的 条评论
为什么被折叠?
被折叠的 条评论
为什么被折叠?
 到【灌水乐园】发言


