前言
在写AndroidUI界面的时候,一直比较让我头疼的是GridView控件。因为在写列表的时候,我希望比如说能有3列的内容,并且这三列是平分了屏幕宽度,宽度是平分了,但是高度该怎么办?高度能用match_parent吗,好像不太好吧,那wrap_content那不行,那就用一个具体的值吧–100dp,这就更不行了!!高度设置死了,但是宽度是没有设置死,这样的话出来的界面特别难看,所以我就希望能有一个控件,它能够自己设置宽和高的比例,不管宽度怎么变,高度始终随宽度变化,这样列表的Item就会是一致大小,看起来就很好了。
实现
先给大家看一下没有使用其他控件只是一个ImageView的时候的界面效果,Item的布局文件如下:
item.xml
<?xml version="1.0" encoding="utf-8"?>
<LinearLayout xmlns:android="http://schemas.android.com/apk/res/android"
    android:layout_width="match_parent"
    android:layout_height="match_parent">
    <ImageView
        android:scaleType="fitXY"
        android:id="@+id/id_iv"
        android:layout_width="match_parent"
        android:layout_height="wrap_content"
        />
</LinearLayout>
然后再看一下GridView的布局文件:
<?xml version="1.0" encoding="utf-8"?>
<RelativeLayout xmlns:android="http://schemas.android.com/apk/res/android"
    android:layout_width="match_parent"
    android:layout_height="match_parent">
    <GridView
        android:id="@+id/gridview"
        android:columnWidth="100dp"
        android:numColumns="auto_fit"
        android:stretchMode="columnWidth"
        android:layout_width="match_parent"
        android:layout_height="match_parent">
    </GridView>
</RelativeLayout>
通过stretchMode属性值来使得列表Item的宽度平分整个屏幕。
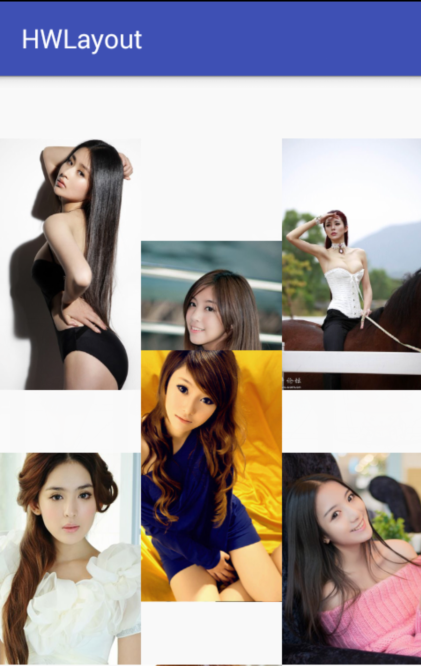
我们先来看一下普通情况下的显示情况:

大家别想成是照片墙了,这是因为我添加的图片是320*480和480*854的,而且是一个320*480下一个就是480*854来产生这种排列混乱的情况。因为图片大小不一样,所以而且ImageView的高度值是wrap_content,这就使得每个Item的高度大小就不一样了。当然有人说高度可以设置一个固定值啊,就用100dp,但是这样程序就写的太死了,这是不行的。
说了这么多,那么该怎么解决这个问题呢?怎么能够使得高度随宽度变化呢?那就是我要拿出来的这个控件了,就随便起个名字吧“HWLayout”。
作为自定义的控件,而且还要能够自定义宽和高的比例,那么就要用自定义属性了,传入宽和高的比例,然后在onMeasure方法中按照比例来改变高度值即可。
自定义属性文件
<?xml version="1.0" encoding="utf-8"?>
<resources>
    <declare-styleable name="HWLayout">
        <attr name="proportion" format="integer"></attr>
    </declare-styleable>
</resources>
HWLayout.java
/**
 * Created by 潘建成 on 2015/9/26.
 * blog:http://blog.csdn.net/programchangesworld
 */
public class HWLayout extends RelativeLayout{
    private int mProportion;  //宽和高的比例
    public HWLayout(Context context){
        this(context, null);
    }

    public HWLayout(Context context, AttributeSet attrs){
        this(context, attrs, 0);
    }

    public HWLayout(Context context, AttributeSet attrs, int defStyle){
        super(context, attrs, defStyle);
        //获取比例值
        TypedArray a = context.obtainStyledAttributes(attrs,
                R.styleable.HWLayout);
        mProportion = a.getInt(R.styleable.HWLayout_proportion,
                11);
    }

    @SuppressWarnings("unused")
    @Override
    protected void onMeasure(int widthMeasureSpec, int heightMeasureSpec) {
        setMeasuredDimension(getDefaultSize(0, widthMeasureSpec), getDefaultSize(0, heightMeasureSpec));
        int childWidthSize = getMeasuredWidth();
        int childHeightSize = getMeasuredHeight();
        String s = ""+mProportion;
        int width_pro = Integer.parseInt(s.substring(0, s.length() / 2));  //得到宽的比例
        int height_pro = Integer.parseInt(s.substring(s.length()/2));       //得到高的比例
        widthMeasureSpec = MeasureSpec.makeMeasureSpec(childWidthSize, MeasureSpec.EXACTLY);
        /**
         * 按照比例改变高度值
         */
        heightMeasureSpec = MeasureSpec.makeMeasureSpec((int)(childWidthSize*height_pro*1.0)/width_pro, MeasureSpec.EXACTLY);
        super.onMeasure(widthMeasureSpec, heightMeasureSpec);
    }
}
代码的实现比较简单,首先是自定义属性proportion,它表示宽和高的比例,这里我用如下的格式表示:“32”表示宽为3,高为2;”3248”表示宽为32,高为48。大家应该看出来了,我就不多说了。重头戏是onMeasure方法,MeasureSpec是测量宽和高的重要依据,通过makeMeasureSpec方法来得到宽度和高度。这个主要在View的绘制时会使用到。
heightMeasureSpec = MeasureSpec.makeMeasureSpec((int)(childWidthSize*height_pro*1.0)/width_pro, MeasureSpec.EXACTLY);这一行代码就可以使得高度随宽度的变化而变化,而且按照我们输入的宽和高的比例,大家可以仔细琢磨一下。
下面是新的Item布局文件:
<?xml version="1.0" encoding="utf-8"?>
<LinearLayout xmlns:android="http://schemas.android.com/apk/res/android"
    xmlns:hw="http://schemas.android.com/apk/res-auto"
    android:layout_width="match_parent"
    android:layout_height="match_parent">
    <com.example.hwlayout.HWLayout
        hw:proportion="23"
        android:layout_width="match_parent"
        android:layout_height="match_parent">
        <ImageView
            android:scaleType="fitXY"
            android:id="@+id/id_iv"
            android:layout_width="match_parent"
            android:layout_height="match_parent"
            />
    </com.example.hwlayout.HWLayout>
</LinearLayout>
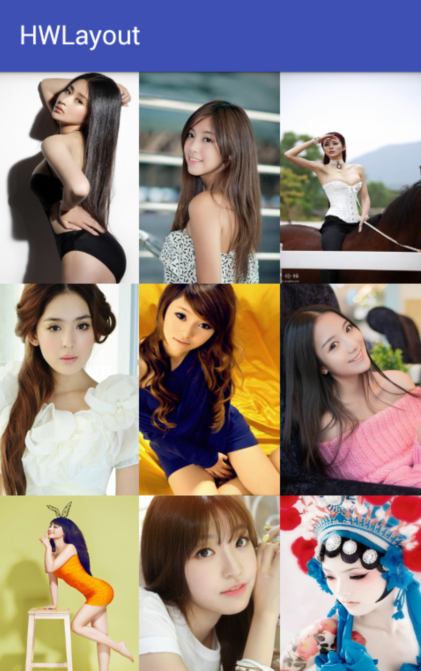
因为图片是320*480,也就是2:3的关系,而480*854也是差不多这个比例,我们就使用2:3,然后来看一下新的显示情况:

很好看有木有,虽然有些图片稍微有些失真,但是比之前的好多了。
小结
好了,这次就这样吧,这个控件还是挺实用的,在屏幕适配的时候也会用到,具体就看大家怎么使用了。


 832
832

 被折叠的 条评论
为什么被折叠?


