


文章目录
1.安装httpd服务
1.1准备工作
[root@localhost ~]# curl -o /etc/yum.repos.d/CentOS-Base.repo https://mirrors.aliyun.com/repo/Centos-vault-8.5.2111.repo  //配置阿里源方便后续下载
[root@localhost ~]# sed -i -e '/mirrors.cloud.aliyuncs.com/d' -e '/mirrors.aliyuncs.com/d' /etc/yum.repos.d/CentOS-Base.repo
root@localhost ~]# yum clean all  //清理缓存
[root@localhost ~]# yum makecache //创建本地缓存
[root@localhost ~]# useradd -r -M -s /sbin/nologin apache //创建一个apache系统用户
[root@localhost ~]# yum -y install openssl-devel pcre-devel expat-devel libtool  //安装依赖包
[root@localhost ~]# yum install -y make  //安装make命令
[root@localhost ~]# yum -y install epel-release vim  //安装opel-release vim
1.2部署httpd服务
下载httpd的源码包并安装
//wget命令下载
[root@localhost ~]# wget https://downloads.apache.org/httpd/httpd-2.4.53.tar.gz
[root@localhost ~]# wget https://downloads.apache.org/apr/apr-1.7.0.tar.gz
[root@localhost ~]# wget https://downloads.apache.org/apr/apr-util-1.6.1.tar.gz
//解压
[root@localhost ~]# tar -xf apr-1.7.0.tar.gz
[root@localhost ~]# tar -xf apr-util-1.6.1.tar.gz
[root@localhost ~]# tar -xf httpd-2.4.53.tar.gz
安装apr源码包
[root@localhost ~]# cd apr-1.7.0/
[root@localhost apr-1.7.0]# ./configure --prefix=/usr/local/apr
[root@localhost apr-1.7.0]# make
[root@localhost apr-1.7.0]# make install
安装apache的依赖apr时报rm: cannot remove ‘libtoolT’: No such file or directory的错
#编辑configure
#找到R M " RM "RM"cfgfile" 将其注释掉即可
$RM "$cfgfile" 将其注释即可
安装apr-util源码包
[root@localhost ~]# cd apr-util-1.6.1/
[root@localhost apr-util-1.6.1]# ./configure --prefix=/usr/local/apr-util --with-apr=/usr/local/apr   //apr-util是apr的子包 所以需要指定指定主包的位置
[root@localhost apr-1.7.0]# make
[root@localhost apr-1.7.0]# make install
安装httpd源码包
[root@localhost ~]# cd httpd-2.4.53/
[root@localhost httpd-2.4.53]#  ./configure --prefix=/usr/local/apache \
--enable-so \
--enable-ssl \
--enable-cgi \
--enable-rewrite \
--with-zlib \
--with-pcre \
--with-apr=/usr/local/apr \
--with-apr-util=/usr/local/apr-util/ \
--enable-modules=most \
--enable-mpms-shared=all \
--with-mpm=prefork
[root@localhost apr-1.7.0]# make
[root@localhost apr-1.7.0]# make install   //此处似乎不能补全需要手敲
1.3配置httpd服务
创建环境变量
//创建环境变量后httpd和apachectl命令就可以使用了
[root@localhost ~]# echo 'export PATH=/usr/local/apache/bin:$PATH' > /etc/profile.d/apache.sh
[root@localhost ~]# source /etc/profile.d/apache.sh
[root@localhost ~]# which httpd
/usr/local/apache/bin/httpd
[root@localhost ~]# which apachectl
/usr/local/apache/bin/apachectl
配置映射关系
[root@localhost ~]# ls /usr/local/apache/   //有头文件include所以需要做链接
bin    cgi-bin  error   icons    logs  manual
build  conf     htdocs  include  man   modules
[root@localhost ~]# ln -s /usr/local/apache/include/ /usr/include/apache
配置man文档
[root@localhost ~]# vim /etc/man_db.conf  //添加下面一条
MANDATORY_MANPATH                       /usr/local/share/apache
关闭防火墙和selinux
[root@localhost ~]#  systemctl disable --now firewalld.service   //关闭防火墙
Removed /etc/systemd/system/multi-user.target.wants/firewalld.service.
Removed /etc/systemd/system/dbus-org.fedoraproject.FirewallD1.service.
[root@localhost ~]# setenforce 0  //关闭selinux  当前生效
[root@localhost ~]# getenforce
Permissive
[root@localhost ~]# vim /etc/selinux/config   //永久关闭
SELINUX=disabled  //第一个修改为disabled
开启httpd的端口(默认是80)
#提前关闭告警信息
[root@localhost ~]# cd /usr/local/apache/
[root@localhost apache]# cd conf/   //进到配置文件目录
[root@localhost conf]# ls
extra  httpd.conf  magic  mime.types  original
[root@localhost conf]# vim httpd.conf   //将下面一行的注释取消掉
ServerName www.example.com:80

#开启80端口
[root@localhost ~]# apachectl start  //开启80端口号

[root@localhost ~]# ss -antl  //再次查看80端口已经开启了
State     Recv-Q    Send-Q         Local Address:Port         Peer Address:Port
LISTEN    0         128                  0.0.0.0:111               0.0.0.0:*
LISTEN    0         32             192.168.122.1:53                0.0.0.0:*
LISTEN    0         128                  0.0.0.0:22                0.0.0.0:*
LISTEN    0         5                  127.0.0.1:631               0.0.0.0:*
LISTEN    0         128                     [::]:111                  [::]:*
LISTEN    0         128                        *:80                      *:*
LISTEN    0         128                     [::]:22                   [::]:*
LISTEN    0         5                      [::1]:631                  [::]:*
43
使用systemctl命令设置httpd
使用源码包安装apache服务 默认是不能用systemctl的
任何源码安装的服务都适用
[root@localhost ~]# cd /usr/lib/systemd/system
[root@localhost system]# ls sshd.service
sshd.service
[root@localhost system]# cp sshd.service httpd.service  //复制一份这个文件改名为httpd.service
[root@localhost system]# vim httpd.service   //编辑这个文件
[root@localhost system]# cat httpd.service
[Unit]
Description=httpd server daemon   //修改为httpd
After=network.target sshd-keygen.target

[Service]
Type=forking
ExecStart=/usr/local/apache/bin/apachectl start   //更改为apachectl的路径   开启
ExecStop=/usr/local/apache/bin/apachectl stop   //关闭
ExecReload=/bin/kill -HUP $MAINPID

[Install]
WantedBy=multi-user.target
[root@localhost ~]# systemctl daemon-reload   //重启让其生效
2.安装mysql
准备工作
创建mysql用户和组
[root@localhost ~]# useradd -r -M -s /sbin/nologin mysql
[root@localhost ~]# id mysql
uid=975(mysql) gid=974(mysql) 组=974(mysql)

[root@localhost ~]# yum install -y ncurses-compat-libs  //mysql依赖包
解压mysql安装包
[root@localhost ~]# cd /usr/src/
[root@localhost src]# tar -xf mysql-5.7.37-linux-glibc2.12-x86_64.tar.gz -C /usr/local/  //解压到/usr/local
[root@localhost ~]# cd /usr/local/
[root@localhost local]# ls
bin  games    lib    libexec                              sbin   src
etc  include  lib64  mysql-5.7.37-linux-glibc2.12-x86_64  share
[root@localhost local]# mv mysql-5.7.37-linux-glibc2.12-x86_64/ mysql  //将解压好的目录修改为mysql
[root@localhost local]# chown -R mysql.mysql mysql/  //修改属主属组
[root@localhost local]# ll
总用量 0
drwxr-xr-x. 2 root  root    6 6月  22 2021 bin
drwxr-xr-x. 2 root  root    6 6月  22 2021 etc
drwxr-xr-x. 2 root  root    6 6月  22 2021 games
drwxr-xr-x. 2 root  root    6 6月  22 2021 include
drwxr-xr-x. 2 root  root    6 6月  22 2021 lib
drwxr-xr-x. 3 root  root   17 6月   5 05:03 lib64
drwxr-xr-x. 2 root  root    6 6月  22 2021 libexec
drwxr-xr-x. 9 mysql mysql 129 6月  28 04:05 mysql
drwxr-xr-x. 2 root  root    6 6月  22 2021 sbin
drwxr-xr-x. 5 root  root   49 6月   5 05:03 share
drwxr-xr-x. 2 root  root    6 6月  22 2021 src
配置mysql
设置环境变量
[root@localhost local]# echo 'export PATH=/usr/local/mysql/bin:$PATH' > /etc/profile.d/mysql.sh
[root@localhost local]# source /etc/profile.d/mysql.sh
[root@localhost local]# which mysql
/usr/local/mysql/bin/mysql
[root@localhost mysql]# ln -s /usr/local/mysql/include/ /usr/include/mysql  //配置include软连接
[root@localhost mysql]# vim /etc/ld.so.conf.d/mysql.conf
[root@localhost mysql]# cat /etc/ld.so.conf.d/mysql.conf   //配置lib库
/usr/local/mysql/lib
[root@localhost mysql]# vim /etc/man_db.conf   //添加man文档
MANDATORY_MANPATH                       /usr/local/mysql/man
建立数据存放目录
[root@localhost ~]# mkdir -p /opt/data
[root@localhost ~]# cd /opt/
[root@localhost opt]# chown -R mysql.mysql data/
[root@localhost opt]# ll
总用量 0
drwxr-xr-x. 2 mysql mysql   6 6月  28 04:18 data
[root@localhost ~]# mysqld --initialize --user=mysql --datadir=/opt/data/
2022-06-28T08:33:21.588738Z 0 [Warning] TIMESTAMP with implicit DEFAULT value is de
precated. Please use --explicit_defaults_for_timestamp server option (see documenta
tion for more details).
2022-06-28T08:33:21.779215Z 0 [Warning] InnoDB: New log files created, LSN=45790
2022-06-28T08:33:21.806184Z 0 [Warning] InnoDB: Creating foreign key constraint sys
tem tables.
2022-06-28T08:33:21.810719Z 0 [Warning] No existing UUID has been found, so we assu
me that this is the first time that this server has been started. Generating a new
UUID: f815d2f1-f6bc-11ec-909f-000c2996f1b8.
2022-06-28T08:33:21.811579Z 0 [Warning] Gtid table is not ready to be used. Table '
mysql.gtid_executed' cannot be opened.
2022-06-28T08:33:22.706316Z 0 [Warning] A deprecated TLS version TLSv1 is enabled.
Please use TLSv1.2 or higher.
2022-06-28T08:33:22.706350Z 0 [Warning] A deprecated TLS version TLSv1.1 is enabled
. Please use TLSv1.2 or higher.
2022-06-28T08:33:22.706767Z 0 [Warning] CA certificate ca.pem is self signed.
2022-06-28T08:33:22.943962Z 1 [Note] A temporary password is generated for root@loc
alhost: .pDs<wQuB1ab
//临时密码
生成配置文件
[root@localhost ~]# vim /etc/my.cnf
[root@localhost ~]# cat /etc/my.cnf
[mysqld]
basedir = /usr/local/mysql
datadir = /opt/data
socket = /tmp/mysql.sock
port = 3306
pid-file = /opt/data/mysql.pid
user = mysql
skip-name-resolve
配置服务启动脚本
[root@localhost ~]# cd /usr/local/mysql/
[root@localhost mysql]# ls
bin  docs  include  lib  LICENSE  man  README  share  support-files
[root@localhost mysql]# cd support-files/
[root@localhost support-files]# ls
magic  mysqld_multi.server  mysql-log-rotate  mysql.server
[root@localhost support-files]# cp mysql.server mysqld
[root@localhost support-files]# vim mysqld //搜索basedir 并修改成下面这样
basedir=/usr/local/mysql
datadir=/usr/local/data
启动mysql
[root@localhost support-files]# /usr/local/mysql/support-files/mysqld start
Starting MySQL.Logging to '/opt/data/localhost.localdomain.err'.
 SUCCESS!
[root@localhost support-files]# ss -antl
State    Recv-Q   Send-Q     Local Address:Port      Peer Address:Port   Process
LISTEN   0        128              0.0.0.0:111            0.0.0.0:*
LISTEN   0        128              0.0.0.0:22             0.0.0.0:*
LISTEN   0        5              127.0.0.1:631            0.0.0.0:*
LISTEN   0        128                 [::]:111               [::]:*
LISTEN   0        128                 [::]:22                [::]:*
LISTEN   0        5                  [::1]:631               [::]:*
LISTEN   0        80                     *:3306                 *:*
[root@localhost ~]# mysql -uroot -p'.pDs<wQuB1ab'
mysql: [Warning] Using a password on the command line interface can be insecure.
Welcome to the MySQL monitor.  Commands end with ; or \g.
Your MySQL connection id is 2
Server version: 5.7.37

Copyright (c) 2000, 2022, Oracle and/or its affiliates.

Oracle is a registered trademark of Oracle Corporation and/or its
affiliates. Other names may be trademarks of their respective
owners.

Type 'help;' or '\h' for help. Type '\c' to clear the current input statement.

mysql>

mysql> set password = password('kurumi123!');
验证密码
[root@localhost ~]# mysql -uroot -p'kurumi123!'
mysql: [Warning] Using a password on the command line interface can be insecure.
Welcome to the MySQL monitor.  Commands end with ; or \g.
Your MySQL connection id is 3
Server version: 5.7.37 MySQL Community Server (GPL)

Copyright (c) 2000, 2022, Oracle and/or its affiliates.

Oracle is a registered trademark of Oracle Corporation and/or its
affiliates. Other names may be trademarks of their respective
owners.

Type 'help;' or '\h' for help. Type '\c' to clear the current input statement.

mysql>
开机自启
[root@localhost support-files]# /usr/local/mysql/support-files/mysqld stop  //关掉mysql
Shutting down MySQL.. SUCCESS!
[root@localhost support-files]#
编写配置文件
[root@localhost ~]# cd /usr/lib/systemd/system
[root@localhost system]# cp sshd.service mysqld.service
[root@localhost system]# vim mysqld.service
[root@localhost system]# cat mysqld.service
[Unit]
Description=mysql server daemon
After=network.target sshd-keygen.target

[Service]
Type=forking
ExecStart=/usr/local/mysql/support-files/mysqld start
ExecStop=/usr/local/mysql/support-files/mysqld stop
ExecReload=/bin/kill -HUP $MAINPID
KillMode=process
Restart=on-failure
RestartSec=42s

[Install]
WantedBy=multi-user.target
关闭selinux
[root@localhost system]# vim /etc/selinux/config
[root@localhost system]# cat /etc/selinux/config

# This file controls the state of SELinux on the system.
# SELINUX= can take one of these three values:
#     enforcing - SELinux security policy is enforced.
#     permissive - SELinux prints warnings instead of enforcing.
#     disabled - No SELinux policy is loaded.
SELINUX=disabled
# SELINUXTYPE= can take one of these three values:
#     targeted - Targeted processes are protected,
#     minimum - Modification of targeted policy. Only selected processes are protected.
#     mls - Multi Level Security protection.
SELINUXTYPE=targeted
[root@localhost system]# systemctl daemon-reload  //重启让service文件生效
[root@localhost system]# systemctl start mysqld.service
[root@localhost system]# systemctl enable --now mysqld.service
[root@localhost system]# systemctl status mysqld.service
● mysqld.service - mysql server daemon
   Loaded: loaded (/usr/lib/systemd/system/mysqld.service; enabled; vendor preset:>
   Active: active (running) since Tue 2022-06-28 04:54:41 EDT; 54s ago
 Main PID: 2120634 (mysqld_safe)
    Tasks: 28 (limit: 11047)
   Memory: 184.4M
   CGroup: /system.slice/mysqld.service
           ├─2120634 /bin/sh /usr/local/mysql/bin/mysqld_safe --datadir=/opt/data >
           └─2120836 /usr/local/mysql/bin/mysqld --basedir=/usr/local/mysql --data>
3.安装php
3.1准备工作
#安装依赖包
[root@localhost ~]# yum -y install libxml2 libxml2-devel openssl openssl-devel bzip2 bzip2-devel libcurl libcurl-devel libicu-devel libjpeg libjpeg-devel libpng libpng-devel openldap-devel  pcre-devel freetype freetype-devel gmp gmp-devel libmcrypt libmcrypt-devel readline readline-devel libxslt libxslt-devel mhash mhash-devel sqlite-devel libzip-devel

[root@localhost ~]# wget https://github.com/kkos/oniguruma/archive/v6.9.4.tar.gz -O oniguruma-6.9.4.tar.gz     //下载此包 后续编译php需要
[root@localhost ~]# tar -zxf oniguruma-6.9.4.tar.gz  //解压
[root@localhost ~]# cd oniguruma-6.9.4
[root@localhost ~]# ./autogen.sh && ./configure --prefix=/usr  //设置存放位置
[root@localhost ~]# make && make install  //make编译

[root@localhost ~]# wget https://www.php.net/distributions/php-7.4.29.tar.xz //下载php的源码包
[root@localhost ~]# tar xf php-7.4.29.tar.xz   //解压
3.2编译php源码包
[root@localhost ~]# cd php-7.4.29/
./configure --prefix=/usr/local/php7  \
--with-config-file-path=/etc \
--enable-fpm \
--enable-inline-optimization \
--disable-debug \
--disable-rpath \
--enable-shared \
--enable-soap \
--with-openssl \
--enable-bcmath \
--with-iconv \
--with-bz2 \
--enable-calendar \
--with-curl \
--enable-exif  \
--enable-ftp \
--enable-gd \
--with-jpeg \
--with-zlib-dir \
--with-freetype \
--with-gettext \
--enable-json \
--enable-mbstring \
--enable-pdo \
--with-mysqli=mysqlnd \
--with-pdo-mysql=mysqlnd \
--with-readline \
--enable-shmop \
--enable-simplexml \
--enable-sockets \
--with-zip \
--enable-mysqlnd-compression-support \
--with-pear \
--enable-pcntl \
--enable-posix

[root@localhost ~]# make
[root@localhost ~]# make install   //make编译
3.3配置php
创建环境变量
[root@localhost ~]# echo 'export PATH=/usr/local/php7/bin:$PATH' > /etc/profile.d/php7.sh  //使php命令可以使用
[root@localhost ~]# source /etc/profile.d/php7.sh    //读取 让其生效
[root@localhost ~]# which php
/usr/local/php7/bin/php
配置php-fpm
[root@localhost ~]# cd php-7.4.29/
[root@localhost php-7.4.29]# cp php.ini-production /etc/php.ini  //将生产环境文件 复制到etc下
[root@localhost php-7.4.29]# cp sapi/fpm/init.d.php-fpm /etc/init.d/php-fpm
[root@localhost fpm]# chmod +x /etc/rc.d/init.d/php-fpm  //此文件需要执行权限所以复制过去要看是否有执行(x)权限
[root@localhost php-7.4.29# cp /usr/local/php7/etc/php-fpm.conf.default /usr/local/php7/etc/php-fpm.conf   //将php-fpm.conf.default 复制一份名为php-fpm.conf
[root@localhost php-7.4.29]# cp /usr/local/php7/etc/php-fpm.d/www.conf.default /usr/local/php7/etc/php-fpm.d/www.conf    //将www.conf.default 复制一份名为www.conf
开启服务检查端口
[root@localhost ~]# service php-fpm start
Starting php-fpm  done
[root@localhost ~]# ss -antl  //php-fpm 的默认端口为9000
State     Recv-Q    Send-Q         Local Address:Port         Peer Address:Port
LISTEN    0         128                127.0.0.1:9000              0.0.0.0:*
LISTEN    0         128                  0.0.0.0:111               0.0.0.0:*
[root@localhost ~]# ps -ef |grep php  //查看php的进程
root      681716       1  0 19:57 ?        00:00:00 php-fpm: master process (/usr/local/php7/etc/php-fpm.conf)
nobody    681717  681716  0 19:57 ?        00:00:00 php-fpm: pool www
nobody    681718  681716  0 19:57 ?        00:00:00 php-fpm: pool www
root      689388  362392  0 19:59 pts/1    00:00:00 grep --color=auto php
3.4 配置apache
创建测试文件
[root@localhost ~]# cd /usr/local/apache/htdocs/   //进入网页目录
[root@localhost htdocs]# mkdir test.com   //创建存放网页的目录
[root@localhost htdocs]# chown -R apache.apache /usr/local/apache/   //设置apache下的文件目录属组属主都为apache
[root@localhost htdocs]# cd test.com/
[root@localhost test.com]# vim index.php   //创建一个index.php的测试文件
[root@localhost test.com]# cat index.php
<?php
   phpinfo();
?>
[root@localhost test.com]# cd ..
[root@localhost htdocs]# ll   //查看属组属主是否变更
总用量 4
-rw-r--r--. 1 apache apache 45 6月  12 2007 index.html
drwxr-xr-x. 2 apache apache 23 4月  21 21:57 test.com
启动代理模块
在apache httpd 2.4以后已经专门有一个模块针对FastCGI的实现,此模块为mod_proxy_fcgi.so,它其实是作为mod_proxy.so模块的扩展,因此,这两个模块都要加载,编辑httpd.conf文件,取消以下两行内容的注释:
[root@localhost ~]# cd /usr/local/apache/conf/
[root@localhost conf]# vim httpd.conf
LoadModule proxy_module modules/mod_proxy.so   //将这两行注释取消 启动这两个模块
LoadModule proxy_fcgi_module modules/mod_proxy_fcgi.so
配置虚拟主机
#搜索AddType后添加两行
[root@localhost conf]# vim httpd.conf
AddType application/x-compress .Z
AddType application/x-gzip .gz .tgz
AddType application/x-httpd-php .php  //添加这两行   //让apache支持php的页面
AddType application/x-httpd-php-source .phps //添加这两行


#搜索index.html
[root@localhost conf]# vim httpd.conf
<IfModule dir_module>
    DirectoryIndex index.php index.html   //在其前面添加index.php 让网站能够访问到php类型
</IfModule>


#在文件最后添加
<VirtualHost *:80>
    DocumentRoot "/usr/local/apache/htdocs/test.com"   //网站位置
    ServerName test.example.com  //域名
    ProxyRequests Off
    ProxyPassMatch ^/(.*\.php)$ fcgi://127.0.0.1:9000/usr/local/apache/htdocs/test.com/$1  //网站位置
    <Directory "/usr/local/apache/htdocs/test.com">  //网站位置
        Options none
        AllowOverride none
        Require all granted
    </Directory>
</VirtualHost>
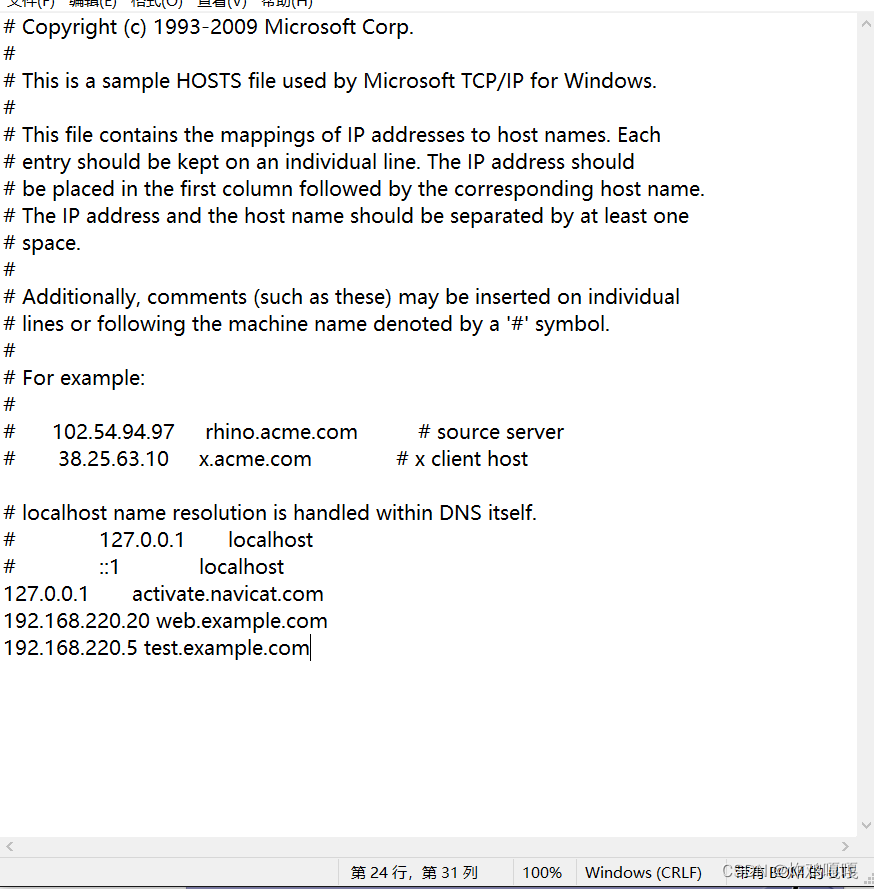
windows操作
为真机的host文件添加ip对应的域名做映射
192.168.220.5为虚拟机ip
test.exampl.com 域名
重启服务
[root@localhost htdocs]# apachectl stop
[root@localhost htdocs]# apachectl start
[root@localhost htdocs]# ss -antl
State     Recv-Q    Send-Q         Local Address:Port         Peer Address:Port
LISTEN    0         128                127.0.0.1:9000              0.0.0.0:*
LISTEN    0         128                  0.0.0.0:111               0.0.0.0:*
LISTEN    0         32             192.168.122.1:53                0.0.0.0:*
LISTEN    0         128                  0.0.0.0:22                0.0.0.0:*
LISTEN    0         5                  127.0.0.1:631               0.0.0.0:*
LISTEN    0         80                         *:3306                    *:*
LISTEN    0         128                     [::]:111                  [::]:*
LISTEN    0         128                        *:80                      *:*
LISTEN    0         128                     [::]:22                   [::]:*
LISTEN    0         5                      [::1]:631                  [::]:*
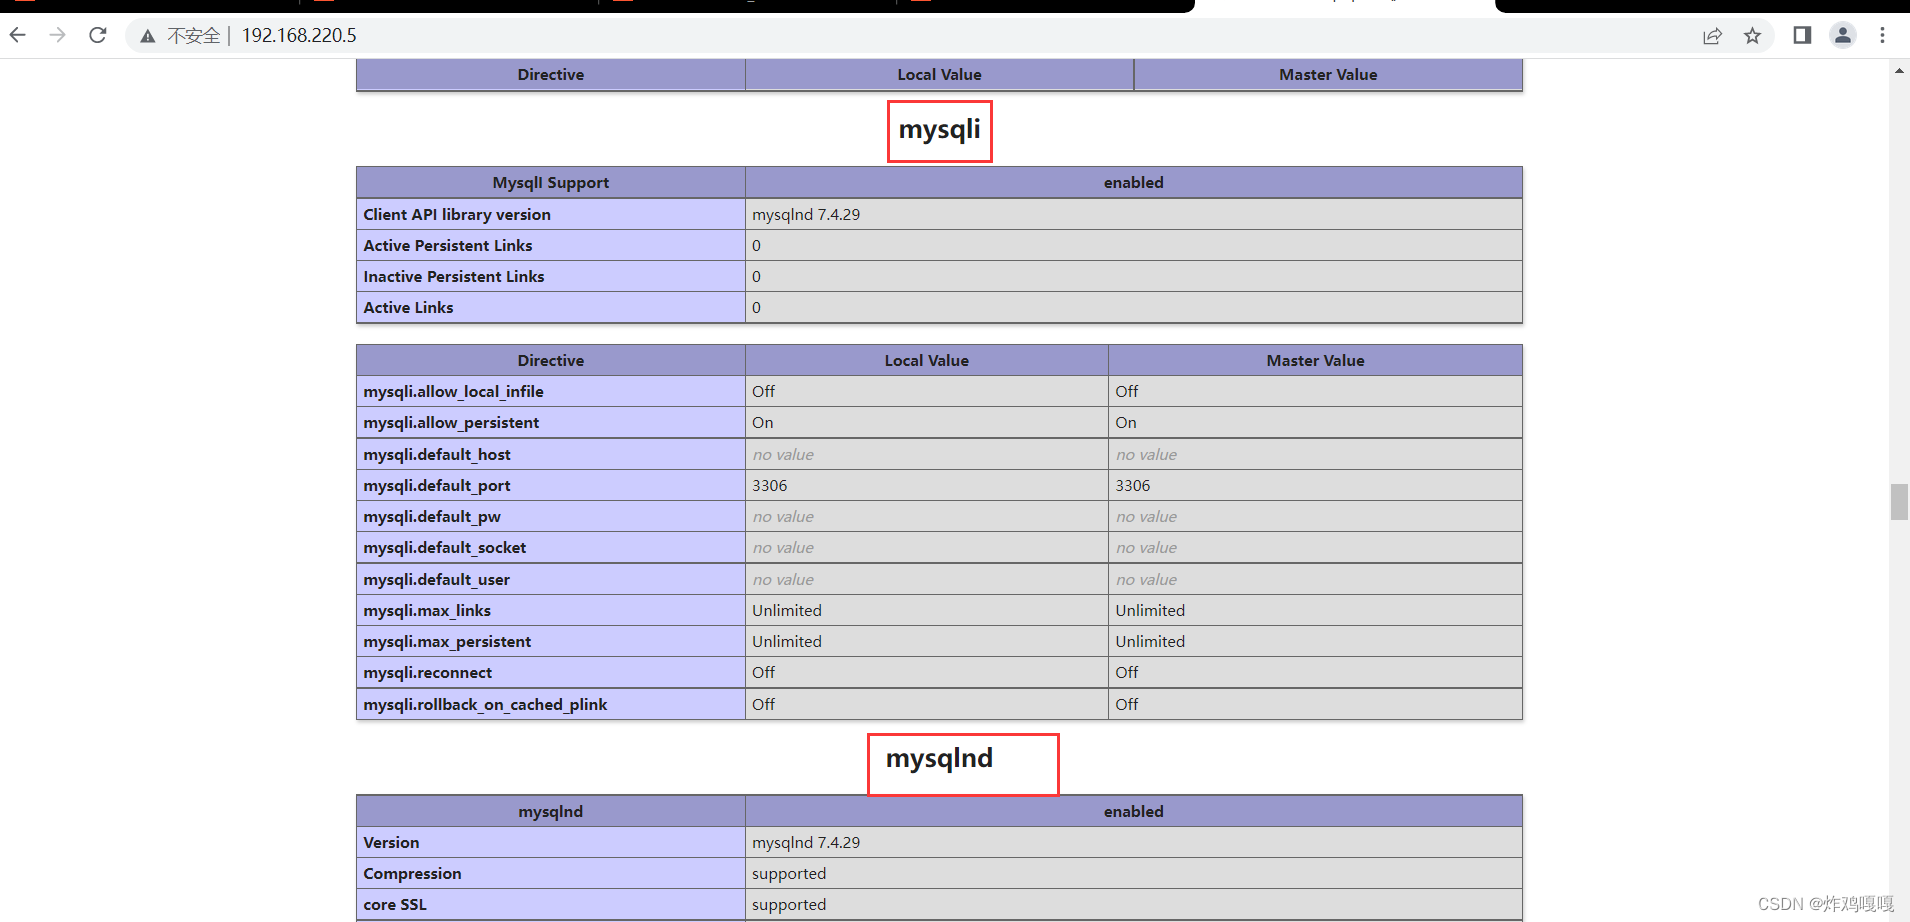
浏览器测试
ip访问
能看到mysqlnd就是数据库可以使用


 331
331


 被折叠的 条评论
为什么被折叠?
被折叠的 条评论
为什么被折叠?
 到【灌水乐园】发言


