


以下我们用 PyTorch 实现一个很简单的二分类器,所用的数据来自 Scikit learn。
首先来生成含200个样本的数据,并绘制出样本的散点图如下图所示:
import matplotlib.pyplot as plt
from sklearn.cluster import SpectralClustering
import sklearn.datasets

X,y = sklearn.datasets.make_moons(200,noise=0.2)

plt.scatter(X[:,0],X[:,1],s=40,c=y,cmap=plt.cm.Spectral)
<matplotlib.collections.PathCollection at 0x149ce908>
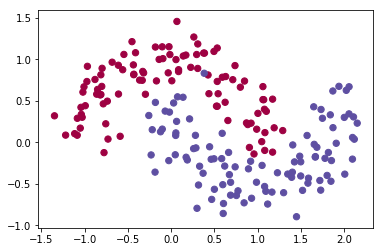
可以看到生成了两类数据,分别用 0 和 1 来表示。我们接下来将要在这个样本数据上构造一个分类器,采用的是一个很简单的全连接网络,网络结构如下:

这个网络包含一个输入层,一个中间层,一个输出层。中间层包含 3 个神经元,使用的激活函数是 tanh。当然,中间层的神经元越多,分类效果一般越好,但这个 3 层的网络对于我们的样本数据已经足够用了。我们来算一下参数数量:上图中一共有 6+6 = 12 条线,就是 12 个权重,加上 3+ 2 = 5 个 bias,一共 17 个参数需要训练。
接下来将样本数据从 numpy 转成 tensor:
X = torch.from_numpy(X).type(torch.FloatTensor)
y = torch.from_numpy(y).type(torch.LongTensor)
开始构建神经网络,其中损失函数用交叉熵损失函数,梯度优化器用Adam。
import torch.nn as nn
import torch.nn.functional as F

class MyClassifier(nn.Module):
    def __init__(self):
        super(MyClassifier,self).__init__()
        self.fc1 = nn.Linear(2,3)
        self.fc2 = nn.Linear(3,2)

    def forward(self,x):
        x = self.fc1(x)
        x = F.tanh(x)
        x = self.fc2(x)
        return x

    def predict(self,x):
        pred = F.softmax(self.forward(x))
        ans = []
        for t in pred:
            if t[0]>t[1]:
                ans.append(0)
            else:
                ans.append(1)
        return torch.tensor(ans)
model = Net()
criterion = nn.CrossEntropyLoss()  #交叉熵损失函数
optimizer = torch.optim.Adam(model.parameters(), lr=0.01) #Adam梯度优化器
训练:
epochs = 10000
losses = []
for i in range(epochs):
    y_pred = model.forward(X)
    loss = criterion(y_pred,y)
    losses.append(loss.item())
    optimizer.zero_grad()
    loss.backward()
    optimizer.step()
查看训练误差:
from sklearn.metrics import accuracy_score
print(accuracy_score(model.predict(X),y))

# Output
0.995
下面的函数帮助我们在两个分类之间画一条分界线,便于将结果可视化。
def predict(x):
   x = torch.from_numpy(x).type(torch.FloatTensor)
   ans = model.predict(x)
   return ans.numpy()

def plot_decision_boundary(pred_func,X,y):
    x_min, x_max = X[:, 0].min() - .5, X[:, 0].max()+ .5
    y_min, y_max = X[:, 1].min() - .5, X[:, 1].max()+ .5
    h = 0.01
    xx,yy=np.meshgrid(np.arange(x_min, x_max, h), np.arange(y_min, y_max, h))
    Z = pred_func(np.c_[xx.ravel(), yy.ravel()])
    Z = Z.reshape(xx.shape)
    plt.contourf(xx, yy, Z, cmap=plt.cm.Spectral)
    plt.scatter(X[:, 0], X[:, 1], c=y, cmap=plt.cm.binary)
分类结果:
plot_decision_boundary(lambda x : predict(x) ,X.numpy(), y.numpy())
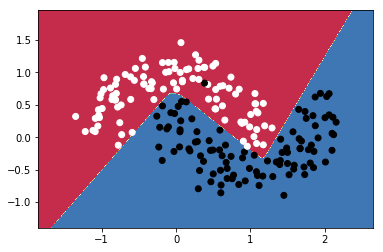
完整代码参见参考资料2,简单二分类器结果如下图所示 。
import sklearn.datasets
import torch
import numpy as np
np.random.seed(0)
X, y = sklearn.datasets.make_moons(200,noise=0.2)
import matplotlib.pyplot as plt
plt.scatter(X[:,0],X[:,1],s=40,c=y,cmap=plt.cm.binary)
X = torch.from_numpy(X).type(torch.FloatTensor)
y = torch.from_numpy(y).type(torch.LongTensor)
import torch.nn as nn
import torch.nn.functional as F
#our class must extend nn.Module
class Net(nn.Module):
def __init__(self):
super(Net,self).__init__()
#Our network consists of 3 layers. 1 input, 1 hidden and 1 output layer
#This applies Linear transformation to input data.
self.fc1 = nn.Linear(2,3)
#This applies linear transformation to produce output data
self.fc2 = nn.Linear(3,2)
#This must be implemented
def forward(self,x):
#Output of the first layer
x = self.fc1(x)
#Activation function is Relu. Feel free to experiment with this
x = F.tanh(x)
#This produces output
x = self.fc2(x)
return x
#This function takes an input and predicts the class, (0 or 1)
def predict(self,x):
#Apply softmax to output
pred = F.softmax(self.forward(x))
ans = []
for t in pred:
if t[0]>t[1]:
ans.append(0)
else:
ans.append(1)
return torch.tensor(ans)
#Initialize the model
model = Net()
#Define loss criterion
criterion = nn.CrossEntropyLoss()
#Define the optimizer
optimizer = torch.optim.Adam(model.parameters(), lr=0.01)
#Number of epochs
epochs = 50000
#List to store losses
losses = []
for i in range(epochs):
#Precit the output for Given input
y_pred = model.forward(X)
#Compute Cross entropy loss
loss = criterion(y_pred,y)
#Add loss to the list
losses.append(loss.item())
#Clear the previous gradients
optimizer.zero_grad()
#Compute gradients
loss.backward()
#Adjust weights
optimizer.step()
from sklearn.metrics import accuracy_score
print(accuracy_score(model.predict(X),y))
def predict(x):
x = torch.from_numpy(x).type(torch.FloatTensor)
ans = model.predict(x)
return ans.numpy()
# Helper function to plot a decision boundary.
# If you don't fully understand this function don't worry, it just generates the contour plot below.
def plot_decision_boundary(pred_func,X,y):
# Set min and max values and give it some padding
x_min, x_max = X[:, 0].min() - .5, X[:, 0].max() + .5
y_min, y_max = X[:, 1].min() - .5, X[:, 1].max() + .5
h = 0.01
# Generate a grid of points with distance h between them
xx,yy=np.meshgrid(np.arange(x_min, x_max, h), np.arange(y_min, y_max, h))
# Predict the function value for the whole gid
Z = pred_func(np.c_[xx.ravel(), yy.ravel()])
Z = Z.reshape(xx.shape)
# Plot the contour and training examples
plt.contourf(xx, yy, Z, cmap=plt.cm.Spectral)
plt.scatter(X[:, 0], X[:, 1], c=y, cmap=plt.cm.binary)
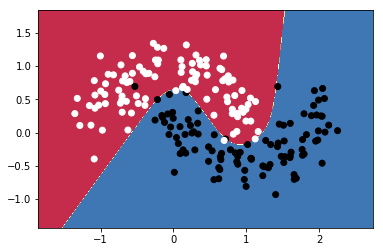
plot_decision_boundary(lambda x : predict(x) ,X.numpy(), y.numpy())
# Output result:0.97
参考资料:
https://www.pytorchtutorial.com/pytorch-simple-classifier/
https://github.com/prudvinit/MyML/blob/master/lib/neural%20networks/pytorch%20moons.py
https://scikit-learn.org/stable/modules/classes.html#module-sklearn.cluster


 653
653


 被折叠的 条评论
为什么被折叠?
被折叠的 条评论
为什么被折叠?
 到【灌水乐园】发言


