


CodeBlocks学习 如何编译多个目标
呵,说多个目标,还不如说是如何在一个工程中,编译不同的动态库。想想MFC中一个动态库就是一个工程,当动态库多的时候,觉得管理不是很好,CodeBlocks支持在一个工程中,可以编译多个动态库,以下是我的学习体会。
之所以会有这样的需求,主要是因为我在用了ECLIPSE之后,觉得其plugin功能真的很强大,再者,CodeBlocks也是基于plugin框架架构的,所以想具体的学习一下,基于wxWidgets的plugin程序框架设计。
在学习过程中,我发现,一个工程一个库,这个管理不太方便。于是,就想可不可以在同一个工程中,编译不同的目标动态库?经过一番摸索,CodeBlocks可以实现我的需求。以下将方法记录下来,以备查阅。
- 创建一个wxStudy工程,增加4个文件到工程,
 //
MainApp.h
#ifndef WX_MAIN_APP_H
#define
WX_MAIN_APP_H
#include
<
wx
/
app.h
>
class
MainApp :
public
wxApp
//
MainApp.h
#ifndef WX_MAIN_APP_H
#define
WX_MAIN_APP_H
#include
<
wx
/
app.h
>
class
MainApp :
public
wxApp
 ...
{
...
{ public: MainApp(); public: virtual bool OnInit(); private: void InitFrame();
 }
;DECLARE_APP(MainApp)
#endif
}
;DECLARE_APP(MainApp)
#endif
//
MainApp.cpp
#include
"
mainApp.h
"
#include
"
MainFrame.h
"
IMPLEMENT_APP(MainApp)MainApp::MainApp()
...
{}
bool
MainApp::OnInit()
...
{ InitFrame(); return true;}
void
MainApp::InitFrame()
...
{ MainFrame* pMainFrm = new MainFrame(_T("MainFrame")); pMainFrm->Show(true);}
//
MainFrame.h
#ifndef MAIN_FRAME_H
#define
MAIN_FRAME_H
#include
<
wx
/
frame.h
>
//
#include <wx/wx.h>
class
MainFrame :
public
wxFrame
...
{ public: MainFrame(const wxString& strTitle); private: void InitCtrl(); private://event void OnAbout(wxCommandEvent& event); void OnQuit(wxCommandEvent& event); //测试动态库 void OnShowMessage(wxCommandEvent& event); private: DECLARE_EVENT_TABLE()}
;
#endif
//
MainFrame.cpp
#include
"
MainFrame.h
"
#include
<
wx
/
menu.h
>
//
#include <wx/string.h>
#include
<
wx
/
msgdlg.h
>
#include
<
wx
/
dynlib.h
>
#include
<
wx
/
filefn.h
>
#include
<
wx
/
filename.h
>
#include
"
maindef.h
"
//
EVENT DECLARE
BEGIN_EVENT_TABLE(MainFrame,wxFrame) EVT_MENU(wxID_EXIT,MainFrame::OnQuit) EVT_MENU(wxID_ABOUT,MainFrame::OnAbout) EVT_MENU(wxID_TEST_DLL,MainFrame::OnShowMessage)END_EVENT_TABLE()
//
END EVENT DECLARE
MainFrame::MainFrame(
const
wxString
&
strTitle):wxFrame(NULL,wxID_ANY,strTitle)
...
{ InitCtrl();}
void
MainFrame::InitCtrl()
...
{ wxMenu* pMenu = new wxMenu(); pMenu->Append(wxID_EXIT,_T("Exit")); pMenu->Append(wxID_ABOUT,_T("About")); pMenu->Append(wxID_TEST_DLL,_T("测试动态库")); wxMenuBar* pMenuBar = new wxMenuBar(); pMenuBar->Append(pMenu,_T("File")); SetMenuBar(pMenuBar);}
/**/
/** 退出程序* @param wxCommandEvent& event*/
void
MainFrame::OnQuit(wxCommandEvent
&
event
)
...
{ Close();}
void
MainFrame::OnAbout(wxCommandEvent
&
event
)
...
{ wxString strMsg(_T("wxWidgets study.")); wxString strCaption(_T("关于")); wxMessageBox(strMsg, strCaption, wxOK | wxICON_INFORMATION,this); //wxMessageBox("Quit program?", "Confirm",wxYES_NO | wxCANCEL, this);}
void
MainFrame::OnShowMessage(wxCommandEvent
&
event
)
...
{ //wxString dir(wxGetWorkingDirectory()); //wxMessageBox(dir,_T("dir"),wxOK);
 wxChar name[MAX_PATH] = ...{0}; GetModuleFileName(0L, name, MAX_PATH); //wxMessageBox(name,_T("dir"),wxOK); wxFileName fname(name); wxString strPath(fname.GetPath(wxPATH_GET_VOLUME)); wxDynamicLibrary lib; wxString libfile(strPath << _T("/plugins/msgplugin/msgplugin.dll")); lib.Load(libfile); if(!lib.IsLoaded()) ...{ wxMessageBox(libfile << _T(" load error."),_T("Error"),wxOK | wxICON_ERROR); return;
 } typedef int (*ShowMessageProc)(const wxString&); ShowMessageProc ShowMessage = (ShowMessageProc)lib.GetSymbol(_T("ShowMessage")); if(NULL == ShowMessage) ...{ wxMessageBox(_T("don't call the method: ShowMessag"), _T("Error"), wxOK | wxICON_ERROR); return; } ShowMessage(_T("call from ") + libfile);}
2.创建动态库所需要的文件src/plugins/msgplugin/msh.h;src/plugins/msgplugin/msh.cpp
//
msg.h
#ifndef MSG_H_INCLUDED
#define
MSG_H_INCLUDED
#include
"
../pluginset.h
"
#include
<
wx
/
string
.h
>
BEGIN_EXPORT_LANGUAGE()
int
PLUGIN_EXPORT ShowMessage(
const
wxString
&
msg);END_EXPORT_LANGUAGE()
#endif
//
MSG_H_INCLUDED
//
msg.cpp
#include
"
msg.h
"
#include
<
wx
/
msgdlg.h
>
int
ShowMessage(
const
wxString
&
msg)
...
{ wxMessageBox(msg,_T("msg")); return 0;}
3.设置编译目标 ,File->new -> build target...,如下图所示:
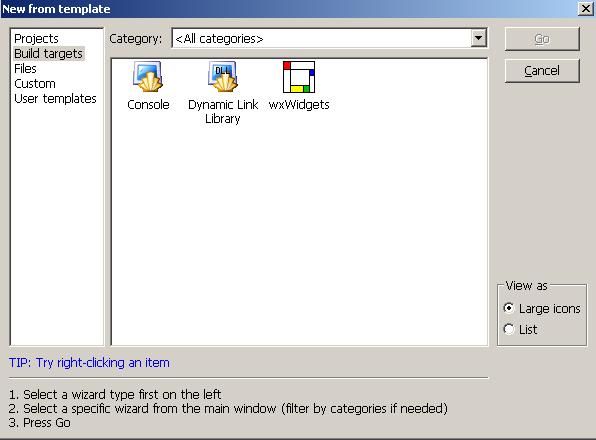
选择 Dynamic Link library,编译动态库,点GO,next,如下图:
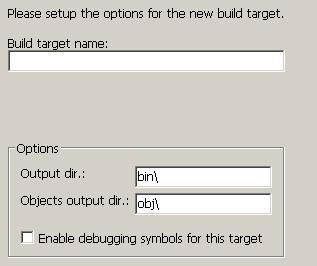
输入msgplugin后,点Finish,这样我们就创建了一个编译目标,但这还不够,因为,还没有为此目标增加任何的源文件,接下来,增加源文件。
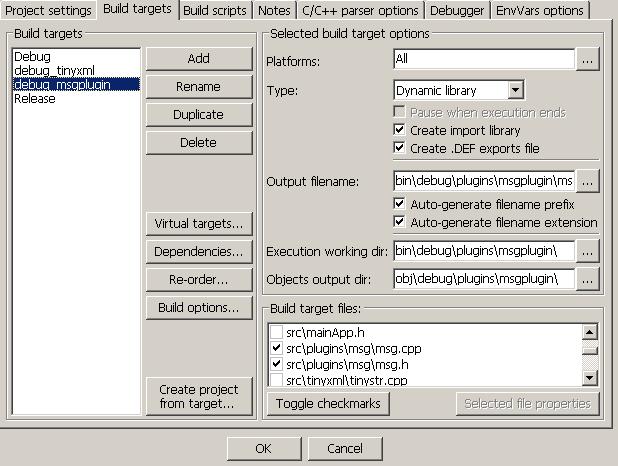
在工程树上点右键,选择Properties->Build targets选项卡,如下图,你会看到我们输入的编译目标(debug_msgplugin):
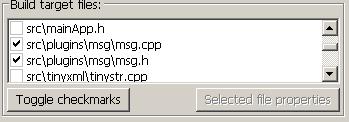
在build target files中,选择我们的源文件,如下图:
呵,离成功还差一步了,接下来,我们要做的就是定义__declspec(__dllexport)或是__dllimport,为什么了,在工程中,我们增加一个pluginset.h的文件,文件内容如下:
//
pluginset.h
#ifndef PLUGINSET_H
#define
PLUGINSET_H
//
windows平台下,动态库的前辍定义
#ifdef __WXMSW__ #ifndef PLUGIN_EXPORT #ifdef EXPORT_LIB
#define
PLUGIN_EXPORT __declspec(__dllexport)
#else
//
!EXPORT_LIB
#if
BUILDING_PLUGIN
#define
PLUGIN_EXPORT __declspec(__dllexport)
#else
//
!BUILDING_PLUGIN
#define
PLUGIN_EXPORT __declspec(__dllimport)
#endif
//
BUILDING_PULGIN
#endif
//
EXPORT_LIB
#endif
//
PLUGIN_EXPORT
#else
#define
PLUGIN_EXPORT
#endif
//
导出方式是c方式还是c++方式
#ifdef PLUGIN_EXPORT_C
#define
BEGIN_EXPORT_LANGUAGE() extern "C" {
#define
END_EXPORT_LANGUAGE() }
#else
#define
BEGIN_EXPORT_LANGUAGE()
#define
END_EXPORT_LANGUAGE()
#endif
#endif
//
PLUGINSET_H
定义要导出的方法,如下:
#ifndef MSG_H_INCLUDED
#define
MSG_H_INCLUDED
#include
"
../pluginset.h
"
#include
<
wx
/
string
.h
>
BEGIN_EXPORT_LANGUAGE()
int
PLUGIN_EXPORT ShowMessage(
const
wxString
&
msg);END_EXPORT_LANGUAGE()
#endif
//
MSG_H_INCLUDED
好了,我们可以编译了,但是在编译之前,我们来分析一下,pluginset.h中的定义:
//windows平台下,动态库的前辍定义
#ifdef __WXMSW__
#ifndef PLUGIN_EXPORT
#ifdef EXPORT_LIB
#define PLUGIN_EXPORT __declspec(__dllexport)
#else // !EXPORT_LIB
#if BUILDING_PLUGIN
#define PLUGIN_EXPORT __declspec(__dllexport)
#else // !BUILDING_PLUGIN
#define PLUGIN_EXPORT __declspec(__dllimport)
#endif // BUILDING_PULGIN
#endif // EXPORT_LIB
#endif // PLUGIN_EXPORT
#else
#define PLUGIN_EXPORT
#endif
……如果定义了BUILDING_PLUGIN,则以动态库的方式导出……
//导出方式是c方式还是c++方式
#ifdef PLUGIN_EXPORT_C
#define BEGIN_EXPORT_LANGUAGE() extern "C" {
#define END_EXPORT_LANGUAGE() }
#else
#define BEGIN_EXPORT_LANGUAGE()
#define END_EXPORT_LANGUAGE()
#endif
如果定义了PLUGIN_EXPORT_C,则以C的方式输出
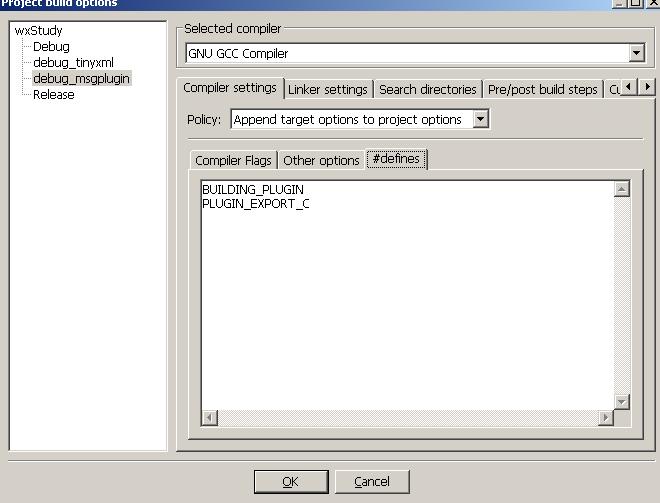
所以,我们还要在设置一下编译器的选项,如下:点右键->properties->build target -> build options ,如下图,选择debug_msgplugin在#defines中,输入 BUILDING_PLUGIN,PLUGIN_EXPORT_C,好的,至此为止,我们的动态库就可以编译了
编译,如下图:选择debug_msgplugin
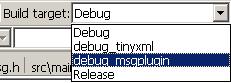
接着build就可以了


 175
175

 被折叠的 条评论
为什么被折叠?
被折叠的 条评论
为什么被折叠?
 到【灌水乐园】发言


