html2canvas跨域踩坑日常

这两天接到公司的指令做海报图分享 然后尝试使用html2canvas+uview+uniapp进行编写

踩坑如下

  1. html2canvas跨域问题
    我司使用的是oss云存储,起初发生跨域以为是本地原因导致,便没在意
    第二天部署到测试服务器上时依旧发生跨域 便开始注意起来
    排查如下:
  • 检查oss云存储是否设置跨域(已设置)
  • 检查html2canvas是否设置useCORS为true(已设置)

在检查后发现都没有问题便陷入了沉思当中,从上午一直到下午也没有解决,无奈只能尝试图片转base64试下,但是在uniapp下没有找到太合适的转换方法,大多是生成画布转base64… 所以决定后端编写接口来进行转base64,转换后再使用html2canvas生成

画布生成代码如下

	// html2canvas生成画布代码
	let container = document.getElementById('shareModal')
	html2canvas(container, {
		scale: 2,
		backgroundColor: '#fff',
		useCORS: true,
	}).then(canvas => {
		this.canvasUrl = canvas.toDataURL("image/png");
		uni.showToast({
			icon: 'success',
			title: '生成图片成功,长按图片可进行保存哦'
		})
	})
  1. 转换倒是成功了,当我尝试给avatar替换为base64时奇怪的事情又发生了,生成后还是没有头像,查看数据已经赋值进去了 然后调试了一下页面

在这里插入图片描述

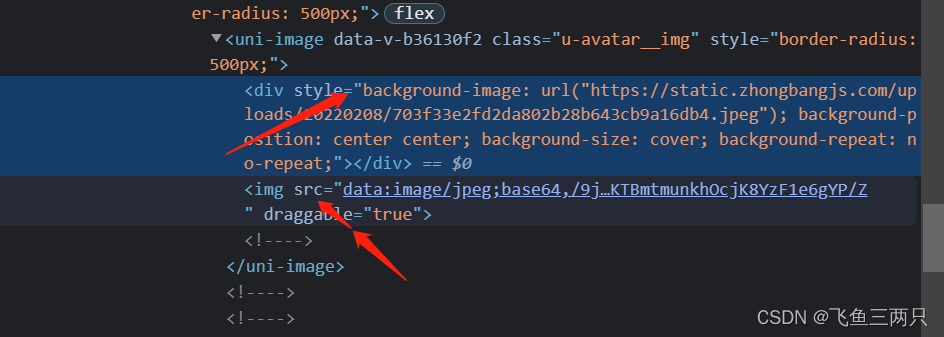
发现使用的uniapp image组件 会默认设置一个background-image属性,当我替换avatar的值为base64后,该background-image属性没有发生变化

解决方案:采用拿到数据后先赋值给临时变量,临时变量的avatar值改变后再赋值给data

完整代码如下

this.$u.api.getUserInfo({}).then(res => {
		if (res.code != 1) {
			this.$u.toast('获取用户信息失败')
		}		
		let userinfo = res.data
		if (userinfo.avatar){
			if (!userinfo.avatar.indexOf('data:image') >= 0){
				this.getBase64(userinfo.avatar).then(data => {
					// TODO: 注意  此处需要将\r\n换行替换为空,不然无法显示
					userinfo.avatar = data.data.replace(/[\r\n]/g, '')
					that.userinfo = userinfo
				})
			}
		}
});

效果图如下
在这里插入图片描述

总结:
所遇到的两种问题只琢磨出了解决方案
并没有查明原因,有知道的大佬请告知!

  • 1
    点赞
  • 2
    收藏
    觉得还不错? 一键收藏
  • 打赏
    打赏
  • 0
    评论
JavaScript HTML renderer The script allows you to take "screenshots" of webpages or parts of it, directly on the users browser. The screenshot is based on the DOM and as such may not be 100% accurate to the real representation as it does not make an actual screenshot, but builds the screenshot based on the information available on the page. How does it work? The script renders the current page as a canvas image, by reading the DOM and the different styles applied to the elements. It does not require any rendering from the server, as the whole image is created on the clients browser. However, as it is heavily dependent on the browser, this library is not suitable to be used in nodejs. It doesn't magically circumvent any browser content policy restrictions either, so rendering cross-origin content will require a proxy to get the content to the same origin. The script is still in a very experimental state, so I don't recommend using it in a production environment nor start building applications with it yet, as there will be still major changes made. Browser compatibility The script should work fine on the following browsers: Firefox 3.5+ Google Chrome Opera 12+ IE9+ Safari 6+ As each CSS property needs to be manually built to be supported, there are a number of properties that are not yet supported. Usage Note! These instructions are for using the current dev version of 0.5, for the latest release version (0.4.1), checkout the old readme. To render an element with html2canvas, simply call: html2canvas(element[, options]); The function returns a Promise containing the <canvas> element. Simply add a promise fullfillment handler to the promise using then: html2canvas(document.body).then(function(canvas) { document.body.appendChild(canvas); }); Building The library uses grunt for building. Alternatively, you can download the latest build from here. Clone git repository with submodules: $ git clone --recursive git://github.com/niklasvh/html2canvas.git Install Grunt and uglifyjs: $ npm install -g grunt-cli uglify-js Run the full build process (including lint, qunit and webdriver tests): $ grunt Skip lint and tests and simply build from source: $ grunt build Running tests The library has two sets of tests. The first set is a number of qunit tests that check that different values parsed by browsers are correctly converted in html2canvas. To run these tests with grunt you'll need phantomjs. The other set of tests run Firefox, Chrome and Internet Explorer with webdriver. The selenium standalone server (runs on Java) is required for these tests and can be downloaded from here. They capture an actual screenshot from the test pages and compare the image to the screenshot created by html2canvas and calculate the percentage differences. These tests generally aren't expected to provide 100% matches, but while commiting changes, these should generally not go decrease from the baseline values. Start by downloading the dependencies: $ npm install Run qunit tests: $ grunt test Examples For more information and examples, please visit the homepage or try the test console. Contributing If you wish to contribute to the project, please send the pull requests to the develop branch. Before submitting any changes, try and test that the changes work with all the support browsers. If some CSS property isn't supported or is incomplete, please create appropriate tests for it as well before submitting any code changes.

“相关推荐”对你有帮助么?

  • 非常没帮助
  • 没帮助
  • 一般
  • 有帮助
  • 非常有帮助
提交
评论
添加红包

请填写红包祝福语或标题

红包个数最小为10个

红包金额最低5元

当前余额3.43前往充值 >
需支付:10.00
成就一亿技术人!
领取后你会自动成为博主和红包主的粉丝 规则
hope_wisdom
发出的红包

打赏作者

飞鱼三两只

你的鼓励将是我创作的最大动力

¥1 ¥2 ¥4 ¥6 ¥10 ¥20
扫码支付:¥1
获取中
扫码支付

您的余额不足,请更换扫码支付或充值

打赏作者

实付
使用余额支付
点击重新获取
扫码支付
钱包余额 0

抵扣说明:

1.余额是钱包充值的虚拟货币,按照1:1的比例进行支付金额的抵扣。
2.余额无法直接购买下载,可以购买VIP、付费专栏及课程。

余额充值