


 本文详细介绍了Shinydashboard和Shiny中的选项卡布局,包括tabsetPanel(), navlistPanel(), navbarPage()的使用,以及混合布局、框架、美化、颜色设定等内容,帮助开发者创建功能丰富的交互式应用。"
115262248,10760055,Python编程:深入理解列表操作,"['Python编程', '数据结构', '列表操作', '序列处理']
本文详细介绍了Shinydashboard和Shiny中的选项卡布局,包括tabsetPanel(), navlistPanel(), navbarPage()的使用,以及混合布局、框架、美化、颜色设定等内容,帮助开发者创建功能丰富的交互式应用。"
115262248,10760055,Python编程:深入理解列表操作,"['Python编程', '数据结构', '列表操作', '序列处理']

欢迎关注天善智能,我们是专注于商业智能BI,人工智能AI,大数据分析与挖掘领域的垂直社区,学习,问答、求职一站式搞定!
对商业智能BI、大数据分析挖掘、机器学习,python,R等数据领域感兴趣的同学加微信:tstoutiao,邀请你进入数据爱好者交流群,数据爱好者们都在这儿。
作者:李誉辉
四川大学在读研究生
前言
这是shinydashboard与shiny_史上最全第三篇,
前文回顾:
shinydashboard与shiny_史上最全(一)
shinydashboard与shiny_史上最全(二)
第一部分:
1 简介
2 shiny文件的创建和运行
3 shinydashboard
3.1 标题栏(Header)
第二部分:
3.2 输入与输出
3.3 侧边栏
3.4 主体(Body)
3.5 布局(Layouts)
第三部分:
4 shiny框架
5 选项卡(tabset)
6 美化
7 CSS语法
第四部分:
8 与leaflet结合
9 web部署
3.5.3 混合布局
下面的例子是行内包含列,只能是行内含列,而不是列内含有行。
及fluidRow()内~box()与clomn()叠加。
UI端代码如下:
 1library(shiny)
 2library(shinydashboard)
 3
 4# 定义body
 5body <- dashboardBody(
 6  # 第1行
 7  fluidRow(
 8    box(
 9      title = "第1行第1个", width = 6, status = "primary",
10      "primary状态", br(), "宽6"),
11    box(
12      title = "第1行第2个", width = 6, status = "warning",
13      "primary状态", br(), "宽6")),
14  # 第2行
15  fluidRow(
16    # 第2行第1列
17    column(width = 3, # 宽度为3
18           box(
19             title = "第2行第1列第1个", width = NULL, height = 100,
20             solidHeader = TRUE, status = "primary",
21             "primary状态", br(), "高100"),
22           box(
23             title = "第2行第1列第2个", width = NULL, heigth = 150,
24             background = "black",
25             "背景颜色:black", br(), "高150"),
26           box(
27             title = "第2行第1列第3个", width = NULL, heigth = 100,
28             background = "fuchsia",
29             "背景颜色:fuchsia", br(), "高100")),
30    # 第2行第2列
31    column(width = 4, # 宽度为4
32           box(
33             title = "第2行第2列第1个", width = NULL, height = 150,
34             solidHeader = TRUE, status = "warning",
35             "warning状态", br(), "高150"),
36           box(
37             title = "第2行第2列第2个", width = NULL, height = 200,
38             background = "light-blue",
39             "背景颜色:light-blue", br(), "高200")),
40    # 第2行第3列
41    column(width = 5, # 宽度为5
42           box(
43             title = "第2行第3列第1个", width = NULL, height = 300,
44             solidHeader = TRUE,
45             "高度300"),
46           box(
47             title = "第2行第3列第2个", width = NULL, height = 200,
48             background = "maroon",
49             "背景颜色:maroon", br(), "高200")),
50    # 第3行
51    fluidRow(
52      box(
53        title = "第3行第1个", width = 4, status = "primary",
54        "primary状态", br(), "宽4"),
55      box(
56        title = "第3行第2个", width = 8, status = "warning",
57        "primary状态", br(), "宽8"))
58  )
59)
60
61# 组合
62dashboardPage(
63  dashboardHeader(title = "混合布局"),
64  dashboardSidebar(disable = TRUE), #
65  dashboardBody(body)
66)
server端代码如下:
1library(shiny)
2
3# 自定义服务器脚本,
4shinyServer(function(input, output) {})
运行结果如下:

4.shiny框架
shiny框架与shinydashboard有很大差别,这里我们将详细说明。
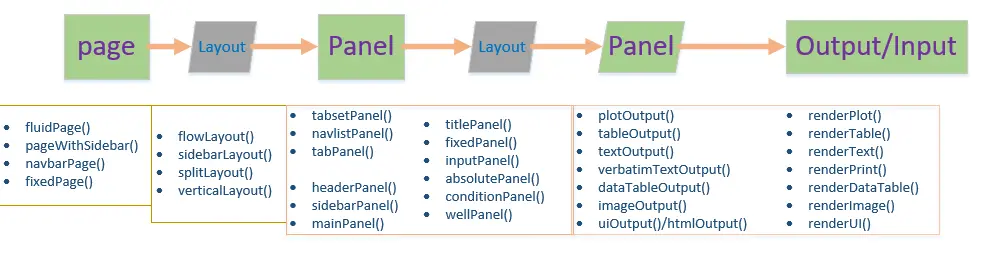
上面这幅图是shiny的主要结构,
panel内可以添加多个Output对象,但都是纵向排列的。
若要横向排列多个对象,需要Layout分列,
再在layout内添加多个panel,再在每个panel中纵向添加多个Output对象。
多个Panel可以嵌套。
布局:
flowLayout(), 表示行排列,前一行排不下的,将自动排列到下一行。
sidebarLayout(), 内含sidebarPanel()和mainPanel()。
相当于去掉标题栏的dashboardPage()。
splitLayout(), 表示水平等分排列,可以指定参数cellWidths(单个对象的宽度)。
verticalLayout(), 表示垂直排列,参数fluid为逻辑值,TRUE表示长宽不固定,FALSE表示固定长宽。
1library(shiny)
5.选项卡(tabset)
5.1
shinydashboard中的选项卡
shinydashboard只支持1种选项卡:
在侧边栏dashboardSidebar()内,用sidebarMenu()添加一系列menuItem()。menuItem()即是选项卡按钮,内有参数tabName。
同时,在主体中的tabItems()内,添加一系列tabItem(), tabItem()即选项页面。
内有参数tabName, menuItem()与tabItem()通过参数tabName进行匹配。menuItem()还可以通过href参数添加网址进行跳转。
tabItem()内可以插入多个任意对象,包括input, box, fluidRow。
下面的例子是我们融合前面已经出现过的例子的代码:
UI端代码:
 最低0.47元/天 解锁文章


 4313
4313

 被折叠的 条评论
为什么被折叠?
被折叠的 条评论
为什么被折叠?
 到【灌水乐园】发言


