AutoCompleteTextView最佳实践-最简例子篇

此系列文章记录了一次使用AutoCompleteTextView(以下简称ACTV)的踩坑过程,并复盘整个的解决流程。本篇文章笔者试图通过介绍一个AutoCompleteTextView的最简例子,来让读者直观地感受到这个控件实际展现效果,也较为容易地掌握它的基本使用方法。
以下是此系列所有文章
- 《AutoCompleteTextView最佳实践-总集篇》
- 《AutoCompleteTextView最佳实践-最简例子篇》
- 《AutoCompleteTextView最佳实践-原理剖析篇》
- 《AutoCompleteTextView最佳实践-键盘事件篇》
- 《AutoCompleteTextView最佳实践-其他功能篇》(未完成)
关于作者
景三,程序员,主要从事Android平台基础架构方面的工作,欢迎交流技术方面的问题,可以去我的Github提issue或者发邮件至relish.wang@gmail.com与我交流。
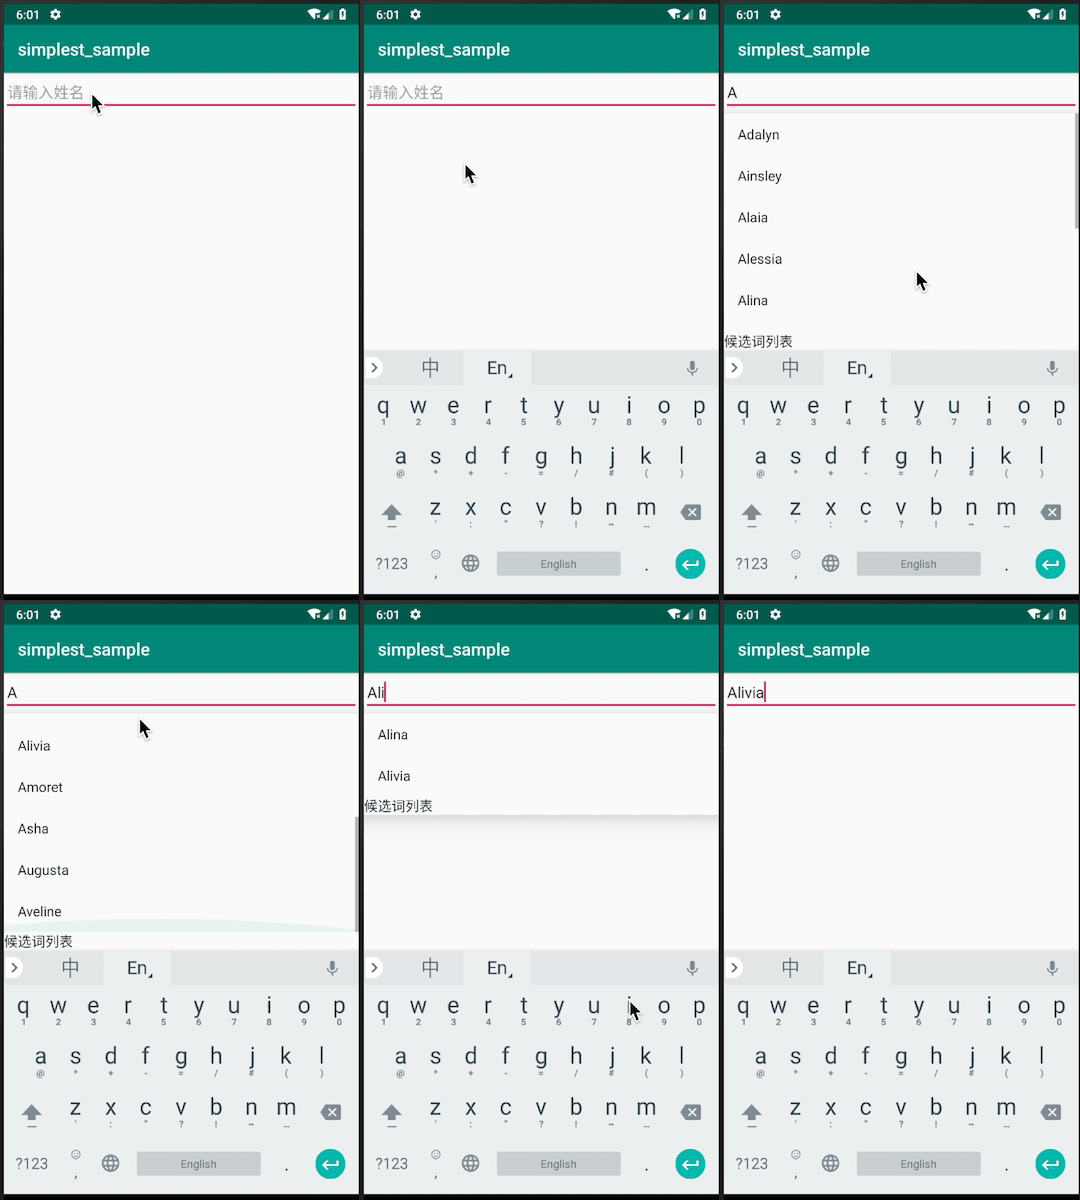
以下是效果展示:

一、关键代码拆解
需要手动编辑的代码在三个文件里:
核心代码
主要的Java代码在MainActivity,且核心代码只有3行代码。
public class MainActivity extends AppCompatActivity {

    @Override
    protected void onCreate(Bundle savedInstanceState) {
        super.onCreate(savedInstanceState);
        setContentView(R.layout.activity_main);

        AutoCompleteTextView autoView = findViewById(R.id.actv);
        // 为适配器添加数据源
        ArrayAdapter<CharSequence> adapter = ArrayAdapter.createFromResource(this, R.array.names, android.R.layout.simple_list_item_1);
        // 设置含候选词的适配器
        autoView.setAdapter(adapter);
    }
}
布局代码
ArrayAdapter中用到的R.array.names, 暂且按下不表。先来看一下AutoCompleteTextView在布局文件中的使用。
<?xml version="1.0" encoding="utf-8"?>
<LinearLayout xmlns:android="http://schemas.android.com/apk/res/android"
    xmlns:tools="http://schemas.android.com/tools"
    android:layout_width="match_parent"
    android:layout_height="match_parent"
    tools:context=".MainActivity">

    <AutoCompleteTextView
        android:id="@+id/actv"
        android:layout_width="match_parent"
        android:layout_height="wrap_content"
        android:hint="请输入姓名"
        android:completionHint="候选词列表"
        android:completionThreshold="1"
        android:dropDownWidth="match_parent"
        android:dropDownHeight="wrap_content"
        android:dropDownVerticalOffset="2dp" />

</LinearLayout>
这里针对几个常用的属性做一下讲解:
-
completionHint
字符串,提示文字会显示在候选列表下面。[completionHint拓展阅读](#1 关于completionHint属性,AutoCompleteTextView是如何将它显示在候选词列表的下方的?)
-
completionThreshold
int,表示键入多少个字符触发候选词匹配。默认值为2,最小值为1。若设置的数字小于1,则还是设置为1。[completionThreshold拓展阅读](#2 completionThreshold若设置的数字小于1,则还是设置为1。何以见得?)
-
dropDownWidth
wrap_content|match_parent|具体数值。表示候选词列表的宽度。默认为WRAP_CONTENT。
-
dropDownHeight
高度。同dropDownWidth。
-
dropDownVerticalOffset
具体数值(如:2dp)。候选列表窗口与AutoCompleteTextView输入框的边距。
数据源
候选词的来源。实际开发过程中可能是本地搜索词的缓存,曾经登录过的账号或来自网络接口数据匹配。在最简例子里,我使用了一个字符串数组。在res/values/arrays.xml中添加字符串数组:
<resources>
    <string-array name="names">
        <item>Adalyn</item>
        <item>Ainsley</item>
        <!-- ...省略部分代码... -->
        <item>Veronica</item>
    </string-array>
</resources>
至此,你已经掌握了AutoCompleteTextView最基本的用法。你只需新建工程,拷贝上述三个文件即可体验AutoCompleteTextView。
二、拓展阅读
引导感兴趣的读者探索源码而设置的栏目。
1 关于completionHint属性,AutoCompleteTextView是如何将它显示在候选词列表的下方的?
根据查看源码可以发现,ACTV的下拉列表最外层是一个ListPopupWindow,而设置completionHint后,其实是将提示文字显示到了一个TextView上。ListPopupWindow根布局(纵向的LinearLayout)addView了这个TextView。
AutoCompleteTextView#setCompletionHint:
public void setCompletionHint(CharSequence hint) {
   	// ...省略部分代码...
    final TextView hintView = (TextView) LayoutInflater.from(mPopupContext).inflate(
        mHintResource, null).findViewById(R.id.text1);
    hintView.setText(mHintText);// 设置了提示文字的TextView
    mHintView = hintView;
    mPopup.setPromptView(hintView);// 将这个TextView设置到了ListPopupWindow里
    // ...省略部分代码...
}
ListPopupWindow#setPromptView:
public void setPromptView(@Nullable View prompt) {
  // ...省略部分代码...
  mPromptView = prompt;// 看到这里,就知道应该去搜索mPromptView被使用的地方
  // ...省略部分代码...
}
ListPopupWindow#buildDropDown
private int buildDropDown() {
  // ...省略部分代码...
  View hintView = mPromptView;// 接上一段代码里的mPromptView
  if (hintView != null) {
      // 构建一个纵向的LinearLayout
      LinearLayout hintContainer = new LinearLayout(context);
      hintContainer.setOrientation(LinearLayout.VERTICAL);

      LinearLayout.LayoutParams hintParams = new LinearLayout.LayoutParams(
              ViewGroup.LayoutParams.MATCH_PARENT, 0, 1.0);
      switch (mPromptPosition) {
      case POSITION_PROMPT_BELOW:
          // dropDownView是用于显示候选词的ListView
          hintContainer.addView(dropDownView, hintParams);
          hintContainer.addView(hintView);// 在这里被add进LinearLayout
          break;
      // ...省略部分代码...
      }
  }
  // ...省略部分代码...
}
2 completionThreshold若设置的数字小于1,则还是设置为1。何以见得?
见源码AutoCompleteTextView#setThreshold
 /**
  * <p>Specifies the minimum number of characters the user has to type in the
  * edit box before the drop down list is shown.</p>
  *
  * <p>When <code>threshold</code> is less than or equals 0, a threshold of
  * 1 is applied.</p>
  *
  * @param threshold the number of characters to type before the drop down
  *                  is shown
  *
  * @see #getThreshold()
  *
  * @attr ref android.R.styleable#AutoCompleteTextView_completionThreshold
  */
public void setThreshold(int threshold) {
    if (threshold <= 0) {
    	threshold = 1;
    }
    mThreshold = threshold;
}


 548
548

 被折叠的 条评论
为什么被折叠?


