


Object Detection API 环境搭建
1、首先安装配置好TensorFlow,参考地址
2、下载TensorFlow模型源码,https://github.com/tensorflow/models
(注:最好不要在C盘下使用,可能存在各种权限问题)
3、通过pip安装:pillow, jupyter, matplotlib, lxml,如下:
pip install pillow 4、编译Protobuf,生产py文件。
需要先安装Google的protobuf,下载protoc-3.4.0-win32.zip
打开cmd窗口,cd到models/research/目录下(老版本没有research目录),执行如下:
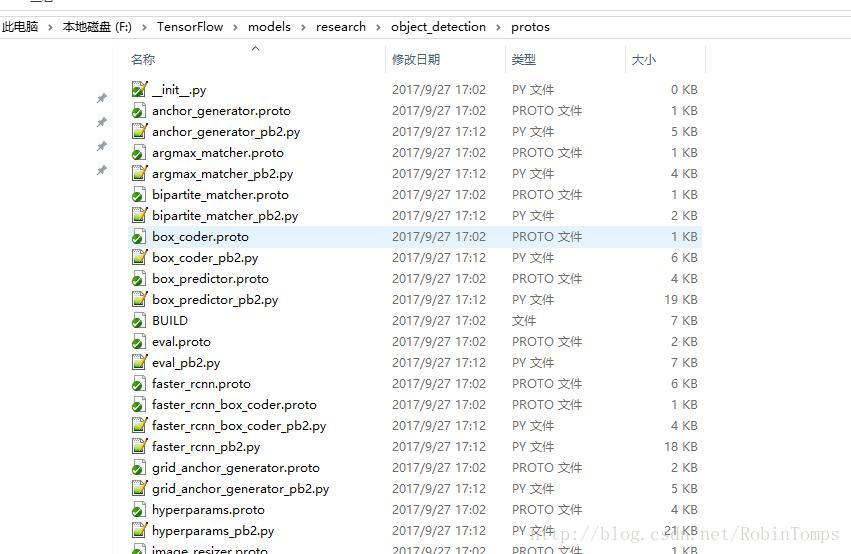
protoc object_detection/protos/*.proto --python_out=.将生成一堆python文件,如下图所示:
5、测试安装
python object_detection/builders/model_builder_test.py
坑: Windows下会出现找不到包的问题:
Traceback (most recent call last):
  File "object_detection/builders/model_builder_test.py", line 21, in <module>
    from object_detection.builders import model_builder
ImportError: No module named 'object_detection'
官网上说要添加两个目录到环境变量,执行如下操作:
# From tensorflow/models/research/
export PYTHONPATH=$PYTHONPATH:`pwd`:`pwd`/slim
然后并没有神马卵用,为了一劳永逸,我直接将整两个目录添加到python默认的搜索路径下就行了。
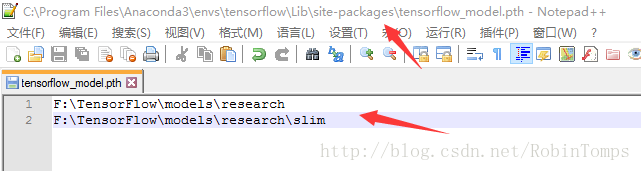
解决方法:在site-packages添加一个路径文件,如tensorflow_model.pth,必须以.pth为后缀,写上你要加入的模块文件所在的目录名称就是了,如下图:
===================以上就算把环境搭建完成了====================
开始训练自己的数据集
1、收集并标记自己的样本图片集
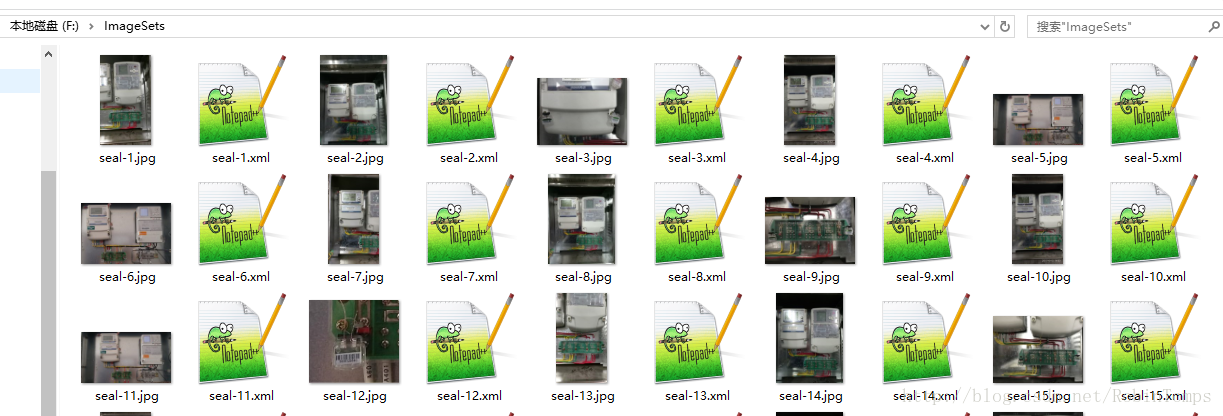
这里我使用的是labelImg,注释文件保存为xml格式,满足PASCAL VOC风格,为了方便,我的图片和注释文件是保存在同一个目录下的,如下所示:
2、将标记完的数据集转换为TFRecord格式的文件。参考
先看一下我的工程目录结构,在pycharm下测试的。
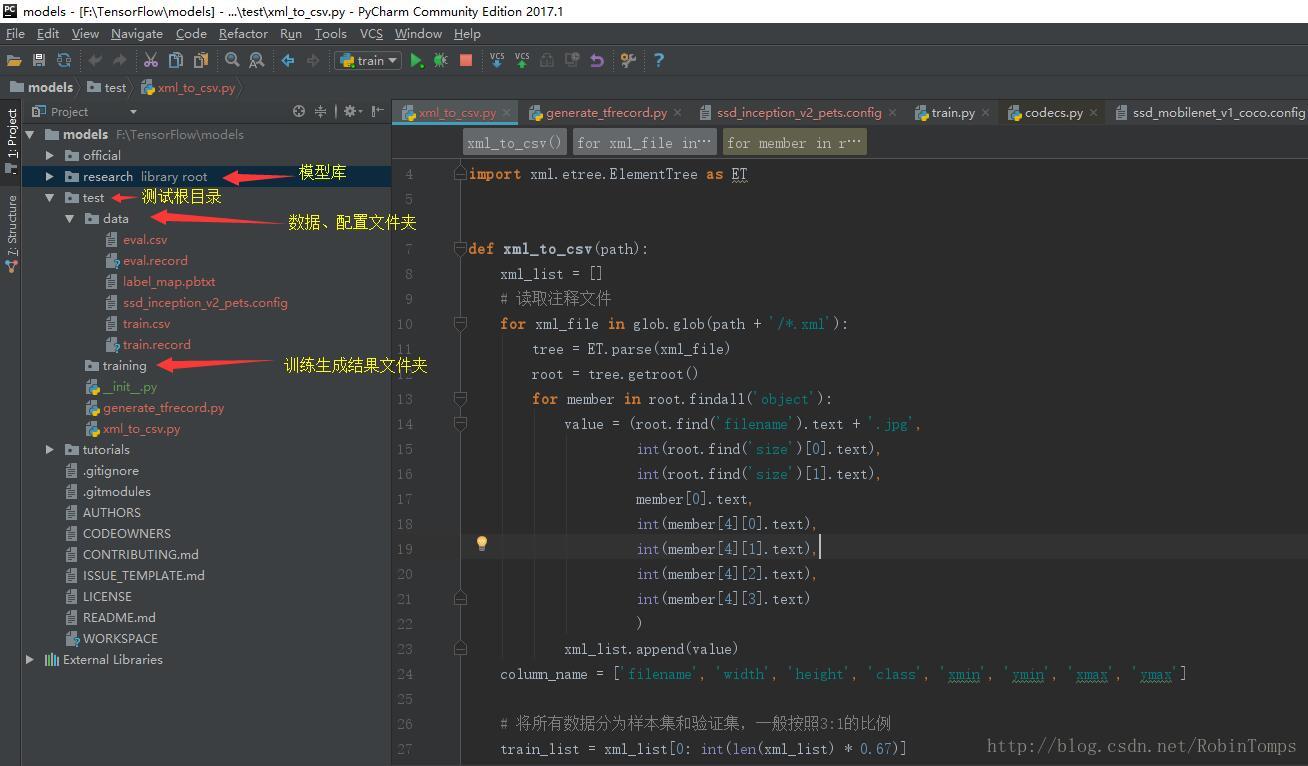
2.1 将注释的xml文件转换为csv格式,使用xml_to_csv.py,将生成train.csv训练集和eval.csv验证集,代码如下:
import os
import glob
import pandas as pd
import xml.etree.ElementTree as ET


def xml_to_csv(path):
    xml_list = []
    # 读取注释文件
    for xml_file in glob.glob(path + '/*.xml'):
        tree = ET.parse(xml_file)
        root = tree.getroot()
        for member in root.findall('object'):
            value = (root.find('filename').text + '.jpg',
                     int(root.find('size')[0].text),
                     int(root.find('size')[1].text),
                     member[0].text,
                     int(member[4][0].text),
                     int(member[4][1].text),
                     int(member[4][2].text),
                     int(member[4][3].text)
                     )
            xml_list.append(value)
    column_name = ['filename', 'width', 'height', 'class', 'xmin', 'ymin', 'xmax', 'ymax']

    # 将所有数据分为样本集和验证集,一般按照3:1的比例
    train_list = xml_list[0: int(len(xml_list) * 0.67)]
    eval_list = xml_list[int(len(xml_list) * 0.67) + 1: ]

    # 保存为CSV格式
    train_df = pd.DataFrame(train_list, columns=column_name)
    eval_df = pd.DataFrame(eval_list, columns=column_name)
    train_df.to_csv('data/train.csv', index=None)
    eval_df.to_csv('data/eval.csv', index=None)


def main():
    path = 'E:\\\data\\\Images'
    xml_to_csv(path)
    print('Successfully converted xml to csv.')

main()
2.2 生成TFRecord文件
from __future__ import division
from __future__ import print_function
from __future__ import absolute_import

import os
import io
import pandas as pd
import tensorflow as tf

from PIL import Image
from object_detection.utils import dataset_util
from collections import namedtuple, OrderedDict

flags = tf.app.flags
flags.DEFINE_string('csv_input', '', 'Path to the CSV input')
flags.DEFINE_string('output_path', '', 'Path to output TFRecord')
FLAGS = flags.FLAGS


# 将分类名称转成ID号
def class_text_to_int(row_label):
    if row_label == 'syjxh':
        return 1
    elif row_label == 'dnb':
        return 2
    elif row_label == 'cjzd':
        return 3
    elif row_label == 'fy':
        return 4
    elif row_label == 'ecth' or row_label == 'etch':  # 妈的,标记写错了,这里简单处理一下
        return 5
    elif row_label == 'lp':
        return 6
    else:
        print('NONE: ' + row_label)
        None


def split(df, group):
    data = namedtuple('data', ['filename', 'object'])
    gb = df.groupby(group)
    return [data(filename, gb.get_group(x)) for filename, x in zip(gb.groups.keys(), gb.groups)]


def create_tf_example(group, path):
    print(os.path.join(path, '{}'.format(group.filename)))
    with tf.gfile.GFile(os.path.join(path, '{}'.format(group.filename)), 'rb') as fid:
        encoded_jpg = fid.read()
    encoded_jpg_io = io.BytesIO(encoded_jpg)
    image = Image.open(encoded_jpg_io)
    width, height = image.size

    filename = (group.filename + '.jpg').encode('utf8')
    image_format = b'jpg'
    xmins = []
    xmaxs = []
    ymins = []
    ymaxs = []
    classes_text = []
    classes = []

    for index, row in group.object.iterrows():
        xmins.append(row['xmin'] / width)
        xmaxs.append(row['xmax'] / width)
        ymins.append(row['ymin'] / height)
        ymaxs.append(row['ymax'] / height)
        classes_text.append(row['class'].encode('utf8'))
        classes.append(class_text_to_int(row['class']))

    tf_example = tf.train.Example(features=tf.train.Features(feature={
        'image/height': dataset_util.int64_feature(height),
        'image/width': dataset_util.int64_feature(width),
        'image/filename': dataset_util.bytes_feature(filename),
        'image/source_id': dataset_util.bytes_feature(filename),
        'image/encoded': dataset_util.bytes_feature(encoded_jpg),
        'image/format': dataset_util.bytes_feature(image_format),
        'image/object/bbox/xmin': dataset_util.float_list_feature(xmins),
        'image/object/bbox/xmax': dataset_util.float_list_feature(xmaxs),
        'image/object/bbox/ymin': dataset_util.float_list_feature(ymins),
        'image/object/bbox/ymax': dataset_util.float_list_feature(ymaxs),
        'image/object/class/text': dataset_util.bytes_list_feature(classes_text),
        'image/object/class/label': dataset_util.int64_list_feature(classes),
    }))
    return tf_example


def main(csv_input, output_path, imgPath):
    writer = tf.python_io.TFRecordWriter(output_path)
    path = imgPath
    examples = pd.read_csv(csv_input)
    grouped = split(examples, 'filename')
    for group in grouped:
        tf_example = create_tf_example(group, path)
        writer.write(tf_example.SerializeToString())

    writer.close()
    print('Successfully created the TFRecords: {}'.format(output_path))


if __name__ == '__main__':

    imgPath = 'E:\data\Images'

    # 生成train.record文件
    output_path = 'data/train.record'
    csv_input = 'data/train.csv'
    main(csv_input, output_path, imgPath)

    # 生成验证文件 eval.record
    output_path = 'data/eval.record'
    csv_input = 'data/eval.csv'
    main(csv_input, output_path, imgPath)
3、开始训练
3.1 创建标签分类的配置文件(label_map.pbtxt),
item {
  id: 1 # id从1开始编号
  name: 'syjxh'
}

item {
  id: 2
  name: 'dnb'
}

item {
  id: 3
  name: 'cjzd'
}

item {
  id: 4
  name: 'fy'
}

item {
  id: 5
  name: 'ecth'
}

item {
  id: 6
  name: 'lp'
}
3.2配置管道配置文件
找到\object_detection\samples\configs\ssd_inception_v2_pets.config文件,复制到test\data文件夹下,修改一下几处:
# ====修改 1=====
num_classes:6    # 根据你的目标分类来,我这里一共标记了6种对象

# ====修改 2=====
# 因为我们是重新训练模型,所以这里注释掉模型检测点,并将from_detection_checkpoint该为false
# fine_tune_checkpoint: "PATH_TO_BE_CONFIGURED/model.ckpt"
  from_detection_checkpoint: false

  num_steps: 200000  # 训练次数

# ====修改 3=====
train_input_reader: {
  tf_record_input_reader {
    # 训练样本路径
    input_path: "F:/TensorFlow/models/test/data/train.record"
  }
  # 标签分类配置文件路径
  label_map_path: "F:/TensorFlow/models/test/label_map.pbtxt"
}

# ====修改 4=====
eval_input_reader: {
  tf_record_input_reader {
    # 验证样本路径
    input_path: "F:/TensorFlow/models/test/data/eval.record"
  }
   # 标签分类配置文件路径
  label_map_path: "F:/TensorFlow/models/test/label_map.pbtxt"
  shuffle: false
  num_readers: 1
}
3.3 开始训练啦……
直接使用object_detection\train.py文件进行训练即可,参数如下:
--logtostderr
--pipeline_config_path=F:/TensorFlow/models/test/data/ssd_inception_v2_pets.config
--train_dir=F:/TensorFlow/models/test/training
配置好参数后,直接run起来,接下来就是漫长的等待,我的电脑配置低,运行一次需要好几天,训练过程中可以使用eval.py文件进行验证,这里就不演示了。
3.4 导出训练结果
训练过程中将在training目录下生成一堆model.ckpt-*的文件,选择一个模型,使用export_inference_graph.py导出pb文件。
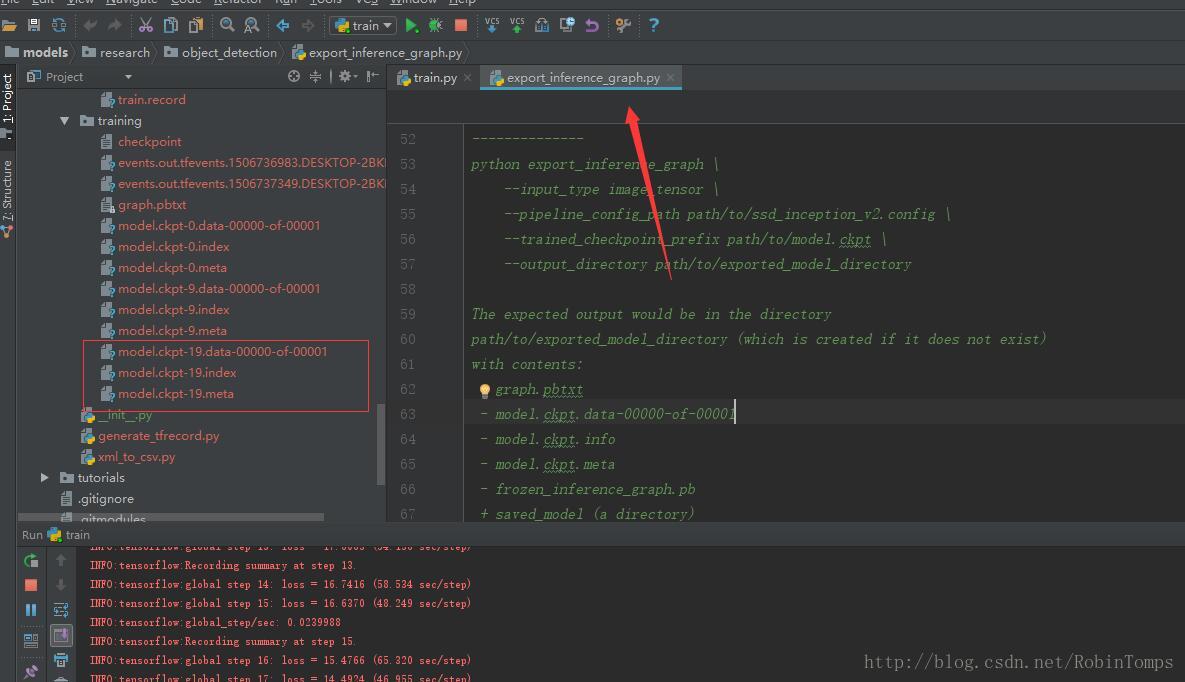
参数如下:
--input_type image_tensor
--pipeline_config_path F:/TensorFlow/models/test/data/ssd_inception_v2_pets.config
--checkpoint_path F:/TensorFlow/models/test/training/model.ckpt-19
--inference_graph_path F:/TensorFlow/models/test/data/frozen_inference_graph.pb
最终将生成frozen_inference_graph.pb文件。
4、测试识别效果
#!/usr/bin/env python
# -*- coding: utf-8 -*-

import os
import sys
import cv2
import numpy as np
import tensorflow as tf
from object_detection.utils import label_map_util
from object_detection.utils import visualization_utils as vis_util
from matplotlib import pyplot as plt


class TOD(object):
    def __init__(self):
        # Path to frozen detection graph. This is the actual model that is used for the object detection.
        self.PATH_TO_CKPT = 'data/frozen_inference_graph.pb'
        # List of the strings that is used to add correct label for each box.
        self.PATH_TO_LABELS = 'data/label_map.pbtxt'
        # 分类数量
        self.NUM_CLASSES = 6

        self.detection_graph = self._load_model()
        self.category_index = self._load_label_map()

    def _load_model(self):
        detection_graph = tf.Graph()
        with detection_graph.as_default():
            od_graph_def = tf.GraphDef()
            with tf.gfile.GFile(self.PATH_TO_CKPT, 'rb') as fid:
                serialized_graph = fid.read()
                od_graph_def.ParseFromString(serialized_graph)
                tf.import_graph_def(od_graph_def, name='')
        return detection_graph

    def _load_label_map(self):
        label_map = label_map_util.load_labelmap(self.PATH_TO_LABELS)
        categories = label_map_util.convert_label_map_to_categories(label_map, max_num_classes=self.NUM_CLASSES, use_display_name=True)
        category_index = label_map_util.create_category_index(categories)
        return category_index

    def detect(self, image):
        with self.detection_graph.as_default():
            with tf.Session(graph=self.detection_graph) as sess:
                # Expand dimensions since the model expects images to have shape: [1, None, None, 3]
                image_np_expanded = np.expand_dims(image, axis=0)
                image_tensor = self.detection_graph.get_tensor_by_name('image_tensor:0')
                # Each box represents a part of the image where a particular object was detected.
                boxes = self.detection_graph.get_tensor_by_name('detection_boxes:0')
                # Each score represent how level of confidence for each of the objects.
                # Score is shown on the result image, together with the class label.
                scores = self.detection_graph.get_tensor_by_name('detection_scores:0')
                classes = self.detection_graph.get_tensor_by_name('detection_classes:0')
                num_detections = self.detection_graph.get_tensor_by_name('num_detections:0')
                # Actual detection.
                (boxes, scores, classes, num_detections) = sess.run(
                    [boxes, scores, classes, num_detections],
                    feed_dict={image_tensor: image_np_expanded})
                # Visualization of the results of a detection.
                vis_util.visualize_boxes_and_labels_on_image_array(
                    image,
                    np.squeeze(boxes),
                    np.squeeze(classes).astype(np.int32),
                    np.squeeze(scores),
                    self.category_index,
                    use_normalized_coordinates=True,
                    line_thickness=8)

        plt.imshow(image)
        plt.show()


if __name__ == '__main__':

    detecotr = TOD()

    img_path = 'E:/data/Images'
    for i in os.listdir(img_path):
        if i.endswith('.jpg'):
            path = os.path.join(img_path, i)
            image = cv2.imread(path)
            detecotr.detect(image)
训练时间太长、电脑卡起了,就不上图了~~~


 7377
7377

 被折叠的 条评论
为什么被折叠?
被折叠的 条评论
为什么被折叠?
 到【灌水乐园】发言


