


Spring整合Mybatis:
1、 创建java工程:
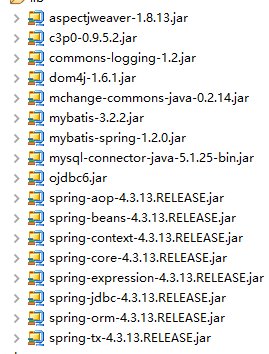
2、 添加jar包:
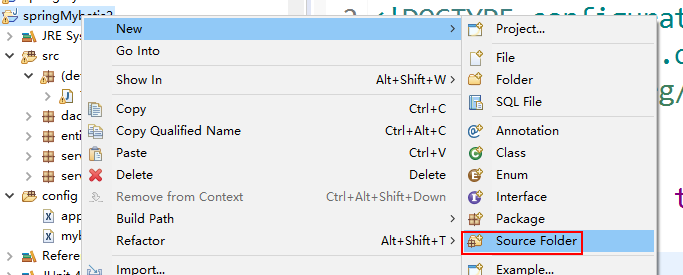
3、 在工程上 点击 右键 创建 source Folder
4、 创建实体类、创建映射文件xml
<?xml version="1.0" encoding="UTF-8"?> <!DOCTYPE mapper PUBLIC "-//mybatis.org//DTD Mapper 3.0//EN" "http://mybatis.org/dtd/mybatis-3-mapper.dtd"> <mapper namespace="dao.UserInfoMapper"> <resultMap type="entity.UserInfo" id="userInfoResult"> <id column="id" property="id" /> <result property="name" column="name" /> <result property="password" column="password" /> </resultMap> <select id="login" parameterType="entity.UserInfo" resultMap="userInfoResult"> select * from userInfo where name=#{name} and password=#{password} </select> </mapper> |
5、 创建mybatis配置文件:
<?xml version="1.0" encoding="UTF-8"?> <!DOCTYPE configuration PUBLIC "-//mybatis.org//DTD Config 3.0//EN" "http://mybatis.org/dtd/mybatis-3-config.dtd"> <configuration> <!-- 加载属性文件 --> <properties resource="db.properties"> </properties> <!-- 定义别名 --> <typeAliases> <typeAlias type="entity.UserInfo" alias="UserInfo"/> </typeAliases> <!-- 到最后需要注释掉 --> <mappers> <!-- <mapper resource="dao/UserInfoMapper.xml"/> --> <pakage name="dao" /> </mappers> </configuration> |
6、 创建service包->>定义接口->>创建service.impl->>实现方法
package service.impl;
import dao.UserInfoMapper; import entity.UserInfo; import service.UserInfoService;
public class UserInfoServiceImpl implements UserInfoService { UserInfoMapper mapper;
public UserInfoMapper getMapper() { return mapper; }
public void setMapper(UserInfoMapper mapper) { this.mapper = mapper; }
@Override public UserInfo login(UserInfo userInfo) { return mapper.login(userInfo); }
}
|
7、 创建属性文件:
driver=oracle.jdbc.OracleDriver url=jdbc:oracle:thin:@localhost:1521:orcl username=test2 password=123456 |
8、 创建spring配置文件:
<?xml version="1.0" encoding="UTF-8"?> <beans xmlns="http://www.springframework.org/schema/beans" xmlns:aop="http://www.springframework.org/schema/aop" xmlns:context="http://www.springframework.org/schema/context" xmlns:tx="http://www.springframework.org/schema/tx" xmlns:xsi="http://www.w3.org/2001/XMLSchema-instance" xsi:schemaLocation="http://www.springframework.org/schema/beans http://www.springframework.org/schema/beans/spring-beans.xsd http://www.springframework.org/schema/aop http://www.springframework.org/schema/aop/spring-aop.xsd http://www.springframework.org/schema/context http://www.springframework.org/schema/context/spring-context.xsd http://www.springframework.org/schema/tx http://www.springframework.org/schema/tx/spring-tx.xsd"> <!-- 加载属性文件 --> <!-- <context:property-placeholder location="classpath:db.properties" /> --> <bean class="org.springframework.beans.factory.config.PropertyPlaceholderConfigurer"> <property name="locations" value="classpath:db.properties" /> </bean> <!-- 配置数据源 --> <bean id="dataSource" destroy-method="close" class="com.mchange.v2.c3p0.ComboPooledDataSource"> <property name="driverClass" value="${driver}" /> <property name="jdbcUrl" value="${url}" /> <property name="user" value="${username}" /> <property name="password" value="${password}" /> <property name="maxPoolSize" value="40" /> <property name="minPoolSize" value="1" /> <!--初始化连接数 --> <property name="initialPoolSize" value="1" /> <!--连接的最大空闲时间,超时的连接将被丢弃,单位:秒 --> <property name="maxIdleTime" value="60" /> <!--没有连接可用时,等待连接的时间,单位:毫秒 --> <property name="checkoutTimeout" value="2000" /> </bean> <!-- 配置sqlSessionFactory,加载mybatis配置文件 --> <bean id="sqlSessionFactory" class="org.mybatis.spring.SqlSessionFactoryBean"> <property name="dataSource" ref="dataSource"></property> <property name="configLocation" value="classpath:mybatis-config.xml"></property> </bean> <!-- 实现接口的实现类 --> <bean id="userInfoMapper" class="org.mybatis.spring.mapper.MapperFactoryBean"> <property name="mapperInterface" value="dao.UserInfoMapper"/> <property name="sqlSessionFactory" ref="sqlSessionFactory"/> </bean> <!-- 配置事务管理器 --> <bean id="trancManager" class="org.springframework.jdbc.datasource.DataSourceTransactionManager"> <property name="dataSource" ref="dataSource"/> </bean> <!-- 事务规则 --> <tx:advice id="txAdvice" transaction-manager="trancManager"> <tx:attributes> <tx:method name="delete*" propagation="REQUIRED" /> <tx:method name="update*" propagation="REQUIRED" /> <tx:method name="add*" propagation="REQUIRED" /> <tx:method name="insert*" propagation="REQUIRED" /> <tx:method name="query" propagation="SUPPORTS" read-only="true"/> <tx:method name="select" propagation="SUPPORTS" read-only="true"/> <tx:method name="login" propagation="SUPPORTS" read-only="true"/> </tx:attributes> </tx:advice> <!-- 配置切面 --> <!-- 把事务控制在service层 --> <aop:config> <aop:pointcut expression="execution(* service.*.*(..))" id="pointCut"/> <!-- 把事务控制在service层 -->
<aop:advisor advice-ref="txAdvice" pointcut-ref="pointCut"/> </aop:config> <bean id="service" class="service.impl.UserInfoServiceImpl"> <property name="mapper" ref="userInfoMapper"/> </bean> </beans> |
扩展:
(1)(红色的:Spring配置-实现类)
使用MapperFactoryBean,将数据映射接口转为Spring Bean
<bean id="empMapper" class="org.mybatis.spring.mapper.MapperFactoryBean">
<property name="mapperInterface" value="dao.EmpMapper"/>
<property name="sqlSessionFactory" ref="sqlSessionFactory"/>
</bean>
MapperScannerConfigurer简化配置,省略dao实现类
<bean class="org.mybatis.spring.mapper.MapperScannerConfigurer">
<property name="sqlSessionFactory" ref="sqlSessionFactory"/>
<property name="basePackage" value="dao"/>
</bean>
上面两种方式使用一种就可以省略dao实现类
(2)黑色的,配置事务管理器
<!--使用注释事务 -->
<tx:annotation-driven transaction-manager="transactionManager" />
在需要加入事务的方法或者类上添加@Transactiona
事务的传播性:@Transactional(propagation=Propagation.REQUIRED)
事务的超时性:@Transactional(timeout=30) //默认是30秒
事务的隔离级别:@Transactional(isolation = Isolation. READ_COMMITTED)
指定单一异常类:@Transactional(rollbackFor=RuntimeException.class)
指定多个异常类:@Transactional(rollbackFor={RuntimeException.class, Exception.class})
只读:@Transactional(readOnly=true)
9、 测试:
import org.junit.Test; import org.springframework.context.ApplicationContext; import org.springframework.context.support.ClassPathXmlApplicationContext;
import entity.UserInfo; import service.UserInfoService;
public class TestSpring { @Test public void test1() { ApplicationContext context = new ClassPathXmlApplicationContext("applicationContext.xml"); UserInfoService service = (UserInfoService) context.getBean("service"); UserInfo userInfo = new UserInfo("Tom", "123456"); if(service.login(userInfo ) == null) { System.out.println("fail"); }else { System.out.println("succ"); } }
} |


 2万+
2万+


 被折叠的 条评论
为什么被折叠?
被折叠的 条评论
为什么被折叠?
 到【灌水乐园】发言


