


目录
Rockchip系列之深度分析CAN接口系列(1)_一歲抬頭的博客-CSDN博客
Rockchip系列之CAN 新增framework系统jni接口访问(2)-CSDN博客
Rockchip系列之CAN 新增framework封装service+manager访问(3)-CSDN博客
Rockchip系列之CAN APP测试应用实现(4)_一歲抬頭的博客-CSDN博客
Rockchip CAN 部分波特率收发不正常解决思路_一歲抬頭的博客-CSDN博客
Android JNI与CAN通信遇到的问题总结_android can通信-CSDN博客
Android 内核关闭CAN 串口设备回显功能_一歲抬頭的博客-CSDN博客
在上一篇博客中,介绍了如何在framework层编写一个服务类CanService,用于提供CAN通信的接口给其他应用程序或模块。还介绍了如何使用CanService类的封装类SystemCan,用于简化CAN通信的操作和配置。
在这篇博客中,将介绍如何在Android平台上开发一个App,用于测试和演示CAN通信的功能。将分别介绍App的界面设计,逻辑实现和使用方法。
这个App比较简单 只要核心接口写完了 应用端写成花都可以 目前实现了以下的功能:
- 可以选择不同的CAN设备和波特率,打开和关闭CAN总线
- 可以输入要发送的CAN数据,向CAN设备发送一帧数据
- 可以接收来自CAN设备的数据,并显示在列表中
- 可以清除已经接收到的数据
App的界面设计
使用Android Studio来开发的App,首先创建一个新的项目,命名为CanApp,并选择Empty Activity作为模板。然后,在res/layout/activity_main.xml文件中,定义了App的界面布局,如下所示:
<?xml version="1.0" encoding="utf-8"?>
<LinearLayout xmlns:android="http://schemas.android.com/apk/res/android"
    xmlns:tools="http://schemas.android.com/tools"
    android:layout_width="match_parent"
    android:layout_height="match_parent"
    android:orientation="vertical"
    android:padding="16dp">

    <TextView
        android:id="@+id/canTextView"
        android:layout_width="wrap_content"
        android:layout_height="wrap_content"
        android:text="CAN Interface:"
        android:textSize="18sp" />

    <Spinner
        android:id="@+id/canSpinner"
        android:layout_width="match_parent"
        android:layout_height="wrap_content" />

    <TextView
        android:id="@+id/baudrateTextView"
        android:layout_width="wrap_content"
        android:layout_height="wrap_content"
        android:text="Baudrate:"
        android:textSize="18sp"
        android:layout_marginTop="16dp" />

    <Spinner
        android:id="@+id/baudrateSpinner"
        android:layout_width="match_parent"
        android:layout_height="wrap_content" />

    <TextView
        android:id="@+id/dataTextView"
        android:layout_width="wrap_content"
        android:layout_height="wrap_content"
        android:text="Data:"
        android:textSize="18sp"
        android:layout_marginTop="16dp" />

    <EditText
        android:id="@+id/dataEditText"
        android:layout_width="match_parent"
        android:layout_height="wrap_content"
        android:hint="Enter data"
        android:text="1122334455667788"
        android:inputType="text" />

    <LinearLayout
        android:layout_width="wrap_content"
        android:layout_height="wrap_content">
        <Button
            android:id="@+id/sendButton"
            android:layout_width="wrap_content"
            android:layout_height="wrap_content"
            android:text="Send"
            android:layout_margin="8dp" />

        <Button
            android:id="@+id/openCanButton"
            android:layout_width="wrap_content"
            android:layout_height="wrap_content"
            android:text="Open CAN"
            android:layout_margin="8dp" />

        <Button
            android:id="@+id/closeCanButton"
            android:layout_width="wrap_content"
            android:layout_height="wrap_content"
            android:text="Close CAN"
            android:layout_margin="8dp" />

        <Button
            android:id="@+id/clearButton"
            android:layout_width="wrap_content"
            android:layout_height="wrap_content"
            android:layout_below="@id/openCanButton"
            android:layout_alignStart="@id/openCanButton"
            android:layout_margin="8dp"
            android:text="Clear Received Data" />
    </LinearLayout>

    <ScrollView
        android:id="@+id/scrollView"
        android:layout_width="match_parent"
        android:layout_height="0dp"
        android:layout_weight="1"
        android:fillViewport="true">

        <ListView
            android:id="@+id/receivedDataListView"
            android:layout_width="match_parent"
            android:layout_height="0dp"
            android:layout_weight="1"
            android:divider="@android:color/darker_gray"
            android:dividerHeight="0.5dp"
            android:padding="8dp"
            android:scrollbarStyle="outsideOverlay"
            android:scrollbars="vertical" />

    </ScrollView>

</LinearLayout>
这个布局文件定义了一个垂直方向的线性布局。
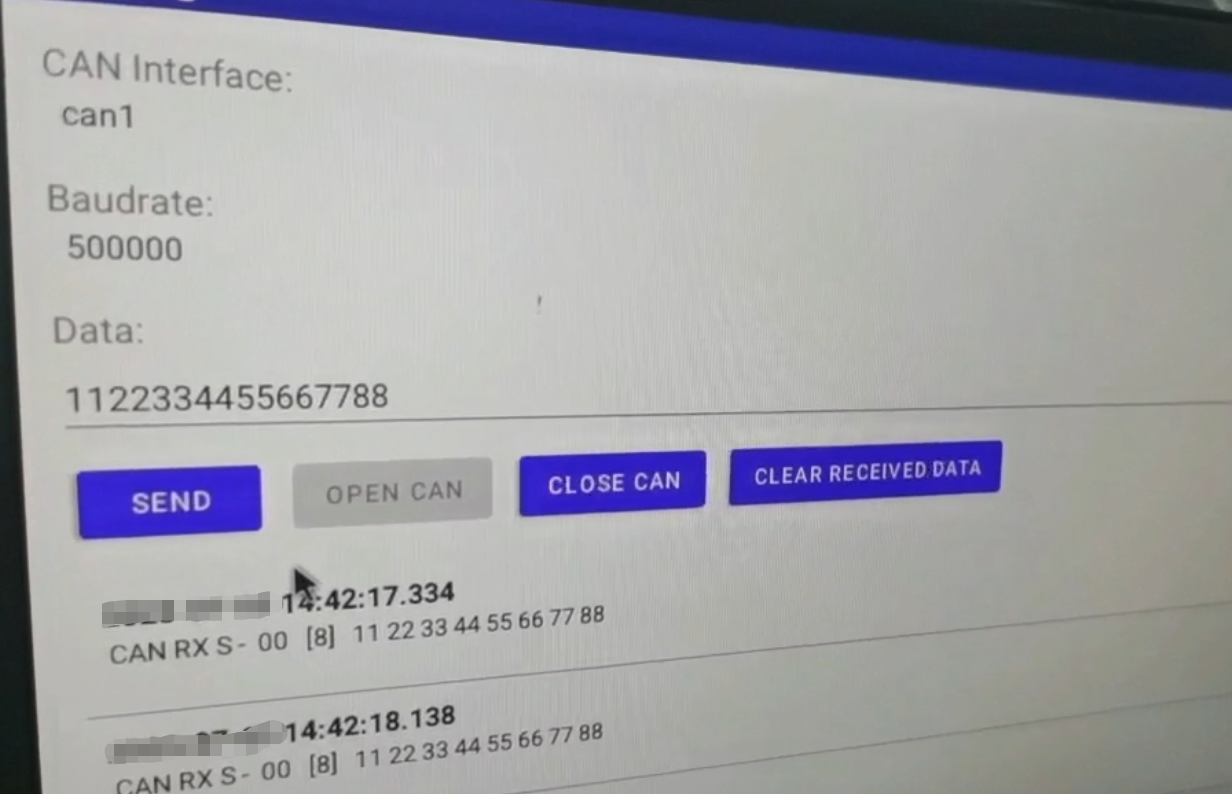
APP运行效果,如下图所示:
(我写这篇博客的时候 运行环境不在身边 截图以前的视频吧)
App的逻辑实现
在src/main/java/com/example/canapp/MainActivity.java文件中实现了App的逻辑功能,如下所示:
public class MainActivity extends AppCompatActivity implements AdapterView.OnItemSelectedListener, View.OnClickListener {
    private static final String TAG = "MainActivity";
    private static final int RECEIVE_CAN_DATA = 1;

    private Spinner canSpinner;
    private Spinner baudrateSpinner;
    private EditText dataEditText;
    private Button sendButton;
    private Button openCanButton;
    private Button closeCanButton;
    private Button clearButton;
    private ListView receivedDataListView;
    private ReceivedDataAdapter receivedDataAdapter;
    private ScrollView scrollView;

    private List<String> canList;
    private List<String> baudrateList;
    private String selectedCan;
    private int selectedBaudrate;
    private boolean isCanOpen = false;

    private SystemCan systemCan;

    private List<String> receivedDataList;
    private Handler handler = new Handler() {
        @Override
        public void handleMessage(Message msg) {
            if (msg.what == RECEIVE_CAN_DATA) {
                Bundle bundle = msg.getData();
                String data = bundle.getString("data");
                String timestamp = getCurrentTimestamp();
                String message = timestamp + " 收到数据: " + data;
                receivedDataList.add(message);

                receivedDataAdapter.notifyDataSetChanged();
                scrollToBottom();
            }
        }
    };

    @Override
    protected void onCreate(Bundle savedInstanceState) {
        super.onCreate(savedInstanceState);
        setContentView(R.layout.activity_main);

        canSpinner = findViewById(R.id.canSpinner);
        baudrateSpinner = findViewById(R.id.baudrateSpinner);
        dataEditText = findViewById(R.id.dataEditText);
        sendButton = findViewById(R.id.sendButton);
        openCanButton = findViewById(R.id.openCanButton);
        closeCanButton = findViewById(R.id.closeCanButton);
        clearButton = findViewById(R.id.clearButton);
        receivedDataListView = findViewById(R.id.receivedDataListView);
        scrollView = findViewById(R.id.scrollView);

        canList = new ArrayList<>();
        canList.add("can1");
        canList.add("can0");
        ArrayAdapter<String> canAdapter = new ArrayAdapter<>(this, android.R.layout.simple_spinner_item, canList);
        canAdapter.setDropDownViewResource(android.R.layout.simple_spinner_dropdown_item);
        canSpinner.setAdapter(canAdapter);
        canSpinner.setOnItemSelectedListener(this);

        baudrateList = new ArrayList<>();
        baudrateList.add("10000");
        baudrateList.add("20000");
        baudrateList.add("40000");
        baudrateList.add("50000");
        baudrateList.add("100000");
        baudrateList.add("125000");
        baudrateList.add("250000");
        baudrateList.add("500000");
        baudrateList.add("666000");
        baudrateList.add("800000");
        baudrateList.add("1000000");
        ArrayAdapter<String> baudrateAdapter = new ArrayAdapter<>(this, android.R.layout.simple_spinner_item, baudrateList);
        baudrateAdapter.setDropDownViewResource(android.R.layout.simple_spinner_dropdown_item);
        baudrateSpinner.setAdapter(baudrateAdapter);
        baudrateSpinner.setOnItemSelectedListener(this);

        sendButton.setOnClickListener(this);
        openCanButton.setOnClickListener(this);
        closeCanButton.setOnClickListener(this);
        clearButton.setOnClickListener(this);

        receivedDataList = new ArrayList<>();
        receivedDataAdapter = new ReceivedDataAdapter(this, receivedDataList);
        receivedDataListView.setAdapter(receivedDataAdapter);

        //
        startCanReceiverThread();
    }


    private void startCanReceiverThread() {
        Thread thread = new Thread(new Runnable() {
            @Override
            public void run() {

                new Thread() {
                    long[] ret = new long[12];
                    @Override
                    public void run() {
                        while (true) {
                            if (isCanOpen) {
                                try {
                                    ret = systemCan.dev_receiveCan(systemCan.fd);
                                } catch (RemoteException e) {
                                    e.printStackTrace();
                                }
                                long canId = ret[0];
                                long canEff = ret[1];
                                long canRtr = ret[2];
                                long canLen = ret[3];
                                long[] canData = Arrays.copyOfRange(ret, 4, (int) (4 + canLen));
                                String str = "can RX ";
                                str += (canEff == 0) ? "S " : "E ";
                                str += (canRtr == 0) ? "-  " : "R  ";
                                String canIdStr = Long.toHexString(canId);
                                if (canEff == 0) {
                                    for (int i = 0; i < 3 - canIdStr.length(); i++) {
                                        canIdStr = '0' + canIdStr;
                                    }
                                } else {
                                    for (int i = 0; i < 8 - canIdStr.length(); i++) {
                                        canIdStr = '0' + canIdStr;
                                    }
                                }
                                str = str + canIdStr + "   [" + Long.toString(canLen) + "]  ";
                                for (int i = 0; i < canLen; i++) {
                                    String hex = Long.toHexString(canData[i]);
                                    hex = (hex.length() == 1) ? ('0' + hex) : hex;
                                    str = str + ' ' + hex;
                                }
                                str = str.toUpperCase();
                                str += '\n';
                                String finalStr = str;
                                Log.d(TAG, "Received CAN data: " + finalStr);
                                Message message = handler.obtainMessage(RECEIVE_CAN_DATA);
                                Bundle bundle = new Bundle();
                                bundle.putString("data", finalStr);
                                message.setData(bundle);
                                handler.sendMessage(message);
                            }
                        }
                    }
                }.start();
            }
        });
        thread.start();
    }
    @Override
    protected void onDestroy() {
        super.onDestroy();
        closeCan();
    }

    @Override
    public void onItemSelected(AdapterView<?> parent, View view, int position, long id) {
        int viewId = parent.getId();
        if (viewId == R.id.canSpinner) {
            selectedCan = canList.get(position);
        } else if (viewId == R.id.baudrateSpinner) {
            String selectedBaudrateStr = baudrateList.get(position);
            selectedBaudrate = Integer.parseInt(selectedBaudrateStr);
        }
    }

    @Override
    public void onNothingSelected(AdapterView<?> parent) {
        // Do nothing
    }

    @Override
    public void onClick(View v) {
        int viewId = v.getId();
        if (viewId == R.id.sendButton) {
            sendCanData();
        } else if (viewId == R.id.openCanButton) {
            openCan();
        } else if (viewId == R.id.closeCanButton) {
            closeCan();
        } else if (viewId == R.id.clearButton) {
            clearReceivedData();
        }
    }

    private void sendCanData() {
        if (!isCanOpen) {
            showToast("请先打开 CAN 总线");
            return;
        }

        String data = dataEditText.getText().toString().trim();
        if (data.isEmpty()) {
            showToast("请输入要发送的数据");
            return;
        }

        // Convert hex string to byte array
        byte[] dataArray = hexStringToByteArray(data);
        if (dataArray == null) {
            showToast("发送的数据格式不正确");
            return;
        }

        try {
            int result = systemCan.dev_sendCan(systemCan.fd, 0, 0, 0, dataArray.length, byteArrayToIntArray(dataArray));
            if (result != 0) {
                showToast("发送数据失败");
            } else {
                showToast("发送数据成功");
            }
        } catch (Exception e) {
            showToast("发送数据出现异常");
            Log.e(TAG, "Error sending CAN data: " + e.getMessage());
        }
    }

    private void openCan() {
        if (isCanOpen) {
            showToast("CAN 总线已经打开");
            return;
        }
        try {
            systemCan = new SystemCan(selectedCan, selectedBaudrate);
            int fd = systemCan.dev_openCan(selectedCan);
            if (fd != -1) {
                systemCan.fd = fd;
                showToast("打开 CAN 总线成功");
                openCanButton.setEnabled(false);
                isCanOpen = true;
            } else {
                showToast("打开 CAN 总线失败");
            }
        } catch (Exception e) {
            showToast("打开 CAN 总线出现异常");
            Log.e(TAG, "Error opening CAN: " + e.getMessage());
        }
        // 添加了额外的参数tq(时间量化器),propSeg(传播段时间),phaseSeg1(相位段1时间),phaseSeg2(相位段2时间)和sjw(同步跳转宽度)
        /*runOnUiThread(new Runnable() {
            @Override
            public void run() {
                try {
                    Thread.sleep(3000);
                } catch (InterruptedException e) {
                    e.printStackTrace();
                }
                ShellUtils.CommandResult commandResult = ShellUtils.execCommand("ip link set " + selectedCan + " down && ip link set " + selectedCan + " type can tq 133 prop-seg 6 phase-seg1 6 phase-seg2 2 sjw 1 && ip link set  " + selectedCan + "  up", true);
                //Log.d("SystemCan-test", + commandResult.result + "," + commandResult.successMsg + "," + commandResult.errorMsg);
            }
        });*/
    }

    private void closeCan() {
        if (!isCanOpen) {
            showToast("CAN 总线已经关闭");
            openCanButton.setEnabled(true);

            return;
        }

        try {
            int result = systemCan.dev_closeCan(systemCan.fd);
            if (result != 0) {
                showToast("关闭 CAN 总线失败");
            } else {
                showToast("关闭 CAN 总线成功");
                openCanButton.setEnabled(true);
                isCanOpen = false;
            }
        } catch (Exception e) {
            showToast("关闭 CAN 总线出现异常");
            Log.e(TAG, "Error closing CAN: " + e.getMessage());
        }
    }

    private void clearReceivedData() {
        receivedDataList.clear();
        receivedDataAdapter.notifyDataSetChanged();
    }

    private String getCurrentTimestamp() {
        SimpleDateFormat sdf = new SimpleDateFormat("yyyy-MM-dd HH:mm:ss.SSS");
        return sdf.format(new Date());
    }

    private void scrollToBottom() {
        scrollView.postDelayed(new Runnable() {
            @Override
            public void run() {
                scrollView.fullScroll(ScrollView.FOCUS_DOWN);
            }
        }, 100);
    }
在src/main/java/com/example/canapp/ReceivedDataAdapter.java文件中实现了App的can 接收数据DataAdapter功能,如下所示:
public class ReceivedDataAdapter extends ArrayAdapter<String> {
    private Context context;
    private List<String> dataList;

    public ReceivedDataAdapter(Context context, List<String> dataList) {
        super(context, 0, dataList);
        this.context = context;
        this.dataList = dataList;
    }

    @Override
    public int getCount() {
        return dataList.size();
    }

    @Override
    public String getItem(int position) {
        return dataList.get(position);
    }

    @Override
    public long getItemId(int position) {
        return position;
    }

    @Override
    public View getView(int position, View convertView, ViewGroup parent) {
        ViewHolder viewHolder;

        if (convertView == null) {
            convertView = LayoutInflater.from(context).inflate(R.layout.list_item_received_data, parent, false);
            viewHolder = new ViewHolder();
            viewHolder.timestampTextView = convertView.findViewById(R.id.timestampTextView);
            viewHolder.dataTextView = convertView.findViewById(R.id.dataTextView);
            convertView.setTag(viewHolder);
        } else {
            viewHolder = (ViewHolder) convertView.getTag();
        }

        String data = dataList.get(position);
        String[] parts = data.split("收到数据:");
        String timestamp = parts[0];
        String canData = parts[1];

        viewHolder.timestampTextView.setText(timestamp);
        viewHolder.dataTextView.setText(canData);

        return convertView;
    }

    private static class ViewHolder {
        TextView timestampTextView;
        TextView dataTextView;
    }
}
App的使用方法
可以使用Android Studio来运行的App,并在真机上进行测试。需要先打开CAN总线,然后输入要发送的数据,点击发送按钮,就可以向CAN设备发送一帧数据。还可以在ListView中查看接收到的数据列表,并清除已经接收到的数据。可以通过Spinner来切换不同的CAN设备和波特率,但是需要先关闭当前的CAN总线,再打开新的CAN总线。可以在Logcat中查看App的日志信息,以及发送和接收到的CAN数据。
我希望它能够帮助你和其他人了解和适配CAN通信的功能。如果你有任何问题,欢迎留言 & 支持三连 ~


 2830
2830


 被折叠的 条评论
为什么被折叠?
被折叠的 条评论
为什么被折叠?
 到【灌水乐园】发言


