


第三章:WXSS-WXML-WXS语法事件处理-组件化开发
01_(掌握)WXML语法-基本规则和mustache语法
Page({
data: {
message: "Hello World",
firstname: "kobe",
lastname: "bryant",
date: new Date().toLocaleDateString(),
},
})
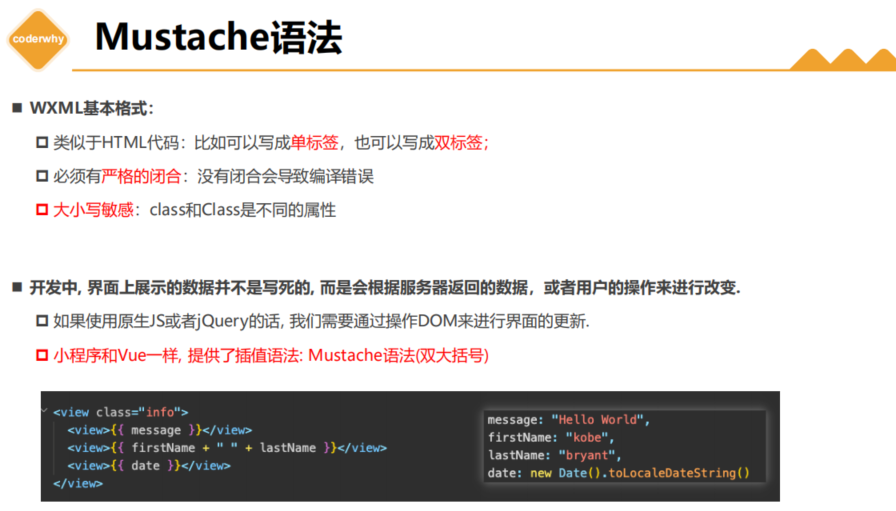
<!-- 1.Mustache语法 -->
<view>{{ message }}</view>
<view>{{ firstname + " " + lastname }}</view>
<view>{{ date }}</view>
02_(掌握)WXML语法-逻辑条件判断-指令
score: 10,
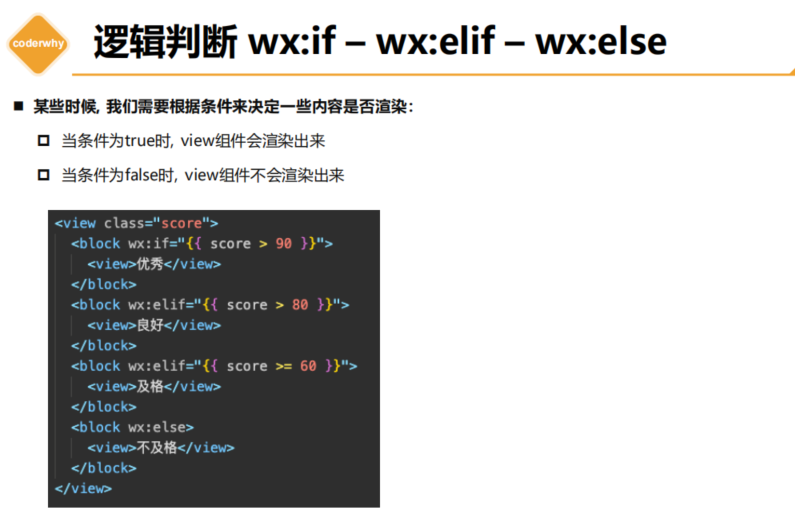
<!-- 2.条件判断 为false的情况下是直接不渲染元素 -->
<view wx:if="{{score > 90}}">优秀</view>
<view wx:elif="{{score > 80}}">良好</view>
<view wx:elif="{{score >= 60}}">及格</view>
<view wx:else>不及格</view>
03_(掌握)WXML语法-hidden属性和if的区别

 isHidden: false,

 onChangeTap() {
    this.setData({
      isHidden: !this.data.isHidden
    })
  }

<!-- 3.hidden属性:v-show 实现原理 display:none -->
<!-- 基本使用 -->
<view hidden>我是hidden的view</view>

<!-- 切换案例 -->
<button bindtap="onChangeTap">切换</button>
<!-- 频繁更新的时候用hidden -->
<view hidden="{{isHidden}}">哈哈哈哈</view>
<!-- dom树中已经不存在 ,但是小程序可能因为热更新的问题导致 我们看代码的时候并没有移除,但本质上已经移除了 -->
<view wx:if="{{!isHidden}}">呵呵呵呵</view>
04_(掌握)WXML语法-列表渲染-for基本使用
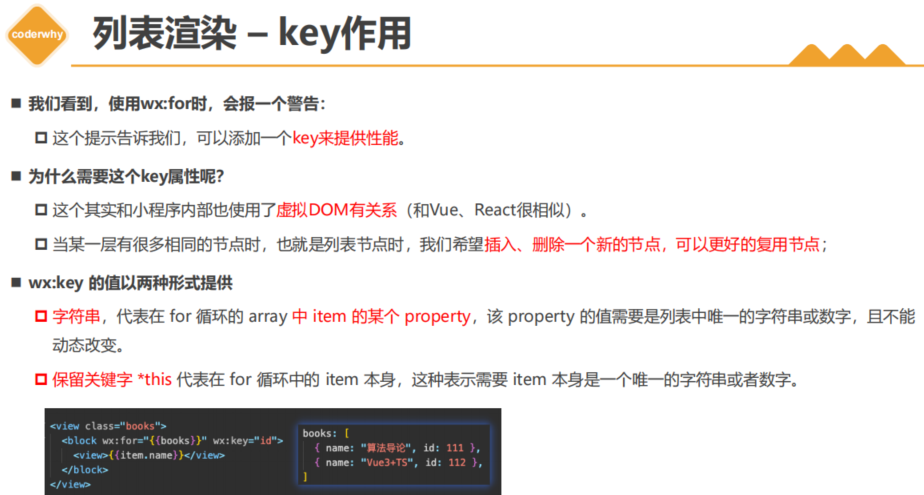
关于wx:key 一般常见的两种写法
写法一:wx:key=“*this” 表示的是item本身,如果item本身是对象类型,对象类型绑定到key会转换成字符串[Object object],这样key就不再是唯一了。对象的时候不推荐
写法二:直接写字符串 – 例如 wx:key=“id”,这时候就会自动从item中寻找id,让id属性作为key
books: [
{ id: 111, name: "代码大全", price: 98 },
{ id: 112, name: "你不知道JS", price: 87 },
{ id: 113, name: "JS高级设计", price: 76 },
]
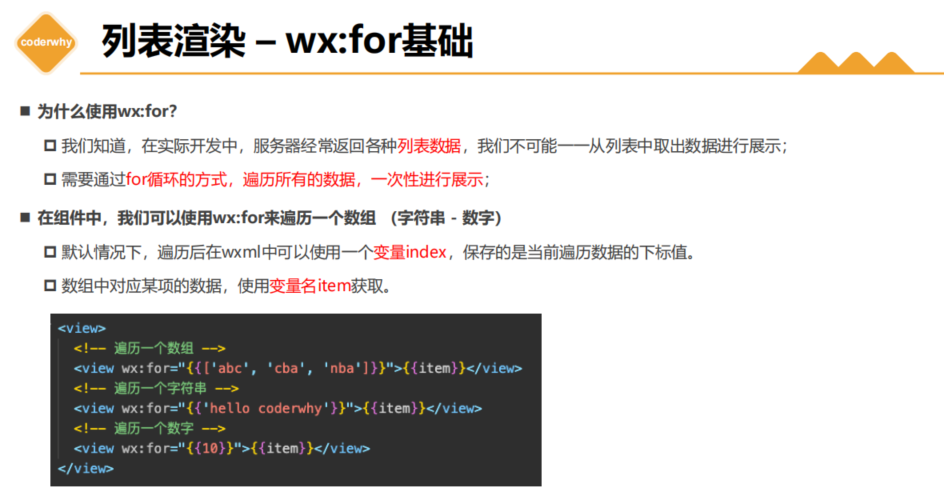
<!-- 4.列表展示 -->
<!-- 4.1.wx:for基本使用 -->
<!-- 遍历data中的数组 -->
<view class="books">
<view wx:for="{{books}}" wx:key="id">
<!-- item: 每项内容, index: 每项索引 -->
{{item.name}}-{{item.price}}
</view>
</view>
<!-- 遍历数字 -->
<view class="number">
<view wx:for="{{10}}" wx:key="*this">
{{ item }}
</view>
</view>
<!-- 遍历字符串 -->
<view class="str">
<view wx:for="coderwhy" wx:key="*this">
{{ item }}
</view>
</view>
05_(掌握)WXML语法-列表渲染-for细节补充

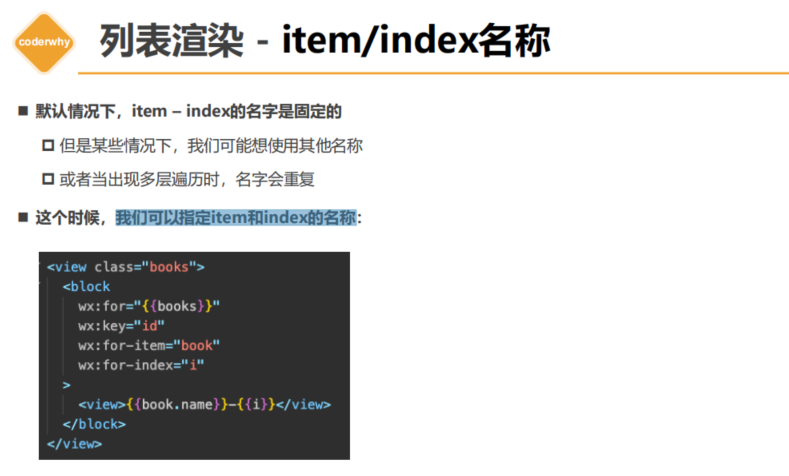
默认情况下,item – index的名字是固定的**
item指遍历的每一项,index是指索引
我们可以指定item**通过 wx:for-item=“book” 和index的名称 wx:for-index=“i”
<!-- 4.2. 细节补充: block-item/index名称-key的使用 -->
<view class="books">
  <block wx:for="{{books}}" wx:key="id" wx:for-item="book" wx:for-index="i">
    <view>{{ book.name }}-{{ book.price }}-{{ i }}</view>
  </block>
</view>
06_(理解)WXS语法-WXS的介绍以及底层实现
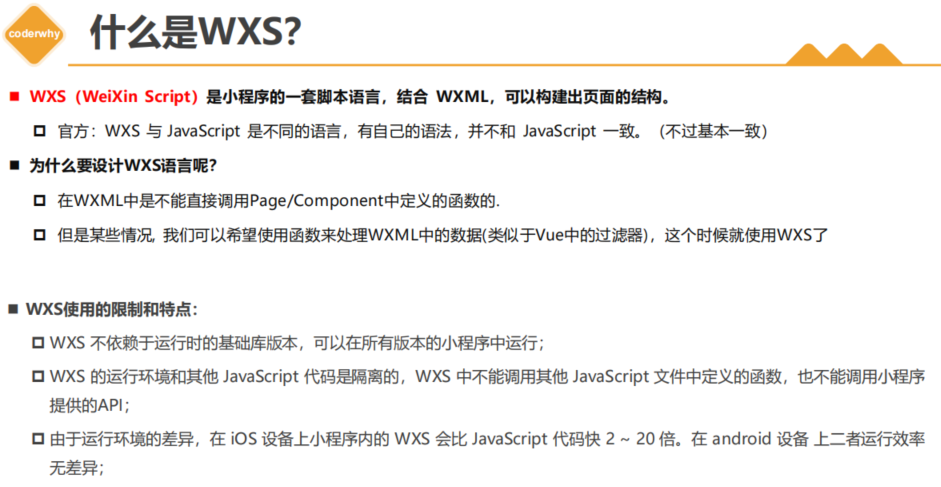

**WXS(WeiXin Script)**是小程序的一套脚本语言,结合 WXML,可以构建出页面的结构
为什么要设计WXS语言呢?
在WXML中是不能直接调用Page/Component中定义的函数的.因为双线程模型
由于运行环境的差异,在 iOS 设备上小程序内的 WXS 会比 JavaScript 代码快 2 ~ 20 倍。在 android 设备 上二者运行效率无差异(因为底层的实现不同);
07_(掌握)WXS-WXS的两种写法和案例练习
[外链图片转存失败,源站可能有防盗链机制,建议将图片保存下来直接上传(img-XKXn4fre-1675304560085)(null)]
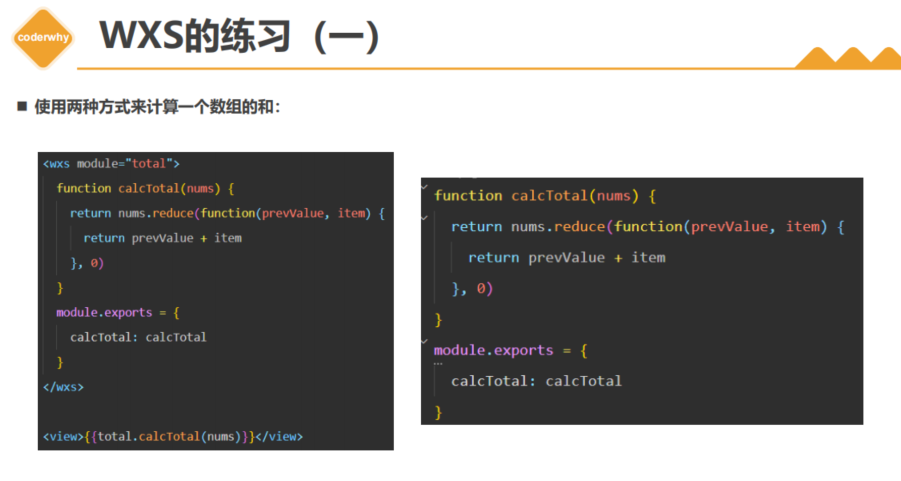
wxs里面不允许放es6代码,只能放es5代码
1.方式一: 标签
定义wxs的两个前提,1.必须有对应命名的module,2.必须导出后, 才能被其他地方调用
使用wxs,必须指定对应的wxs的模块
<!-- wxs里面不允许放es6代码,只能放es5代码 -->
<!-- 使用wxs的两个前提,1.必须有对应命名的module,2.必须导出后, 才能被其他地方调用 -->
<!-- 1.方式一: 标签 -->
<wxs module="format">

  function formatPrice(price) {
    return "¥" + price
  }

  // 必须导出后, 才能被其他地方调用: 必须使用CommonJS导出
  module.exports = {
    formatPrice: formatPrice
  }
</wxs>

<view class="books">
  <block wx:for="{{books}}" wx:key="id">
    <!-- 使用wxs,必须指定对应的wxs的模块 -->
    <view>name:{{item.name}}-price:{{format.formatPrice(item.price)}}</view>
  </block>
</view>
2.方式二: 独立的文件, 通过src引入–开发中常用
<wxs module="format" src="/utils/format.wxs"></wxs>

<view class="books">
  <block wx:for="{{books}}" wx:key="id">
    <!-- 使用wxs,必须指定对应的wxs的模块 -->
    <view>name:{{item.name}}-price:{{format.formatPrice(item.price)}}</view>
  </block>
</view>

<view class="total">总价格: {{format.calcPrice(books)}}</view>
format.wxs
function formatPrice(price) {
return "¥" + price
}
function calcPrice(books) {
return "¥" + books.reduce(function(preValue, item) {
return preValue + item.price
}, 0)
}
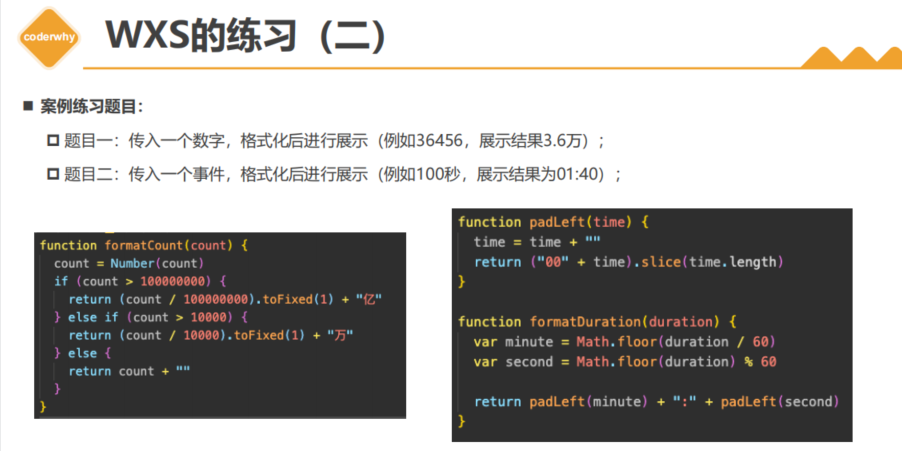
// 对count进行格式化
function formatCount(count) {
count = Number(count)
if (count >= 100000000) {
return (count / 100000000).toFixed(1) + "亿"
} else if (count >= 10000) {
return (count / 10000).toFixed(1) + "万"
} else {
return count
}
}
// function padLeft(time) {
// if ((time + "").length >= 2) return time
// return "0" + time
// }
// 2 -> 02
// 24 -> 24
function padLeft(time) {
time = time + ""
return ("00" + time).slice(time.length)
}
// 对time进行格式化
// 100 -> 01:40
function formatTime(time) {
// 1.获取时间
var minute = Math.floor(time / 60)
var second = Math.floor(time) % 60
// 2.拼接字符串
return padLeft(minute) + ":" + padLeft(second)
}
// 必须导出后, 才能被其他地方调用: 必须使用CommonJS导出
module.exports = {
formatPrice: formatPrice,
calcPrice: calcPrice,
formatCount: formatCount,
formatTime: formatTime
}
08_(掌握)WXS语法-WXS案例练习-count格式化
<wxs module="format" src="/utils/format.wxs"></wxs>
<view>------------题目练习------------</view>
<view class="count">播放量: {{format.formatCount(playCount)}}</view>

// 对count进行格式化
function formatCount(count) {
 // 使用Number()方法不能定义变量,不然就var count = parseInt(count)
  count = Number(count)
  if (count >= 100000000) {
    return (count / 100000000).toFixed(1) + "亿"
  } else if (count >= 10000) {
    return (count / 10000).toFixed(1) + "万"
  } else {
    return count
  }
}
09_(掌握)WXS语法-WXS案例练习-time格式化
block标签中不可以添加class属性
  duration: 255,
 currentTime: 65

<wxs module="format" src="/utils/format.wxs"></wxs>

<view class="time">
  {{format.formatTime(currentTime)}}/{{format.formatTime(duration)}}
</view>

format.wxs
// 时间格式的转换方式一
// function padLeft(time) {
//   if ((time + "").length >= 2) return time
//   return "0" + time
// }
// 时间格式的转换方式二
// 2 -> 02
// 24 -> 24
function padLeft(time) {
  time = time + ""
  return ("00" + time).slice(time.length)
}

// 对time进行格式化
// 100 -> 01:40
function formatTime(time) {
  // 1.获取时间
  var minute = Math.floor(time / 60)
  var second = Math.floor(time) % 60

  // 2.拼接字符串
  return padLeft(minute) + ":" + padLeft(second)
}

// 必须导出后, 才能被其他地方调用: 必须使用CommonJS导出
module.exports = {
  formatPrice: formatPrice,
  calcPrice: calcPrice,
  formatCount: formatCount,
  formatTime: formatTime
}
第三章:小程序的事件处理

10_(掌握)事件处理-事件介绍-基本使用-事件类型


<!-- 1.事件的基本使用 -->
<button bindtap="onBtnTap">按钮</button>

// 绑定事件监听函数
  onBtnTap(event) {
    console.log("onBtnTap:", event);
  },
11_(掌握)事件处理-event对象中target区别

[外链图片转存失败,源站可能有防盗链机制,建议将图片保存下来直接上传(img-3w2YQyfU-1675304560043)(null)]
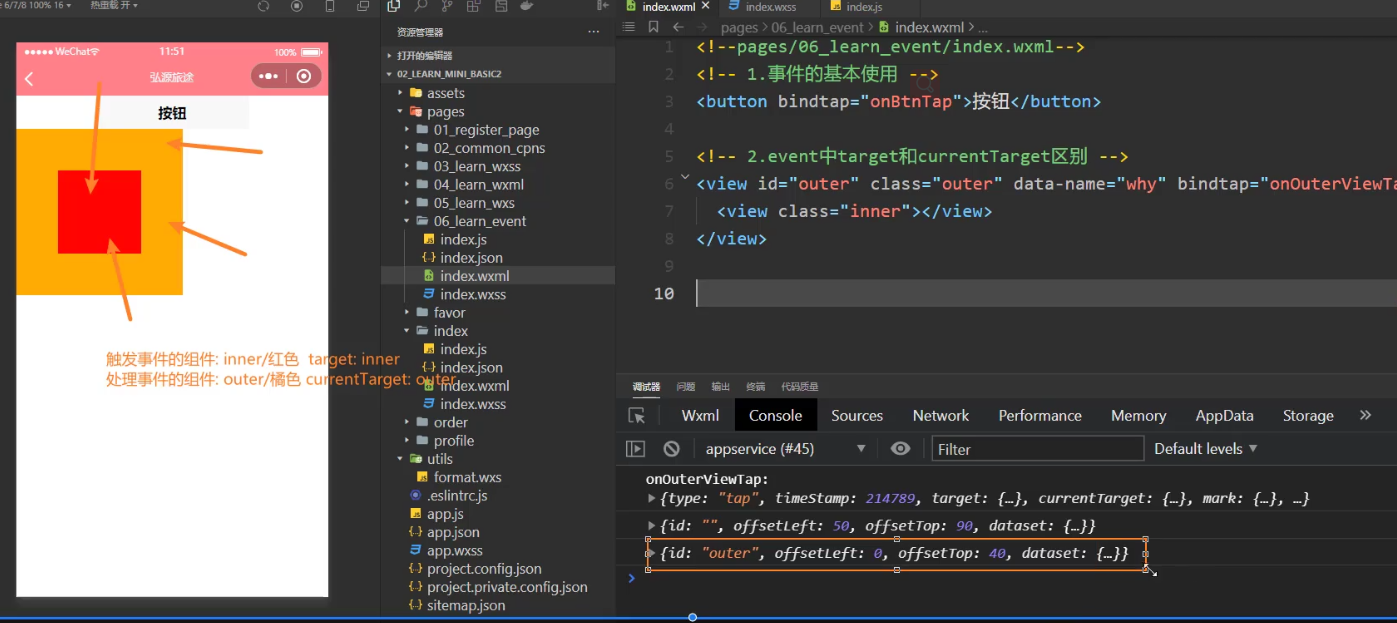
1.target触发事件的元素
2.currentTarget处理事件的元素
<!-- 2.event中target和currentTarget区别 -->
<view id="outer" class="outer" data-name="why" bindtap="onOuterViewTap">
  <view id="inner" class="inner"></view>
</view>


onOuterViewTap(event) {
    // 1.target触发事件的元素
    // 2.currentTarget处理事件的元素
    console.log("onOuterViewTap:", event);
    console.log(event.target);
    console.log(event.currentTarget);
    // 虽然是false,但是里面的属性是一模一样的,相当与new两个对象,内存地址不同,但是里面完全相同
    // console.log(event.target== event.currentTarget);

    // 3.获取自定义属性: name  ---用currentTarget获取处理事件的元素 自定义属性
    const name = event.currentTarget.dataset.name
    console.log(name);
  },
12_(了解)事件处理-event对象touches的区别
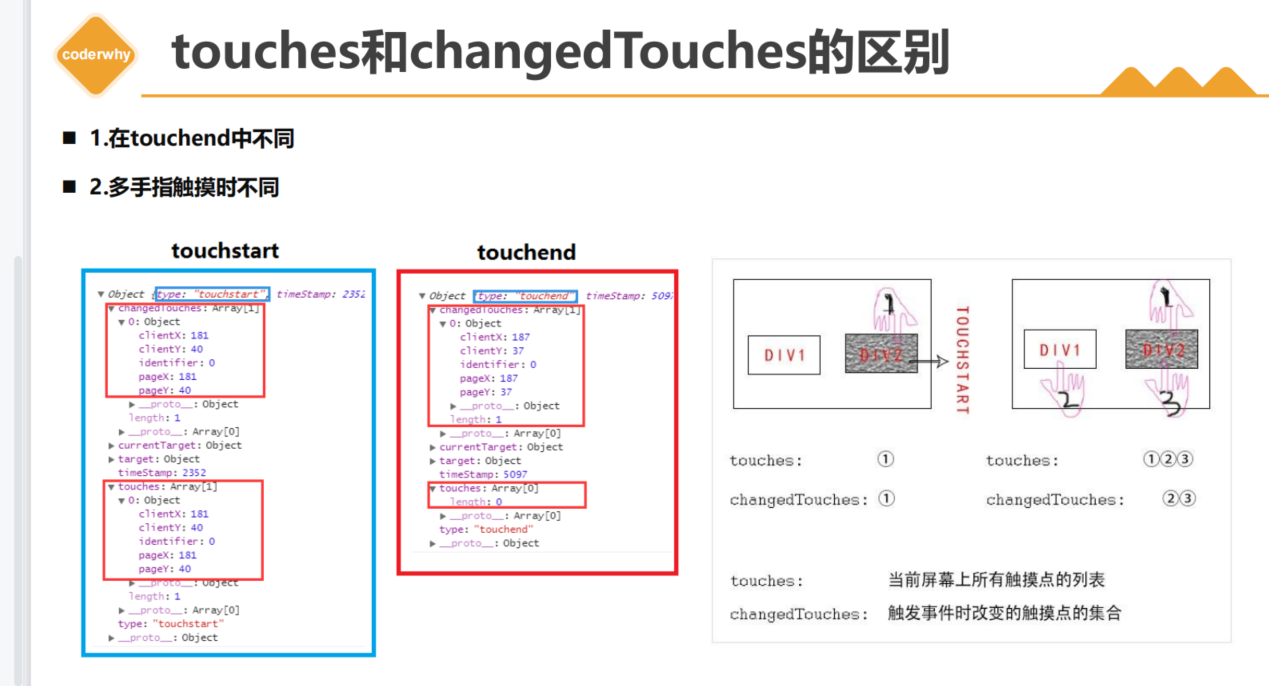
区别一:
touches 正在触摸的所有手指,如果离开touches 为空
changedTouches 当前最新一次的所有触摸手指(发送变化的元素)离开也算(如果发送改变离开,changedTouches为离开的值)
 <!-- 3.event中touches和changeTouches区别 -->
<view
  class="touches"
  bindtap="onTouchTap"
  bindlongpress="onLongPress"
  bindtouchend="onTouchEnd"
>
  多指触摸
</view>

// 监听触摸事件
  onTouchTap(event) {
    console.log("tap:", event);
  },
  onLongPress(event) {
    console.log("long:", event);
  },
  onTouchEnd(event) {
    console.log("end:", event);
  },
13_(掌握)事件处理-参数传递-自定义属性
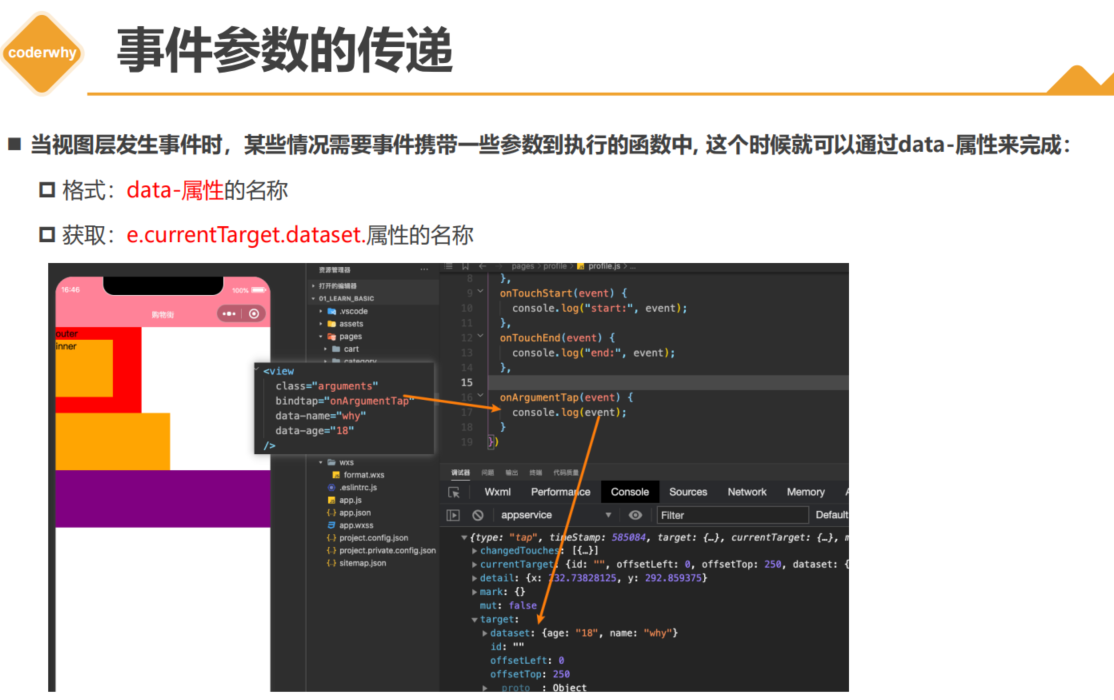
将视图层的数据传入到逻辑层里面–通过自定义属性 data-(自定义属性名)
<!-- 4.event的参数传递 -->
<view
  class="arguments"
  bindtap="onArgumentsTap"
  data-name="why"
  data-age="18"
  data-height="1.88"
>
  参数传递
</view>

// 监听事件, 并且传递参数
  onArgumentsTap(event) {
    console.log("onArgumentsTap:", event);
    const { name, age, height } = event.currentTarget.dataset
    console.log(name, age, height);
  },
14_(掌握)事件处理-参数传递的案例练习
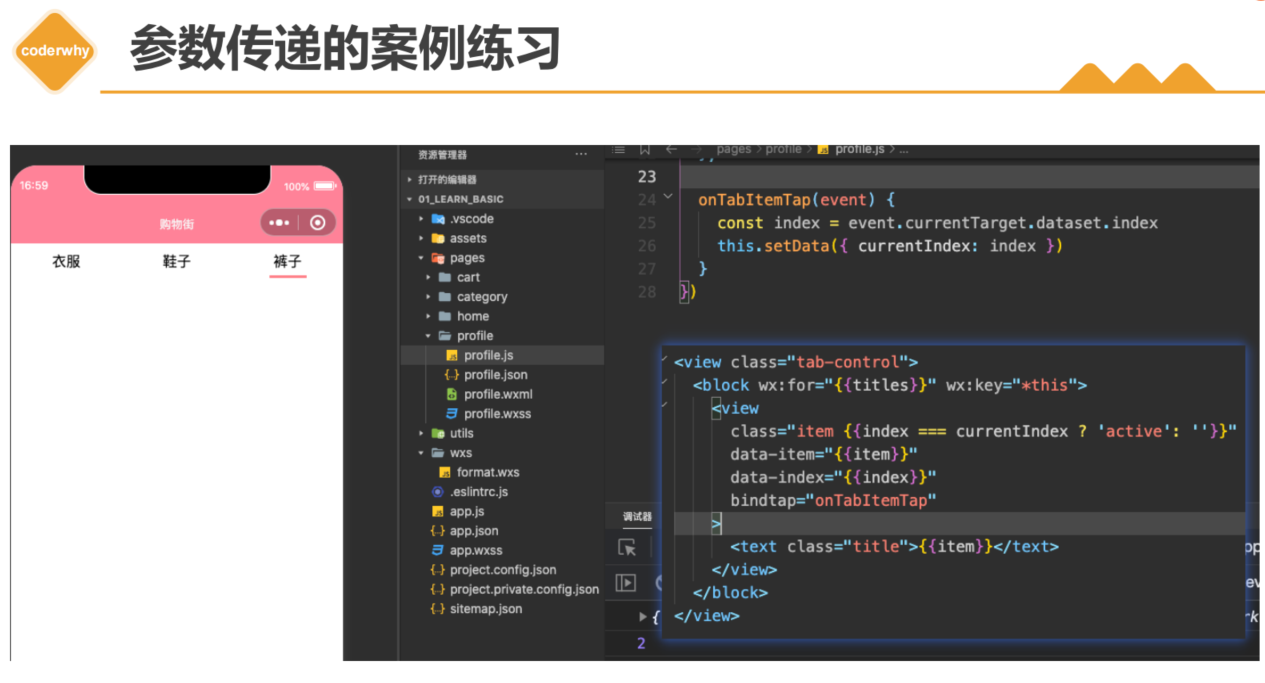
// 这里不能用 event.target 因为wxml外层包括的是text,text上没有index。undefined
// 1.target触发事件的元素 这是是
坑
1.添加属性的时候不能属性值前面不能有空格
<!-- 5.tab-control案例(重要) -->
<view class="tab-control">
  <block wx:for="{{titles}}" wx:key="*this">
    <view class="item {{index === currentIndex ? 'active': ''}}"
    bindtap="onItemTap"
    data-index="{{index}}">
      <text class="title">{{item}}</text>
    </view>
  </block>
</view>

  data: {
    titles: ["手机", "电脑", "iPad", "相机"],
    currentIndex: 0
  },
  // 导航栏切换事件
  onItemTap(event){
    const currentIndex = event.currentTarget.dataset.index
    this.setData({
      currentIndex
    })
  }
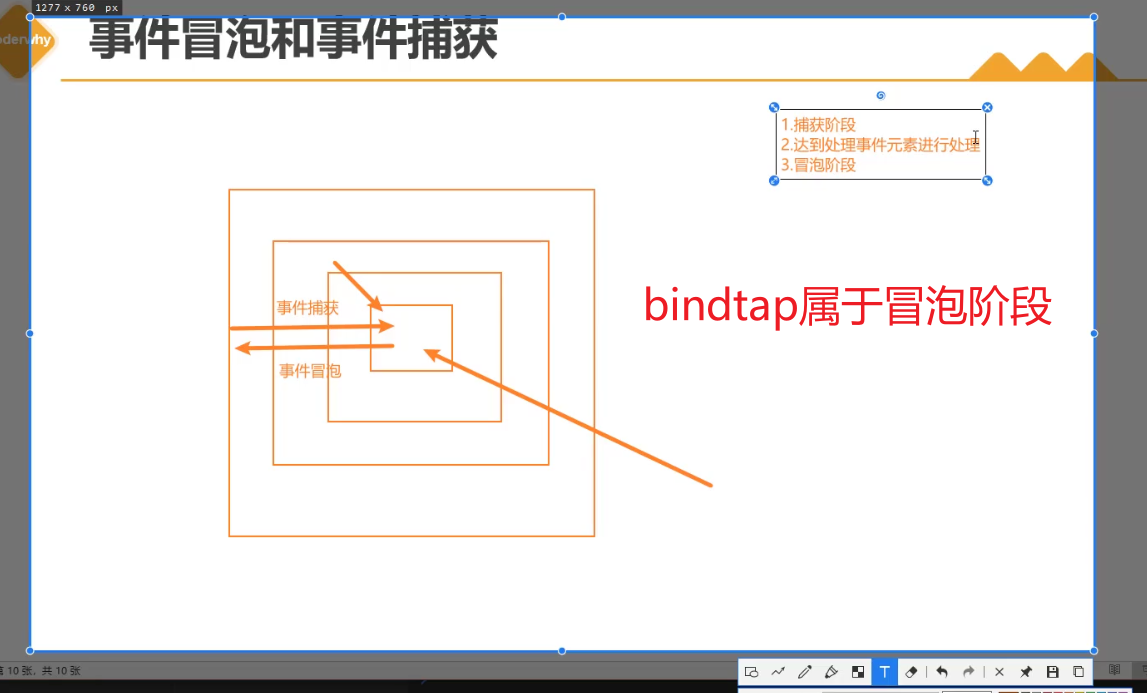
15_(了解)事件处理-事件的捕获和冒泡的阶段
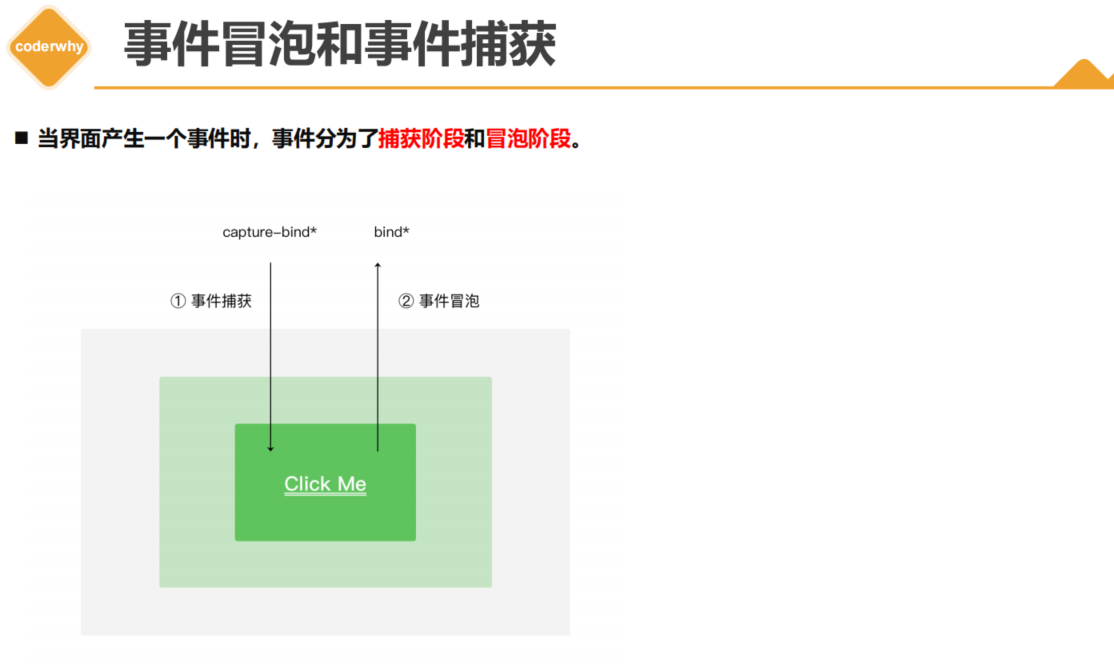
当元素之间存在嵌套关系就会产生事件的捕获和冒泡
capture-bind:tap(capture-bindtap)属于捕获阶段,bind:tap(bindtap)属于冒泡阶段–都是先捕获从外到内,然后冒泡从内到外
<!-- 6.捕获和冒泡阶段 -->
<view class="view1" capture-bind:tap="onView1CaptureTap" bindtap="onView1Tap">
  <view class="view2" capture-bind:tap="onView2CaptureTap" bindtap="onView2Tap">
    <view class="view3" capture-bind:tap="onView3CaptureTap" bindtap="onView3Tap"></view>
  </view>
</view>

// 捕获和冒泡过程
  onView1CaptureTap() {
    console.log("onView1CaptureTap");
  },
  onView2CaptureTap() {
    console.log("onView2CaptureTap");
  },
  onView3CaptureTap() {
    console.log("onView3CaptureTap");
  },
  onView1Tap() {
    console.log("onView1Tap");
  },
  onView2Tap() {
    console.log("onView2Tap");
  },
  onView3Tap() {
    console.log("onView3Tap");
  },
7.将bind替换为catch: 阻止事件仅一步传递(了解)
catch 会进一步阻止事件传递,碰到capture-catch:tap 将不会在向下传递事件(用的很少,了解即可)
<!-- 6.捕获和冒泡阶段 -->
<view class="view1" capture-bind:tap="onView1CaptureTap" bindtap="onView1Tap">
  <view class="view2" capture-catch:tap="onView2CaptureTap" bindtap="onView2Tap">
    <view class="view3" capture-bind:tap="onView3CaptureTap" bindtap="onView3Tap"></view>
  </view>
</view>
16_(理解)事件处理-通过mark传递数据的方式
8.给逻辑传递数据data-(传递的属性值名), 另外一种方式: mark:(传递的属性值名)
mark会将所有子组件或者当前组件中的所有mark传递的数据合并到一个对象里面–在event对象里面是可以拿到mark数据,相对于data-()不用考虑currentTarget或者target,但是data-()是html和小程序一套代码,而mark是小程序的独有代码,所以总结
如果可以清楚data-()currentTarget和target的区别,就用data()-
不清楚可以用mark替代方案,但是最后还是必须明白currentTarget和target的区别- -
区别:1.target触发事件的元素 这是是2.currentTarget处理事件的元素(更常用)
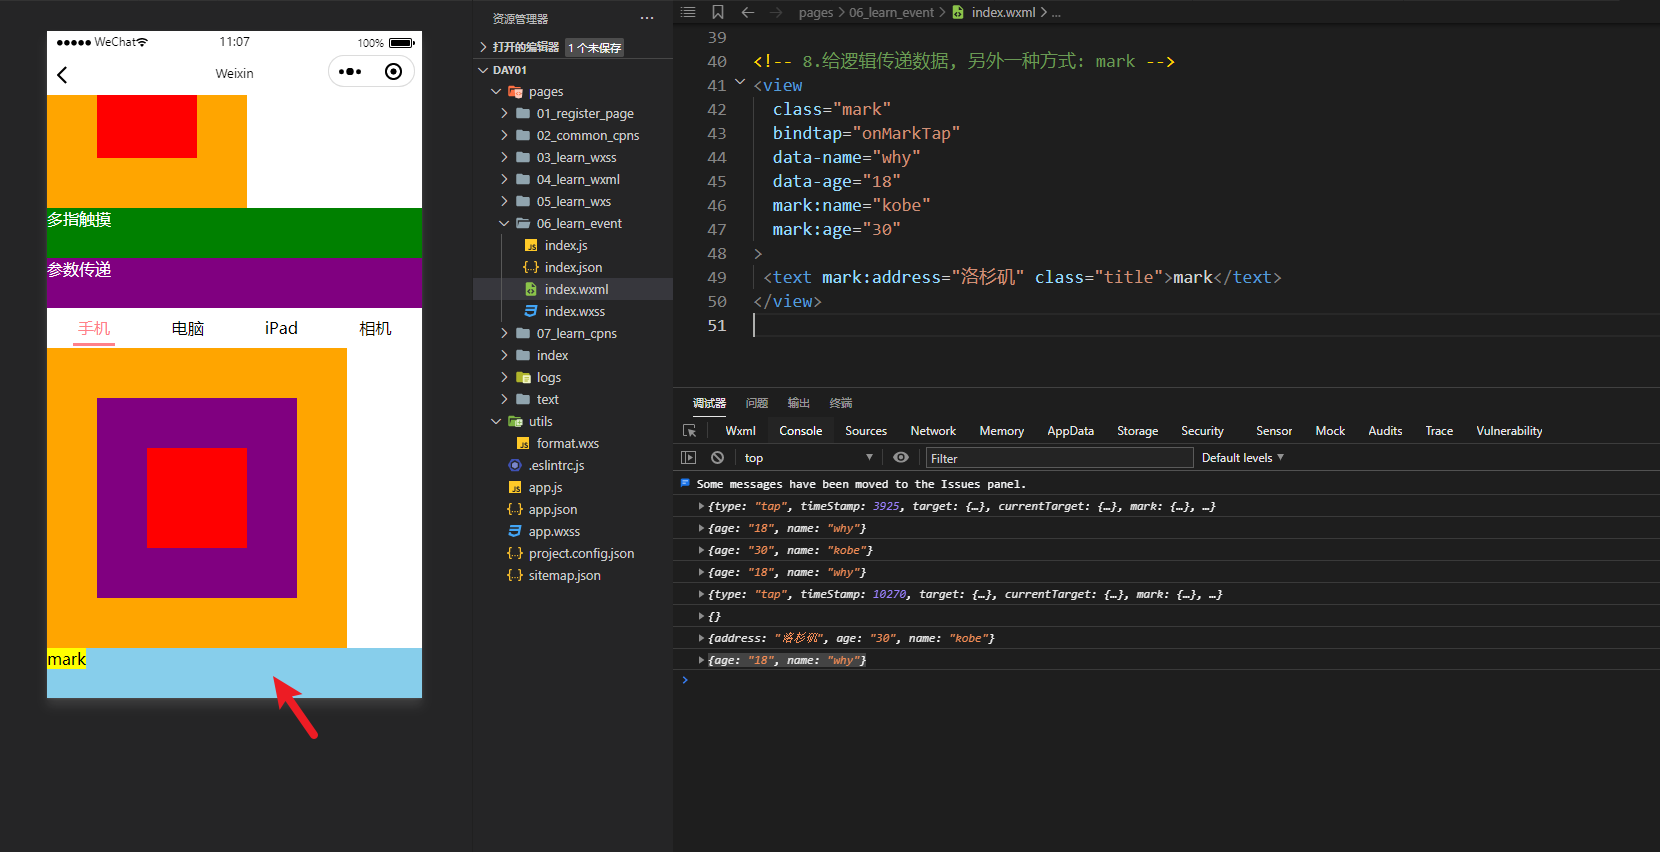
<!-- 8.给逻辑传递数据, 另外一种方式: mark -->
<view
  class="mark"
  bindtap="onMarkTap"
  data-name="why"
  data-age="18"
  mark:name="kobe"
  mark:age="30"
>
 <text mark:address="洛杉矶" class="title">mark</text>
</view>


// mark的数据传递
 onMarkTap(event) {
  console.log(event);
  const data1 = event.target.dataset
  // 点击外层的传递数据的结果
  console.log(data1);//{}
  const data2 = event.mark
  console.log(data2);//{address: "洛杉矶", age: "30", name: "kobe"}
  const data3 = event.currentTarget.dataset
  console.log(data3);// {age: "18", name: "why"}
  }
第三章:小程序的组件化开发
17_(理解)组件化-小程序的组件化思想和应用结构
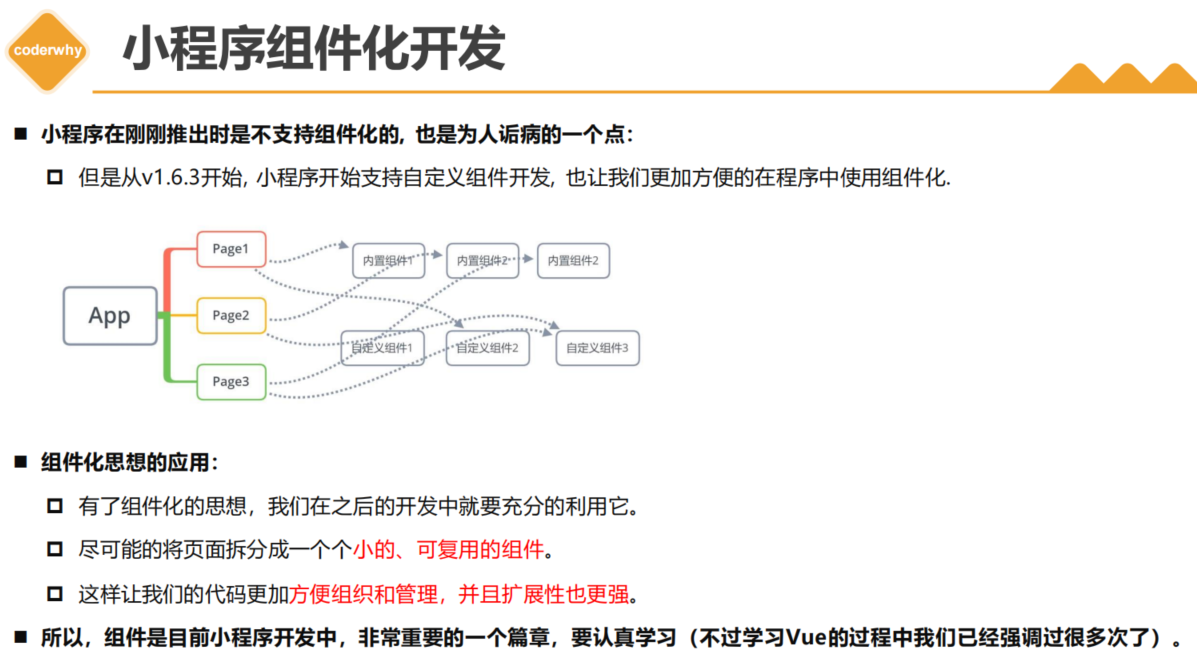
18_(掌握)组件化-自定义组件以及使用过程
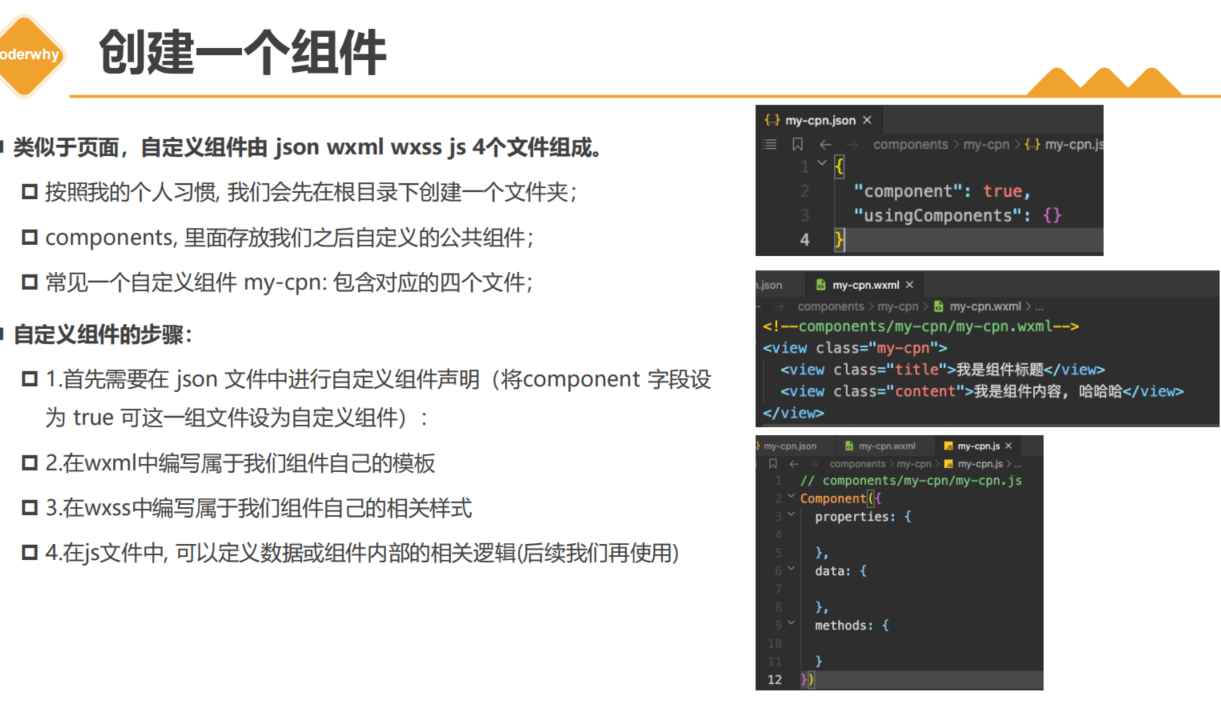
创建组件的位置
如果是公共组件我们放到顶层文件夹components文件夹下,如果只是本页面组件我们直接创建在本文件下创建对应文件夹即可
组件和普通页面的区别
就是在组件里面.json文件中存在 “component”:true ,在.js文件中通过Component实例化而不是Page
组件的使用
1.内置组件可以直接使用
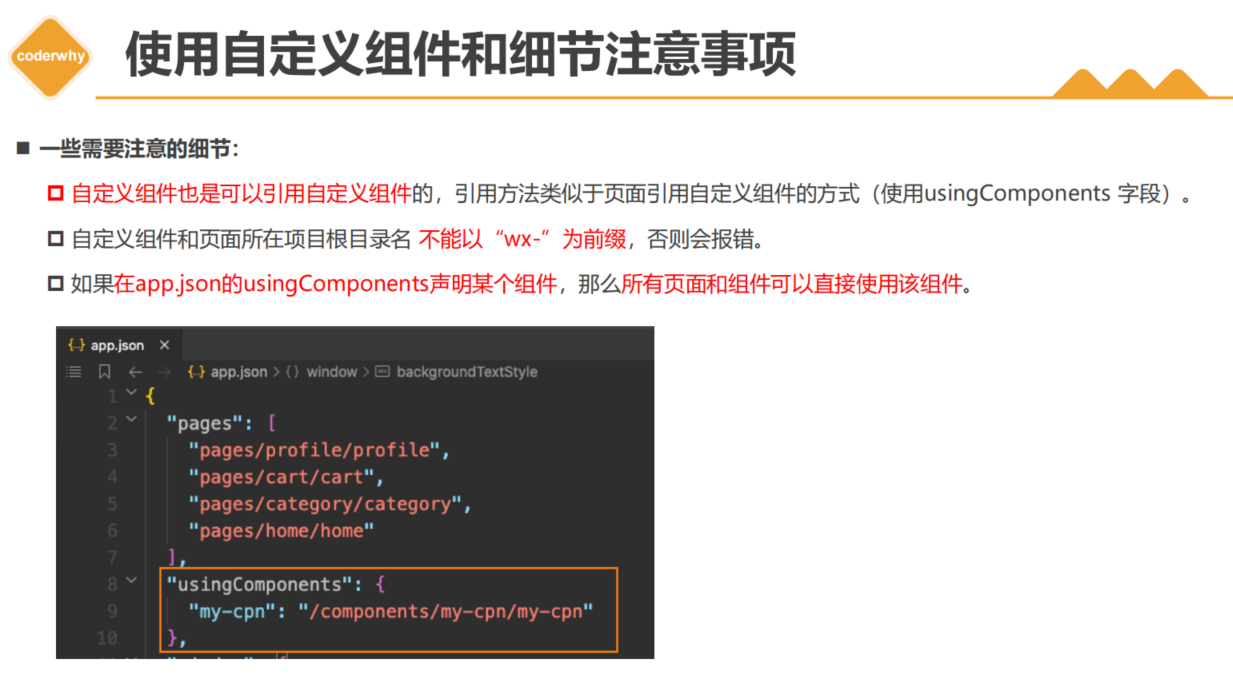
2.自定义组件使用必须配置,需要在使用的地方的json文件夹下配置–键值对
index.json
"section-info": "/components/section-info/section-info",

 <!-- 2.自定义组件 -->
<section-info/>

19_(理解)组件化-自定义组件的样式细节 补充
[外链图片转存失败,源站可能有防盗链机制,建议将图片保存下来直接上传(img-eTaam6gj-1675304560123)(null)]
[外链图片转存失败,源站可能有防盗链机制,建议将图片保存下来直接上传(img-vaU1fMLA-1675304560175)(null)]
07_learn_cpns
{
 "usingComponents": {
   "test-style": "/components/test-style/test-style"
 }
}

<!-- 3.测试组件样式 -->
<test-style/>
<view class="title">我是页面的title</view>

.title {
 background-color: skyblue;
}
test-style
// components/test-style/test-style.js

Component({
  options: {
    // 在实际开发中最好还是用isolated,完全隔离
    styleIsolation: "shared"
  }
})

{
  "component": true,
  "usingComponents": {}
}

<!--components/test-style/test-style.wxml-->
<view>----------测试样式的组件-----------</view>
<view class="title">我是组件的标题</view>

/* components/test-style/test-style.wxss */
.title {
  font-size: 36rpx;
  color: red;
}
/* 可以生效,但是副作用太大,强烈不建议使用 */
/* view {
  background-color: orange;
} */
20_(掌握)组件化-组件通信-Properties传递数据


index.wxml
{
  "usingComponents": {
    "section-info": "/components/section-info/section-info",
    "test-style": "/components/test-style/test-style"
  }
}

<!-- 2.自定义组件 -->
<section-info
  info="abc"
  title="我与地坛"
  content="要是有些事情我没说, 别以为是我忘记了"
  bind:titleclick="onSectionTitleClick"
/>
<section-info info="cba" title="黄金时代" content="在我一生中最好的黄金时代, 我想吃, 我想爱"/>
section-info
// components/section-info/section-info.js
Component({
  properties: {
    title: {
      type: String,
      value: "默认标题"
    },
    content: {
      type: String,
      value: "默认内容"
    }
  },
})

{
  "component": true,
  "usingComponents": {}
}

<!--components/section-info/section-info.wxml-->
<view class="section">
  <view class="title" bindtap="onTitleTap">{{ title }}</view>
  <view class="content info">{{ content }}</view>
</view>

/* components/section-info/section-info.wxss */
.section .title {
  font-size: 40rpx;
  font-weight: 700;
  color: red;
}

.section .content {
  font-size: 24rpx;
  color: purple;
}
21_(了解)组件化-组件通信-ExternalClasse–向组件传递样式

外部定义
定义
<section-info info="cba" title="黄金时代" content="在我一生中最好的黄金时代, 我想吃, 我想爱"/>
设置样式
.cba {
  background-color: #00f;
}
内部接受
接受
externalClasses: ["info"],
使用
<view class="section">
  <view class="title" bindtap="onTitleTap">{{ title }}</view>
  <view class="content info">{{ content }}</view>
</view>
22_(掌握)组件化-组件通信-组件发出自定义事件
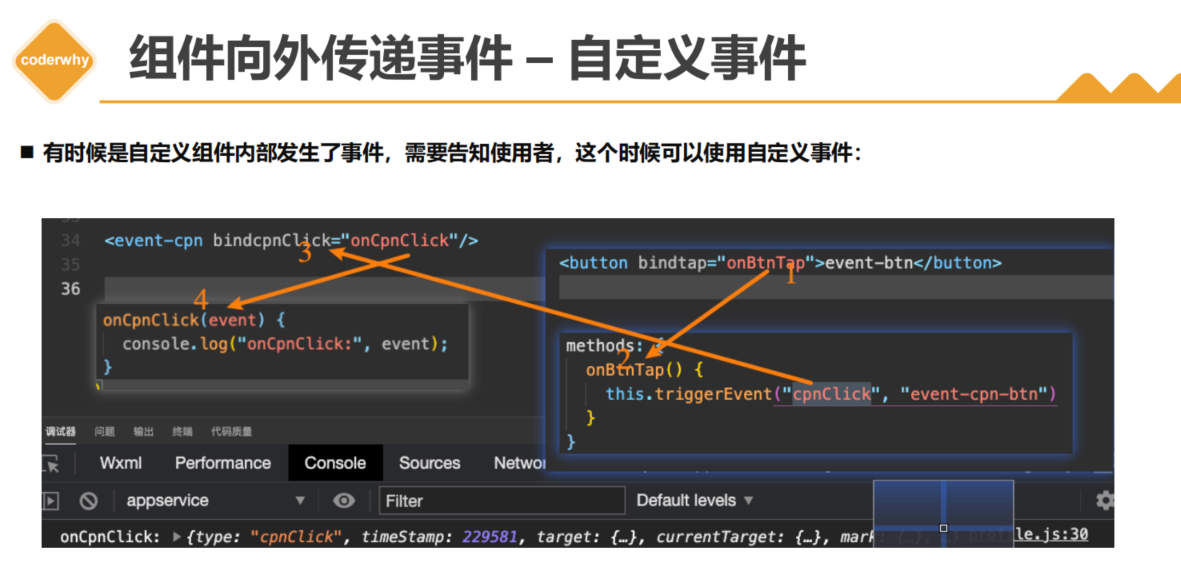
子组件传递事件
<!--1. 自定义事件 -->
  <view class="title" bindtap="onTitleTap">{{ title }}</view>

methods: {
    // 2.将自定义事件传递出去,携带参数
    onTitleTap() {
      console.log("title被点击了~");
      this.triggerEvent("titleclick", "aaa")
    }
  }
父组件接受事件,处理事件 bind:titleclick(事件名)=“onSectionTitleClick”(定义父组件处理事件名)
<!--3.父组件接受事件,处理事件  bind:titleclick(事件名)="onSectionTitleClick"(定义父组件处理事件名) -->
<section-info
  info="abc"
  title="我与地坛"
  content="要是有些事情我没说, 别以为是我忘记了"
  bind:titleclick="onSectionTitleClick"
/>
// 4.父组件处理事件,携带的参数放在event.detail中
  onSectionTitleClick(event) {
    console.log("区域title发生了点击", event.detail);
  },
23_(掌握)组件化-组件通信的案例练习(自己写)
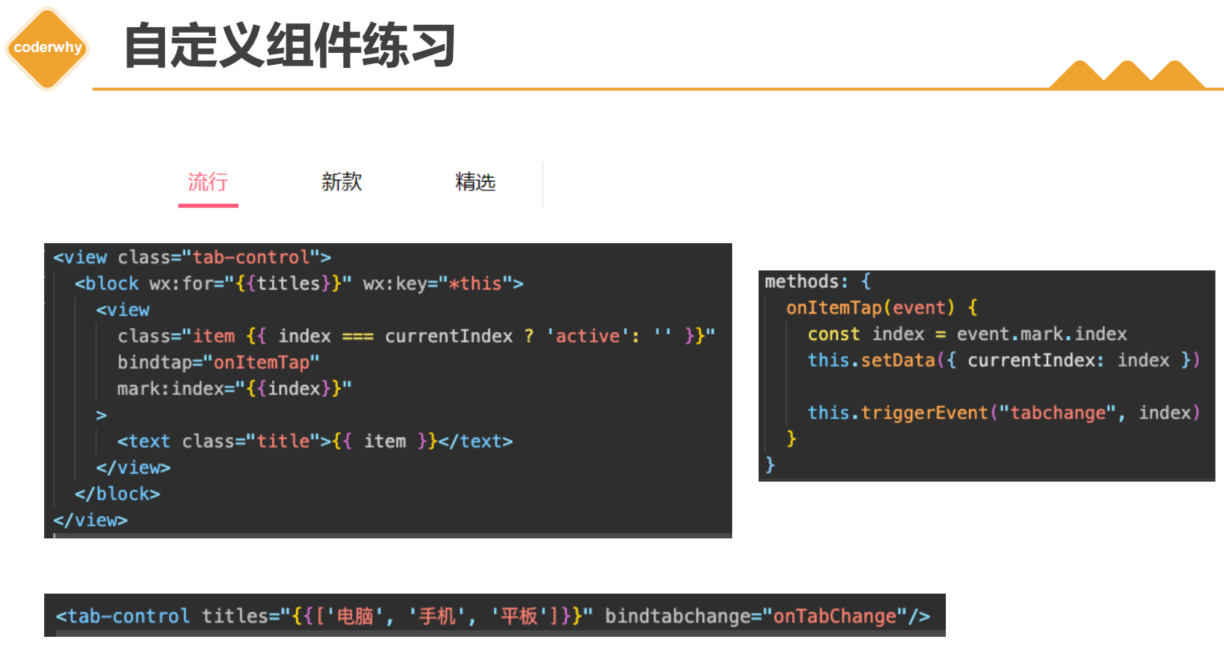
案例实现步骤
父组件
1.引用子组件,将数据传递个子组件
<!-- 4.tab-control的使用 -->
<tab-control
  class="tab-control"
  titles="{{digitalTitles}}"
  bind:indexchange="onTabIndexChange"
/>
2.接受子组件传递的对应方法,接受参数,实现对应处理
 onTabIndexChange(event){
    const index = event.detail
    console.log("点击了", this.data.digitalTitles[index]);
  }
子组件
1.通过properties接收父组件传递过来的数据,展示数据

<!--components/tab-control/tab-control.wxml-->
<view class="tab-control">
  <block wx:for="{{ titles }}" wx:key="*this">
    <view
      class="item {{index === currentIndex ? 'active': ''}}"
      bindtap="onItemTap"
      data-index="{{index}}"
    >
      <text class="title">{{ item }}</text>
    </view>
  </block>
</view>

2.向父组件传递函数,参数
// components/tab-control/tab-control.js
Component({
  properties:{
    titles:{
      type:Array,
      value:[]
    }
  },
  data:{
    currentIndex:0
  },
  methods:{
    onItemTap(event){
      const currentIndex = event.currentTarget.dataset.index
      this.setData({currentIndex})
      // 自定义事件
      this.triggerEvent("indexchange",currentIndex)
    }
  }
})
案例tab栏详细步骤
1.定义子组件结构,将所需的变量和属性定义出来–编写样式
2.js文件接收父组件传递过来的数据和自定义属性,定义固定的数据和绑定方法–向父组件传递自定义事件
3.父组件定义数据传递给子组件数据
4.父组件接受子组件自定义事件,处理逻辑


 478
478


 被折叠的 条评论
为什么被折叠?
被折叠的 条评论
为什么被折叠?
 到【灌水乐园】发言


