Zygote进程介绍
在Android系统中,存在不同的服务,这些服务可以分为:

Android系统借用Binder通信机制实现了C/S架构设计,客户端应用程序如需要实现某些功能,只需请求指定的服务,由服务端来实现。Android服务包括以上的系统服务和应用服务,系统服务是指Android系统在启动过程就已经启动实现了的服务,对于系统服务又分为Java服务和本地服务,其实很好区分,Java服务是由Java代码编写而成,由SystemServer进程提供,而本地服务是由C/C++实现的服务,由Init进程在系统启动时启动的服务。应用服务是由开发者自行实现的某些特定服务。对于本地系统服务,我们知道它们是由Init进程来启动的,那对于Java系统服务,又是如何启动的呢?
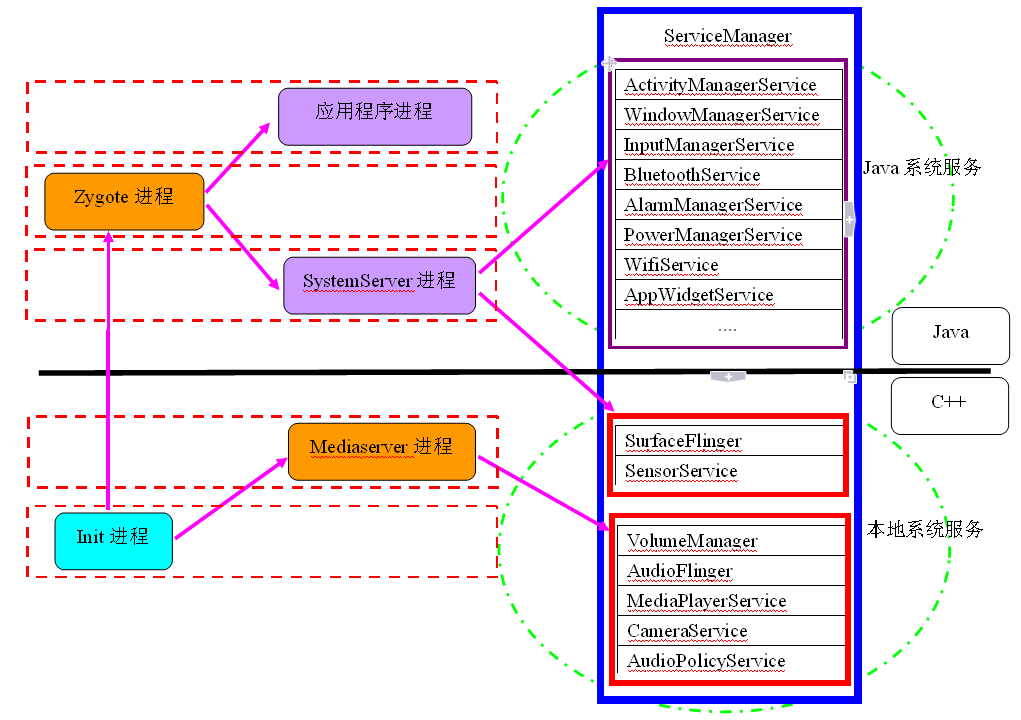
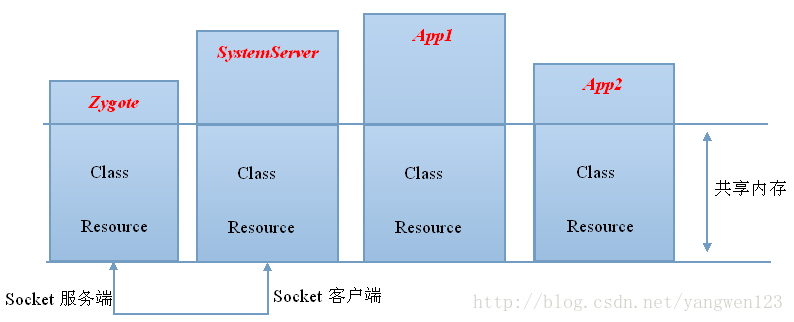
所有的应用程序进程以及系统服务进程SystemServer都是由Zygote进程孕育(fork)出来的,zygote和system_server分别是Java世界的半边天,任何一个进程的死亡都会导致Java崩溃。zygote本身是Native应用程序,与驱动内核无关。zygote进程对应的具体程序是“app_process”,这个可执行文件名称在Android.mk文件中指定,在Zygote进程启动时,将进程名称设置为"zygote"。
我们知道,Android系统是基于Linux内核的,而在Linux系统中,所有的进程都是init进程的子孙进程,也就是说,所有的进程都是直接或者间接地由init进程fork出来的。Zygote进程也不例外,它是在系统启动的过程,由init进程创建的。在系统启动脚本system/core/rootdir/init.rc文件中。
-
- service zygote /system/bin/app_process -Xzygote /system/bin --zygote --start-system-server
- socket zygote stream 666
- critical
- onrestart write /sys/android_power/request_state wake
- onrestart write /sys/power/state on
- onrestart restart media
- onrestart restart netd
- onrestart restart mlistener
-Xzygote:该参数将作为虚拟机启动时所需的参数;
/system/bin:代表虚拟机程序所在目录;
--zygote:指明以ZygoteInit.java类中的main函数作为虚拟机执行入口;
--start-system-server:告诉Zygote进程启动SystemServer进程;
Zygote进程执行代码:
frameworks\base\cmds\app_process\App_main.cpp
frameworks\base\core\jni\AndroidRuntime.cpp
frameworks\base\core\java\com\android\internal\os\ZygoteInit.java
Zygote启动分为两个阶段:
1. 虚拟机启动 --- 通过native启动
startVm(&mJavaVM, &env) 启动虚拟机
onVmCreated(env) 虚拟机启动后的初始化
startReg(env) 注册JNI函数
env->CallStaticVoidMethod(startClass, startMeth, strArray) 调用ZygoteInit类的main函数开创java世界
2.SystemServer进程 --- 通过Java启动
registerZygoteSocket() 为zygote进程注册监听socket
preload() 加载常用的JAVA类和系统资源
startSystemServer() 启动SystemServer进程
runSelectLoopMode() 进入循环监听模式
closeServerSocket() 进程退出时,关闭socket监听

Zygote进程包含两个主要模块:
1. Socket服务端,该Socket服务端用于接收启动新的Dalvik进程命令。
2. Framework共享类及共享资源,当Zygote进程启动后,会装载一些共享类和资源,共享类是在preload-classes文件中定义的,共享资源是在preload-resources文件中定义。因为其他Dalvik进程是由Zygote进程孵化出来的,因此只要Zygote装载好了这些类和资源后,新的Dalvik进程就不需要在装载这些类和资源了,它们共享Zygote进程的资源和类。
app_process
App_main.cpp
Zygote进程是通过app_process启动的,app_process通过解析命令行参数,然后启动一个Android虚拟机,调用Java的入口函数从而启动一个进程,app_process也可以启动其他进程,比如monkey,am,pm等。
- int main(int argc, const char* const argv[])
- {
-
-
-
-
- mArgC = argc;
- mArgV = argv;
- mArgLen = 0;
- for (int i=0; i<argc; i++) {
- mArgLen += strlen(argv[i]) + 1;
- }
- mArgLen--;
- AppRuntime runtime;
- const char* argv0 = argv[0];
-
- argc--;
- argv++;
-
-
-
- int i = runtime.addVmArguments(argc, argv);
- bool zygote = false;
- bool startSystemServer = false;
- bool application = false;
- const char* parentDir = NULL;
- const char* niceName = NULL;
- const char* className = NULL;
- while (i < argc) {
- const char* arg = argv[i++];
- if (!parentDir) {
- parentDir = arg;
-
- } else if (strcmp(arg, "--zygote") == 0) {
- zygote = true;
- niceName = "zygote";
-
- } else if (strcmp(arg, "--start-system-server") == 0) {
- startSystemServer = true;
-
- } else if (strcmp(arg, "--application") == 0) {
- application = true;
-
- } else if (strncmp(arg, "--nice-name=", 12) == 0) {
- niceName = arg + 12;
- } else {
-
- className = arg;
- break;
- }
- }
- if (niceName && *niceName) {
- setArgv0(argv0, niceName);
- set_process_name(niceName);
- }
-
- runtime.mParentDir = parentDir;
-
- if (zygote) {
-
- ALOGV("doLastShutDownCheck");
- doLastShutDownCheck();
-
- runtime.start("com.android.internal.os.ZygoteInit",startSystemServer ? "start-system-server" : "");
-
-
-
-
-
-
-
- } else if (className) {
-
- runtime.mClassName = className;
- runtime.mArgC = argc - i;
- runtime.mArgV = argv + i;
- runtime.start("com.android.internal.os.RuntimeInit",application ? "application" : "tool");
- } else {
- fprintf(stderr, "Error: no class name or --zygote supplied.\n");
- app_usage();
- LOG_ALWAYS_FATAL("app_process: no class name or --zygote supplied.");
- return 10;
- }
- }
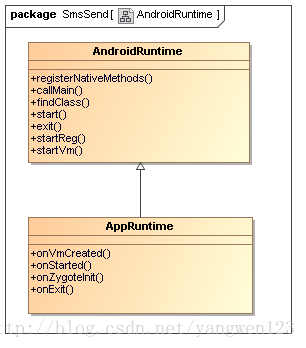
这个函数的主要作用就是创建一个AppRuntime变量,然后调用它的start成员函数。AppRuntime类的声明和实现在App_main.cpp中,派生于AndroidRuntime类
从上面的代码可以知道,app_process就是通过启动一个Android虚拟机并加载相应的Java类来启动一个进程。
虚拟机启动过程
AndroidRuntime.cpp
- void AndroidRuntime::start(const char* className, const char* options)
- {
- blockSigpipe();
-
-
-
-
- if (strcmp(options, "start-system-server") == 0) {
-
- const int LOG_BOOT_PROGRESS_START = 3000;
- LOG_EVENT_LONG(LOG_BOOT_PROGRESS_START,ns2ms(systemTime(SYSTEM_TIME_MONOTONIC)));
- }
-
- const char* rootDir = getenv("ANDROID_ROOT");
- if (rootDir == NULL) {
- rootDir = "/system";
- if (!hasDir("/system")) {
- LOG_FATAL("No root directory specified, and /android does not exist.");
- return;
- }
- setenv("ANDROID_ROOT", rootDir, 1);
- }
-
- JNIEnv* env;
- if (startVm(&mJavaVM, &env) != 0) {
- return;
- }
- onVmCreated(env);
-
- if (startReg(env) < 0) {
- ALOGE("Unable to register all android natives\n");
- return;
- }
-
- jclass stringClass;
- jobjectArray strArray;
- jstring classNameStr;
- jstring optionsStr;
-
- stringClass = env->FindClass("java/lang/String");
- assert(stringClass != NULL);
-
- strArray = env->NewObjectArray(2, stringClass, NULL);
- assert(strArray != NULL);
-
-
-
- classNameStr = env->NewStringUTF(className);
- assert(classNameStr != NULL);
-
- env->SetObjectArrayElement(strArray, 0, classNameStr);
-
- optionsStr = env->NewStringUTF(options);
-
- env->SetObjectArrayElement(strArray, 1, optionsStr);
-
- char* slashClassName = toSlashClassName(className);
-
- jclass startClass = env->FindClass(slashClassName);
- if (startClass == NULL) {
- ALOGE("JavaVM unable to locate class '%s'\n", slashClassName);
- } else {
-
- jmethodID startMeth = env->GetStaticMethodID(startClass, "main",
- "([Ljava/lang/String;)V");
- if (startMeth == NULL) {
- ALOGE("JavaVM unable to find main() in '%s'\n", className);
-
- } else {
- env->CallStaticVoidMethod(startClass, startMeth, strArray);
- }
- }
- free(slashClassName);
- ALOGD("Shutting down VM\n");
- if (mJavaVM->DetachCurrentThread() != JNI_OK)
- ALOGW("Warning: unable to detach main thread\n");
- if (mJavaVM->DestroyJavaVM() != 0)
- ALOGW("Warning: VM did not shut down cleanly\n");
- }
AndroidRuntime::start()中完成四个任务:
① startVm(&mJavaVM, &env) 启动虚拟机
② onVmCreated(env) 虚拟机启动后的初始化
③ startReg(env) 注册JNI函数
④ env->CallStaticVoidMethod(startClass, startMeth, strArray) 调用ZygoteInit类的main函数开创java世界
- int AndroidRuntime::startVm(JavaVM** pJavaVM, JNIEnv** pEnv)
- {
- int result = -1;
- JavaVMInitArgs initArgs;
- JavaVMOption opt;
- char propBuf[PROPERTY_VALUE_MAX];
- char stackTraceFileBuf[PROPERTY_VALUE_MAX];
- char dexoptFlagsBuf[PROPERTY_VALUE_MAX];
- char enableAssertBuf[sizeof("-ea:")-1 + PROPERTY_VALUE_MAX];
- char jniOptsBuf[sizeof("-Xjniopts:")-1 + PROPERTY_VALUE_MAX];
- char heapstartsizeOptsBuf[sizeof("-Xms")-1 + PROPERTY_VALUE_MAX];
- char heapsizeOptsBuf[sizeof("-Xmx")-1 + PROPERTY_VALUE_MAX];
- char heapgrowthlimitOptsBuf[sizeof("-XX:HeapGrowthLimit=")-1 + PROPERTY_VALUE_MAX];
- char extraOptsBuf[PROPERTY_VALUE_MAX];
- char* stackTraceFile = NULL;
- bool checkJni = false;
- bool checkDexSum = false;
- bool logStdio = false;
- enum {
- kEMDefault,
- kEMIntPortable,
- kEMIntFast,
- #if defined(WITH_JIT)
- kEMJitCompiler,
- #endif
- } executionMode = kEMDefault;
- property_get("dalvik.vm.checkjni", propBuf, "");
- if (strcmp(propBuf, "true") == 0) {
- checkJni = true;
- } else if (strcmp(propBuf, "false") != 0) {
-
- property_get("ro.kernel.android.checkjni", propBuf, "");
- if (propBuf[0] == '1') {
- checkJni = true;
- }
- }
- property_get("dalvik.vm.execution-mode", propBuf, "");
- if (strcmp(propBuf, "int:portable") == 0) {
- executionMode = kEMIntPortable;
- } else if (strcmp(propBuf, "int:fast") == 0) {
- executionMode = kEMIntFast;
- #if defined(WITH_JIT)
- } else if (strcmp(propBuf, "int:jit") == 0) {
- executionMode = kEMJitCompiler;
- #endif
- }
- property_get("dalvik.vm.stack-trace-file", stackTraceFileBuf, "");
- property_get("dalvik.vm.check-dex-sum", propBuf, "");
- if (strcmp(propBuf, "true") == 0) {
- checkDexSum = true;
- }
- property_get("log.redirect-stdio", propBuf, "");
- if (strcmp(propBuf, "true") == 0) {
- logStdio = true;
- }
- strcpy(enableAssertBuf, "-ea:");
- property_get("dalvik.vm.enableassertions", enableAssertBuf+4, "");
- strcpy(jniOptsBuf, "-Xjniopts:");
- property_get("dalvik.vm.jniopts", jniOptsBuf+10, "");
-
- opt.extraInfo = (void*) runtime_exit;
- opt.optionString = "exit";
- mOptions.add(opt);
-
- opt.extraInfo = (void*) runtime_vfprintf;
- opt.optionString = "vfprintf";
- mOptions.add(opt);
-
- opt.extraInfo = (void*) runtime_isSensitiveThread;
- opt.optionString = "sensitiveThread";
- mOptions.add(opt);
- opt.extraInfo = NULL;
-
-
- opt.optionString = "-verbose:gc";
- mOptions.add(opt);
-
-
-
-
-
- strcpy(heapstartsizeOptsBuf, "-Xms");
- property_get("dalvik.vm.heapstartsize", heapstartsizeOptsBuf+4, "4m");
- opt.optionString = heapstartsizeOptsBuf;
- mOptions.add(opt);
- strcpy(heapsizeOptsBuf, "-Xmx");
- property_get("dalvik.vm.heapsize", heapsizeOptsBuf+4, "16m");
- opt.optionString = heapsizeOptsBuf;
- mOptions.add(opt);
-
- opt.optionString = "-XX:mainThreadStackSize=24K";
- mOptions.add(opt);
- strcpy(heapgrowthlimitOptsBuf, "-XX:HeapGrowthLimit=");
- property_get("dalvik.vm.heapgrowthlimit", heapgrowthlimitOptsBuf+20, "");
- if (heapgrowthlimitOptsBuf[20] != '\0') {
- opt.optionString = heapgrowthlimitOptsBuf;
- mOptions.add(opt);
- }
-
-
-
-
- property_get("dalvik.vm.dexopt-flags", dexoptFlagsBuf, "");
- if (dexoptFlagsBuf[0] != '\0') {
- const char* opc;
- const char* val;
- opc = strstr(dexoptFlagsBuf, "v=");
- if (opc != NULL) {
- switch (*(opc+2)) {
- case 'n': val = "-Xverify:none"; break;
- case 'r': val = "-Xverify:remote"; break;
- case 'a': val = "-Xverify:all"; break;
- default: val = NULL; break;
- }
-
- if (val != NULL) {
- opt.optionString = val;
- mOptions.add(opt);
- }
- }
- opc = strstr(dexoptFlagsBuf, "o=");
- if (opc != NULL) {
- switch (*(opc+2)) {
- case 'n': val = "-Xdexopt:none"; break;
- case 'v': val = "-Xdexopt:verified"; break;
- case 'a': val = "-Xdexopt:all"; break;
- case 'f': val = "-Xdexopt:full"; break;
- default: val = NULL; break;
- }
-
- if (val != NULL) {
- opt.optionString = val;
- mOptions.add(opt);
- }
- }
- ...
- }
- }
初始化虚拟机
- virtual void onVmCreated(JNIEnv* env)
- {
-
- if (mClassName == NULL) {
- return;
- }
-
-
- char* slashClassName = toSlashClassName(mClassName);
-
- mClass = env->FindClass(slashClassName);
- if (mClass == NULL) {
- ALOGE("ERROR: could not find class '%s'\n", mClassName);
- }
- free(slashClassName);
-
- mClass = reinterpret_cast<jclass>(env->NewGlobalRef(mClass));
- }
注册JNI函数
创建好了虚拟机,因此需要给该虚拟机注册一些JNI函数。
- int AndroidRuntime::startReg(JNIEnv* env)
- {
-
-
-
-
-
- androidSetCreateThreadFunc((android_create_thread_fn) javaCreateThreadEtc);
- LOGV("--- registering native functions ---\n");
-
-
-
-
-
-
- env->PushLocalFrame(200);
-
- if (register_jni_procs(gRegJNI, NELEM(gRegJNI), env) < 0) {
- env->PopLocalFrame(NULL);
- return -1;
- }
- env->PopLocalFrame(NULL);
-
- return 0;
- }
JNI函数注册过程,循环调用gRegJNI数组中的每个元素的mProc方法
-
- static int register_jni_procs(const RegJNIRec array[], size_t count, JNIEnv* env)
- {
- for (size_t i = 0; i < count; i++) {
- if (array[i].mProc(env) < 0) {
- #ifndef NDEBUG
- LOGD("----------!!! %s failed to load\n", array[i].mName);
- #endif
- return -1;
- }
- }
- return 0;
- }
使用宏REG_JNI将系统中所有JNI注册函数添加到JNI数组gRegJNI中。
- //gRegJNI全局数组中
- static const RegJNIRec gRegJNI[] = {
- REG_JNI(register_android_debug_JNITest),
- REG_JNI(register_com_android_internal_os_RuntimeInit),
- REG_JNI(register_android_os_SystemClock),
- REG_JNI(register_android_util_EventLog),
- REG_JNI(register_android_util_Log),
- REG_JNI(register_android_util_FloatMath),
- REG_JNI(register_android_text_format_Time),
- REG_JNI(register_android_pim_EventRecurrence),
- REG_JNI(register_android_content_AssetManager),
- REG_JNI(register_android_content_StringBlock),
- REG_JNI(register_android_content_XmlBlock),
- REG_JNI(register_android_emoji_EmojiFactory),
- REG_JNI(register_android_security_Md5MessageDigest),
- REG_JNI(register_android_text_AndroidCharacter),
- REG_JNI(register_android_text_AndroidBidi),
- REG_JNI(register_android_text_KeyCharacterMap),
- REG_JNI(register_android_os_Process),
- REG_JNI(register_android_os_Binder),
- REG_JNI(register_android_view_Display),
- REG_JNI(register_android_nio_utils),
- REG_JNI(register_android_graphics_PixelFormat),
- REG_JNI(register_android_graphics_Graphics),
- REG_JNI(register_android_view_Surface),
- REG_JNI(register_android_view_ViewRoot),
- REG_JNI(register_com_google_android_gles_jni_EGLImpl),
- REG_JNI(register_com_google_android_gles_jni_GLImpl),
- REG_JNI(register_android_opengl_jni_GLES10),
- REG_JNI(register_android_opengl_jni_GLES10Ext),
- REG_JNI(register_android_opengl_jni_GLES11),
- REG_JNI(register_android_opengl_jni_GLES11Ext),
- REG_JNI(register_android_opengl_jni_GLES20),
- ....
- };
调用Java类的入口函数
AndroidRuntime通过JNI方式调用Java类的入口main函数,从此开辟了Java世界。在这里通过传递不同的启动类,就可以实现通过app_process启动不同的进程,前面分析app_process的main函数时,已经知道对于zygote进程来说,传递的启动类为com.android.internal.os.ZygoteInit,而如果是启动其他进程则传递的是com.android.internal.os.RuntimeInit。
Zygote进程启动
从C++层调用Java层的ZygoteInit类的main函数,从此开辟了Java世界。
- public static void main(String argv[]) {
-
- try {
-
- VMRuntime.getRuntime().setMinimumHeapSize(5 * 1024 * 1024);
-
- SamplingProfilerIntegration.start();
-
- registerZygoteSocket();
- EventLog.writeEvent(LOG_BOOT_PROGRESS_PRELOAD_START, SystemClock.uptimeMillis());
-
- preloadClasses();
- preloadResources();
- EventLog.writeEvent(LOG_BOOT_PROGRESS_PRELOAD_END,SystemClock.uptimeMillis());
-
-
- SamplingProfilerIntegration.writeZygoteSnapshot();
-
-
- gc();
-
-
- if (argv.length != 2) {
- throw new RuntimeException(argv[0] + USAGE_STRING);
- }
- if (argv[1].equals("true")) {
-
- startSystemServer();
- } else if (!argv[1].equals("false")) {
- throw new RuntimeException(argv[0] + USAGE_STRING);
- }
- Log.i(TAG, "Accepting command socket connections");
-
- if (ZYGOTE_FORK_MODE) {
- runForkMode();
- } else {
- runSelectLoopMode();
- }
- closeServerSocket();
- } catch (MethodAndArgsCaller caller) {
-
- caller.run();
- } catch (RuntimeException ex) {
- Log.e(TAG, "Zygote died with exception", ex);
- closeServerSocket();
- throw ex;
- }
- }
在以上ZygoteInit类的main中完成以下五个工作:
① registerZygoteSocket() 为zygote进程注册监听socket
② preload() 加载常用的JAVA类和系统资源
③ startSystemServer() 启动SystemServer进程
④ runSelectLoopMode() 进入循环监听模式
⑤ closeServerSocket() 进程退出时,关闭socket监听
启动Socket服务端口
zygote 并没有采用binder通信机制,而是采用基于AF_UNIX类型的socket通信方式
- private static void registerZygoteSocket() {
- if (sServerSocket == null) {
- int fileDesc;
- try {
-
- String env = System.getenv(ANDROID_SOCKET_ENV);
- fileDesc = Integer.parseInt(env);
- } catch (RuntimeException ex) {
- throw new RuntimeException(ANDROID_SOCKET_ENV + " unset or invalid", ex);
- }
- try {
-
- sServerSocket = new LocalServerSocket(createFileDescriptor(fileDesc));
- } catch (IOException ex) {
- throw new RuntimeException("Error binding to local socket '" + fileDesc + "'", ex);
- }
- }
- }
函数首先调用System.getenv()获取系统为Zygote进程分配的Socket文件描述符,然后调用createFileDescriptor(fileDesc)创建一个真正的Socket文件描述符。Socket的使用方式有:
1. 阻塞方式:使用listen()监听某个端口,然后调用read()函数从这个端口读取数据,当Socket端口没有数据时,read()函数将一直等待,直到读取到数据才返回;
2. 非阻塞方式:使用Linux系统调用select()函数监测Socket文件描述符,当该文件描述符上有数据时,自动触发中断,在中断处理函数中去读取文件描述符上的数据,LocalServerSocket就是对非阻塞式Socket的封装;
预加载类和资源
- private static void preloadClasses() {
- final VMRuntime runtime = VMRuntime.getRuntime();
-
- InputStream is = ZygoteInit.class.getClassLoader().getResourceAsStream(PRELOADED_CLASSES);
- if (is == null) {
- Log.e(TAG, "Couldn't find " + PRELOADED_CLASSES + ".");
- } else {
- Log.i(TAG, "Preloading classes...");
- long startTime = SystemClock.uptimeMillis();
-
-
- setEffectiveGroup(UNPRIVILEGED_GID);
- setEffectiveUser(UNPRIVILEGED_UID);
-
-
- float defaultUtilization = runtime.getTargetHeapUtilization();
- runtime.setTargetHeapUtilization(0.8f);
-
-
- runtime.gcSoftReferences();
- runtime.runFinalizationSync();
- Debug.startAllocCounting();
- try {
- BufferedReader br= new BufferedReader(new InputStreamReader(is), 256);
-
- int count = 0;
- String line;
-
- while ((line = br.readLine()) != null) {
-
- line = line.trim();
- if (line.startsWith("#") || line.equals("")) {
- continue;
- }
- try {
- if (Config.LOGV) {
- Log.v(TAG, "Preloading " + line + "...");
- }
-
- Class.forName(line);
- if (Debug.getGlobalAllocSize() > PRELOAD_GC_THRESHOLD) {
- if (Config.LOGV) {
- Log.v(TAG," GC at " + Debug.getGlobalAllocSize());
- }
- runtime.gcSoftReferences();
- runtime.runFinalizationSync();
- Debug.resetGlobalAllocSize();
- }
- count++;
- } catch (ClassNotFoundException e) {
- Log.w(TAG, "Class not found for preloading: " + line);
- } catch (Throwable t) {
- Log.e(TAG, "Error preloading " + line + ".", t);
- if (t instanceof Error) {
- throw (Error) t;
- }
- if (t instanceof RuntimeException) {
- throw (RuntimeException) t;
- }
- throw new RuntimeException(t);
- }
- }
- Log.i(TAG, "...preloaded " + count + " classes in "
- + (SystemClock.uptimeMillis()-startTime) + "ms.");
- } catch (IOException e) {
- Log.e(TAG, "Error reading " + PRELOADED_CLASSES + ".", e);
- } finally {
-
- runtime.setTargetHeapUtilization(defaultUtilization);
- Debug.stopAllocCounting();
-
- setEffectiveUser(ROOT_UID);
- setEffectiveGroup(ROOT_GID);
- }
- }
- }
预装载的类列表保存在framework.jar中的名为preloaded-classes的文本文件中,该文件是通过framework/base/tools/prload/WritePreloadedClassFile.java类生成的,产生preloaded-classes文件的方法是在Android源码根目录执行以下命令:
- java -Xss512M -cp out/host/linux-x86/framework/preload.jar WritePreloadedClassFile frameworks/base/tools/preload/20100223.compiled
- 1517 classses were loaded by more than one app.
- Added 147 more to speed up applications.
- 1664 total classes will be preloaded.
- Writing object model...
- Done!
最后生成frameworks/base/preloaded-classes文本文件。preloadClasses函数就是读取preloaded-classes文件,该文件中的每一行代表一个具体的类,然后通过Class.forName()装载这些类,preloadClasses 执行时间比较长,也是导致android系统启动慢的原因。
加载共享资源
- private static void preloadResources() {
- final VMRuntime runtime = VMRuntime.getRuntime();
- Debug.startAllocCounting();
- try {
- if(LESS_GC) {
- System.gc();
- runtime.runFinalizationSync();
- }
- mResources = Resources.getSystem();
- mResources.startPreloading();
- if (PRELOAD_RESOURCES) {
- Log.i(TAG, "Preloading resources...");
-
- long startTime = SystemClock.uptimeMillis();
-
- TypedArray ar = mResources.obtainTypedArray(
- com.android.internal.R.array.preloaded_drawables);
-
- int N = preloadDrawables(runtime, ar);
- ar.recycle();
- Log.i(TAG, "...preloaded " + N + " resources in "
- + (SystemClock.uptimeMillis()-startTime) + "ms.");
- startTime = SystemClock.uptimeMillis();
-
- ar = mResources.obtainTypedArray(
- com.android.internal.R.array.preloaded_color_state_lists);
-
- N = preloadColorStateLists(runtime, ar);
- ar.recycle();
- Log.i(TAG, "...preloaded " + N + " resources in "
- + (SystemClock.uptimeMillis()-startTime) + "ms.");
- }
- mResources.finishPreloading();
- } catch (RuntimeException e) {
- Log.w(TAG, "Failure preloading resources", e);
- } finally {
- Debug.stopAllocCounting();
- }
- }
preload-resources实在frameworks/base/core/res/res/values/arrays.xml中定义的,包括drawable资源和color资源。函数调用preloadDrawables()来加载drawable资源,drawable资源定义:
- <array name="preloaded_drawables">
- <item>@drawable/toast_frame_holo</item>
- <item>@drawable/btn_check_on_pressed_holo_light</item>
- <item>@drawable/btn_check_on_holo_light</item>
- ....
- </array>
- private static int preloadDrawables(VMRuntime runtime, TypedArray ar) {
- int N = ar.length();
- for (int i=0; i<N; i++) {
- if (Debug.getGlobalAllocSize() > PRELOAD_GC_THRESHOLD) {
- if (false) {
- Log.v(TAG, " GC at " + Debug.getGlobalAllocSize());
- }
- if(LESS_GC) {
- System.gc();
- runtime.runFinalizationSync();
- Debug.resetGlobalAllocSize();
- }
- }
- int id = ar.getResourceId(i, 0);
- if (false) {
- Log.v(TAG, "Preloading resource #" + Integer.toHexString(id));
- }
- if (id != 0) {
-
- Drawable dr = mResources.getDrawable(id);
- if ((dr.getChangingConfigurations()&~ActivityInfo.CONFIG_FONT_SCALE) != 0) {
- Log.w(TAG, "Preloaded drawable resource #0x"
- + Integer.toHexString(id)
- + " (" + ar.getString(i) + ") that varies with configuration!!");
- }
- }
- }
- return N;
- }
接着调用preloadColorStateLists()来加载color资源。这些资源被保存到全局变量mResources中。
- <array name="preloaded_color_state_lists">
- <item>@color/primary_text_dark</item>
- <item>@color/primary_text_dark_disable_only</item>
- <item>@color/primary_text_dark_nodisable</item>
- ....
- </array>
- private static int preloadColorStateLists(VMRuntime runtime, TypedArray ar) {
- int N = ar.length();
- for (int i=0; i<N; i++) {
- if (Debug.getGlobalAllocSize() > PRELOAD_GC_THRESHOLD) {
- if (false) {
- Log.v(TAG, " GC at " + Debug.getGlobalAllocSize());
- }
- if(LESS_GC) {
- System.gc();
- runtime.runFinalizationSync();
- Debug.resetGlobalAllocSize();
- }
- }
- int id = ar.getResourceId(i, 0);
- if (false) {
- Log.v(TAG, "Preloading resource #" + Integer.toHexString(id));
- }
- if (id != 0) {
-
- mResources.getColorStateList(id);
- }
- }
- return N;
- }
启动SystemServer进程
- private static boolean startSystemServer()
- throws MethodAndArgsCaller, RuntimeException {
-
- String args[] = {
- "--setuid=1000",
- "--setgid=1000",
- "--setgroups=1001,1002,1003,1004,1005,1006,1007,1008,1009,1010,1018,3001,3002,3003",
- "--capabilities=130104352,130104352",
- "--runtime-init",
- "--nice-name=system_server",
- "com.android.server.SystemServer",
- };
- ZygoteConnection.Arguments parsedArgs = null;
- int pid;
- try {
- parsedArgs = new ZygoteConnection.Arguments(args);
-
-
-
-
-
- int debugFlags = parsedArgs.debugFlags;
- if ("1".equals(SystemProperties.get("ro.debuggable")))
- debugFlags |= Zygote.DEBUG_ENABLE_DEBUGGER;
-
-
- pid = Zygote.forkSystemServer(
- parsedArgs.uid, parsedArgs.gid,
- parsedArgs.gids, debugFlags, null,
- parsedArgs.permittedCapabilities,
- parsedArgs.effectiveCapabilities);
- } catch (IllegalArgumentException ex) {
- throw new RuntimeException(ex);
- }
-
- if (pid == 0) {
-
- handleSystemServerProcess(parsedArgs);
- }
- return true;
- }
Zygote进程通过Zygote.forkSystemServer函数来创建一个新的进程来启动SystemServer组件,返回值pid等0的地方就是新的进程要执行的路径,即新创建的进程会执行handleSystemServerProcess函数。
循环等待客户端的连接
- private static void runSelectLoopMode() throws MethodAndArgsCaller {
- ArrayList<FileDescriptor> fds = new ArrayList();
- ArrayList<ZygoteConnection> peers = new ArrayList();
- FileDescriptor[] fdArray = new FileDescriptor[4];
- fds.add(sServerSocket.getFileDescriptor());
- peers.add(null);
- int loopCount = GC_LOOP_COUNT;
- while (true) {
- int index;
-
-
-
-
-
-
-
-
-
- if (loopCount <= 0) {
- gc();
- loopCount = GC_LOOP_COUNT;
- } else {
- loopCount--;
- }
- try {
- fdArray = fds.toArray(fdArray);
-
-
- index = selectReadable(fdArray);
- } catch (IOException ex) {
- throw new RuntimeException("Error in select()", ex);
- }
- if (index < 0) {
- throw new RuntimeException("Error in select()");
- } else if (index == 0) {
-
- ZygoteConnection newPeer = acceptCommandPeer();
- peers.add(newPeer);
- fds.add(newPeer.getFileDesciptor());
- } else {
- boolean done;
-
- done = peers.get(index).runOnce();
-
- if (done) {
- peers.remove(index);
- fds.remove(index);
- }
- }
- }
- }
函数runSelectLoopMode()使Zygote进入非阻塞读取socket操作,函数selectReadable()用于监听服务端Socket文件描述是否有客户端的连接,该函数使用的是Linux多路I/O服务select系统调用:
- do {
- err = select (nfds, &fdset, NULL, NULL, NULL);
- } while (err < 0 && errno == EINTR);
当selectReadable返回-1时,表示内部错误;返回值为0时,表示没有可处理的连接;返回值大于0时,表示客户端连接的个数。
zygote总结:
1.创建AppRuntime对象,并调用它的start函数;
2.调用startVm创建Java虚拟机;
3.调用startReg函数来注册JNI函数;
4.调用ZygoteInit类的main函数,从此就进入了Java世界;
5.调用registerZygoteSocket 注册一个服务端socket;
6.调用preloadClasses 函数加载类资源;
7.调用preloadResources函数加载系统资源;
8.调用startSystemServer函数创建SystemServer进程;
9.调用runSelectLoopMode函数进入服务端socket监听;
Zygote孵化新进程
fork是Linux系统的系统调用,用于复制当前进程,产生一个新的进程。新进程被创建后,和父进程共享已经分配的内存空间,除了进程ID外,新进程拥有和父进程完全相同的进程信息,直到向内存写入数据时,操作系统才复制一份目标地址空间,并将要写的数据写入到新的地址空间中,这就是所谓的copy-on-write机制,这种机制最大限度地在多个进程中共享物理内存。fork函数的返回值大于0时,代表的是父进程,当等于0时,代表的是被复制的子进程,父子进程的区分就是通过fork的返回值来区分。当一个客户端进程请求Zygote孵化一个新的进程时,Zygote首先会得到该客户端的Socket连接,并将该连接封装为ZygoteConnection对象,并调用该对象的runOnce()函数来fork出一个新进程:done = peers.get(index).runOnce();
- boolean runOnce() throws ZygoteInit.MethodAndArgsCaller {
-
- String args[];
- Arguments parsedArgs = null;
- FileDescriptor[] descriptors;
- try {
- args = readArgumentList();
- descriptors = mSocket.getAncillaryFileDescriptors();
- } catch (IOException ex) {
- Log.w(TAG, "IOException on command socket " + ex.getMessage());
- closeSocket();
- return true;
- }
- if (args == null) {
-
- closeSocket();
- return true;
- }
-
- PrintStream newStderr = null;
-
- if (descriptors != null && descriptors.length >= 3) {
- newStderr = new PrintStream(
- new FileOutputStream(descriptors[2]));
- }
- int pid = -1;
- FileDescriptor childPipeFd = null;
- FileDescriptor serverPipeFd = null;
- try {
- parsedArgs = new Arguments(args);
- applyUidSecurityPolicy(parsedArgs, peer);
- applyRlimitSecurityPolicy(parsedArgs, peer);
- applyCapabilitiesSecurityPolicy(parsedArgs, peer);
- applyInvokeWithSecurityPolicy(parsedArgs, peer);
- applyDebuggerSystemProperty(parsedArgs);
- applyInvokeWithSystemProperty(parsedArgs);
- int[][] rlimits = null;
- if (parsedArgs.rlimits != null) {
- rlimits = parsedArgs.rlimits.toArray(intArray2d);
- }
- if (parsedArgs.runtimeInit && parsedArgs.invokeWith != null) {
- FileDescriptor[] pipeFds = Libcore.os.pipe();
- childPipeFd = pipeFds[1];
- serverPipeFd = pipeFds[0];
- ZygoteInit.setCloseOnExec(serverPipeFd, true);
- }
-
- pid = Zygote.forkAndSpecialize(parsedArgs.uid, parsedArgs.gid,
- parsedArgs.gids, parsedArgs.debugFlags, rlimits);
- } catch (IOException ex) {
- logAndPrintError(newStderr, "Exception creating pipe", ex);
- } catch (ErrnoException ex) {
- logAndPrintError(newStderr, "Exception creating pipe", ex);
- } catch (IllegalArgumentException ex) {
- logAndPrintError(newStderr, "Invalid zygote arguments", ex);
- } catch (ZygoteSecurityException ex) {
- logAndPrintError(newStderr,
- "Zygote security policy prevents request: ", ex);
- }
- try {
-
- if (pid == 0) {
-
- IoUtils.closeQuietly(serverPipeFd);
- serverPipeFd = null;
- handleChildProc(parsedArgs, descriptors, childPipeFd, newStderr);
-
-
- return true;
- } else {
-
- IoUtils.closeQuietly(childPipeFd);
- childPipeFd = null;
- return handleParentProc(pid, descriptors, serverPipeFd, parsedArgs);
- }
- } finally {
- IoUtils.closeQuietly(childPipeFd);
- IoUtils.closeQuietly(serverPipeFd);
- }
- }
forkAndSpecialize函数调用nativeForkAndSpecialize函数来创建一个新进程,nativeForkAndSpecialize是一个Native函数,该函数最终调用fork来复制一个进程。当Zygote复制出新进程时,由于复制出的新进程与Zygote进程共享内存空间,而在Zygote进程中创建的服务端Socket是新进程不需要的,因此新创建的进程需要关闭该Socket服务端,并调用为新进程指定的类文件的main入口函数。
普通进程启动
对应am工具,对应的脚本为:
- base=/system
- export CLASSPATH=$base/framework/am.jar
- exec app_process $base/bin com.android.commands.am.Am "$@"
Android将使用app_process启动的普通进程分工具进程和普通进程两种类型,通过传递命令行参数来设置,在启动虚拟机时,传递的参数不同:
- runtime.start("com.android.internal.os.RuntimeInit",application ? "application" : "tool");
对应工具进程,传递tool字符串,而对于普通进程则传递application字符串,同时进程启动的Java类为com.android.internal.os.RuntimeInit
- public static final void main(String[] argv) {
- if (argv.length == 2 && argv[1].equals("application")) {
- if (DEBUG) Slog.d(TAG, "RuntimeInit: Starting application");
- redirectLogStreams();
- } else {
- if (DEBUG) Slog.d(TAG, "RuntimeInit: Starting tool");
- }
- commonInit();
-
- nativeFinishInit();
- if (DEBUG) Slog.d(TAG, "Leaving RuntimeInit!");
- }
通过nativeFinishInit函数重新回到C++空间,并根据设置的启动Java类来更好入口函数
- static void com_android_internal_os_RuntimeInit_nativeFinishInit(JNIEnv* env, jobject clazz)
- {
- gCurRuntime->onStarted();
- }
- virtual void onStarted()
- {
- sp<ProcessState> proc = ProcessState::self();
- ALOGV("App process: starting thread pool.\n");
-
- proc->startThreadPool();
- AndroidRuntime* ar = AndroidRuntime::getRuntime();
-
- ar->callMain(mClassName, mClass, mArgC, mArgV);
- IPCThreadState::self()->stopProcess();
- }
Java启动类的查找过程在onVmCreated(JNIEnv* env)函数中完成。对于am工具,其入口类为com.android.commands.am.Am.java,该类的main函数如下:
- public static void main(String[] args) {
- try {
- (new Am()).run(args);
- } catch (IllegalArgumentException e) {
- showUsage();
- System.err.println("Error: " + e.getMessage());
- } catch (Exception e) {
- e.printStackTrace(System.err);
- System.exit(1);
- }
- }
至此就启动了一个am进程。


 611
611


 被折叠的 条评论
为什么被折叠?
被折叠的 条评论
为什么被折叠?
 到【灌水乐园】发言


