


OpenCL学习笔记——整体流程
OpenCL可以实现混合设备的并行计算,这些设备包括CPU,GPU,以及其他处理器,比如Cell处理器,DSP等。使用OpenCL编程,可以实现可以值得并行加速代码。
OpenCL架构
通常包括以下四部分:
• 平台模型 (Platform Model)
• 执行模型 (Execution Model)
• 内存模型 (Memory Model)
• 编程模型 (Programming Model)
不同厂商的 OpenCL 实施定义了不同的 OpenCL 平台,通过 OpenCL 平台,主机能够和 OpenCL 设备之间进行交互操作。现在主要的 OpenCL 平台有 AMD、Nvdia,intel 等。OpenCL 使用了一种Installable Client Driver 模型,这样不同厂商的平台就能够在系统中共存。
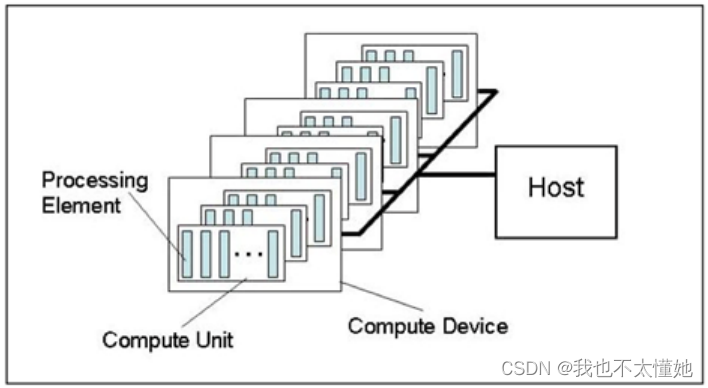
OpenCL 平台通常包括一个主机 (Host) 和多个 OpenCL 设备(device),每个 OpenCL 设备包括一个或多个CU(compute units),每个 CU 包括又一个或多个 PE(process element)。每个 PE 都有自己的程序计数器 (PC)。
环境配置
首先肯定是要先把自己电脑上面有关opencl的环境配置好
查看自己电脑的显卡:打开设备管理器->显示适配器,里面就是电脑拥有的的显卡,我的电脑里面是有Intel和NVIDIA的显卡的。

大家可以去网上下载一下“GPU-Z”这个软件,这个软件可以查看电脑的显卡对OpenCL的支持性,以及支持的版本,我的电脑的如下图可见,有√就是支持的(当你把鼠标移动到单词周围会有适配版本提示)。


接下来就可以根据自己的GPU型号,下载相应的显卡驱动了。
下载完相应SDK,在自己的Visual Studio中配置OpenCL环境就好了,其他博客这方面已经讲的很好了,大家自行搜一下,这里我就不重复了。
每次配环境,环境杀手是谁我不说,好在最终成功了,测试代码成功运行,输出平台信息。

执行流程
流程图如下

下面以两向量相加为例,进行OpenCL的设计
1、平台(Platform)
主机加上OpenCL框架管理下的若干设备构成了这个平台,通过这个平台,应用程序可以与设备共享资源并在设备上执行kernel。实际使用中基本上一个厂商对应一个Platform,比如Intel, AMD都是这样。
我们要查询平台寻找可用平台,我们用下面这个函数:
cl_int clGetPlatformIDs(cl_unit num_entries,
					cl_platform_id* platforms,
					cl_uint* num_platforms);
通常这个函数要调用2次,第一次用来查询可用的平台数,第二次选择自己需要的平台。
下面是创建平台、查询平台、选择平台的代码,注释很详细了。
//------------------- 获得并选择可用平台-----------------------------
	// 获得平台数量
	cl_int	iStatus = 0;		// 函数返回状态
	cl_uint	uiNumPlatforms = 0;		// 平台个数
	iStatus = clGetPlatformIDs(0, NULL,&uiNumPlatforms); // 查询可用的平台个数,并返回状态
	if (CL_SUCCESS != iStatus)
	{
		cout << "Error: Getting platforms error" << endl;
	}
	cout << "一共有平台:" << uiNumPlatforms << endl;

	// 获得平台地址
	if (uiNumPlatforms > 0)  // 如果有可用平台
	{
		// 根据平台数为平台分配内存空间
		cl_platform_id *pPlatforms = (cl_platform_id *)malloc(uiNumPlatforms * sizeof(cl_platform_id));
		iStatus = clGetPlatformIDs(uiNumPlatforms, pPlatforms, NULL);		// 获得可用的平台
		gpu.Platform = pPlatforms[0];										// 获得第一个平台的地址
		free(pPlatforms);													// 释放平台占用的内存空间
	}
2、设备(Device)
官方的解释是计算单元(Compute Units)的集合。举例来说,GPU是典型的device。Intel和AMD的多核CPU也提供OpenCL接口,所以也可以作为Device。
查询设备,我们用下面这个函数:
clGetDeviceIDs(cl_platform_id platform,
			cl_device_type device_type,
			cl_unit num_entries,
			cl_device_id* devices,
			cl_unit* num_devices);
这个函数通常也是调用2次,第一次查询设备数量,第二次检索得到我们想要的设备。下面代码是查询可用设备数以及选择第一个GPU设备,如果没有GPU设备那就创建CPU设备。
//--------------------------查询GPU设备,并选择可用设备------------------------------
	iStatus = clGetDeviceIDs(gpu.Platform, CL_DEVICE_TYPE_GPU, 0, NULL, &gpu.uiNumDevices);		// 获得GPU设备数量
	if (0 == gpu.uiNumDevices)			// 如果没有GPU设备
	{
		cout << "No GPU device available." << endl;
		cout << "Choose CPU as default device." << endl;
		iStatus = clGetDeviceIDs(gpu.Platform,CL_DEVICE_TYPE_CPU, 0,NULL, &gpu.uiNumDevices);  // 选择CPU作为设备,获得设备数
		gpu.pDevices = (cl_device_id *)malloc(gpu.uiNumDevices * sizeof(cl_device_id));			 // 为设备分配空间

		iStatus = clGetDeviceIDs(gpu.Platform,
								CL_DEVICE_TYPE_CPU,
								gpu.uiNumDevices,
								gpu.pDevices,NULL);  // 获得CPU平台
	}
	else
	{
		gpu.pDevices = (cl_device_id *)malloc(gpu.uiNumDevices * sizeof(cl_device_id));
		//选择GPU作为设备
		iStatus = clGetDeviceIDs(gpu.Platform,
								CL_DEVICE_TYPE_GPU,
								gpu.uiNumDevices,
								gpu.pDevices, NULL);
	}
3、上下文(Context)
OpenCL的Platform上共享和使用资源的环境,包括kernel、device、memory objects、command queue等。使用中一般一个Platform对应一个Context。
用下面这个函数进行上下文创建
cl_context clCreateContest(const cl_context_properties* properties,
							cl_uint num_devices,
							const cl_device_id* devices,
							void (CL_CALLBACK *pfn_notify)(const char* errinfo,const void* private_info,size_t cb,void* user_data),
							void* user_data,cl_int* errcode_ret);
下面为根据已有设备创建上下文的代码
// ---------------------创建设备环境---------------------------------
	cl_context_properties  contextProperties[] = { CL_CONTEXT_PLATFORM,(cl_context_properties)gpu.Platform,0 };
	gpu.Context = clCreateContext(contextProperties, 1, gpu.pDevices, NULL, NULL, NULL);
	// 创建设备环境
	if (NULL == gpu.Context)
	{
		cout << "Error: Can not create context" << endl;
	}
4、指令队列(Command Queue)
对于不同的设备,它们都有自己的独立的命令队列;命令队列中的命令 (kernel 函数)可能是同步的,也可能是异步的,它们的执行顺序可以是有序的,也可以是乱序的。命令队列就是主机的请求,在设备上执行的一种机制,他把Device和Context联系起来。
函数定义
cl_command_queue clCreateCommandQueue(cl_context context,
									cl_device_id device,
									cl_command_queue_properties properties,
									cl_int* errcode_ret);
我的使用
// -------------------创建命令队列--------------------------------------
	gpu.CommandQueue = clCreateCommandQueue(gpu.Context, gpu.pDevices[0], 0, NULL);	// 创建第1个设备的命令队列
	if (NULL == gpu.CommandQueue)
	{
		cout << "Error: Can not create CommandQueue" << endl;
	}
5、程序对象(Program)
OpenCL Program由kernel函数、其他函数和声明组成。它通过cl_program表示。当创建一个program时,你必须指定它是由哪些文件组成的,然后编译它。
创建函数、编译函数如下:
cl_program clCreateProgramWithSource(cl_context context,
									cl_uint count,
									const char** strings,
									const size_t* lengths,
									cl_int* errcode_ret);
cl_int clBuildProgram(cl_program program,
					cl_uint num_devices,
					const cl_device_id* device_list,
					const char* options,
					void (CL_CALLBACK *pfn_notify)(cl_program program,void* user_data),
					void* user_data);
我的实现:
// ----------------------创建程序对象------------------------------
	string		strSource = "";		// 用于存储cl文件中的代码
	const char	*pSource = NULL;		// 代码字符串指针
	size_t		uiArrSourceSize[] = { 0 };		// 代码字符串长度

	iStatus = ConvertToString(gpu.pFileName, strSource);// 将cl文件中的代码转为字符串
	pSource = strSource.c_str();		// 获得strSource指针
	uiArrSourceSize[0] = strlen(pSource);	// 字符串大小
	gpu.Program = clCreateProgramWithSource(gpu.Context, 1, &pSource, uiArrSourceSize, NULL);
	// 创建程序对象
	if (NULL == gpu.Program)
	{
		cout << "Error: Can not create program" << endl;
	}
	// ----------------------------编译程序--------------------------------
	iStatus = clBuildProgram(gpu.Program, 1, gpu.pDevices, NULL, NULL, NULL);	// 编译程序
	if (CL_SUCCESS != iStatus)	 // 编译错误
	{
		cout << "Error: Can not build program" << endl;
		char szBuildLog[16384];
		clGetProgramBuildInfo(gpu.Program, *gpu.pDevices, CL_PROGRAM_BUILD_LOG, sizeof(szBuildLog), szBuildLog, NULL);

		cout << "Error in Kernel: " << endl << szBuildLog;//输出报错信息
		clReleaseProgram(gpu.Program);
	}
6、内存对象(Buffer 、Image)
OpenCL 内存对象就是一些 OpenCL 数据,这些数据一般在设备内存中,能够被拷入也能够被拷出。OpenCL 内存对象包括 buffer 对象和 image 对象。
• Buffer 对象:连续的内存块 ----顺序存储,能够通过指针、行列式等直接访问。
• Image 对象:是 2 维或 3 维的内存对象,只能通过 read_image() 或 write_image() 来读取。image 对象可以是可读或可写的,但不能同时既可读又可写。
下面的函数会在指定的context上创建一个buffer对象,Buffer由上下文conetxt创建,这样上下文管理的多个设备就会共享Buffer中的数据。
cl_mem clCreateBuffer(cl_context context,
						cl_mem_flags flags,
						size_t size,
						void* host_ptr,
						cl_int* errcode_ret);
具体应用如下:
// 创建输入内存对象A
		cl_mem memInputBuffer = clCreateBuffer(
			gpu.Context,
			CL_MEM_READ_ONLY | CL_MEM_COPY_HOST_PTR, // 输入内存为只读,并可以从宿主机内存复制到设备内存
			sizeof(cl_float)*ARRAY_SIZE,		  // 输入内存空间大小
			(void*)arrInA,
			NULL);

		// 创建输入内存对象B
		cl_mem memmaskBuffer = clCreateBuffer(
			gpu.Context,
			CL_MEM_READ_ONLY | CL_MEM_COPY_HOST_PTR,  // 输入内存为只读,并可以从宿主机内存复制到设备内存
			sizeof(cl_float)*ARRAY_SIZE,			  // 输入内存空间大小
			(void*)arrInB,
			NULL);

		// 创建输出内存对象
		cl_mem memOutputBuffer = clCreateBuffer(
			gpu.Context,
			CL_MEM_WRITE_ONLY,							// 输出内存只能写
			sizeof(cl_float)*ARRAY_SIZE,					// 输出内存空间大小
			NULL,
			NULL);

		if ((NULL == memInputBuffer) || (NULL == memmaskBuffer) || (NULL == memOutputBuffer))
		{
			cout << "Error creating memory objects" << endl;
		}
7、核函数(Kernel)
可以从主机端调用,运行在设备端的函数。Kernel 对象通过程序对象以及指定的函数名字创建。注意:函数必须是程序源代码中存在的函数。
cl_kernel clCreateKernel(cl_program program,
					const char* kernel_name,
					cl_int* errcode_ret);
创建 Kernel 后,运行 Kernel 之前,我们还要为 Kernel 对象设置参数。我们可以在 Kernel 运行后,重新设置参数再次运行。
cl_int clSetKernelArg(cl_kernel kernel,
					cl_uint arg_index,
					size_t arg_size,
					const void* arg_value);
arg_index 指定该参数为 Kernel 函数中的第几个参数 (比如第一个参数为 0,第二个为 1,…)。内存对象和单个的值都可以作为 Kernel 参数。
以两个向量相加为例:
		//--------------------------创建内核对象-------------------------------------
		gpu.Kernel = clCreateKernel(gpu.Program,
			"Vecadd",  // cl文件中的入口函数
			NULL);
		if (NULL == gpu.Kernel)
		{
			cout << "Error: Can not create kernel" << endl;
		}
		//----------------------------设置内核参数----------------------------------
		cl_int	iStatus = 0;		// 函数返回状态
		iStatus = clSetKernelArg(gpu.Kernel,
								0,		// 参数索引
								sizeof(cl_mem),
								(void *)&memInputBuffer);

		iStatus = clSetKernelArg(gpu.Kernel,
								1,		// 参数索引
								sizeof(cl_mem),
								(void *)&memmaskBuffer);

		iStatus |= clSetKernelArg(gpu.Kernel,
								2,
								sizeof(cl_mem),
								(void *)&memOutputBuffer);

		if (CL_SUCCESS != iStatus)
		{
			cout << "Error setting kernel arguments" << endl;
		}
8、入队执行(NDRange)、读取结果
主机端运行设备端kernel函数的主要接口。实际上还有其他的,NDRange是非常常见的,用于分组运算。
首先要设置线程索引空间的维度以及workgroup大小等。通过函数clEnqueueNDRangeKernel把Kernel放在一个队列里,但不保证他马上执行,OpenCL driver 会管理队列,调度 Kernel 的执行。
cl_int clEnqueueNDRangeKernel(cl_command_queue command_queue,
								cl_kernel kernel,
								cl_uint work_dim,
								const size_t* global_work_offset,
								const size_t* global_work_size,
								const size_t* local_work_size,
								cl_uint num_events_in_wait_list,
								const cl_event* event_wait_list,
								cl_event* event);
该函数把要执行的 Kernel 函数放在指定的命令队列中,global_work_size大小(线程索引空间)必须指定,local_work_size大小可以指定,也可以为空。如果为空,则系统会自动根据硬件选择合适的大小。event_wait_list 用来选定一些 events,只有这些 events 执行完后,该 kernel 才可能被执行,也就是通过事件机制来实现不同 kernel 函数之间的同步。
当 Kernel 函数执行完毕后,我们要把数据从 device memory 中拷贝到 host memory 中去。可以用下面这个函数
cl_int clEnqueueReadBuffer(cl_command_queue command_queue,
							cl_mem buffer,
							cl_bool blocking_read,
							size_t offset,
							size_t cb,
							void* ptr,
							cl_uint num_events_in_wait_list,
							const cl_event* event_wait_list,
							cl_event* event);
具体实现:
	// --------------------------运行内核---------------------------------
		const size_t global_Work_Size[1] = {ARRAY_SIZE};
		const size_t local_Work_Size[1] = { 1 };
		// 利用命令队列使将再设备上执行的内核排队
		iStatus = clEnqueueNDRangeKernel(
			gpu.CommandQueue,
			gpu.Kernel,
			1,
			NULL,
			global_Work_Size,  // 确定内核在设备上的多个处理单元间的分布
			local_Work_Size,				 // 确定内核在设备上的多个处理单元间的分布
			0,
			NULL,
			NULL);

		if (CL_SUCCESS != iStatus)
		{
			cout << "Error: Can not run kernel" << endl;
		}
		// -------------------将输出读取到主机内存-----------------------
		iStatus = clEnqueueReadBuffer(
			gpu.CommandQueue,		// 命令队列
			memOutputBuffer,	// 输出内存对象
			CL_TRUE,			// 内核读取结束之前该函数不会返回
			0,
			ARRAY_SIZE * sizeof(int),
			arrOut,
			0,
			NULL,
			NULL);

		if (CL_SUCCESS != iStatus)
		{
			cout << "Error: Can not reading result buffer" << endl;
		}
9、释放资源
大多数的 OpenCL 资源都是指针,不使用的时候需要释放掉。当然,程序关闭的时候这些对象也会被自动释放掉。
释放资源的函数是:clRelase{Resource} ,比如: clReleaseProgram(), clReleaseMemObject() 等。
// -----------------------释放资源--------------------------------
		iStatus = clReleaseKernel(gpu.Kernel);
		iStatus = clReleaseProgram(gpu.Program);
		iStatus = clReleaseMemObject(memInputBuffer);
		iStatus = clReleaseMemObject(memOutputBuffer);
		iStatus = clReleaseMemObject(memOutputBuffer);
		iStatus = clReleaseCommandQueue(gpu.CommandQueue);
		iStatus = clReleaseContext(gpu.Context);


		if (NULL != gpu.pDevices)
		{
			free(gpu.pDevices);
			gpu.pDevices = NULL;
		}
程序实例,向量相加
add.cl
__kernel void Vecadd(__global const float *a,
					__global const float *b,
					__global float *c)
{
	int id=get_global_id(0);
	c[id]=a[id]+b[id];
}
这里在头文件里定义了一个结构体,这样用起来清晰一点
test.h
#pragma once
#include "CL/cl.h"
#include<string>
#include<opencv2/opencv.hpp>
#include<math.h>

using namespace std;
using namespace cv;

#define ARRAY_SIZE  10

struct GPUInfo
{
	cl_platform_id	Platform = NULL;		// 选择的平台
	char			*pName = NULL;		// 平台版本名
	cl_uint			uiNumDevices = 0;		// 设备数量
	cl_device_id	*pDevices = NULL;		// 设备
	cl_context		Context = NULL;		// 设备环境
	cl_command_queue CommandQueue = NULL;		// 命令队列
	const char		*pFileName = "add.cl";	// cl文件名
	cl_program		Program = NULL;		// 程序对象

	cl_kernel		Kernel = NULL;		// 内核对象
	size_t			uiGlobal_Work_Size[1] = { 0 };	// 用于设定内核分布
};

//将文件内容转换成字符串
cl_int ConvertToString(const char *pFileName, std::string &Str);
//GPU 前期初始化
void gpuinfo(GPUInfo &gpu);
//向量相加
void vecadd(GPUInfo &gpu);
learn.cpp
// OpenCl-1.cpp : Defines the entry point for the console application.
//
#include<math.h>
#include <CL/cl.h>
#include <iostream>
#include <fstream>
#include "test.h"
#include<opencv2/opencv.hpp>
#include<opencv.hpp>

using namespace std;
using namespace cv;
#pragma warning( disable : 4996 )
#define ARRAY_SIZE  10

cl_int ConvertToString(const char *pFileName, std::string &Str)
{
	size_t		uiSize = 0;
	size_t		uiFileSize = 0;
	char		*pStr = NULL;
	std::fstream fFile(pFileName, (std::fstream::in | std::fstream::binary));

	if (fFile.is_open())
	{
		fFile.seekg(0, std::fstream::end);
		uiSize = uiFileSize = (size_t)fFile.tellg();  // 获得文件大小
		fFile.seekg(0, std::fstream::beg);
		pStr = new char[uiSize + 1];

		if (NULL == pStr)
		{
			fFile.close();
			return 0;
		}

		fFile.read(pStr, uiFileSize);				// 读取uiFileSize字节
		fFile.close();
		pStr[uiSize] = '\0';
		Str = pStr;

		delete[] pStr;

		return 0;
	}

	cout << "Error: Failed to open cl file\n:" << pFileName << endl;
	return -1;
}

void gpuinfo(GPUInfo &gpu)
{
	//-------------------1. 获得并选择可用平台-----------------------------
	// 获得平台数量
	cl_int			iStatus = 0;		// 函数返回状态
	cl_uint			uiNumPlatforms = 0;		// 平台个数
	iStatus = clGetPlatformIDs(0, NULL,&uiNumPlatforms); // 查询可用的平台个数,并返回状态
	cout << "一共有平台:" << uiNumPlatforms << endl;
	if (CL_SUCCESS != iStatus)
	{
		cout << "Error: Getting platforms error" << endl;
	}

	// 获得平台地址
	if (uiNumPlatforms > 0)  // 如果有可用平台
	{
		// 根据平台数为平台分配内存空间
		cl_platform_id *pPlatforms = (cl_platform_id *)malloc(uiNumPlatforms * sizeof(cl_platform_id));
		iStatus = clGetPlatformIDs(uiNumPlatforms, pPlatforms, NULL);		// 获得可用的平台

	//---------------------输出所有平台信息------------------------------
	//for (int i = 0; i < uiNumPlatforms; i++)
	//{
	//	iErr = clGetPlatformInfo(pPlatforms[i], CL_PLATFORM_VERSION, 0, NULL, &uiSize);			// 获得平台版本名的字节数
	//	pName = (char *)alloca(uiSize * sizeof(char));										// 根据字节数为平台版本名分配内存空间
	//	iErr = clGetPlatformInfo(pPlatforms[i], CL_PLATFORM_VERSION, uiSize, pName, NULL);		// 获得平台版本名字
	//	cout << pName << endl;

	//}

	//--------------------------------------------------------------------

		gpu.Platform = pPlatforms[0];											// 获得第一个平台的地址
		free(pPlatforms);													// 释放平台占用的内存空间
	}

	// 获得平台版本名
	cl_int			iErr = 0;		// 返回参数
	size_t			uiSize = 0;		// 平台版本名字字节数
	iErr = clGetPlatformInfo(gpu.Platform, CL_PLATFORM_VERSION, 0, NULL, &uiSize);			// 获得平台版本名的字节数
	gpu.pName = (char *)alloca(uiSize * sizeof(char));										// 根据字节数为平台版本名分配内存空间
	iErr = clGetPlatformInfo(gpu.Platform, CL_PLATFORM_VERSION, uiSize, gpu.pName, NULL);		// 获得平台版本名字
	cout << "所选平台OpenCL版本:" << gpu.pName << endl;

	//--------------2. 查询GPU设备,并选择可用设备------------------------
	iStatus = clGetDeviceIDs(gpu.Platform, CL_DEVICE_TYPE_GPU, 0, NULL, &gpu.uiNumDevices);		// 获得GPU设备数量
	if (0 == gpu.uiNumDevices)			// 如果没有GPU设备
	{
		cout << "No GPU device available." << endl;
		cout << "Choose CPU as default device." << endl;
		iStatus = clGetDeviceIDs(gpu.Platform, CL_DEVICE_TYPE_CPU, 0, NULL, &gpu.uiNumDevices);  // 选择CPU作为设备,获得设备数
		gpu.pDevices = (cl_device_id *)malloc(gpu.uiNumDevices * sizeof(cl_device_id));			 // 为设备分配空间

		iStatus = clGetDeviceIDs(gpu.Platform, CL_DEVICE_TYPE_CPU, gpu.uiNumDevices, gpu.pDevices, NULL);  // 获得平台
	}
	else
	{
		gpu.pDevices = (cl_device_id *)malloc(gpu.uiNumDevices * sizeof(cl_device_id));
		//选择GPU作为设备
		iStatus = clGetDeviceIDs(gpu.Platform, CL_DEVICE_TYPE_GPU, gpu.uiNumDevices, gpu.pDevices, NULL);
	}

	// -------------------3.创建设备环境---------------------------------
	cl_context_properties  contextProperties[] = { CL_CONTEXT_PLATFORM,(cl_context_properties)gpu.Platform,0 };
	gpu.Context = clCreateContext(contextProperties, 1, gpu.pDevices, NULL, NULL, NULL);	// 创建设备环境
	if (NULL == gpu.Context)
	{
		cout << "Error: Can not create context" << endl;
	}

	// -------------------4.创建命令队列--------------------------------------
	gpu.CommandQueue = clCreateCommandQueue(gpu.Context, gpu.pDevices[0], 0, NULL);	// 创建第1个设备的命令队列
	if (NULL == gpu.CommandQueue)
	{
		cout << "Error: Can not create CommandQueue" << endl;
	}


	// ----------------------5. 创建程序对象------------------------------
	string			strSource = "";		// 用于存储cl文件中的代码
	const char		*pSource = NULL;		// 代码字符串指针
	size_t			uiArrSourceSize[] = { 0 };		// 代码字符串长度

	iStatus = ConvertToString(gpu.pFileName, strSource);// 将cl文件中的代码转为字符串
	pSource = strSource.c_str();		// 获得strSource指针
	uiArrSourceSize[0] = strlen(pSource);	// 字符串大小
	gpu.Program = clCreateProgramWithSource(gpu.Context, 1, &pSource, uiArrSourceSize, NULL);	// 创建程序对象
	if (NULL == gpu.Program)
	{
		cout << "Error: Can not create program" << endl;
	}

	// -----------------------------6. 编译程序--------------------------------
	iStatus = clBuildProgram(gpu.Program, 1, gpu.pDevices, NULL, NULL, NULL);	// 编译程序
	if (CL_SUCCESS != iStatus)	 // 编译错误
	{
		cout << "Error: Can not build program" << endl;
		char szBuildLog[16384];
		clGetProgramBuildInfo(gpu.Program, *gpu.pDevices, CL_PROGRAM_BUILD_LOG, sizeof(szBuildLog), szBuildLog, NULL);

		cout << "Error in Kernel: " << endl << szBuildLog;
		clReleaseProgram(gpu.Program);

	}
}

	void vecadd(GPUInfo &gpu)
	{
		//-------------------------7. 并创建输入输出内核内存对象--------------------------------
		// 设置数组数据

		int				arrInA[ARRAY_SIZE];			// 输入数组A
		int				arrInB[ARRAY_SIZE];			// 输入数组B
		int				arrOut[ARRAY_SIZE];			// 输出数组

		for (int i = 0; i < ARRAY_SIZE; i++)
		{
			arrInA[i] = i;
			arrInB[i] = 2 * i;
		}

		// 创建输入内存对象A
		cl_mem memInputBuffer = clCreateBuffer(
			gpu.Context,
			CL_MEM_READ_ONLY | CL_MEM_COPY_HOST_PTR,  // 输入内存为只读,并可以从宿主机内存复制到设备内存
			sizeof(cl_float)*ARRAY_SIZE,		  // 输入内存空间大小
			(void*)arrInA,
			NULL);

		// 创建输入内存对象B
		cl_mem memmaskBuffer = clCreateBuffer(
			gpu.Context,
			CL_MEM_READ_ONLY | CL_MEM_COPY_HOST_PTR,  // 输入内存为只读,并可以从宿主机内存复制到设备内存
			sizeof(cl_float)*ARRAY_SIZE,			  // 输入内存空间大小
			(void*)arrInB,
			NULL);

		// 创建输出内存对象
		cl_mem memOutputBuffer = clCreateBuffer(
			gpu.Context,
			CL_MEM_WRITE_ONLY,							// 输出内存只能写
			sizeof(cl_float)*ARRAY_SIZE,					// 输出内存空间大小
			NULL,
			NULL);

		if ((NULL == memInputBuffer) || (NULL == memmaskBuffer) || (NULL == memOutputBuffer))
		{
			cout << "Error creating memory objects" << endl;
		}

		//--------------------------8. 创建内核对象-------------------------------------
		gpu.Kernel = clCreateKernel(gpu.Program,
			"Vecadd",  // cl文件中的入口函数
			NULL);
		if (NULL == gpu.Kernel)
		{
			cout << "Error: Can not create kernel" << endl;
		}

		//----------------------------9. 设置内核参数----------------------------------
		cl_int			iStatus = 0;		// 函数返回状态
		iStatus = clSetKernelArg(gpu.Kernel,
								0,		// 参数索引
								sizeof(cl_mem),
								(void *)&memInputBuffer);

		iStatus = clSetKernelArg(gpu.Kernel,
								1,		// 参数索引
								sizeof(cl_mem),
								(void *)&memmaskBuffer);

		iStatus |= clSetKernelArg(gpu.Kernel,
								2,
								sizeof(cl_mem),
								(void *)&memOutputBuffer);


		if (CL_SUCCESS != iStatus)
		{
			cout << "Error setting kernel arguments" << endl;
		}

		// --------------------------10.运行内核---------------------------------
		const size_t global_Work_Size[1] = {ARRAY_SIZE};			// 输入数组大小
		const size_t local_Work_Size[1] = { 1 };
		// 利用命令队列使将再设备上执行的内核排队
		iStatus = clEnqueueNDRangeKernel(
			gpu.CommandQueue,
			gpu.Kernel,
			1,
			NULL,
			global_Work_Size,  // 确定内核在设备上的多个处理单元间的分布
			local_Work_Size,				 // 确定内核在设备上的多个处理单元间的分布
			0,
			NULL,
			NULL);


		if (CL_SUCCESS != iStatus)
		{
			cout << "Error: Can not run kernel" << endl;
		}

		// -------------------11. 将输出读取到主机内存-----------------------

		iStatus = clEnqueueReadBuffer(
			gpu.CommandQueue,		// 命令队列
			memOutputBuffer,	// 输出内存对象
			CL_TRUE,			// 内核读取结束之前该函数不会返回
			0,
			ARRAY_SIZE * sizeof(int),
			arrOut,
			0,
			NULL,
			NULL);

		if (CL_SUCCESS != iStatus)
		{
			cout << "Error: Can not reading result buffer" << endl;

		}

		// ---------------------12--输出计算结果---------------
		cout << "ArrayC = ArrayA + ArrAyB" << endl;
		for (int i = 0; i < ARRAY_SIZE; i++)
		{
		cout << arrOut[i] << " = " << arrInA[i] << "  +  " << arrInB[i] << endl;
		}

		// -----------------------13. 释放资源--------------------------------
		iStatus = clReleaseKernel(gpu.Kernel);
		iStatus = clReleaseProgram(gpu.Program);
		iStatus = clReleaseMemObject(memInputBuffer);
		iStatus = clReleaseMemObject(memOutputBuffer);
		iStatus = clReleaseMemObject(memOutputBuffer);
		iStatus = clReleaseCommandQueue(gpu.CommandQueue);
		iStatus = clReleaseContext(gpu.Context);

		if (NULL != gpu.pDevices)
		{
			free(gpu.pDevices);
			gpu.pDevices = NULL;
		}
	}
main.cpp
#include <CL/cl.h>
#include <iostream>
#include <fstream>
#include "test.h"
#include<opencv2/opencv.hpp>
#include<math.h>


using namespace std;
using namespace cv;
#pragma warning( disable : 4996 )

int main(int argc, char* argv[])
{
	GPUInfo gpu1;
	gpuinfo(gpu1);
	vecadd(gpu1);
}
定义了一维数组的大小为10,运行结果如下


 3971
3971


 被折叠的 条评论
为什么被折叠?
被折叠的 条评论
为什么被折叠?
 到【灌水乐园】发言


