


前一篇博客介绍了Windows下tensorflow和faster rcnn的安装和demo的运行,这篇介绍如何训练自己的模型和数据。
本以为demo跑通后离成功只剩一步之遥,没想到只成功了一半。
这篇博客主要参考这位大佬和这位大佬的帖子,真的非常厉害。
训练自己的数据集
以一个只检测一类的数据集为例,我这里是已有标注的汽车测试集,类别名称为“car”,图片格式为bmp。
我们仍然采用VOC2007数据集的类。皮不变,只是把我们自己的数据集“塞进去”:
---VOC2007
    ------Annotations
    ------ImagesSet
         ---------Main
    ------JPEGImages
真正“起作用”的训练集其实是这四个文件夹,位置是:
faster-rcnn.pytorch/data/VOCdevkit/VOC2007/
第一步:了解文件夹内容
- JPEGImages文件夹
文件夹里包含了训练图片和测试图片,混放在一起。
- Annatations文件夹
文件夹存放的是xml格式的标签文件,每个xml文件都对应于JPEGImages文件夹的一张图片。
- ImageSets文件夹
Action存放的是人的动作,我们暂时不用
Layout存放的人体部位的数据。我们暂时不用
Main存放的是图像物体识别的数据,分为20类,当然我们自己制作就不一定了,Main里面有test.txt , train.txt, val.txt ,trainval.txt.这四个文件我们后面会生成
Segmentation存放的是可用于分割的数据
- 其他的文件夹不解释了,分割XXX等用的
如果下载了VOC2007数据集,那么把它解压,把各个文件夹里面的东西删除,保留文件夹名字。如果没下载,那么就仿照他的文件夹格式,自己建好空文件夹就行。
第二步:制作文件夹
- JPEGSImages文件夹
将自己的图片放到JPEGSImages里面,在VOC2007里面,人家的图片文件名都是000001.jpg类似这样的,我们也统一格式,把我们的图片名字重命名成这样的。
重命名图片名称的代码,路径和自己的图片格式注意修改:
#!/usr/bin/env python2
# -*- coding: utf-8 -*-
import os

class BatchRename():
    '''
    批量重命名文件夹中的图片文件
    '''
    def __init__(self):
        self.path = '/home/ubun/labelImg-master/data/input'

    def rename(self):
        filelist = os.listdir(self.path)
        total_num = len(filelist)
        i = 1
        for item in filelist:
            if item.endswith('.bmp'):
                src = os.path.join(os.path.abspath(self.path), item)
                if len(str(i))==1:
                    dst = os.path.join(os.path.abspath(self.path), '00000'+str(i) + '.bmp')
                elif len(str(i))==2:
                    dst = os.path.join(os.path.abspath(self.path), '0000'+str(i) + '.bmp')
                else:
                    dst = os.path.join(os.path.abspath(self.path), '000'+str(i) + '.bmp')
                try:
                    os.rename(src, dst)
                    print 'converting %s to %s ...' % (src, dst)
                    i = i + 1
                except:
                    continue
        print 'total %d to rename & converted %d jpgs' % (total_num, i)

if __name__ == '__main__':
    demo = BatchRename()
    demo.rename()
如果文件太多,请看大佬的另一篇文章能批量重命名文件。
另外如果需要把所有图片都改成一样大小,请参考这位大佬的帖子,代码如下:
#coding=utf-8
import os  #打开文件时需要
from PIL import Image
import re

Start_path='C:\\Users\\zcy\\Desktop\\transform\\' #你的图片目录
iphone5_width=333 #图片最大宽度
iphone5_depth=500 #图片最大高度

list=os.listdir(Start_path)
#print list
count=0
for pic in list:
    path=Start_path+pic
    print path
    im=Image.open(path)
    w,h=im.size
    #print w,h
    #iphone 5的分辨率为1136*640,如果图片分辨率超过这个值,进行图片的等比例压缩

    if w>iphone5_width:
        print pic
        print "图片名称为"+pic+"图片被修改"
        h_new=iphone5_width*h/w
        w_new=iphone5_width
        count=count+1
        out = im.resize((w_new,h_new),Image.ANTIALIAS)
        new_pic=re.sub(pic[:-4],pic[:-4]+'_new',pic)
        #print new_pic
        new_path=Start_path+new_pic
        out.save(new_path)

    if h>iphone5_depth:
        print pic
        print "图片名称为"+pic+"图片被修改"
        w=iphone5_depth*w/h
        h=iphone5_depth
        count=count+1
        out = im.resize((w_new,h_new),Image.ANTIALIAS)
        new_pic=re.sub(pic[:-4],pic[:-4]+'_new',pic)
        #print new_pic
        new_path=Start_path+new_pic
        out.save(new_path)

print 'END'
count=str(count)
print "共有"+count+"张图片尺寸被修改"
由于我的数据集是现成的,命名和图片大小都一致,此处不再展示。
- Annatations文件夹
可以采用labelImg工具制作数据集,也可以根据自己的需要修改xml文件中的内容。xml文件可以用记事本打开。
其中一个xml文件详解:
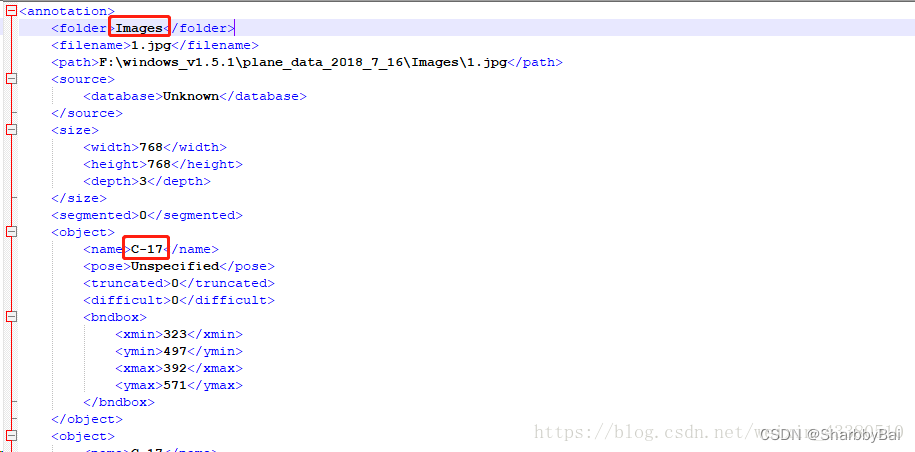
图中画圈的属性,需修改与VOC一样,folder应修改为"VOC2007",类别的name属性,也可修改为你想识别的类别,在此我将所有目标的name都改为"car",修改代码见这位大佬提供的github代码,链接如下:
https://github.com/XinZhangNLPR/Xml-document-modify.git
在所有xml文件修改后,将它们放入Annotations文件夹中。
- 生成ImageSets文件夹中的子文件夹Main中的txt文档:test.txt , train.txt, val.txt ,trainval.txt。一共四个。
路径和文件名称需要注意修改:
#!/usr/bin/env python2
# -*- coding: utf-8 -*-
"""
Created on Sat Jun 15 11:05:26 2019
@author: ubun
"""

import os
import random

trainval_percent = 0.66
train_percent = 0.5
xmlfilepath = '/home/ubun/py-faster-rcnn-master/VOCdevkit/VOC2007/Annotations'
txtsavepath = '/home/ubun/py-faster-rcnn-master/VOCdevkit/VOC2007/ImageSets/ImageSets/Main'
total_xml = os.listdir(xmlfilepath)

num=len(total_xml)
list=range(num)
tv=int(num*trainval_percent)
tr=int(tv*train_percent)
trainval= random.sample(list,tv)
train=random.sample(trainval,tr)

ftrainval = open('/home/ubun/py-faster-rcnn-master/VOCdevkit/VOC2007/ImageSets/Main/trainval.txt', 'w')
ftest = open('/home/ubun/py-faster-rcnn-master/VOCdevkit/VOC2007/ImageSets/Main/test.txt', 'w')
ftrain = open('/home/ubun/py-faster-rcnn-master/VOCdevkit/VOC2007/ImageSets/Main/train.txt', 'w')
fval = open('/home/ubun/py-faster-rcnn-master/VOCdevkit/VOC2007/ImageSets/Main/val.txt', 'w')

for i  in list:
    name=total_xml[i][:-4]+'\n'
    if i in trainval:
        ftrainval.write(name)
        if i in train:
            ftrain.write(name)
        else:
            fval.write(name)
    else:
        ftest.write(name)

ftrainval.close()
ftrain.close()
fval.close()
ftest .close()
第三步:修改相关配置文件:
(1)修改py-faster-rcnn/lib/datasets/pascal_voc.py
self._classes = ('__background__', # always index 0
                         '你的标签1','你的标签2',你的标签3','你的标签4')
注:如果只是在原始检测的20种类别:'aeroplane', 'bicycle', 'bird', 'boat','bottle', 'bus', 'car', 'cat', 'chair',
'cow', 'diningtable', 'dog', 'horse','motorbike', 'person', 'pottedplant',
'sheep', 'sofa', 'train', 'tvmonitor'中检测单一类别,可参考修改下面的代码:
def _load_image_set_index(self):
        """
        Load the indexes listed in this dataset's image set file.
        """
        # Example path to image set file:
        # self._devkit_path + /VOCdevkit2007/VOC2007/ImageSets/Main/val.txt
        image_set_file = os.path.join(self._data_path, 'ImageSets', 'Main',
                                      self._image_set + '.txt')
        assert os.path.exists(image_set_file), \
                'Path does not exist: {}'.format(image_set_file)
        with open(image_set_file) as f:
            image_index = [x.strip() for x in f.readlines()]
注:如果需要在原始的20类别只检测车辆的话才需要修改这部分代码.
        # only load index with cars obj
        new_image_index = []
        for index in image_index:
            filename = os.path.join(self._data_path, 'Annotations', index + '.xml')
            tree = ET.parse(filename)
            objs = tree.findall('object')
            num_objs = 0
            for ix, obj in enumerate(objs):
                curr_name = obj.find('name').text.lower().strip()
                if curr_name == 'car':
                    num_objs += 1
                    break
            if num_objs > 0:
                new_image_index.append(index)
        return new_image_index
def _load_pascal_annotation(self, index):
        """
        Load image and bounding boxes info from XML file in the PASCAL VOC
        format.
        """
        filename = os.path.join(self._data_path, 'Annotations', index + '.xml')
        tree = ET.parse(filename)
        objs = tree.findall('object')
        if not self.config['use_diff']:
            # Exclude the samples labeled as difficult
            non_diff_objs = [
                obj for obj in objs if int(obj.find('difficult').text) == 0]
            # if len(non_diff_objs) != len(objs):
            #     print 'Removed {} difficult objects'.format(
            #         len(objs) - len(non_diff_objs))
            objs = non_diff_objs
注:如果需要在原始的20类别只检测车辆的话才需要修改这部分代码.
        # change num objs , only read car
        # num_objs = len(objs)
        num_objs = 0
        for ix, obj in enumerate(objs):
            curr_name = obj.find('name').text.lower().strip()
            if curr_name == 'car':
                num_objs += 1
        boxes = np.zeros((num_objs, 4), dtype=np.uint16)
        gt_classes = np.zeros((num_objs), dtype=np.int32)
        overlaps = np.zeros((num_objs, self.num_classes), dtype=np.float32)
        # "Seg" area for pascal is just the box area
        seg_areas = np.zeros((num_objs), dtype=np.float32)
#注:如果需要在原始的20类别只检测车辆的话才需要修改这部分代码
# Load object bounding boxes into a data    frame.
        tmp_ix = 0
        for ix, obj in enumerate(objs):
            bbox = obj.find('bndbox')
            # Make pixel indexes 0-based
            x1 = float(bbox.find('xmin').text) - 1
            y1 = float(bbox.find('ymin').text) - 1
            x2 = float(bbox.find('xmax').text) - 1
            y2 = float(bbox.find('ymax').text) - 1
            curr_name = obj.find('name').text.lower().strip()
            if curr_name != 'car':
                continue
            cls = self._class_to_ind[curr_name]
            boxes[tmp_ix, :] = [x1, y1, x2, y2]
            gt_classes[tmp_ix] = cls
            overlaps[tmp_ix, cls] = 1.0
            seg_areas[tmp_ix] = (x2 - x1 + 1) * (y2 - y1 + 1)
            tmp_ix += 1
        overlaps = scipy.sparse.csr_matrix(overlaps)
        return {'boxes' : boxes,
                'gt_classes': gt_classes,
                'gt_overlaps' : overlaps,
                'flipped' : False,
                'seg_areas' : seg_areas}
这个文件里存着VOC数据库的class,需要更改我们识别的类别,我的做法是把原class注释掉,把自己的class加进去,这里的类名和前面xml文件中,目标的name属性应该是一样的。
注意:background这个类别需要保留。
(2)修改faster-rcnn.pytorch/demo.py
跟更改pascal_voc,py方法类似,更改自己训练集的类别。
(3)修改检测图片类别
voc2007相关配置文件默认图片格式为jpg形式,如果寻要训练的图片不是此格式,则修改~/lib/datasets/pascal_voc.py文件:
self._image_ext = '.jpg'
(4)删除缓存文件(每次修改配置文件后训练都要做)
删除py-faster-rcnn文件夹下所有的.pyc文件及data文件夹下的cache文件夹,data/VOCdekit2007下的annotations_cache文件夹(最近一次成功训练的annotation和当前annotation一样的话这部分可以不删,否则可以正常训练,但是最后评价模型会出错)
第四步:开始训练与检测
- 开始训练
python train.py
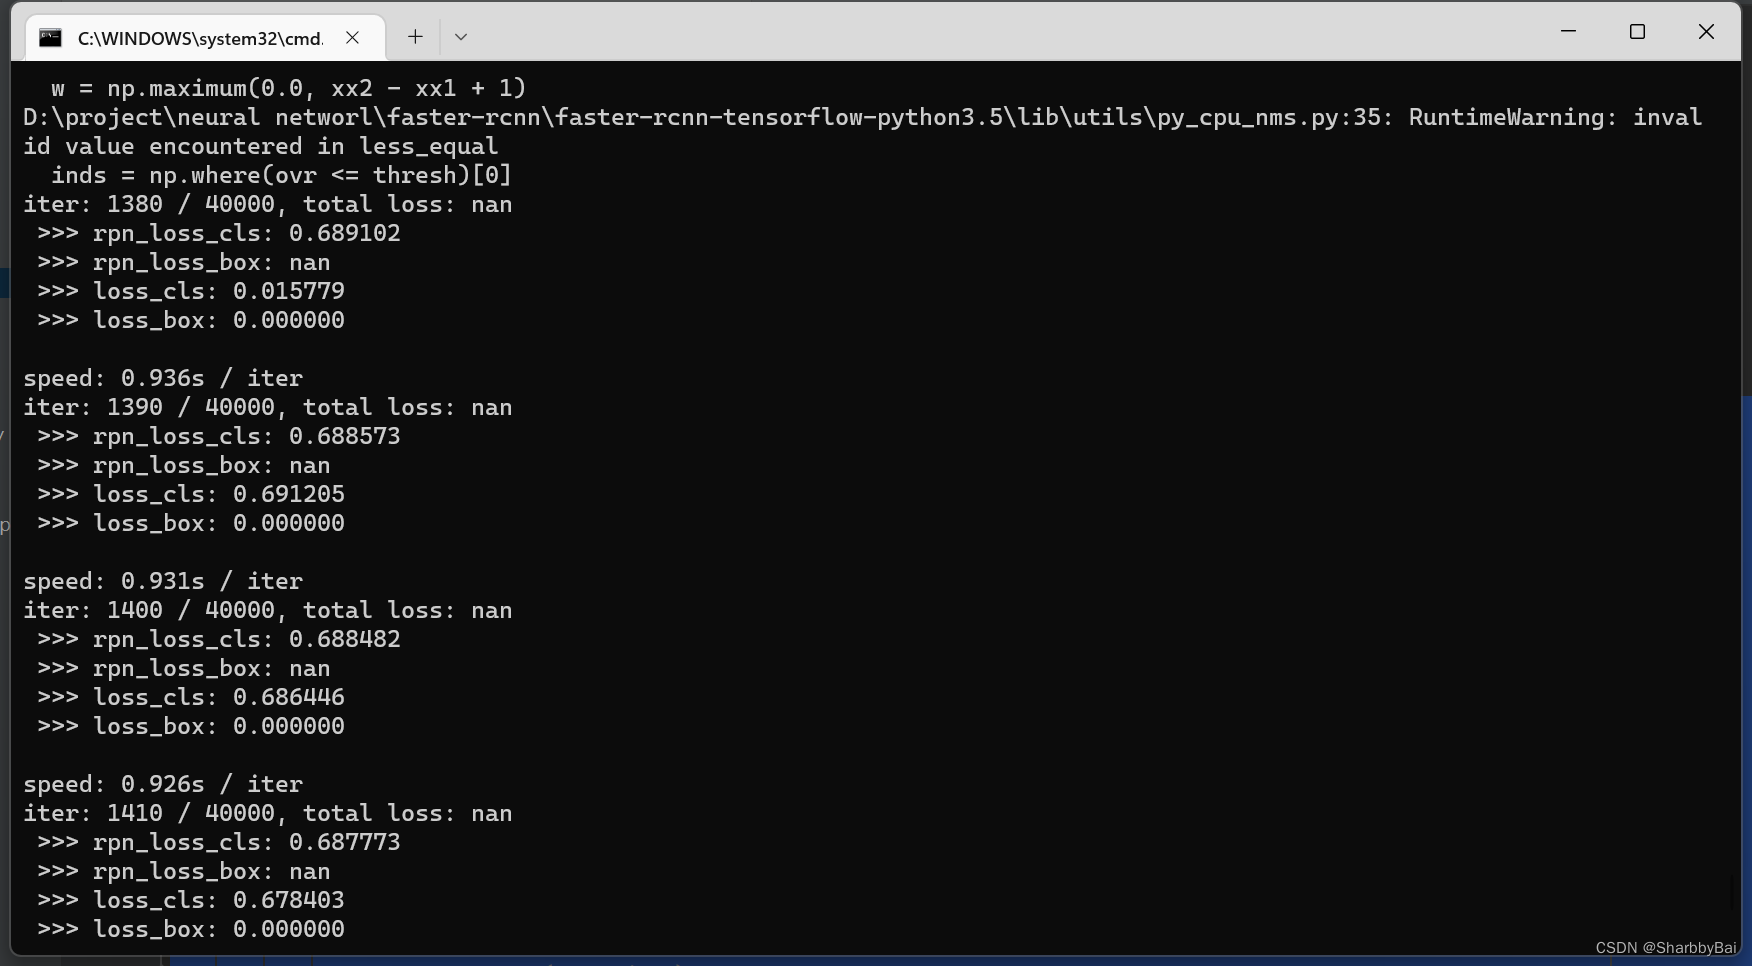
在本次训练过程中,依然出现了许多问题。
首先,是出现了下面这个问题刷屏的情况:

更改了学习率等等一系列参数后,不刷屏了,又开始出现loss=nan的问题:
试了一些解决方案,详情请见这几位大佬的帖子及评论区,传送门如下:
https://blog.csdn.net/qq_38156298/article/details/103895679
https://blog.csdn.net/weixin_38362784/article/details/106479621
https://blog.csdn.net/ksws0292756/article/details/80702704
https://blog.csdn.net/slq1023/article/details/90147042
但是,这几种方法我都失败了。。。。
后来发现,出现loss=nan是因为有的目标框检测出来是负值,原因我推测可能是因为目标框有类似Xmim>Xmax这种情况。也就是说,还是数据集的问题。。。。。。。
Anyway,最终还是训练出结果了,但是这一次训练竟然用了将近11个小时。。。。。具体原因还要以后继续分析一下。。。。
- 开始检测
python demo.py
本次训练自己的数据集就先记录到这里。后续问题在下篇再记录。


 867
867


 被折叠的 条评论
为什么被折叠?
被折叠的 条评论
为什么被折叠?
 到【灌水乐园】发言


