


目录
组件库地址:欢迎大家到 Github 中 Star
Skybiu-ui | 一个Vue3组件库A VitePress site https://sky0258.github.io/skybiu-ui/
一、 从本地选取文件
1. 默认方法
使用 input 标签 设置 type = file
<!DOCTYPE html>
<html lang="en">
<head>
    <meta charset="UTF-8">
    <meta http-equiv="X-UA-Compatible" content="IE=edge">
    <meta name="viewport" content="width=device-width, initial-scale=1.0">
    <title>Document</title>
</head>
<body>
    <input type="file">
</body>
</html>
2. 设置其他元素
直接使用 input 标签设置 type = file 进行选取,要改样式的话,就隐藏 input 标签,设置上传按钮点击事件为 input.click() 进行点击上传
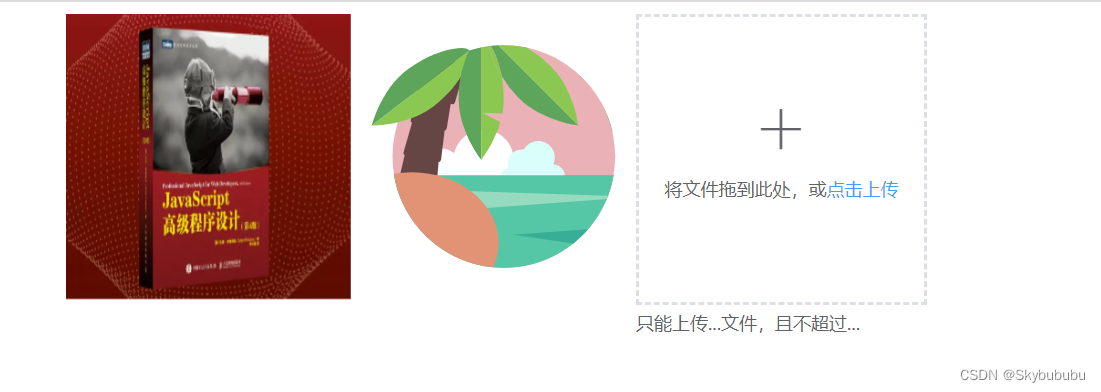
<div class="upContain">
<div class="t-uploader" @click="open">
<input type="file" style="display: none"/>
<i class="iconfont"></i><br />
<span>将文件拖到此处,或点击上传</span>
</div>
<span>只能上传图片,且不能超过 500M </span>
</div>
<script>
const open = () => {
const input = document.querySelector('input')
input.click();
};
</script>效果如下

二、获取上传的文件
1. 文件名获取
文件信息的获取相对简单,在 input 标签上绑定 change 事件,默认参数中 e.target.files 就是上传文件数组中的详细信息
将文件信息存入全局数组中,在 DOM 中渲染
<div>
<tButton @click="open">点击上传文件</tButton>
<input
type="file"
style="display: none"
@change="getFile"
/>
<span class="message">只能上传...文件,且不超过...</span>
// 文件列表渲染
<div class="fileList">
<li v-for="(item, index) in fileList" :key="index">
<span><i class="iconfont"></i>{{ item.name }}</span>
<i class="iconfont" @click="deleteFile(index)"></i>
</li>
</div>
</div>
<script>
const open = () => {
const input = document.querySelector('input')
input.click();
};
const fileList = [];
const getFile = (e) => {
// 将新上传的文件加入数组
fileList.unshift(...e.target.files);
};
// 文件删除
const deleteFile = (index) => {
fileList.splice(index, 1);
};
</script>
2. 图片渲染
- new 一个 FileReader 实例,并调用 readAsDataURL 方法传入参数 file 来读取选中的图像文件,最后在 onload 事件中,获取到成功读取的文件内容。
- 最后插入一个 img 节点设置 src = reader.result 显示选中的图片
具体代码
function readFile(file){
    var reader = new FileReader();
    reader.readAsDataURL(file);
    reader.onload = function(e){
        // 图片内容
        console.log(reader.result);
    }
}
后台打印
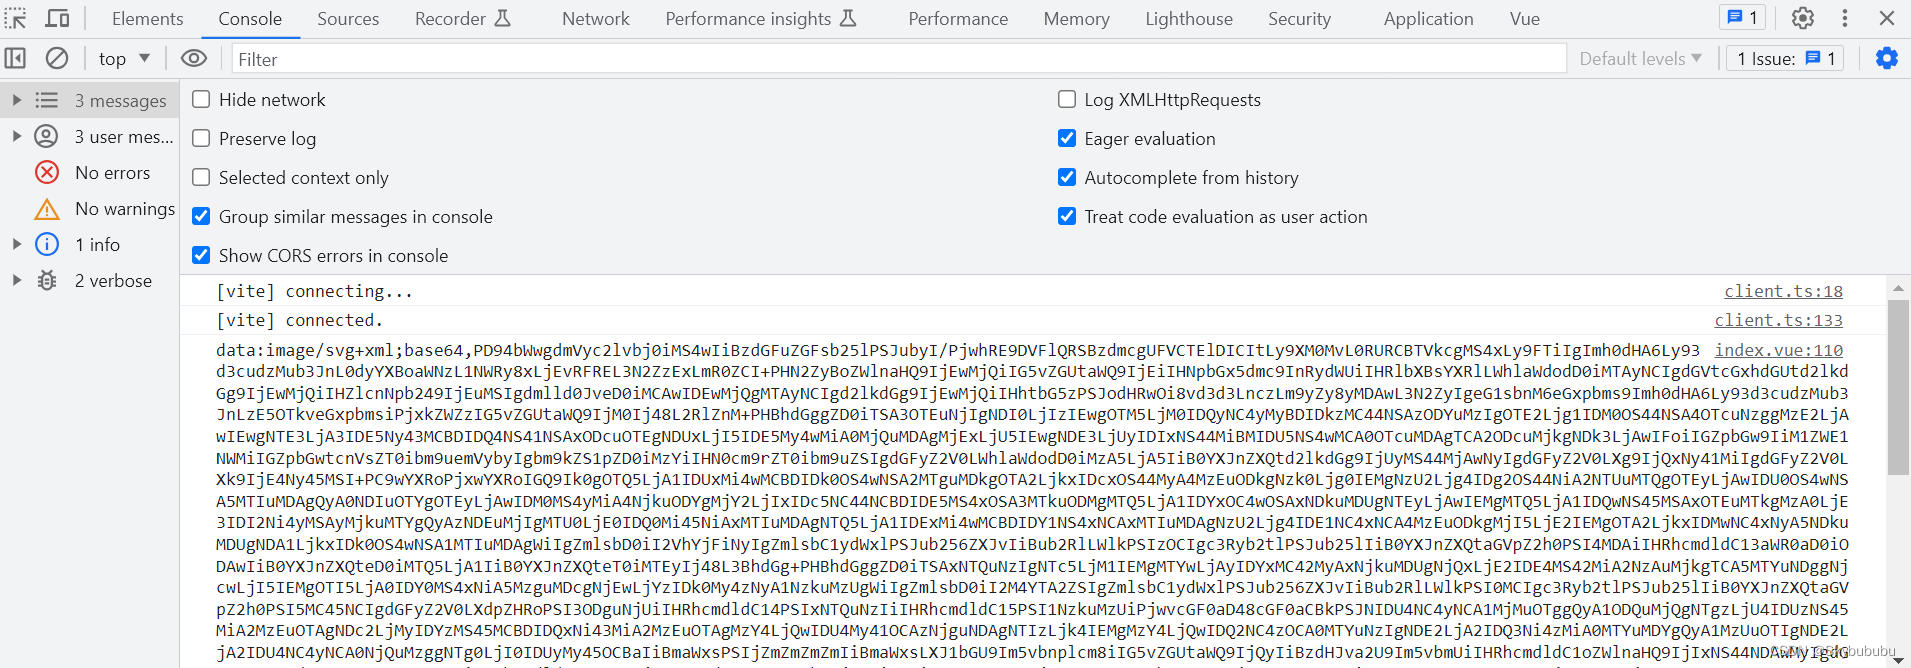
这些一长串的东西设置成 img 标签的 src 路径值就会显示出你上传的照片了
问题出现 !!!
如果你想把路径都放进一个数组中,然后再组件中,循环渲染出图片的话,你会发现你在全局申请一个变量 imgSrc ,然后在 onload 中设置
imgSrc = reader.result;
结果是无效的,imgSrc 的值并没有发生变化
这是由于 onload 是异步的,所以无法直接赋值,那么只能采取 promise 进行处理
具体代码
// 处理文件函数
function getSrc(file) {
  return new Promise(function (resolve, reject) {
    var reader = new FileReader();
    reader.readAsDataURL(file);
    reader.onload = () => {
      console.log(reader.result);
      resolve(reader.result);
    };
  });
}

const imgList = [];

// 获取文件路径放入 imgList 数组
const getImgFile = (e) => {
  const files = e.target.files;
  for(const file of files) {
      getSrc(file)
      .then((res) => {
          imgList.push(res);
      })
      .catch((err) => {
          console.log(err);
      });
  }
}
组件中循环渲染
<ul class="imageList">
  <li v-for="(src, index) in imgList" :key="index">
    <img :src="src" alt="" />
  </li>
</ul>
效果图
这样就可以成功获取图片啦!!!


 547
547


 被折叠的 条评论
为什么被折叠?
被折叠的 条评论
为什么被折叠?
 到【灌水乐园】发言


