


两种方式加载图片:
- loadImage
- displayImage
 ImageLoader.getInstance().loadImage(imageUrl, mImageSize, options, new SimpleImageLoadingListener(){

            @Override
            public void onLoadingComplete(String imageUri, View view,
                    Bitmap loadedImage) {
                super.onLoadingComplete(imageUri, view, loadedImage);
                mImageView.setImageBitmap(loadedImage);
            }

}); ImageLoader.getInstance().displayImage(imageUrl, mImageView, options); 区别:
displayImage()方法中,对ImageView对象使用的是Weak references,方便垃圾回收器回收ImageView对象
如果我们要加载固定大小的图片的时候,使用loadImage()方法需要传递一个ImageSize对象,而displayImage()方法会根据ImageView对象的测量值,或者android:layout_width and android:layout_height设定的值,或者android:maxWidth and/or android:maxHeight设定的值来裁剪图片
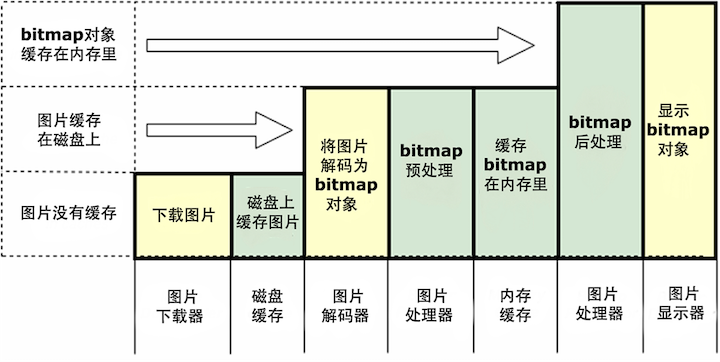
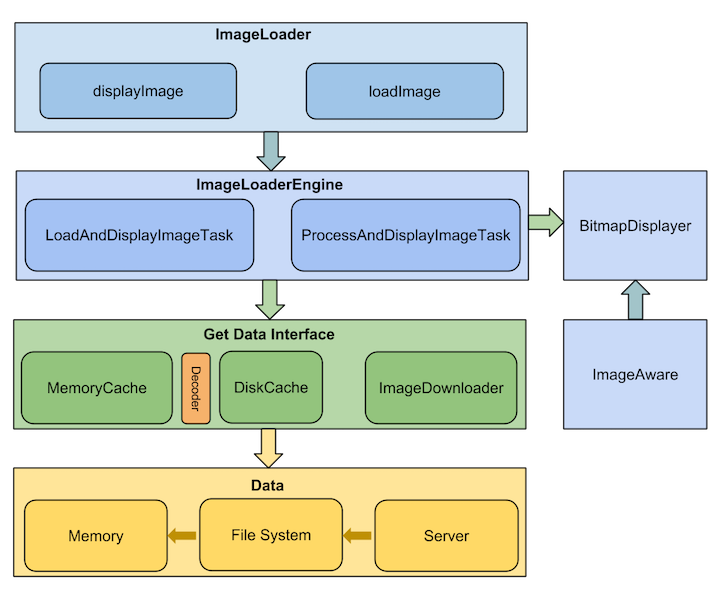
上面是 UIL 的总体设计图。整个库分为ImageLoaderEngine,Cache及ImageDownloader,ImageDecoder,BitmapDisplayer,BitmapProcessor五大模块,其中Cache分为MemoryCache和DiskCache两部分。
简单的讲就是ImageLoader收到加载及显示图片的任务,并将它交给ImageLoaderEngine,ImageLoaderEngine分发任务到具体线程池去执行,任务通过Cache及ImageDownloader获取图片,中间可能经过BitmapProcessor和ImageDecoder处理,最终转换为Bitmap交给BitmapDisplayer在ImageAware中显示。
ImageLoaderConfiguration
代表了ImageLoader中的配置信息
主要函数
1.build
按照配置,生成 ImageLoaderConfiguration。代码如下:
public ImageLoaderConfiguration build() {
    initEmptyFieldsWithDefaultValues();
    return new ImageLoaderConfiguration(this);
}
2.initEmptyFieldsWithDefaultValues
初始化值为null的属性。若用户没有配置相关项,UIL 会通过调用DefaultConfigurationFactory中的函数返回一个默认值当配置。
  private void initEmptyFieldsWithDefaultValues() {
            if(this.taskExecutor == null) {
            //用于执行从源获取图片任务的 Executor。
                this.taskExecutor = DefaultConfigurationFactory.createExecutor(this.threadPoolSize, this.threadPriority, this.tasksProcessingType);
            } else {
                this.customExecutor = true;
            }

            if(this.taskExecutorForCachedImages == null) {
            //用于执行从缓存获取图片任务的 Executor
                this.taskExecutorForCachedImages = DefaultConfigurationFactory.createExecutor(this.threadPoolSize, this.threadPriority, this.tasksProcessingType);
            } else {
                this.customExecutorForCachedImages = true;
            }

            if(this.diskCache == null) {
            //硬盘缓存文件名生成器
                if(this.diskCacheFileNameGenerator == null) {
                    this.diskCacheFileNameGenerator = DefaultConfigurationFactory.createFileNameGenerator();
                }
                //硬盘缓存
                this.diskCache = DefaultConfigurationFactory.createDiskCache(this.context, this.diskCacheFileNameGenerator, this.diskCacheSize, this.diskCacheFileCount);
            }

            if(this.memoryCache == null) {
            //图片内存缓存
                this.memoryCache = DefaultConfigurationFactory.createMemoryCache(this.context, this.memoryCacheSize);
            }

            if(this.denyCacheImageMultipleSizesInMemory) {
                  //图片内存缓存,不允许缓存一个图片的不同尺寸
                this.memoryCache = new FuzzyKeyMemoryCache(this.memoryCache, MemoryCacheUtils.createFuzzyKeyComparator());
            }

            if(this.downloader == null) {
           //图片下载器
                this.downloader = DefaultConfigurationFactory.createImageDownloader(this.context);
            }

            if(this.decoder == null) {
            //图片解码器
                this.decoder = DefaultConfigurationFactory.createImageDecoder(this.writeLogs);
            }

            if(this.defaultDisplayImageOptions == null) {
            //默认选项
                this.defaultDisplayImageOptions = DisplayImageOptions.createSimple();
            }
        }
我们先看默认的获取源图片的taskExecutor,调用下面的代码获取
DefaultConfigurationFactory.createExecutor(this.threadPoolSize, this.threadPriority, this.tasksProcessingType);传入三个参数
threadPoolSize 线程池的核心线程大小,即最大并发数
threadPriority 默认线程池的线程优先级
tasksProcessingType 默认线程池的线程队列类型。目前只有 FIFO, LIFO 两种可供选择
  public static Executor createExecutor(int threadPoolSize, int threadPriority, QueueProcessingType tasksProcessingType) {
  //当前线程队列的类型是否为后进先出
        boolean lifo = tasksProcessingType == QueueProcessingType.LIFO;
        //根据标记创建不同的队列
        BlockingQueue taskQueue = (BlockingQueue)(lifo?new LIFOLinkedBlockingDeque():new LinkedBlockingQueue());
        //创建一个线程池执行器,核心线程数为3,最大线程数为3,
        //keepAlive时间为0,
        //最后一个参数为默认的线程工厂,线程优先级为3
        return new ThreadPoolExecutor(threadPoolSize, threadPoolSize, 0L, TimeUnit.MILLISECONDS, taskQueue, createThreadFactory(threadPriority, "uil-pool-"));
    }
我们去看看默认的线程工厂
 private static ThreadFactory createThreadFactory(int threadPriority, String threadNamePrefix) {
        return new DefaultConfigurationFactory.DefaultThreadFactory(threadPriority, threadNamePrefix);
} DefaultThreadFactory(int threadPriority, String threadNamePrefix) {
this.threadPriority = threadPriority;
this.group = Thread.currentThread().getThreadGroup();
this.namePrefix = threadNamePrefix + poolNumber.getAndIncrement() + "-thread-";
}
public Thread newThread(Runnable r) {
Thread t = new Thread(this.group, r, this.namePrefix + this.threadNumber.getAndIncrement(), 0L);
if(t.isDaemon()) {
t.setDaemon(false);
}
t.setPriority(this.threadPriority);
return t;
}由于执行从缓存获取图片任务的 Executor和上面的配置一致,这里就不详细介绍了。
然后我们看硬盘缓存文件名生成器
 public static FileNameGenerator createFileNameGenerator() {
        return new HashCodeFileNameGenerator();
    }
public class HashCodeFileNameGenerator implements FileNameGenerator {
public HashCodeFileNameGenerator() {
}
public String generate(String imageUri) {
return String.valueOf(imageUri.hashCode());
}
}我们可以看出,硬盘缓存的文件名为图片uri的hash值。
接下来是磁盘缓存
public static DiskCache createDiskCache(Context context, FileNameGenerator diskCacheFileNameGenerator, long diskCacheSize, int diskCacheFileCount) {
        File reserveCacheDir = createReserveDiskCacheDir(context);
        File cacheDir;
        //如果配置了磁盘缓存大小或者缓存文件个数,则返回LruDiskCache,否则使用无大小限制的UnlimitedDiskCache
        if(diskCacheSize > 0L || diskCacheFileCount > 0) {
            cacheDir = StorageUtils.getIndividualCacheDirectory(context);

            try {
                return new LruDiskCache(cacheDir, reserveCacheDir, diskCacheFileNameGenerator, diskCacheSize, diskCacheFileCount);
            } catch (IOException var8) {
                L.e(var8);
            }
        }

        cacheDir = StorageUtils.getCacheDirectory(context);
        return new UnlimitedDiskCache(cacheDir, reserveCacheDir, diskCacheFileNameGenerator);
接下来看内存缓存
  public static MemoryCache createMemoryCache(Context context, int memoryCacheSize) {
        if(memoryCacheSize == 0) {
            ActivityManager am = (ActivityManager)context.getSystemService("activity");
            //获取应用的最大内存
            int memoryClass = am.getMemoryClass();
            if(hasHoneycomb() && isLargeHeap(context)) {
                memoryClass = getLargeMemoryClass(am);
            }

            memoryCacheSize = 1048576 * memoryClass / 8;
        }

        return new LruMemoryCache(memoryCacheSize);
    }
这里采用的是LruMemoryCache,底层代码如下,详细可见源码
 public LruMemoryCache(int maxSize) {
        if(maxSize <= 0) {
            throw new IllegalArgumentException("maxSize <= 0");
        } else {
            this.maxSize = maxSize;
            this.map = new LinkedHashMap(0, 0.75F, true);
        }
    }
然后是文件下载器
 public static ImageDownloader createImageDownloader(Context context) {
        return new BaseImageDownloader(context);
    }
这里就是加载图片的具体逻辑,具体可以参照源码。
生成ImageLoaderConfiguration以后,我们可以接下来就使用它进行初始化,这时候一般会调用下面的方法
 public synchronized void init(ImageLoaderConfiguration configuration) {
        if(configuration == null) {
            throw new IllegalArgumentException("ImageLoader configuration can not be initialized with null");
        } else {
            if(this.configuration == null) {
                L.d("Initialize ImageLoader with configuration", new Object[0]);
                this.engine = new ImageLoaderEngine(configuration);
                this.configuration = configuration;
            } else {
                L.w("Try to initialize ImageLoader which had already been initialized before. To re-init ImageLoader with new configuration call ImageLoader.destroy() at first.", new Object[0]);
            }

        }
    }
这里创建了一个ImageLoaderEngine对象,这个一个任务分发器,作用就是把任务分发给上面的两个Executor
  ImageLoaderEngine(ImageLoaderConfiguration configuration) {
        this.configuration = configuration;
        this.taskExecutor = configuration.taskExecutor;
        this.taskExecutorForCachedImages = configuration.taskExecutorForCachedImages;
        this.taskDistributor = DefaultConfigurationFactory.createTaskDistributor();
    }
我们看看createTaskDistributor的实现
public static Executor createTaskDistributor() {
        return Executors.newCachedThreadPool(createThreadFactory(5, "uil-pool-d-"));
    }
这里使用了系统封装好的线程池newCachedThreadPool。配置如下
public static ExecutorService newCachedThreadPool(ThreadFactory threadFactory) {
        return new ThreadPoolExecutor(0, Integer.MAX_VALUE,
                                      60L, TimeUnit.SECONDS,
                                      new SynchronousQueue<Runnable>(),
                                      threadFactory);
    }
这里为什么要采用newCachedThreadPool,因为不存在较耗时或阻塞操作,所以用无并发数(Int 最大值)限制的线程池即可


 432
432

 被折叠的 条评论
为什么被折叠?
被折叠的 条评论
为什么被折叠?
 到【灌水乐园】发言


