


随着我们网络的不断拓展,业务流量也随之增多,单条链路的带宽无法满足整体需求时,
若更换带宽接口则会增加维护设备成本;
若增加链路则需求分配IP地址,造成地址浪费;
若发生链路故障,则会影响整个区域的通信;
因此出现了新的技术-Eth-trunk来解决。
将多个端口绑定为一起带宽转发就会增加(不必使用G口)
由于是多个端口绑定故即便发生端口故障或者是单条链路故障其他端口也会进行转发.
如果物理端口断掉,带宽转发会稍微影响,但不会中断(除非绑定了两条,而两条都断开).
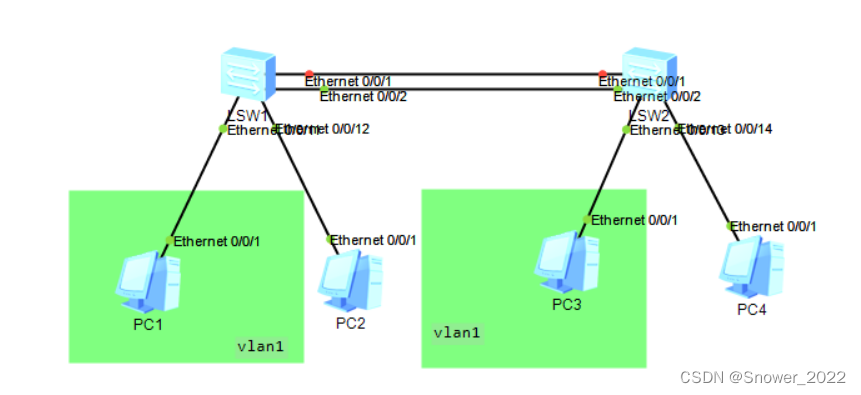
实验场景:
1)交换网络中存在2个 VLAN – 1 和 2(VLAN的IP地址为:192.168.1.0 和 192.168.2.0)
2)对交换机之间的链路进行捆绑,增加互联带宽,确保同 VLAN的 PC 之间互通
第一步:
创建 vlan 1 和 2
vlan batch 1 2第二步:
配置交换机与PC之间的链路为 Access,并加入到正确的 VLAN
[sw1]
interface e0/0/11
port link-type access
port default vlan 1
qinterface e0/0/12
port link-type access
port default vlan 2
q[sw2]
interface e0/0/13
port link-type access
port default vlan 1
qinterface e0/0/14
port link-type access
port default vlan 2
q
第三步:配置对SW1/2之间的链路进行链路捆绑【sw1】
[sw1]interface Eth-Trunk 1
[sw1-Eth-Trunk1]mode manual load-balance
[sw1-Eth-Trunk1]trunkport e0/0/1
Info: This operation may take a few seconds. Please wait for a moment...done.
[sw1-Eth-Trunk1]trunkport e0/0/2
Info: This operation may take a few seconds. Please wait for a moment...done.
[sw1-Eth-Trunk1]q
[sw1]display eth-trunk // 显示Eth-Trunk信息
Eth-Trunk1's state information is:
WorkingMode: NORMAL Hash arithmetic: According to SIP-XOR-DIP
Least Active-linknumber: 1 Max Bandwidth-affected-linknumber: 8
Operate status: up Number Of Up Port In Trunk: 2
--------------------------------------------------------------------------------
PortName Status Weight
Ethernet0/0/1 Up 1
Ethernet0/0/2 Up 1【sw2】同上
第四步:把 Eth-trunk 配置为 Trunk(SW2的配置与SW1相同)
[sw1]interface Eth-Trunk 1
[sw1-Eth-Trunk1]port link-type trunk
[sw1-Eth-Trunk1]port trunk allow-pass vlan all
[sw1-Eth-Trunk1]q
配置完毕后进行测试,PC1与PC3的互通情况。若正常连通,再down 掉SW1的 interface e0/0/1,之后再次测试PC1与PC3的互通情况,可正常通信即表明配置成功。查看配置,会有失败的一瞬间,之后便可正常工作。


 8637
8637


 被折叠的 条评论
为什么被折叠?
被折叠的 条评论
为什么被折叠?
 到【灌水乐园】发言


