


web大前端之旅Ⅹ
完成bind函数
<!DOCTYPE html>
<html lang="en">
<head>
    <meta charset="UTF-8">
    <meta http-equiv="X-UA-Compatible" content="IE=edge">
    <meta name="viewport" content="width=device-width, initial-scale=1.0">
    <title>Document</title>
</head>
<body>
    <button id="btn">click me !</button>
    <script>
       bind(btn,"click",function(){
        alert(1);
       })
       function bind(obj,eventStr,callback){
        if(obj.addEventListener){
            obj.addEventListener(eventStr,callback,false);
        }else{
            obj.attachEvent("on"+eventStr,callback);//兼容IE8及以下
        }
       }
    </script>
</body>
</html>
事件的传播
W3C综合了两个公司的方案,将事件传播分成了三个阶段:
- 捕获阶段:在捕获阶段时从最外层的祖先元素,向目标元素进行事件的捕获,但是默认此时不会触发事件
- 目标阶段:事件捕获到目标元素,捕获结束开始在目标元素上触发事件
- 冒泡阶段:事件从目标元素向它的祖先元素传递,依次触发祖先元素上的事件
注:如果希望在捕获阶段就触发事件,可以将addEventListener()的第三个参数设置为true,一般情况下我们不会希望在捕获阶段触发事件,所以这个参数一般都是false,并且注意,IE8及以下的浏览器中没有捕获阶段,我们可以使用event.stopPropagation();取消事件传播。
拖拽练习
<!DOCTYPE html>
<html lang="en">
<head>
    <meta charset="UTF-8">
    <meta http-equiv="X-UA-Compatible" content="IE=edge">
    <meta name="viewport" content="width=device-width, initial-scale=1.0">
    <title>Test</title>
    <style>
        #box3{
            width: 150px;
            height: 150px;
            background-color: #6495ED;
            position: absolute;
        }
        #box2{
            width: 150px;
            height: 150px;
            background-color: aliceblue;
            position: absolute;
            top: 50px;
            left: 50px;
        }
    </style>
</head>
<body>
        <div id="box2"></div>
        <div id="box3"></div>
    <script>
      var box3 = document.getElementById("box3");
      var box2 = document.getElementById("box2");
      drag(box2);
      drag(box3);
      function drag(obj){
        obj.onmousedown = function(event){
            obj.setCapture && obj.setCapture();
            event = event || window.event;
            var ol = event.clientX - obj.offsetLeft;
            var ot = event.clientX - obj.offsetTop;
        obj.onmousemove = function(event){
            event = event || window.event;
            var left = event.clientX - ol;
            var top = event.clientY - ot;

            obj.style.left = left+"px";
            obj.style.top = top+"px";
        };
        document.onmouseup = function(){
            document.onmousemove = null;
            document.onmouseup = null;
            obj.releaseCapture && obj.releaseCapture();
        };
        /*
        当我们拖拽一个网页中的内容时,浏览器会默认去搜索引擎中搜索内容,此时会导致拖拽功能的异常,这个是浏览器提供的默认行为,
        如果不希望发生这个行为,则可以通过returk false来取消默认行为
        */
       return false;
      };
      }
    </script>
</body>
</html>
鼠标滚轮事件
键盘事件
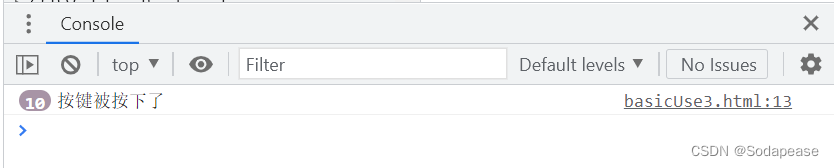
<script>
        document.onkeydown = function(){
            console.log("按键被按下了");
        }
    </script>
可以通过keyCode来获取按键的编码通过它可以判断哪个按键被按下
除了keyCode,事件对象中还提供了几个属性
altKeyctrlKeyshiftKey
这个三个用来判断alt ctrl和shift是否被按下
如果按下则返回true,否则返回false
注:在文本框中输入内容,属于onkeydown的默认行为
如果在onkeydown中取消了默认行为,则输入的内容,不会出现在文本框中
实现div键盘跟随
<!DOCTYPE html>
<html lang="en">
<head>
    <meta charset="UTF-8">
    <meta http-equiv="X-UA-Compatible" content="IE=edge">
    <meta name="viewport" content="width=device-width, initial-scale=1.0">
    <title>Document</title>
    <style>
        #box{
            width: 100px;
            height: 100px;
            background-color: #6495ED;
            position: absolute;
        }
    </style>
</head>
<body>
    <div id="box"></div>
    <script>
        document.onkeydown = function(event){
           var event = event || window.event;
            switch(event.keyCode){
                case 37:
                    box.style.left = box.offsetLeft - 10 + "px";
                    break;
                case 39:
                    box.style.left = box.offsetLeft + 10 + "px";
                    break;
                case 38:
                    box.style.left = box.offsetLeft - 10 + "px";
                    break;
                case 40:
                    box.style.left = box.offsetLeft + 10 + "px";
                    break;
            }
            return false;
        }
    </script>
</body>
</html>
BOM
BOM
浏览器对象模型
BOM可以使我们通过JS来操作浏览器
在BOM中为我们提供了一组对象,用来完成对浏览器的操作 BOM对象
- Window
代表的是整个浏览器的窗口,同时window也是网页中的全局对象
- Navigator
代表的当前浏览器的信息,通过该对象可以来识别不同的浏览器
- Location
代表当前浏览器的地址栏信息,通过Location可以获取地址栏信息,或者操作浏览器跳转页面
- History
代表浏览器的历史记录,可以通过该对象来操作浏览器的历史记录
由于隐私原因,该对象不能获取到具体的历史记录,只能操作浏览器向前或向后翻页而且该操作只在当次访问时有效
- Screen
代表用户的屏幕的信息,通过该对象可以获取到用户的显示器的相关的信息
Window
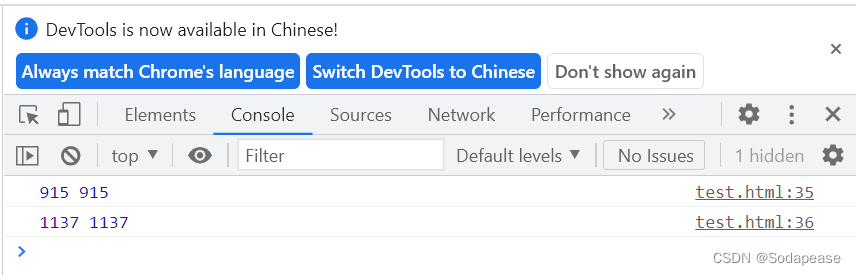
浏览器可视窗口尺寸
console.log(window.innerHeight,innerHeight)
console.log(window.innerWidth,innerWidth)
弹出框
JavaScript 有三种类型的弹出框:警告框、确认框和提示框。
- 如果要确保信息传递给用户,通常会使用
警告框。当警告框弹出时,用户将需要单击“确定”来继续。
语法:
window.alert("attention");
- 如果您希望用户验证或接受某个东西,则通常使用
“确认”框。
当确认框弹出时,用户将不得不单击“确定”或“取消”来继续进行。
如果用户单击“确定”,该框返回 true。如果用户单击“取消”,该框返回 false。
window.confirm("sure?");
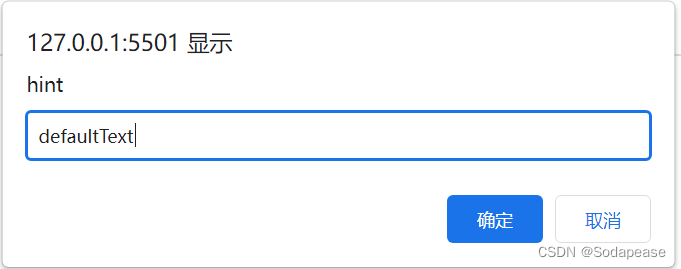
- 如果您希望用户在进入页面前输入值,通常会使用
提示框。
当提示框弹出时,用户将不得不输入值后单击“确定”或点击“取消”来继续进行。
如果用户单击“确定”,该框返回输入值。如果用户单击“取消”,该框返回 NULL。
window.prompt("hint","defaultText");
注:三种方法均可不带window前缀
定时事件
JavaScript 可以在时间间隔内执行,这就是所谓的定时事件( Timing Events)
两个关键的定时方法:
setTimeout(function, milliseconds)
在等待指定的毫秒数后执行函数setInterval(function, milliseconds)
等同于 setTimeout(),但持续重复执行该函数
延时器
setTimeout() 方法:延时器
setTimeout(function, milliseconds);
- 第一个参数是要执行的函数。
- 第二个参数指示执行之前的毫秒数。
定时器
- 第一个参数是要执行的函数。
- 第二个参数每个执行之间的时间间隔的长度。
setInterval(function, milliseconds);
其它窗口方法
- window.open() :打开新的窗口
window.open(URL,name,specs,replace);
- window.close() :关闭当前窗口
window.close();
- window.moveTo() :移动当前窗口
window.moveTo(x,y);
- window.resizeTo() :调整当前窗口
window.resizeTo(width,height);
Navigator
Navigator代表的当前浏览器的信息,通过该对象可以来识别不同的浏览器。由于历史原因,Navigator对象中的大部分属性都已经不能帮助我们识别浏览器了,一般我们只会使用userAgent来判断浏览器的信息,userAgent是一个字符串,这个字符串中包含有用来描述浏览器信息的内容,不同的浏览器会有不同的userAgent
var ua = navigator.userAgent;
console.log(ua);
对浏览器的判断:
var ua = navigator.userAgent;
if (/firefox/i.test(ua)) {
    alert("你是火狐浏览器");
} else if (/chrome/i.test(ua)) {
    alert("你是谷歌浏览器");
} else if (/msie/i.test(ua)) {
    alert("你是IE浏览器");
}
if(window.ActiveXObject){
            alert("你是IE浏览器")
        }else{
            alert("你不是IE浏览器")
        }
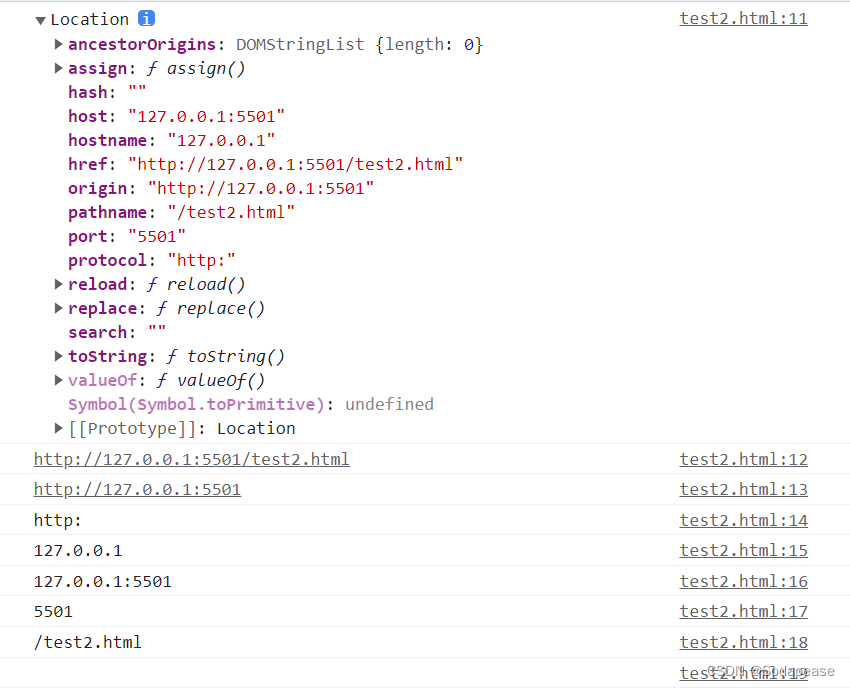
Location
- 输出location对象
console.log(location);
- 输出当前地址的全路径地址
console.log(location.href);
- 输出当前地址的来源
console.log(location.origin);
- 输出当前地址的协议
console.log(location.protocol);
- 输出当前地址的主机名
console.log(location.hostname);
- 输出当前地址的主机
console.log(location.host);
- 输出当前地址的端口号
console.log(location.port);
- 输出当前地址的路径部分
console.log(location.pathname);
- 输出当前地址的后边的参数部分
console.log(location.search);
修改地址:
location = "https://www.csdn.net/";
location.href = "https://www.csdn.net/";
调用方法
assign():用来跳转到其它的页面,作用和直接修改location一样
location.assign("https://www.csdn.net/");
reload():用于重新加载当前页面,作用和刷新按钮一样,如果在方法中传递一个true,作为参数,则会强制清空缓存刷新页面
location.reload(true);
replace():可以使用一个新的页面替换当前页面,调用完毕也会跳转页面,它不会生成历史记录,不能使用回退按钮回退
location.replace("https://www.csdn.net/");
History
History可以用来操作浏览器向前或向后翻页
console.log(history);           //输出history对象
console.log(history.length);    //可以获取到当成访问的链接数量
调用方法
back():可以回退到上一个页面,作用和浏览器的回退按钮一样
history.back();
- forward():可以跳转到下一个页面,作用和浏览器的前进按钮一样
history.forward();
- go():可以用来跳转到指定的页面,它需要一个整数作为参数
history.go(n);
1:表示向前跳转一个页面,相当于
forward()
-1:表示向后跳转一个页面,相当于back()
Screen
Screen 对象包含有关客户端显示屏幕的信息。
Screen对象属性
availHeight返回显示屏幕的高度 (除 Windows 任务栏之外)。
document.write("<p>Available Height: ")
document.write(screen.availHeight + "</p>")
availWidth返回显示屏幕的宽度 (除 Windows 任务栏之外)。
document.write("<p>Available Width: ")
document.write(screen.availWidth + "</p>")
bufferDepth设置或返回调色板的比特深度。
document.write("<p>Buffer Depth: ")
document.write(screen.bufferDepth + "</p>")
colorDepth返回目标设备或缓冲器上的调色板的比特深度。
document.write("<p>Color Depth: ")
document.write(screen.colorDepth + "</p>")
deviceXDPI返回显示屏幕的每英寸水平点数。
document.write("<p>Device XDPI: ")
document.write(screen.deviceXDPI + "</p>")
deviceYDPI返回显示屏幕的每英寸垂直点数。
document.write("<p>Device YDPI: ")
document.write(screen.deviceYDPI + "</p>")
fontSmoothingEnabled返回用户是否在显示控制面板中启用了字体平滑。
document.write("<p>FontSmoothingEnabled: ")
document.write(screen.fontSmoothingEnabled + "</p>")
height返回显示屏幕的高度。
document.write("<p>Height: ")
document.write(screen.height + "</p>")
width返回显示屏幕的宽度。
document.write("<p>Width: ")
document.write(screen.width+ "</p>")
logicalXDPI返回显示屏幕每英寸的水平方向的常规点数。
document.write("<p>Logical XDPI: ")
document.write(screen.logicalXDPI + "</p>")
logicalYDPI返回显示屏幕每英寸的垂直方向的常规点数。
document.write("<p>Logical YDPI: ")
document.write(screen.logicalYDPI + "</p>")
pixelDepth返回显示屏幕的颜色分辨率(比特每像素)。
document.write("<p>Pixel Depth: ")
document.write(screen.pixelDepth + "</p>")
updateInterval设置或返回屏幕的刷新率。
document.write("<p>Update Interval: ")
document.write(screen.updateInterval + "</p>")


 395
395


 被折叠的 条评论
为什么被折叠?
被折叠的 条评论
为什么被折叠?
 到【灌水乐园】发言


