


Qt:环境20.04.1-Ubuntu,Qt5.14.2
1.创建项目:
创建CM项目文件夹,创建下面文件和文件夹
├── cm-lib
│   ├── cm-lib.pro //库项目
│   └── source
│       ├── cm-lib_global.h
│       └── models
│           ├── client.cpp
│           └── client.h
├── CM.pro
├── cm-tests
│   ├── cm-tests.pro //TEST
│   └── source
│       └── models
│           └── client-tests.cpp
└── cm-ui
    ├── cm-ui.pro //UI
    ├── source
    │   └── main.cpp
    └── views
CM.pro:
TEMPLATE = subdirs
SUBDIRS += \ #包含的子目录
    cm-ui \
    cm-lib \
    cm-tests
message(cm project dir: $${PWD})
cm-lib.pro:
QT -= gui #由于这是一个库项目,我们不需要加载默认的 GUI 模块
TARGET = cm-lib #输出的库名字
TEMPLATE = lib #指定生成库
CONFIG += c++14
DEFINES += CMLIB_LIBRARY
INCLUDEPATH += source
SOURCES += source/models/client.cpp
HEADERS += source/cm-lib_global.h \
		source/models/client.h
cm-ui.pro
QT += qml quick
TEMPLATE = app
CONFIG += c++14
INCLUDEPATH += source
SOURCES += source/main.cpp
QML_IMPORT_PATH = $$PWD
cm-test:pro:
QT += testlib
QT -= gui #我们不需要GUI模块
TARGET = client-tests
TEMPLATE = app
CONFIG += c++14
CONFIG += console #控制台程序
CONFIG -= app_bundle
INCLUDEPATH += source
SOURCES += source/models/client-tests.cpp
CM/cm-lib/source/cm-lib_global.h:
#ifndef CMLIB_GLOBAL_H
#define CMLIB_GLOBAL_H
#include <QtCore/qglobal.h>
#if defined(CMLIB_LIBRARY)
#  define CMLIBSHARED_EXPORT Q_DECL_EXPORT
#else
#  define CMLIBSHARED_EXPORT Q_DECL_IMPORT
#endif
#endif // CMLIB_GLOBAL_H
CM/cm-lib/source/models/client.h:
#ifndef CLIENT_H
#define CLIENT_H
#include "cm-lib_global.h"
class CMLIBSHARED_EXPORT Client
{
public:
	Client();
};
#endif // CLIENT_H
CM/cm-lib/source/models/client.cpp:
#include "client.h"
Client::Client()
{
}
CM/cm-tests/source/models/client-tests.cpp:
#include <QString>
#include <QtTest>

class ClientTests : public QObject
{
    Q_OBJECT
public:
    ClientTests();
private Q_SLOTS:
    void testCase1();
};

ClientTests::ClientTests()
{
}

void ClientTests::testCase1()
{
    QVERIFY2(true, "Failure");
}

QTEST_APPLESS_MAIN(ClientTests)
#include "client-tests.moc"
CM/cm-ui/source/main.cpp:
#include <QGuiApplication>
#include <QQmlApplicationEngine>
int main(int argc, char *argv[])
{
	QGuiApplication app(argc, argv);
	QQmlApplicationEngine engine;
	return app.exec();
}

2.掌握MVC:
在cm-ui下添加views.qrc views.qrc下添加MasterView.qml 保存CM/cm-ui/views目录
修改views.qrc为:
<RCC>
    <qresource prefix="/views">
        <file alias="MasterView.qml">views/MasterView.qml</file>
    </qresource>
</RCC>
MasterView.qml:
import QtQuick 2.9
import QtQuick.Window 2.2
Window
{
    visible: true //显示界面
    width: 640
    height: 480
    title: qsTr("Client Management")
    Text
    {
        text: qsTr("学习Qt")
    }
}
main.cpp 里面添加
engine.load(QUrl(QStringLiteral("qrc:/views/MasterView.qml")));//用于加载qml
运行cm-ui:

cm-lib 中创建MasterController类 保存/CM/cm-lib/source/controllers目录
MasterController.h:
#ifndef MASTERCONTROLLER_H
#define MASTERCONTROLLER_H

#include <QObject>
#include <cm-lib_global.h>> //包含导出宏的头文件
//添加命名空间
namespace cm
{
namespace controllers //
{
class CMLIBSHARED_EXPORT MasterController : public QObject
{
    Q_OBJECT
public:
    explicit MasterController(QObject *parent = nullptr);
signals:
};
}
}
#endif // MASTERCONTROLLER_H
MasterController.cpp:
#include "MasterController.h"
namespace cm
{
namespace controllers
{
MasterController::MasterController(QObject *parent) : QObject(parent)
{

}
}
}
cm-ui的main.cpp要访问cm-lib的头文件需要cm-ui.pro添加
INCLUDEPATH += source
    ../cm-lib/source
cm-ui.pro :添加链接库
LIBS += -L$$PWD/../../build-CM-Desktop_Qt_5_14_2_GCC_64bit-Debug/cm-lib/ -lcm-lib
我们在这里所做的是向 QML 引擎注册类型,然后,我们实例化 MasterController 的一个实例并将其注入到根 QML 上下文中,添加下面代码。
qmlRegisterType<cm::controllers::MasterController>("CM", 1, 0, "MasterController");
cm::controllers::MasterController masterController;/
engine.rootContext()->setContextProperty("masterController",&masterController);
现在可以测试qml读取CM-LIB的成员变量
为了能够从 QML 访问这个成员,我们需要配置一个新属性。 在 Q_OBJECT 宏之后但在第一个公共访问修饰符之前,添加以下内容
在这里,我们正在创建 QML 可以访问的 QString 类型的新属性
QML 将该属性称为 ui_welcomeMessage,并且在调用时,将获取(或设置)名为welcomeMessage 的 MEMBER 变量中的值
//属性
Q_PROPERTY( QString ui_welcomeMessage MEMBER welcomeMessage CONSTANT )
//公有成员
QString welcomeMessage = "学习Qt";
回到 MasterView.qml,我们将使用这个属性。 将 Text 组件的 text 属性改为如下
text: masterController.ui_welcomeMessage

UX
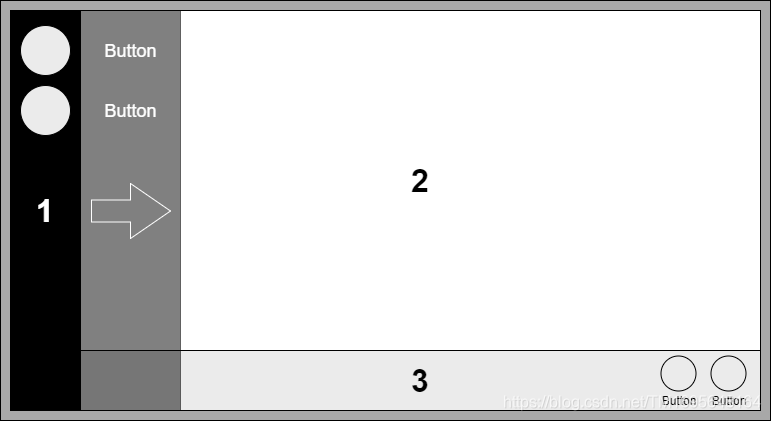
导航栏 (1) 将永远存在并包含将用户导航到应用程序内关键区域的按钮。默认情况下,栏会变窄,与按钮关联的命令将由图标表示;但是,按下切换按钮将扩展栏以显示每个按钮的随附描述性文本。
内容窗格 (2) 将是一堆子视图。导航到应用程序的不同区域将通过替换内容窗格中的子视图来实现。例如,如果我们在导航栏上添加一个 New Client 按钮并按下它,我们会将 New Client View 推送到内容框架堆栈上。
命令栏 (3) 是一个可选元素,用于向用户显示更多命令按钮。导航栏的主要区别在于这些命令将与当前视图相关的上下文敏感。例如,在创建新客户端时,我们需要一个保存按钮,但是当我们搜索客户端时,保存按钮没有意义。每个子视图将可选地显示自己的命令栏。命令将通过图标显示,下方带有简短说明。
在 cm-ui 中,右键单击 views.qrc 并选择添加新QML文件:
在 cm-ui/ui/views 中创建 SplashView.qml 文件,重复此过程,创建以下所有文件:
| File | Purpose |
|---|---|
| SplashView.qml | 加载 UI 时显示的占位符视图。 |
| DashboardView.qml | The central “home” view. |
| CreateClientView.qml | 查看以输入新客户的详细信息 |
| EditClientView.qml | 查看以读取/更新现有客户端详细信息 |
| FindClientView.qml | 用于搜索现有客户的视图 |
把

改为

StackView
堆栈视图
子视图将通过 StackView 组件呈现,该组件提供了一个带有内置历史记录的基于堆栈的导航模型。
新视图(在此上下文中的视图意味着几乎所有 QML)在要显示时被push到堆栈,并且可以从堆栈中弹出以返回到前一个视图。我们不需要使用历史功能,但它们是一个非常有用的功能。
要访问该组件,我们首先需要引用该模块,因此将导入添加到 MasterView.qml
import QtQuick.Controls 2.14
完成后,让我们用 StackView 替换 Text 元素:
StackView
{
	id: contentFrame
	initialItem: "qrc:/views/SplashView.qml"
}
我们为组件分配了一个唯一标识符 contentFrame 以便我们可以在QML的其他地方引用它,并且我们指定我们默认要加载的子视图——SplashView
接下来,编辑 SplashView将QtQuick模块版本更新为 2.9,使其与MasterView匹配,(如果没有明确说明,请对所有其他 QML 文件执行此操作).这不是绝对必要的,但这是避免视图间不一致的做法.引用不同 QtQuick 版本的两个视图上的相同代码可能会表现出不同的行为.
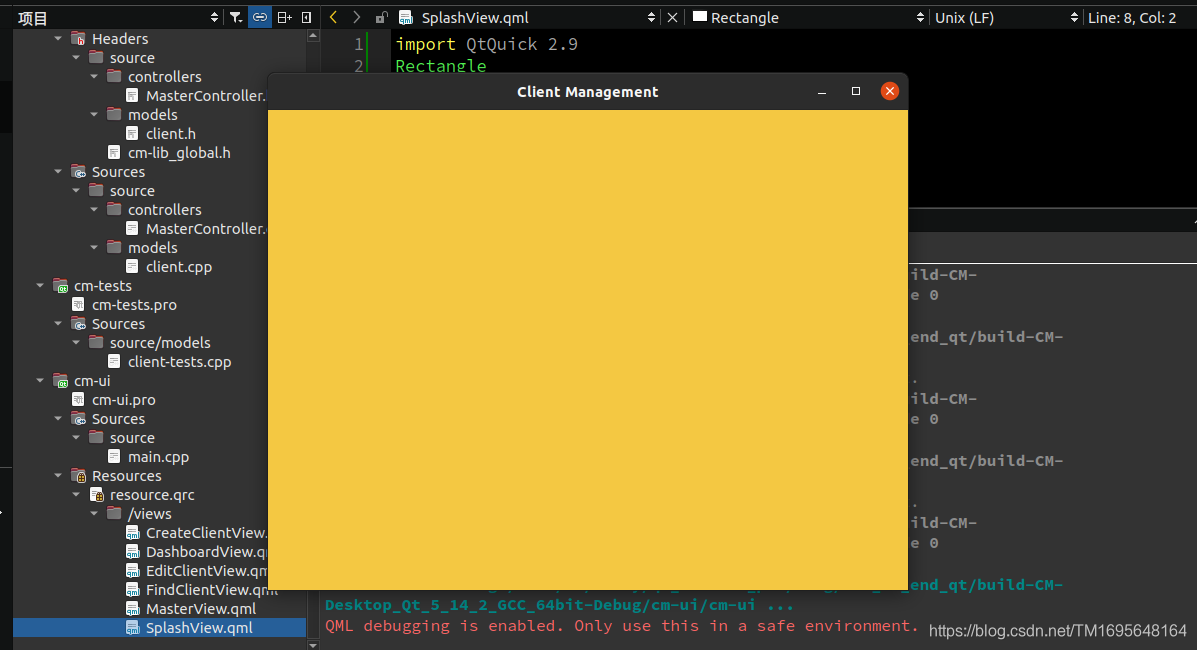
在SplashView.qml是制作一个 400 像素宽 x 200 像素高的矩形:
import QtQuick 2.9
Rectangle
{
    width: 400
    height: 200
    color: "#f4c842"
}
可以像我们在这里所做的那样使用十六进制 RGB 值指定颜色.或者命名为 SVG 颜色.
如果您将光标悬停在 Qt Creator 中的十六进制字符串上,您将获得一个非常有用的小弹出色样.

Anchors
锚点
SplashView 的一个小问题是它实际上并没有填满窗口,当然,我们可以将 400 x 200 尺寸更改为 1024 x 768 以使其与 MasterView 匹配,但是如果用户调整窗口大小会发生什么?现代 UI 都是关于响应式设计的——动态内容可以适应它所呈现的显示,因此仅适用于一个平台的硬编码属性并不理想。
将 anchors.fill: parent 添加到 StackView 组件
import QtQuick 2.9
import QtQuick.Window 2.2
import QtQuick.Controls 2.14
import CM 1.0
Window
{
    visible: true
    width: 640
    height: 480
    title: qsTr("Client Management")
    StackView
    {
        id: contentFrame
        anchors.fill: parent
        initialItem: "qrc:/views/SplashView.qml"
    }
}
将 anchors.fill: parent 添加到 SplashView.qml
import QtQuick 2.9
Rectangle
{
    anchors.fill: parent
    color: "#f4c842"
}
StackView 现在将填充它的父窗口,我们明确给出了 1024 x 768 的固定大小。再次运行应用程序,你现在应该有一个橙黄色 SplashView,它充满了屏幕,如果你调整它的大小.它会很自动地调整自己的大小。
Navigation
向 SplashView.qml 添加文本框
import QtQuick 2.9
Rectangle
{
    anchors.fill: parent
    color: "#f4c842"
    Text
    {
        anchors.centerIn: parent
        text: "Splash View"
    }
}
把SplashView.qml的内容分别拷贝到FindClientView.qml text: “FindClient View”,EditClientView.qml ,text: “EditClient View”,DashboardView.qml,text: “Dashboard View” CreateClientView.qml,text: “Create Client View”。
在MasterView.qml中添加:
Component.onCompleted: contentFrame.replace("qrc:/views/DashboardView.qml");
现在,当您构建和运行时,一旦 MasterView 完成加载,它就会将子视图切换到 DashboardView,这可能发生得如此之快
以至于您甚至不再看到 SplashView,但它仍然存在。如果您的应用程序需要进行大量初始化,并且您不能真正拥有非阻塞 UI,那么拥有这样的启动视图是很好的,这是放置公司徽标和“网状样条…”加载消息的方便位置。
StackView 就像网络浏览器中的历史记录。如果您访问 www.google.com 然后访问 www.packtpub.com,那么您将 www.packtpub.com 推入堆栈。如果您在浏览器上单击“返回”,则会返回 www.google.com。此历史记录可以由多个页面(或视图)组成,您可以在其中前后导航。有时您不需要历史记录,有时您主动不希望用户能够返回。我们可以他调用replace() 方法,将一个新视图推入堆栈并清除所有历史记录。
cm-lib 下controllers 目录添加NavigationController 类
NavigationController.h:
#ifndef NAVIGATIONCONTROLLER_H
#define NAVIGATIONCONTROLLER_H

#include <cm-lib_global.h>
#include <models/client.h>
#include <QObject>

namespace cm
{
namespace controllers
{
class CMLIBSHARED_EXPORT NavigationController : public QObject
{
    Q_OBJECT
public:
    NavigationController(QObject* parent = nullptr)
        :QObject(parent)
    {}
signals:
    void goCreateClientView();
    void goDashBoardView();
    void goEditClientView(cm::models::Client* client);
    void goFindClientView();
};
}
}
#endif // NAVIGATIONCONTROLLER_H
client.h client.cpp 中添加
namespace cm
{
namespace models
{
}
}
MasterController.h:
#ifndef MASTERCONTROLLER_H
#define MASTERCONTROLLER_H

#include <QObject>
#include <cm-lib_global.h>

#include <controllers/NavigationController.h>

namespace cm
{
namespace controllers
{
class CMLIBSHARED_EXPORT MasterController : public QObject
{
    Q_OBJECT
    Q_PROPERTY(QString ui_welcomeMessage READ welcomeMessage CONSTANT)
    //之前的MEMBER改为READ
    Q_PROPERTY(cm::controllers::NavigationController* ui_navigationController READ navigationController CONSTANT)
    //以便qml访问NavigationController
	//该属性是由UI QML访问的,它不在cm命名空间的范围内执行,因此我们必须明确指定完全限定名称
	//对于QML直接与之交互的任何东西,包括信号和槽中的参数,都要明确命名空间
public:
    explicit MasterController(QObject *parent = nullptr);
    ~MasterController();
    NavigationController* navigationController();//获取NavigationController对象实例
    const QString& welcomeMessage() const;
    //改为函数获取message
private:
    class Implementation;
    QScopedPointer<Implementation>implementation;
signals:

};
}
}
#endif // MASTERCONTROLLER_H
我们需要能够创建 NavigationController 的实例并让我们的 UI 与其交互。出于单元测试的原因,将对象创建隐藏在某种对象工厂接口后面是一种很好的做法,但在此阶段我们不关心这一点,因此我们将简单地在 MasterController 中创建对象。将私有实现 (PImpl) 习惯用法添加到我们的 MasterController 中。如果您之前没有接触过 PImpl,那么它只是一种将所有私有实现细节从头文件移到定义中的技术,这有助于保持头文件尽可能简短和干净,只包含公共 API。
MasterController.cpp
#include "MasterController.h"
#include "NavigationController.h"

namespace cm {
namespace controllers {
class MasterController::Implementation //对象
{
public:
    Implementation(MasterController* _masterController)
        : masterController(_masterController)
    {
        navigationController = new NavigationController(masterController);
    }

    MasterController* masterController{nullptr};
    NavigationController* navigationController{nullptr};
    //把之前成员放到PImpl中
    QString welcomeMessage = "学习Qt";
};

MasterController::MasterController(QObject* parent)
    : QObject(parent)
{
    implementation.reset(new Implementation(this));
}

MasterController::~MasterController()
{
}

NavigationController* MasterController::navigationController()
{
    return implementation->navigationController;
}

const QString& MasterController::welcomeMessage() const
{
    return implementation->welcomeMessage;
}
}}
我们需要在cm-ui项目中向QML系统注册新的NavigationController类,所以在main.cpp中,在MasterController的现有注册旁边添加以下注册。
qmlRegisterType<cm::controllers::NavigationController>("CM", 1, 0, "NavigationController");
已经注入了NavigationController ,现在能从MasterView.qml对NavigationController 里的信号进行连接,现在准备连接 MasterView 以对这些导航信号做出反应。 在 StackView 之前添加以下元素:
    Connections
    {
        target: masterController.ui_navigationController
        onGoCreateClientView: contentFrame.replace("qrc:/views/CreateClientView.qml")
        onGoDashboardView: contentFrame.replace("qrc:/views/DashBoardView.qml")
        onGoEditClientView: contentFrame.replace("qrc:/views/EditClientView.qml", {selectedClient: client})
        onGoFindClientView: contentFrame.replace("qrc:/views/FindClientView.qml")
    }
添加后的MasterView.qml:
import QtQuick 2.9
import QtQuick.Window 2.2
import QtQuick.Controls 2.14
import CM 1.0
Window
{
    visible: true
    width: 640
    height: 480
    title: qsTr("Client Management")
    Component.onCompleted: contentFrame.replace("qrc:/views/DashBoardView.qml");

    Connections
    {
        target: masterController.ui_navigationController
        onGoCreateClientView: contentFrame.replace("qrc:/views/CreateClientView.qml")
        onGoDashBoardView: contentFrame.replace("qrc:/views/DashBoardView.qml")
        onGoEditClientView: contentFrame.replace("qrc:/views/EditClientView.qml", {selectedClient: client})
        onGoFindClientView: contentFrame.replace("qrc:/views/FindClientView.qml")
    }

    StackView
    {
        id: contentFrame
        anchors.fill: parent
        initialItem: "qrc:/views/SplashView.qml"
    }
}
我们创建了一个绑定到 NavigationController 实例的连接组件,它对我们NavigationController添加的每个 go 信号做出反应,并通过 contentFrame 使用replace() 方法导航到相关视图 。因此,无论何时在 NavigationController 上触发 goCreateClientView() 信号,都会在我们的 Connections 组件上调用 onGoCreateClientView() 插槽,并将 CreateClientView 加载到名为 contentFrame 的 StackView 中。在 onGoEditClientView 的情况下,客户端参数从信号中传递,我们将该对象传递给名为 selectedClient 的属性,稍后我们将添加到视图中。
QML 组件中的一些信号和槽是为我们自动生成和连接的,并且是基于约定的。槽函数被命名 on[CapitalisedNameOfRelatedSignal] 。例如,如果您有一个名为 mySplendidSignal() 的信号,那么相应的槽将被命名为 onMySplendidSignal, 这些约定适用于NavigationController 和 Connections 组件.
接下来测试qml中masterController信号函数和qml中槽函数
1.添加一个黑色MasterView.qml 的Window下添加一个黑色Rectangle矩形 navigationBar
Rectangle
{
    id: navigationBar
    anchors
    {
        top: parent.top
        bottom: parent.bottom
        left: parent.left
    }
    width: 100
    color: "#000000"
}

继续在Rectangle 添加一个Column 下添加三个按钮:
我们使用 Column 组件来为我们布置按钮,而不必单独将按钮彼此锚定,每个按钮显示一些文本,单击时会调用 NavigationController 上的信号,Connection 组件对信号做出反应并为我们执行视图转换
import QtQuick 2.9
import QtQuick.Window 2.2
import QtQuick.Controls 2.14
import CM 1.0
Window
{
    visible: true
    width: 640
    height: 480
    title: qsTr("Client Management")
    Component.onCompleted: contentFrame.replace("qrc:/views/DashBoardView.qml");

    Connections
    {
        target: masterController.ui_navigationController
        onGoCreateClientView: contentFrame.replace("qrc:/views/CreateClientView.qml")
        onGoDashBoardView: contentFrame.replace("qrc:/views/DashBoardView.qml")
        onGoEditClientView: contentFrame.replace("qrc:/views/EditClientView.qml", {selectedClient: client})
        onGoFindClientView: contentFrame.replace("qrc:/views/FindClientView.qml")
    }

    Rectangle
    {
        id: navigationBar
        anchors
        {
            top: parent.top
            bottom: parent.bottom
            left: parent.left
        }
        width: 100
        color: "#000000"
        Column
        {
            Button
            {
                text: "Dashboard"
                onClicked: masterController.ui_navigationController.goDashBoardView()
            }
            Button
            {
                text: "New Client"
                onClicked: masterController.ui_navigationController.goCreateClientView()
            }
            Button
            {
                text: "Find Client"
                onClicked: masterController.ui_navigationController.goFindClientView()
            }
        }
    }
    StackView {
        id: contentFrame
        anchors {
            top: parent.top
            bottom: parent.bottom
            right: parent.right
            left: navigationBar.right
        }
        initialItem: Qt.resolvedUrl("qrc:/views/SplashView.qml")
    }


//    StackView
//    {
//        id: contentFrame
//        anchors.fill: parent
//        initialItem: "qrc:/views/SplashView.qml"
//    }
}

很棒的东西,我们有一个功能性的导航框架! 但是,当您单击其中一个导航按钮时,导航栏会暂时消失并再次出现。 我们还在应用程序输出控制台中收到“冲突锚点”消息,这表明我们正在做一些不太正确的事情。 让我们在继续之前解决这些问题。
qrc:/views/FindClientView.qml:2:1: QML FindClientView: StackView has detected conflicting anchors. Transitions may not execute properly.
qrc:/views/FindClientView.qml:2:1: QML FindClientView: StackView has detected conflicting anchors. Transitions may not execute properly.
qrc:/views/FindClientView.qml:2:1: QML FindClientView: StackView has detected conflicting anchors. Transitions may not execute properly.
qrc:/views/CreateClientView.qml:2:1: QML CreateClientView: StackView has detected conflicting anchors. Transitions may not execute properly.
qrc:/views/MasterView.qml:38: TypeError: Property 'goDashboardView' of object cm::controllers::NavigationController(0x55eaae09cf10) is not a function
Fixing conflicts
导航栏问题很简单。 如前所述,QML 在结构上是分层的。 这体现在元素的渲染方式上——首先出现的子元素首先被渲染。在我们的例子中,我们先绘制导航栏,然后绘制内容框架。当 StackView 组件加载新内容时,默认情况下它会应用过渡动画以使其看起来不错。这些转换可能导致内容移出控件的边界并绘制在其下方的任何内容上。有几种方法可以解决这个问题。
1.我们可以重新排列组件呈现的顺序,并将导航栏放在内容框架之后。在 StackView 上层绘制导航栏,
2/将实现的选项是简单地设置 StackView 的剪辑属性:clip: true 这将剪辑与控件边界重叠的任何内容,并且不呈现它。
下一个问题有点深奥。正如我们所讨论的,在过去几年的QML开发中,我遇到的令人困惑的头号原因是组件的大小。我们使用过的一些组件,例如 Rectangle,本质上是视觉元素。如果它们的大小未定义,无论是直接使用宽度/高度属性还是间接使用锚点,则它们将不会呈现。其他元素(例如 Connections)根本不是可视化的,并且大小属性是多余的。诸如 Column 之类的布局元素可能在一个轴上具有固定大小,但在另一个轴上本质上是动态的。
大多数组件的一个共同点是它们继承自Item,而后者又直接继承自QtObject,后者只是一个普通的QObject。与 C++ 端的 Qt 框架为普通的旧 QObject* 实现许多默认行为的方式大致相同,QML 组件通常可以在此处利用的 Item 组件实现默认行为。
在我们的子视图中,我们使用 Rectangle 作为我们的根对象。这是有道理的,因为我们想要显示一个固定大小和有颜色的矩形。然而,这会给 StackView 带来问题,因为它不知道它应该是什么大小。为了提供这些信息,我们尝试将它锚定到它的父级(StackView),但是这会导致它自己的问题,因为它会在我们切换视图时与 StackView 试图执行的转换发生冲突。
解决的方法是让我们的子视图的根成为一个普通的Item。StackView 组件具有处理 Item 组件的内部逻辑,并且只会为我们调整大小。然后我们的 Rectangle 组件成为已经自动调整大小的 Item 组件的子级,我们可以锚定到它
QML中的所有可视项目都继承自Item。虽然Item本身没有可视化的外观,但是它定了以可视化项目的所有属性,例如位置,大小,布局anchors相关属性和关于按键处理的keys属性等。Item拥有一个visibel属性,将其社这位false可以隐藏项目,该属性默认值为true。
调整大小的 Item 组件的子级:
Item
{
    Rectangle
    {
        ...
    }
}
再次运行应用程序,您现在应该有很好的平滑过渡并且控制台中没有警告消息。
这是一种灵活的、解耦的导航机制,并且正在不同视图之间转换。让UI调用业务逻辑层来发出一个信号,然后UI对其做出反应,这似乎有点像在视图之间导航的迂回方式,但这种业务逻辑信号/UI 槽设计带来了好处。它保持 UI 模块化,因为视图不需要相互了解。它将导航逻辑保留在业务逻辑层中,并使该层能够请求UI将用户导航到特定视图,而无需了解有关UI或视图本身的任何信息。至关重要的是,它还为我们提供了拦截点,以便当用户请求导航到给定视图时,我们可以处理它并执行我们需要的任何其他处理,例如状态管理或清理。
Style
在开发过程中,先着眼于功能通常是个好主意,但 UI 是用户与之交互的应用程序的一部分,是成功解决方案的关键要素。 在本章中,我们将介绍一个类似 CSS 的样式资源,并以我们在上一章中介绍的响应式设计原则为基础。我们将创建自定义 QML 组件和模块以最大限度地重用代码。我们将 Font Awesome 集成到我们的解决方案中,为我们提供一套可缩放的图标,并帮助我们的 UI 具有现代图形外观。我们将整理导航栏,介绍命令的概念,并为动态的、上下文相关的命令栏构建框架。
Style resource
首先,让我们创建一个新的资源文件来包含我们需要的非 QML 视觉元素。在 cm-ui 项目中,Add New… > Qt > Qt Resource File:将文件命名为 assets.qrc 并将其放置在 cm/cm-ui 中。你的新文件会在资源编辑器中自动打开,我觉得它不是一个特别有用的编辑器,所以关闭它。您将看到 assets.qrc 文件已添加到 cm-ui 项目的 Resources 部分。右键单击assets.qrc 它并选择Add New… > Qt > QML 文件。添加文件 Style.qml 新建assets文件夹 并将其保存到 cm/cm-ui/assets。
以与视图相同的方式在纯文本编辑器中编辑 assets.qrc 文件:
<RCC>
    <qresource prefix="/assets">
        <file alias="Style.qml">assets/Style.qml</file>
    </qresource>
</RCC>
现在,编辑 Style.qml,我们将添加一个用于视图背景颜色的样式属性:
pragma Singleton
import QtQuick 2.9
Item
{
    readonly property color colourBackground: "#f4c842"
}
我们在 C++ 术语中所做的是创建一个单例类,其中包含一个名为 colourBackground 的 const color 类型的公共成员变量,其初始化值为(非常)浅灰色的十六进制 RGB 代码。
我们需要在与 Style.qml (cm/cm-ui/assets) 相同的文件夹中创建一个名为 qmldir(没有文件扩展名)的模块定义文件。右键单击assets.qrc 它并选择Add New… > General > Empty File 选择 路径/CM/cm-ui/assets 名称 qmldir。创建一个名为 qmldir(没有文件扩展名)的模块定义文件。创建 qmldir 文件后,编辑 assets.qrc 并在 /assets 前缀内的 Style.qml 旁边为其插入一个新条目:
<file alias="qmldir">assets/qmldir</file>
assets.qrc:
<RCC>
    <qresource prefix="/assets">
        <file alias="qmldir">assets/qmldir</file>
        <file alias="Style.qml">assets/Style.qml</file>
    </qresource>
</RCC>
双击新添加的 qmldir 文件并输入以下几行:
module assets
singleton Style 1.0 Style.qml
我们在导入 QtQuick 2.9 时已经看到了模块。这使得 QtQuick 模块的 2.9 版可用于我们的视图。在我们的 qmldir 文件中,我们定义了一个我们自己称为assets的新模块,并告诉 Qt 在该模块的 1.0 版中有一个 Style 对象,在我们的 Style.qml 文件中实现。现在在SplashView,qml通过qmldir中定义的模块,来访问Style.qml 中定义的colourBackground: “#f4c842”
从我们看到的第一个子视图 SplashView 开始,然后添加以下内容以访问我们的新模块:
import assets 1.0
你会注意到,我们看到了一个红色下划线,将鼠标指针悬停在该行上,工具提示将告诉我们需要将导入qmldir路径添加到新的 定义文件中。
我们需要在main.cpp中实例化 QQmlApplicationEngine 后立即将以下行添加:
engine.addImportPath("qrc:/");
那么为什么是 qrc:/ 而不是我们的 qmldir 文件的绝对路径呢?您会记得我们将views.qrc资源包添加到 cm-ui.pro 中的 RESOURCES 变量。它的作用是从 views.qrc 中获取所有文件,并将它们编译成一种虚拟文件系统中的应用程序二进制文件,其中前缀充当虚拟文件夹。这个虚拟文件系统的根被引用为 qrc:/ 并且通过在导入路径中使用它,我们实际上是在要求 Qt 查看我们所有模块的捆绑资源文件。前往 cm-ui.pro 并确保我们的新 assets.qrc 也已添加到 RESOURCES:
RESOURCES += \
    assets.qrc \
    resource.qrc
这可能有点令人困惑,所以重申一下,我们添加了以下文件夹来搜索新模块,要么使用 QML2_IMPORT_PATH 环境变量在本地物理文件系统上搜索我们的 cm-ui 项目文件夹,要么使用 addImportPath() 方法来搜索在运行时搜索我们的虚拟资源文件系统的根。
我们的新模块的 qmldir 文件都位于一个名为 assets 的文件夹下一级,即物理文件系统中的 /cm/cm-ui/assets 或 qrc:/assets 中的 虚拟的。这为我们提供了模块名称assets.如果我们的文件夹结构更深,比如 stuff/badgers/assets,那么我们的模块需要被称为 stuff.badgers.assets,因为这是相对于我们定义的导入路径的路径。同样,如果我们想为现有视图添加另一个模块,我们将在 cm-ui/views 中创建一个 qmldir 文件并调用模块。
如果你看到 Qt Creator 还是有红线依然存在,请确保 cm-ui.pro 包含 QML_IMPORT_PATH += $$PWD 行。
重复此操作以设置除MasterView之外的所有视图的Rectangle背景颜色。请记住在每个视图中也包含 import assets 1.0
color: Style.colourBackground
当您构建和运行应用程序时,您可能想知道为什么当视图看起来与以前完全相同时我们要经历所有这些繁琐的事情。好吧,假设我们刚刚与营销人员开会,他们告诉我们黄橙色不再适合该品牌,我们需要改变所有观点以成为干净的灰白色颜色。好吧,假设我们刚刚与营销人员开会,他们告诉我们黄橙色不再适合该品牌,我们需要改变所有观点以成为干净的灰白色颜色。现在,只有七个,所以这没什么大不了的,但是想象一下,如果我们必须更改 50 个复杂视图中所有组件的所有颜色;那将是一个非常痛苦的过程。
Font Awesome
到 http://fontawesome.io/。下载套件并打开存档文件。 我们感兴趣的文件是 fonts/fontawesome-webfont.ttf。将此文件复制到 cm/cm-ui/assets 中的项目文件夹中。修改assets.qrc:添加
<file alias="fontawesome.ttf">assets/fontawesome-webfont.ttf</file>
assets.qrc:
<RCC>
    <qresource prefix="/assets">
        <file alias="qmldir">assets/qmldir</file>
        <file alias="Style.qml">assets/Style.qml</file>
        <file alias="fontawesome.ttf">assets/fontawesome-webfont.ttf</file>
    </qresource>
</RCC>
请记住,我们的别名不必与原始文件名相同,我们将其缩短了一点。接下来,编辑 Style.qml,我们会将字体连接到我们的自定义样式以便于使用。我们首先需要加载字体并使其可用,我们使用 FontLoader 组件实现了这一点。在根 Item 元素中添加以下内容:
pragma Singleton
import QtQuick 2.9
Item
{
    property alias fontAwesome: fontAwesomeLoader.name
    readonly property color colourBackground: "#f4c842"
    FontLoader
    {
        id: fontAwesomeLoader
        source: "qrc:/assets/fontawesome.ttf"
    }
}
在source属性中,我们使用在 assets.qrc 文件中定义的 /assets前缀(或虚拟文件夹)以及 fontawesome.ttf 别名。现在,我们已经加载了字体,但就目前而言,我们将无法从 Style.qml 外部引用它。这是因为只有根组件级别的属性才能在文件外部访问。子组件被视为私有。我们解决这个问题的方法是为我们想要公开的元素创建一个属性别名property alias fontAwesome: fontAwesomeLoader.name 这将创建一个名为 fontAwesome 的公共可用属性,当调用该属性时,只需将调用者重定向到内部 fontAwesomeLoader 元素的 name 属性。
回到 Font Awesome 网站,导航到图标页面。在这里,您可以看到所有可用的图标。 单击一个将显示有关它的更多信息,从这里我们可以获得显示它所需的关键信息,那就是unicode字符。我将为我们的菜单选择以下图标,但您可以随意选择您想要的任何图标:

| Command | Icon | Unicode character |
|---|---|---|
| Toggle Menu | bars | f0c9 |
| Dashboard | home | f015 |
| New Client | user-plus | f234 |
| Find Client | search | f002 |
现在,让我们将 MasterView 上的 Button 组件替换为每个图标的 Text 组件:
import QtQuick 2.9
import QtQuick.Window 2.2
import QtQuick.Controls 2.14
import assets 1.0

Window
{
    visible: true
    width: 640
    height: 480
    title: qsTr("Client Management")
    Component.onCompleted: contentFrame.replace("qrc:/views/DashboardView.qml");

    Connections
    {
        target: masterController.ui_navigationController
        onGoCreateClientView: contentFrame.replace("qrc:/views/CreateClientView.qml")
        onGoDashBoardView: contentFrame.replace("qrc:/views/DashboardView.qml")
        onGoEditClientView: contentFrame.replace("qrc:/views/EditClientView.qml", {selectedClient: client})
        onGoFindClientView: contentFrame.replace("qrc:/views/FindClientView.qml")
    }

    Rectangle
    {
        id: navigationBar
        anchors
        {
            top: parent.top
            bottom: parent.bottom
            left: parent.left
        }
        width: 100
        color: "#000000"
        Column
        {
            Text
            {
                font
                {
                    family: Style.fontAwesome
                    pixelSize: 42
                }
                color: "#ffffff"
                text: "\uf0c9"
            }
            Text
            {
                font
                {
                    family: Style.fontAwesome
                    pixelSize: 42
                }
                color: "#ffffff"
                text: "\uf015"
            }
            Text
            {
                font
                {
                    family: Style.fontAwesome
                    pixelSize: 42
                }
                color: "#ffffff"
                text: "\uf234"
            }
            Text
            {
                font
                {
                    family: Style.fontAwesome
                    pixelSize: 42
                }
                color: "#ffffff"
                text: "\uf002"
            }
        }
    }

    StackView
    {
        id: contentFrame
        anchors
        {
            top: parent.top
            bottom: parent.bottom
            right: parent.right
            left: navigationBar.right
        }
        initialItem: Qt.resolvedUrl("qrc:/views/SplashView.qml")
        clip: true
    }

//    StackView
//    {
//        id: contentFrame
//        anchors.fill: parent
//        initialItem: "qrc:/views/SplashView.qml"
//    }
}

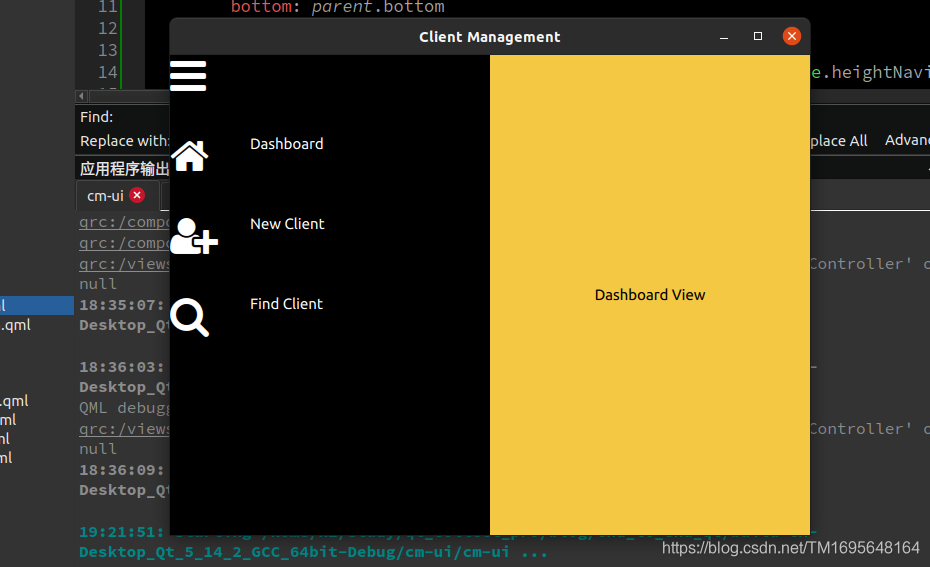
现在,让我们将 MasterView 上的 Button 组件替换为每个图标的 Text 组件:
我们将为客户端命令添加描述性文本.
            Row //Row 目的是把描述文本与图标放在同一行
            {
                Text
                {
                    font
                    {
                        family: Style.fontAwesome
                        pixelSize: 42
                    }
                    color: "#ffffff"
                    text: "\uf234"
                }
                Text
                {
                    color: "#ffffff"
                    text: "New Client"
                }
            }
Row 组件将水平布局其子项——首先是图标,然后是描述性文本。对其他命令重复此操作。
import QtQuick 2.9
import QtQuick.Window 2.2
import QtQuick.Controls 2.14
import assets 1.0

Window
{
    visible: true
    width: 640
    height: 480
    title: qsTr("Client Management")
    Component.onCompleted: contentFrame.replace("qrc:/views/DashboardView.qml");

    Connections
    {
        target: masterController.ui_navigationController
        onGoCreateClientView: contentFrame.replace("qrc:/views/CreateClientView.qml")
        onGoDashBoardView: contentFrame.replace("qrc:/views/DashboardView.qml")
        onGoEditClientView: contentFrame.replace("qrc:/views/EditClientView.qml", {selectedClient: client})
        onGoFindClientView: contentFrame.replace("qrc:/views/FindClientView.qml")
    }

    Rectangle
    {
        id: navigationBar
        anchors
        {
            top: parent.top
            bottom: parent.bottom
            left: parent.left
        }
        width: 100
        color: "#000000"
        Column
        {
            Text
            {
                font
                {
                    family: Style.fontAwesome
                    pixelSize: 42
                }
                color: "#ffffff"
                text: "\uf0c9"
            }

            Row
            {
                Text
                {
                    font
                    {
                        family: Style.fontAwesome
                        pixelSize: 42
                    }
                    color: "#ffffff"
                    text: "\uf015"
                }
                Text
                {
                    color: "#ffffff"
                    text: "Dashboard"
                }
            }

            Row
            {
                Text
                {
                    font
                    {
                        family: Style.fontAwesome
                        pixelSize: 42
                    }
                    color: "#ffffff"
                    text: "\uf234"
                }
                Text
                {
                    color: "#ffffff"
                    text: "New Client"
                }
            }
            Row
            {
                Text
                {
                    font
                    {
                        family: Style.fontAwesome
                        pixelSize: 42
                    }
                    color: "#ffffff"
                    text: "\uf002"
                }
                Text
                {
                    color: "#ffffff"
                    text: "Find Client"
                }
            }
        }
    }


    StackView
    {
        id: contentFrame
        anchors
        {
            top: parent.top
            bottom: parent.bottom
            right: parent.right
            left: navigationBar.right
        }
        initialItem: Qt.resolvedUrl("qrc:/views/SplashView.qml")
        clip: true
    }


//    StackView
//    {
//        id: contentFrame
//        anchors.fill: parent
//        initialItem: "qrc:/views/SplashView.qml"
//    }
}

Components
我们刚刚编写的 QML它已经变得难以维护。我们的 MasterView 变得有点长且难以阅读。当我们要更改命令按钮的外观时,例如对齐图标和文本,我们必须在四个位置进行更改。如果我们想添加第五个按钮,我们必须复制、粘贴和编辑一大堆 QML 才能做到这一点。这就是可重用组件发挥作用的地方。
接下来把NavigationBar和NavigationButton 单独提取出来
创建新组件,右键单击我们选择Row元素,然后选择 Refactoring > Move Component into separate File。将新组件命名为 NavigationButton 并将其保存到一个新文件夹——cm/cm-ui/components下:

Row 元素将移动到我们的新文件中,在 MasterView 中,您将留下一个空的 NavigationButton 组件

它多出一个红色波浪线NavigationButton,我们的应用程序将不再运行。虽然重构步骤为我们创建了一个新的 NavigationButton.qml 文件,但它实际上并没有包含在我们项目中,所以 Qt 不知道它在哪里。我们需要通过resources 添加进来。
1.在Resources下创建一个名为 components.qrc 的新Qt资源文件放在 cm/cm-ui 文件夹中。
2.就像我们为我们的assets一样在cm/cm-ui/components中创建一个空的qmldir文件。
3.编辑components.qrc以在 /components 前缀中包含我们的两个新文件。
<RCC>
    <qresource prefix="/components">
        <file alias="qmldir">components/qmldir</file>
        <file alias="NavigationButton.qml">components/NavigationButton.qml</file>
    </qresource>
</RCC>
4.编辑 qmldir 以设置我们的模块并向其中添加我们的 NavigationButton 组件
module components
NavigationButton 1.0 NavigationButton.qml
5.确保在 cm-ui.pro 中的 RESOURCES 变量中添加了 components.qrc
6.在 MasterView 中,包含我们的新组件模块以访问我们的新组件:
import components 1.0 //添加后NavigationButton的红波浪线消失
有时,让我们的模块被完全识别并消除红色波浪线可能只能通过重新启动 Qt Creator 来完成,因为这会强制重新加载所有 QML 模块。
我们现在NavigationButton可重用的组件,它隐藏了实现细节,减少了代码重复,并使添加新命令和维护旧命令变得更加容易。
目前,我们的 NavigationButton 具有硬编码的图标和描述文本值,无论何时我们使用该组件都相同。我们需要公开这两个文本属性,以便我们可以为每个命令对它们进行设置。正如我们所见,我们可以使用属性别名来实现这一点,但我们需要向我们的 Text 元素添加唯一标识符才能使其工作。将 Item 组件作为根元素,给他初始一些默认值。
NavigationButton.qml
import QtQuick 2.9
import assets 1.0
Item
{
    property alias iconCharacter: textIcon.text
    property alias description: textDescription.text
    Row
    {
        Text
        {
            id: textIcon
            font
            {
                family: Style.fontAwesome
                pixelSize: 42
            }
            color: "#ffffff"
            text: "uf11a"
        }
        Text
        {
            id: textDescription
            color: "#ffffff"
            text: "SET ME!!"
        }
    }
}
现在以组件的形式可以使用属性进行配置,我们可以替换 MasterView 中的命令:
import QtQuick 2.9
import QtQuick.Window 2.2
import QtQuick.Controls 2.14
import assets 1.0
import components 1.0

Window
{
    visible: true
    width: 640
    height: 480
    title: qsTr("Client Management")
    Component.onCompleted: contentFrame.replace("qrc:/views/DashboardView.qml");

    Connections
    {
        target: masterController.ui_navigationController
        onGoCreateClientView: contentFrame.replace("qrc:/views/CreateClientView.qml")
        onGoDashBoardView: contentFrame.replace("qrc:/views/DashboardView.qml")
        onGoEditClientView: contentFrame.replace("qrc:/views/EditClientView.qml", {selectedClient: client})
        onGoFindClientView: contentFrame.replace("qrc:/views/FindClientView.qml")
    }

    Rectangle
    {
        id: navigationBar
        anchors
        {
            top: parent.top
            bottom: parent.bottom
            left: parent.left
        }
        width: 100
        color: "#000000"
        Column
        {
            NavigationButton
            {
                iconCharacter: "\uf0c9"
                description: ""
            }
            NavigationButton
            {
                iconCharacter: "\uf015"
                description: "Dashboard"
            }
            NavigationButton
            {
                iconCharacter: "\uf234"
                description: "New Client"
            }
            NavigationButton
            {
                iconCharacter: "\uf002"
                description: "Find Client"
            }
        }
    }


    StackView
    {
        id: contentFrame
        anchors
        {
            top: parent.top
            bottom: parent.bottom
            right: parent.right
            left: navigationBar.right
        }
        initialItem: Qt.resolvedUrl("qrc:/views/SplashView.qml")
        clip: true
    }


//    StackView
//    {
//        id: contentFrame
//        anchors.fill: parent
//        initialItem: "qrc:/views/SplashView.qml"
//    }
}
这比我们之前所有的重复 QML 更简洁和易于管理。

如您所见,我们所有的组件都绘制在彼此之上造成这种情况的根本原因是我们之前提到的关于尺寸的问题。我们有一个带有根 Item 元素的可视化组件,我们还没有明确定义它的大小。我们忽略的另一件事是我们的自定义样式。接下来让我们解决这些问题。
Styling the navigation bar
从简单的部分开始,让我们首先将我们的硬编码颜色和图标像素大小从 NavigationButton 移动到 Style.qml 中:
Style.qml :添加
readonly property color colourNavigationBarBackground: "#000000" //导航条的背景颜色黑色
readonly property color colourNavigationBarFont: "#ffffff" //白色的字体
readonly property int pixelSizeNavigationBarIcon: 42 //图标大小
NavigationButton.qml
import QtQuick 2.9
import assets 1.0

Item
{
    property alias iconCharacter: textIcon.text
    property alias description: textDescription.text
    Row
    {
        Text
        {
            id: textIcon
            font
            {
                family: Style.fontAwesome
                pixelSize: Style.pixelSizeNavigationBarIcon
            }
            color: Style.colourNavigationBarFont
            text: "uf11a"
        }
        Text
        {
            id: textDescription
            color: Style.colourNavigationBarFont
            text: "SET ME!!"
        }
    }
}
我们现在需要考虑如何调整按钮元素的大小。我们有一个想要方形的图标,因此宽度和高度将相同。接下来,我们有一个与图标高度相同但更宽的文本描述:

整个组件的宽度是图标的宽度加上描述的宽度。整个组件的高度与图标和描述的高度相同;然而,它让我们更灵活地使高度与两者中较大者相同。这样,如果我们决定让一个项目比另一个大,我们就知道该组件将足够大以包含它们。让我们为图标选择 80 x 80 的起始尺寸,为描述选择 80 x 240 的起始尺寸并定义属性:
Style.qml 添加
readonly property real widthNavigationButtonIcon: 80
readonly property real heightNavigationButtonIcon: widthNavigationButtonIcon
readonly property real widthNavigationButtonDescription: 240
readonly property real heightNavigationButtonDescription: heightNavigationButtonIcon
readonly property real widthNavigationButton: widthNavigationButtonIcon + widthNavigationButtonDescription
readonly property real heightNavigationButton: Math.max(heightNavigationButtonIcon, heightNavigationButtonDescription)
这里有几点需要注意。 属性可以直接绑定到其他属性,这减少了重复的数量并使整个设置更加动态。我们知道我们希望我们的图标是方形的,所以通过绑定高度和宽度一样,如果我们想改变图标的总大小,我们只需要更新宽度,高度就会自动更新QML 还与 JavaScript 引擎有很强的集成,因此我们可以使用 Math.max() 函数来帮助我们确定哪个高度更大.
我们希望导航按钮做的另一件事是当用户将鼠标悬停在按钮上时提供某种视觉提示,以表明它是一个交互式元素。 为此,我们需要每个按钮都有自己的背景矩形。在 NavigationButton 中,将 Row 元素包装在一个新的 Rectangle 中,并将尺寸插入到我们的组件中:
NavigationButton.qml
import QtQuick 2.9
import assets 1.0

Item {
    property alias iconCharacter: textIcon.text
    property alias description: textDescription.text

    width: Style.widthNavigationButton
    height: Style.heightNavigationButton

    Rectangle
    {
        id: background
        anchors.fill: parent
        color: Style.colourNavigationBarBackground //黑色导航条

        Row
        {
            Text
            {
                id: textIcon //图标
                width: Style.widthNavigationButtonIcon //
                height: Style.heightNavigationButtonIcon //
                font
                {
                    family: Style.fontAwesome
                    pixelSize: Style.pixelSizeNavigationBarIcon
                }
                color: Style.colourNavigationBarFont
                text: "\uf11a"
            }
            Text
            {
                id: textDescription
                width: Style.widthNavigationButtonDescription
                height: Style.heightNavigationButtonDescription
                color: Style.colourNavigationBarFont
                text: "SET ME!!"
            }
        }
    }
}

因为我们的导航栏被硬编码为 100 像素宽.所以我们的部分描述被截断了。我们需要改变这一点,并实现切换展开/折叠功能。我们已经计算了我们需要的大小,所以让我们通过向 Style.qml 添加几个新属性:
    readonly property real widthNavigationBarCollapsed: widthNavigationButtonIcon //折叠
    readonly property real heightNavigationBarExpanded: widthNavigationButton //展开
折叠状态将刚好足以容纳图标,而展开状态将包含整个按钮,包括描述。接下来,让我们将导航栏封装在一个新组件中。在这种情况下不会有任何重用的优势,因为只有一个,但它有助于保持我们的 QML 有条理并使 MasterView 更简洁易读。
右键单击 components.qrc 并选择 Add New… > Qt > QML File。新建名NavigationBar.qml 添加到 cm/cm-ui/components:

编辑 components.qrc
<RCC>
    <qresource prefix="/components">
        <file alias="qmldir">components/qmldir</file>
        <file alias="NavigationButton.qml">components/NavigationButton.qml</file>
        <file alias="NavigationBar.qml">components/NavigationBar.qml</file>
    </qresource>
</RCC>
通过编辑 qmldir 将组件添加到我们的组件模块:
NavigationBar 1.0 NavigationBar.qml
从 MasterView 中剪切 Rectangle 及其子元素,并将其粘贴到NavigationBar.qml中根Item元素内 。如果 QtQuick 模块导入已初始化为某个旧版本,请将其更新到版本 2.9。为我们的assets模块添加一个导入以访问我们的 Style 对象。将 Rectangle 的 anchors 和 width 属性移动到根 Item 中并设置 Rectangle 中添加anchors.fill: parent以填充其父项:
NavigationBar.qml:
import QtQuick 2.9
Item
{
    anchors //Rectangle中移动过来的项
    {
        top: parent.top
        bottom: parent.bottom
        left: parent.left
    }
    width: 100
    Rectangle
    {
        id: navigationBar
        anchors.fill: parent //添加
        color: "#000000"
        Column
        {
            NavigationButton
            {
                iconCharacter: "\uf0c9"
                description: ""
            }
            NavigationButton
            {
                iconCharacter: "\uf015"
                description: "Dashboard"
            }
            NavigationButton
            {
                iconCharacter: "\uf234"
                description: "New Client"
            }
            NavigationButton
            {
                iconCharacter: "\uf002"
                description: "Find Client"
            }
        }
    }
}
回到 MasterView,您现在可以在原来的 Rectangle位置添加新的 NavigationBar组件:
虽然您再次看到红色波浪线,但您实际上将能够运行应用程序并验证重构没有破坏任何东西。我们新的 NavigationBar 组件的锚定好了,但是宽度有点复杂——我们怎么知道它应该是 Style.widthNavigationBarCollapsed(导航栏的宽度折叠) 还是 Style.heightNavigationBarExpanded(导航栏的高度展开)?我们将使用一个可公开访问的布尔属性来控制它,该属性指示栏是否折叠。 然后我们可以使用这个属性的值来决定我们想要使用条件的宽度?运算符语法。 最初将属性设置为 true,因此默认情况下栏将以其折叠状态呈现:
在NavigationBar.qml Item 后添加
Item
{
    property bool isCollapsed: true //导航栏是否叠
NavigationBar.qml 添加
import assets 1.0
将其100的硬编码宽度width: 100替换,如下所示:
width: isCollapsed ? Style.widthNavigationBarCollapsed : Style.heightNavigationBarExpanded
接下来,将 Rectangle 的 color 属性更新为
Style.colourNavigationBarBackground
NavigationBar.qml :
import QtQuick 2.9
import assets 1.0

Item
{
    property bool isCollapsed: true //是否折叠
    anchors
    {
        top: parent.top
        bottom: parent.bottom
        left: parent.left
    }
    width: isCollapsed ? Style.widthNavigationBarCollapsed : Style.heightNavigationBarExpanded //NavigationBar 根据isCollapsed显示折叠效果
    Rectangle
    {
        id: navigationBar
        anchors.fill: parent
        color: Style.colourNavigationBarBackground
        Column
        {
            NavigationButton
            {
                iconCharacter: "\uf0c9"
                description: ""
            }
            NavigationButton
            {
                iconCharacter: "\uf015"
                description: "Dashboard"
            }
            NavigationButton
            {
                iconCharacter: "\uf234"
                description: "New Client"
            }
            NavigationButton
            {
                iconCharacter: "\uf002"
                description: "Find Client"
            }
        }
    }
}
Clicking
接下来通过MouseArea组件实现NavigationButton的点击功能,与 Button 组件非常相似,我们的 NavigationButton 在被点击时不应该做任何事情,除了通知它们的父级事件已经发生。组件应该尽可能通用且无视上下文,以便您可以在多个地方使用它们。我们需要做的是添加一个 MouseArea 组件,并通过自定义信号简单地传递 onClicked 事件。
在 NavigationButton 中,我们首先添加要在单击组件时发出的信号。 在属性之后添加这个:
NavigationButton.qml:
Item {
    property alias iconCharacter: textIcon.text
    property alias description: textDescription.text
    signal navigationButtonClicked() //添加点击信号
尝试给信号提供非常具体的名称,即使它们有点长。如果您简单地调用所有内容 clicked(),那么事情可能会变得有点混乱,有时您可能会发现自己引用了与您想要的信号不同的信号。
接下来,我们将添加另一个属性来支持我们将实现的一些鼠标悬停。这将是一种颜色类型,我们将其默认为常规背景颜色
property color hoverColour: Style.colourNavigationBarBackground
我们将这种颜色与 Rectangle 的 states 属性结合使用,在Rectangle的结尾添加Rectangle 的states属性以显示鼠标悬停状态:
        states:
        [
            State
            {
                name: "hover"
                PropertyChanges
                {
                    target: background
                    color: hoverColour
                }
            }
        ]
将数组中的每个状态视为一个命名配置。默认配置没有名称 (""),由我们已经在 Rectangle 元素中设置的属性组成。 “悬停”状态将更改应用于 PropertyChanges 元素中指定的属性,即它会将具有 ID 背景的元素的颜色属性更改为 hoverColour 的任何值。接下来,在Rectangle内Row后添加我们的鼠标区域:
        MouseArea
        {
            anchors.fill: parent
            cursorShape: Qt.PointingHandCursor
            hoverEnabled: true
            onEntered: background.state = "hover"
            onExited: background.state = ""
            onClicked: navigationButtonClicked()
        }
我们使用anchors 属性来填充整个按钮背景区域,包括图标和文本描述。接下来,我们将通过在鼠标光标进入按钮区域时将鼠标光标更改为PointingHandCursor。并使用 hoverEnabled 标志启用悬停来使事情,启用后,当光标进入和退出区域时会发出onEntered和onExited信号,我们可以使用相应的插槽通过在刚刚实现的悬停状态和默认状态之间切换来更改背景矩形的外观(“ ”),最后,我们使用 onClicked() 槽响应 MouseArea 的 clicked() 信号并简单地发出我们自己的信号。
NavigationButton.qml:
import QtQuick 2.9
import assets 1.0

Item
{
    property alias iconCharacter: textIcon.text
    property alias description: textDescription.text
    property color hoverColour: Style.colourNavigationBarBackground
    signal navigationButtonClicked()

    width: Style.widthNavigationButton
    height: Style.heightNavigationButton

    Rectangle
    {
        id: background
        anchors.fill: parent
        color: Style.colourNavigationBarBackground
        Row
        {
            Text
            {
                id: textIcon
                width: Style.widthNavigationButtonIcon //
                height: Style.heightNavigationButtonIcon //
                font
                {
                    family: Style.fontAwesome
                    pixelSize: Style.pixelSizeNavigationBarIcon
                }
                color: Style.colourNavigationBarFont
                text: "\uf11a"
            }
            Text
            {
                id: textDescription
                width: Style.widthNavigationButtonDescription
                height: Style.heightNavigationButtonDescription
                color: Style.colourNavigationBarFont
                text: "SET ME!!"
            }
        }
        MouseArea
        {
            anchors.fill: parent                            //填充填充整个按钮背景区域
            cursorShape: Qt.PointingHandCursor              //鼠标光标更改为指向手
            hoverEnabled: true                              //hoverEnabled 标志启用悬停
            onEntered: background.state = "hover"           //当光标进入更改背景状态"hover"
            onExited: background.state = ""                 //当光标退出更改背景状态""
            onClicked: navigationButtonClicked()
            //我们使用 onClicked() 槽响应 MouseArea 的 clicked() 信号
        }
        states:
        [
            State
            {
                name: "hover"
                PropertyChanges
                {
                    target: background
                    color: hoverColour
                }
            }
        ]
    }
}
我们现在可以对NavigationBar中的导航按钮 Clicked() 信号做出反应,并在我们使用它时添加一些悬停颜色。 首先实现toggle按钮:
NavigationBar.qml
NavigationButton
{
    iconCharacter: "\uf0c9"
    description: ""
    hoverColour: "#993333" 								   //添加悬浮颜色
    onNavigationButtonClicked: isCollapsed = !isCollapsed  //导航栏展开和折叠
}
我们实现了 约定来为我们的信号创建一个槽,当它触发时,我们只需在 true 和 false 之间切换 isCollapsed 的值。您现在可以运行该应用程序。 单击 Toggle 按钮以展开和折叠导航栏:
对于剩余的导航按钮,我们想要对 clicked 事件做出反应的是在 NavigationCoordinator 上发出 goDashboardView()、goCreateClientView() 和 goFindClientView() 信号。将 onNavigationButtonClicked 插槽添加到其他按钮并响应 masterController对象以获取我们想要调用的信号。
NavigationBar.qml
import QtQuick 2.9
import assets 1.0

Item
{
    property bool isCollapsed: true

    anchors
    {
        top: parent.top
        bottom: parent.bottom
        left: parent.left
    }
    width: isCollapsed ? Style.widthNavigationBarCollapsed : Style.heightNavigationBarExpanded
    Rectangle
    {
        id: navigationBar
        anchors.fill: parent
        color: Style.colourNavigationBarBackground
        Column
        {
            NavigationButton
            {
                iconCharacter: "\uf0c9"
                description: ""
                hoverColour: "#993333"
                onNavigationButtonClicked: isCollapsed = !isCollapsed
            }
            NavigationButton
            {
                iconCharacter: "\uf015"
                description: "Dashboard"
                hoverColour: "#dc8a00"
                onNavigationButtonClicked:
                    masterController.ui_navigationController.goDashBoardView();
            }
            NavigationButton
            {
                iconCharacter: "\uf234"
                description: "New Client"
                hoverColour: "#dccd00"
                onNavigationButtonClicked:
                    masterController.ui_navigationController.goCreateClientView();
            }
            NavigationButton
            {
                iconCharacter: "\uf002"
                description: "Find Client"
                hoverColour: "#8aef63"
                onNavigationButtonClicked:
                    masterController.ui_navigationController.goFindClientView();
            }
        }
    }
}
您现在可以单击按钮导航到不同的子视图。
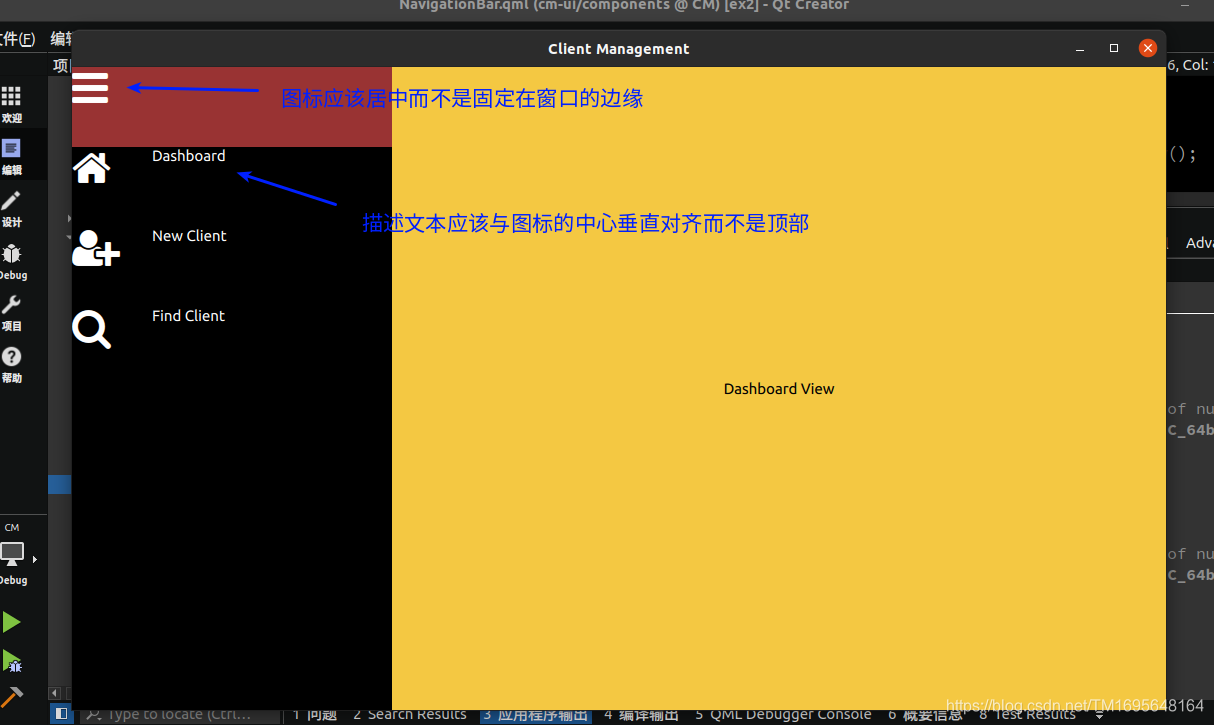
完成导航栏的最后一些小调整是更好地对齐按钮的内容并调整一些内容的大小。描述文本应该与图标的中心垂直对齐而不是顶部,我们的图标应该居中而不是固定在窗口的边缘。第一个问题很容易解决,因为我们已经对尺寸进行了一致和明确的处理。只需将以下属性添加到 NavigationButton 中的两个 Text 组件:
两个 Text 元素的大小都被调整为占据按钮的整个高度,所以我们只需要在该空间内垂直对齐文本。
verticalAlignment: Text.AlignVCenter
修复图标的对齐方式是一样的,但这次是在水平对齐。
verticalAlignment: Text.AlignVCenter
horizontalAlignment: Text.AlignHCenter
至于尺寸,我们的描述文字有点小,文字后面有很多空白。 向我们的 Style 对象添加一个新属性:
readonly property int pixelSizeNavigationBarText: 22
设置描述文本的大小
font.pixelSize: Style.pixelSizeNavigationBarText
接下来,将 Style 中的 widthNavigationButtonDescription 属性减少到 160。即扩展部分的大小。
NavigationButton.qml
    Rectangle
    {
        id: background
        anchors.fill: parent
        color: Style.colourNavigationBarBackground
        Row
        {
            Text
            {
                id: textIcon
                width: Style.widthNavigationButtonIcon //
                height: Style.heightNavigationButtonIcon //
                font
                {
                    family: Style.fontAwesome
                    pixelSize: Style.pixelSizeNavigationBarIcon
                }
                color: Style.colourNavigationBarFont
                text: "\uf11a"
                //图标中间对奇
                verticalAlignment: Text.AlignVCenter //
                horizontalAlignment: Text.AlignHCenter
            }
            Text
            {
                id: textDescription
                width: Style.widthNavigationButtonDescription
                height: Style.heightNavigationButtonDescription
                color: Style.colourNavigationBarFont
                text: "SET ME!!"
                verticalAlignment: Text.AlignVCenter //垂直对齐
                font.pixelSize: Style.pixelSizeNavigationBarText //描述文本大小
            }
        }

但是,您可能没有注意到的一件事是,当栏折叠并且只显示图标时,MouseArea 仍然是包括描述在内的按钮的全宽。尝试将鼠标移动到描述所在的位置,您可以看到指示手形光标出现。您甚至可以单击组件并进行转换。

我们需要做的是解决这个问题,而不是 NavigationButton 中的根 Item 元素是固定宽度(Style.widthNavigationButton),我们需要让它动态并将其设置为 parent.width。为了让它起作用,我们需要沿着 QML 层次结构向上走,并确保它的父级也有一个宽度。它的父元素是 NavigationBar 中的 Column 元素。 将 Column 的 width 属性也设置为 parent.width。


Commands
下一件事是实现上下文相关的命令栏。尽管无论用户在做什么,我们的导航栏始终都带有相同的按钮,但命令栏会根据上下文包含不同的按钮。例如,如果用户正在添加或编辑客户端,我们将需要一个保存按钮来提交对数据库的任何更改。但是,如果我们正在搜索客户,则保存没有意义,而“查找”按钮更相关。虽然创建命令栏的技术与导航栏大体相似,但所需的额外灵活性带来了更多挑战。
为了帮助我们克服这些障碍,我们将执行命令。这种方法的另一个好处是我们可以将逻辑从UI层移到业务逻辑层。我喜欢 UI 尽可能简单和通用。这使您的应用程序更加灵活,并且C++代码中的错误比QML中的错误更容易识别和解决。
命令对象将封装一个图标、描述性文本、一个确定按钮是否启用的函数,最后是一个在相关按钮被按下时将发出的 executed() 号。我们命令栏中的每个按钮都将绑定到一个命令对象。
我们的每个子视图都可能有一个命令列表和一个关联的命令栏。对于执行此操作的视图,我们将通过命令控制器向UI呈现命令列表。
在 cm-lib 项目中创建两个新的 C++ 类,它们都应该继承自 QObject:
-
Command 在新文件夹 cm-lib/source/framework 中
-
Command Controller 在现有文件夹 cm-lib/source/controllers 中
右cm-lib选择添加Add New->C+±>C++ Class 选择路径cm-lib/source/ 新建framework,选择类名Command基类Object
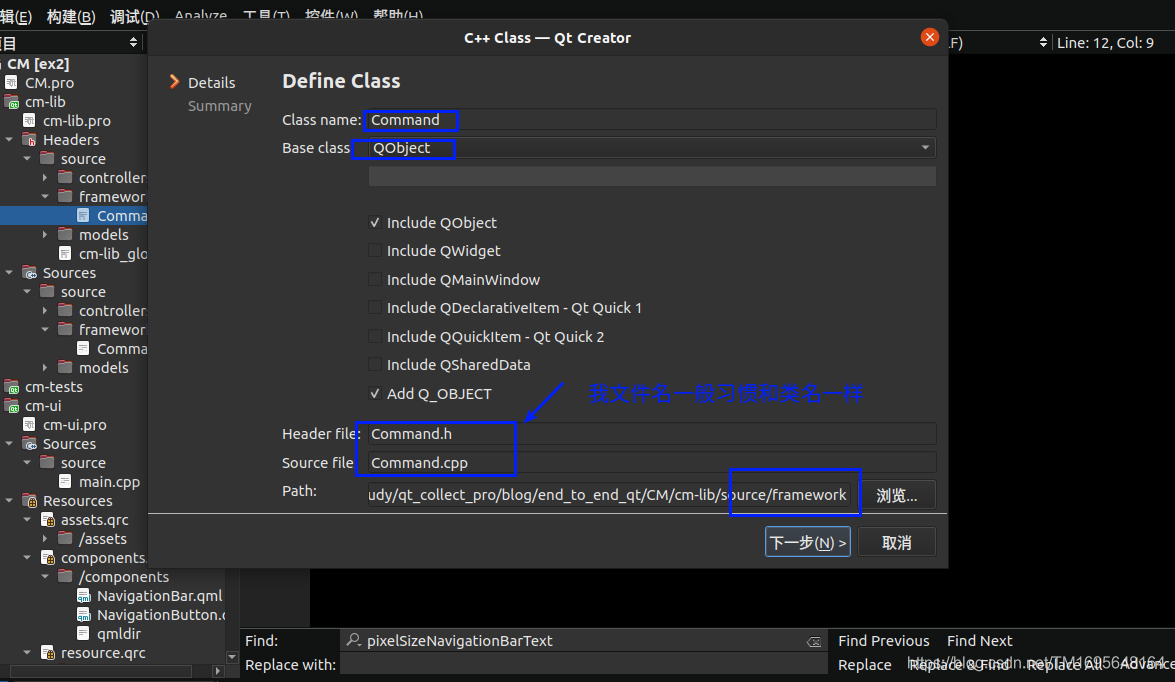
同样步骤添加CommandController类到cm-lib/source/controllers文件夹
打开Command.h
Command.h:
#ifndef COMMAND_H
#define COMMAND_H

#include <QObject>
//1.添加 #include <cm-lib_global.h> 头
#include <cm-lib_global.h>

//3.添加命名空间
namespace cm
{
namespace framework
{
//2.类名前添加CMLIBSHARED_EXPORT
class CMLIBSHARED_EXPORT Command : public QObject
{
    //命令对象将封装一个图标、描述性文本、一个确定按钮是否启用的函数
    //最后是一个在相关按钮被按下时将发出的executed()号
    //我们命令栏中的每个按钮都将绑定到一个命令对象
    //我们将要在UI按钮上显示的图标字符和描述值表示为字符串
    Q_OBJECT
    Q_PROPERTY( QString ui_iconCharacter READ iconCharacter CONSTANT )
    Q_PROPERTY( QString ui_description READ description CONSTANT )
    Q_PROPERTY( bool ui_canExecute READ canExecute NOTIFY canExecuteChanged )
public:
    explicit Command(QObject* parent = nullptr,
                     const QString& iconCharacter = "",
                     const QString& description = "",
                     std::function<bool()> canExecute = [](){ return true; });
    ~Command();
    //返回成员函数的接口
    const QString& iconCharacter() const;
    const QString& description() const;
    bool canExecute() const;
signals:
    void canExecuteChanged();
    void executed();
signals:
//4.添加私有成员
//我们将成员变量隐藏在私有实现中并提供对implementation的访问
private:
    class Implementation;
    QScopedPointer<Implementation> implementation;
};
}
}
#endif // COMMAND_H
Command.cpp:
#include "Command.h"
//Command的实现
//1.添加命名空间
namespace cm
{
namespace framework
{
//Implementation对象的实现
class Command::Implementation
{
public:
    Implementation(const QString& _iconCharacter, const QString&
     _description, std::function<bool()> _canExecute)
        : iconCharacter(_iconCharacter)
        , description(_description)
        , canExecute(_canExecute)
    {
    }

    QString iconCharacter;
    QString description;
    //我们可以将canExecute成员表示为一个简单的bool成员
    //调用代码可以根据需要将其设置为true或false
    //然而,一个更优雅的解决方案是传入一个方法来为我们即时计算值
    //默认情况下,我们将其设置为返回true的lambda,这意味着按钮将被启用
    std::function<bool()> canExecute;
};

//构造函数实则是初始化包装器的实例,
Command::Command(QObject* parent, const QString& iconCharacter, const QString& description, std::function<bool()> canExecute)
    : QObject(parent)
{
    implementation.reset(new Implementation(iconCharacter, description, canExecute));
}

Command::~Command()
{
}

const QString& Command::iconCharacter() const
{
    return implementation->iconCharacter;
}

const QString& Command::description() const
{
    return implementation->description;
}

bool Command::canExecute() const
{
    return implementation->canExecute();
}
}
}
std::function<bool()> canExecute;的目的应该是为了可以传函数去判断true和false。QObject、命名空间和 库导出代码现在应该很熟悉了。我们将要在 UI 按钮上显示的图标字符和描述值表示为字符串。我们将成员变量隐藏在私有实现中并为它们提供访问器方法。我们可以将 canExecute 成员表示为一个简单的 bool 成员,调用代码可以根据需要将其设置为 true 或 false;然而,一个更优雅的解决方案是传入一个方法来为我们即时计算值。默认情况下,我们将其设置为返回 true 的 lambda,这意味着按钮将被启用。我们提供了一个 canExecuteChanged() 信号来配合这个,只要我们希望 UI 重新评估按钮是否启用,我们就可以触发它。最后一个元素是executed()信号,当相应的按钮被按下时将由 UI 触发。
现在看CommandController 类:用于控制管理 创建 Command 列表
在这里,我们引入了一个新类型——QQmlListProperty。它本质上是一个包装器,使 QML 能够与自定义对象列表进行交互。请记住,我们需要在 Q_PROPERTY 语句中完全限定模板类型。实际保存数据的私有成员是 QList,我们已经实现了一个访问器方法,该方法获取 QList 并将其转换为相同模板类型的 QQmlListProperty。
CommandController.h :
#ifndef COMMANDCONTROLLER_H
#define COMMANDCONTROLLER_H

#include <QObject>
#include <cm-lib_global.h>
#include <QtQml/QQmlListProperty>
#include <framework/Command.h>

namespace cm
{
namespace controllers
{
class CMLIBSHARED_EXPORT CommandController : public QObject
{
    Q_OBJECT
    Q_PROPERTY(QQmlListProperty<cm::framework::Command>
     ui_createClientViewContextCommands READ
     ui_createClientViewContextCommands CONSTANT)
public:
    explicit CommandController(QObject *parent = nullptr);
    ~CommandController();
    QQmlListProperty<framework::Command>
    ui_createClientViewContextCommands();
signals:
    //对象私有成员的包装器
private:
    class Implementation;
    QScopedPointer<Implementation> implementation;
};
}
}
#endif // COMMANDCONTROLLER_H
CommandController.cpp:
#include "CommandController.h"

#include <QList>
#include <QDebug>
using namespace cm::framework;
namespace cm
{
namespace controllers
{
//成员对象的具体实现
//保存命令对象指针的QList,和CommandController的、指针
class CommandController::Implementation
{
public:
    Implementation(CommandController* _commandController)
        : commandController(_commandController)
    {
    }
    CommandController* commandController{nullptr};
    QList<Command*> createClientViewContextCommands{};
};

CommandController::CommandController(QObject *parent) : QObject(parent)
{
    implementation.reset(new Implementation(this));
}

CommandController::~CommandController()
{
}

QQmlListProperty<Command> CommandController::ui_createClientViewContextCommands()
{
    return QQmlListProperty<Command>(this, implementation->createClientViewContextCommands);
}
}
}
我们为 CreateClientView 创建了一个命令列表。我们稍后会为其他视图添加命令列表。我们只需创建一个命令来保存新创建的客户端。
1.在Implementation的构造函数中添加:
/*
  创建命令时,explicit Command(QObject* parent = nullptr,
                     const QString& iconCharacter = "",
                     const QString& description = "",
                     std::function<bool()> canExecute = [](){ return true; });
*/
//parent参数commandController 我们将它作为commandController的父级,这样我们就不必担心内存管理。
//我们为其分配一个软盘图标(unicode f0c7)和 Save 标签
//我们暂时将 canExecute 函数保留为默认值
//因此它将始终处于启用状态
Command* createClientSaveCommand = new Command(commandController, QChar( 0xf0c7 ), "Save");
//把命令createClientSaveCommand添加到QList中
createClientViewContextCommands.append( createClientSaveCommand );
2.在CommandController.h中添加槽函数:
public slots:
    void onCreateClientSaveExecuted();
3.在Implementation的构造函数中连接信号槽:
//当createClientSaveCommand 命令触发executed信号会触发commandController的onCreateClientSaveExecuted 函数执行保存命令
QObject::connect(createClientSaveCommand, &Command::executed, commandController, &CommandController::onCreateClientSaveExecuted);
4.实现槽函数:
//这里只打印了一条调试信息
void CommandController::onCreateClientSaveExecuted()
{
    qDebug() << "You executed the Save command!";
}
CommandController.h
#ifndef COMMANDCONTROLLER_H
#define COMMANDCONTROLLER_H

#include <QObject>
#include <cm-lib_global.h>
#include <QtQml/QQmlListProperty>
#include <framework/Command.h>

namespace cm
{
namespace controllers
{
class CMLIBSHARED_EXPORT CommandController : public QObject
{
    Q_OBJECT
    Q_PROPERTY(QQmlListProperty<cm::framework::Command>
     ui_createClientViewContextCommands READ
     ui_createClientViewContextCommands CONSTANT)
public:
    explicit CommandController(QObject *parent = nullptr);
    ~CommandController();
    QQmlListProperty<framework::Command>
    ui_createClientViewContextCommands();
public slots:
    void onCreateClientSaveExecuted();
signals:
    //对象私有成员的包装器
private:
    class Implementation;
    QScopedPointer<Implementation> implementation;
};
}
}
#endif // COMMANDCONTROLLER_H
CommandController.cpp:
#include "CommandController.h"
#include <QList>
#include <QDebug>
using namespace cm::framework;
namespace cm
{
namespace controllers
{
//成员对象的具体实现
class CommandController::Implementation
{
public:
    Implementation(CommandController* _commandController)
        : commandController(_commandController)
    {
        /*
         * 创建命令时,explicit Command(QObject* parent = nullptr,
                             const QString& iconCharacter = "",
                             const QString& description = "",
                             std::function<bool()> canExecute = [](){ return true; });
        */
        //parent参数commandController 我们将它作为commandController的父级,这样我们就不必担心内存管理。
        //我们为其分配一个软盘图标(unicode f0c7)和 Save 标签
        //我们暂时将 canExecute 函数保留为默认值
        //因此它将始终处于启用状态
        Command* createClientSaveCommand = new Command( commandController, QChar( 0xf0c7 ), "Save" );
        QObject::connect( createClientSaveCommand, &Command::executed, commandController, &CommandController::onCreateClientSaveExecuted );
        createClientViewContextCommands.append( createClientSaveCommand );
    }
    CommandController* commandController{nullptr};
    QList<Command*> createClientViewContextCommands{};
};

CommandController::CommandController(QObject *parent) : QObject(parent)
{
    implementation.reset(new Implementation(this));
}

CommandController::~CommandController()
{
}

QQmlListProperty<Command> CommandController::ui_createClientViewContextCommands()
{
    return QQmlListProperty<Command>(this, implementation->createClientViewContextCommands);
}

void CommandController::onCreateClientSaveExecuted()
{
    qDebug() << "You executed the Save command!";
}

}
}
目的是我们向用户提供一个绑定到 Command 对象的命令按钮。当用户按下按钮时,我们将从 UI 中触发 execution() 信号。我们建立的连接将导致命令控制器上的插槽被调用,我们将执行我们的业务逻辑。现在,我们只需在按下按钮时向控制台打印一行。
接下来,让我们在 main.cpp 中注册我们的两个新类型:
qmlRegisterType<cm::controllers::CommandController>("CM", 1, 0, "CommandController");
qmlRegisterType<cm::framework::Command>("CM", 1, 0, "Command");
添加对CommandController实例的访问
1.下面我们需要将 CommandController 属性添加到 MasterController:
Q_PROPERTY(cm::controllers::CommandController* ui_commandController READ commandController CONSTANT)
添加对CommandController访问函数
public:
	CommandController* commandController();
2.在MasterController实例Impl中创建CommandController的指针和实例化
class MasterController::Implementation
{
public:
    Implementation(MasterController* _masterController)
        : masterController(_masterController)
    {
        commandController = new CommandController(masterController);/
        navigationController = new NavigationController(masterController);
    }
    MasterController* masterController{nullptr};
    CommandController* commandController{nullptr};
    NavigationController* navigationController{nullptr};
    QString welcomeMessage = "学习Qt";
};
CommandController* MasterController::commandController()
{
    return implementation->commandController;
}
MasterController.h:
#ifndef MASTERCONTROLLER_H
#define MASTERCONTROLLER_H

#include <QObject>
#include <cm-lib_global.h>

#include <controllers/NavigationController.h>
#include <controllers/CommandController.h>

namespace cm
{
namespace controllers
{
class CMLIBSHARED_EXPORT MasterController : public QObject
{
    Q_OBJECT
    Q_PROPERTY(QString ui_welcomeMessage READ welcomeMessage CONSTANT)
    Q_PROPERTY(cm::controllers::NavigationController* ui_navigationController READ navigationController CONSTANT)
    Q_PROPERTY(cm::controllers::CommandController* ui_commandController READ commandController CONSTANT)
public:
    explicit MasterController(QObject *parent = nullptr);
    ~MasterController();

    CommandController* commandController();
    NavigationController* navigationController();
    const QString& welcomeMessage() const;
private:
    class Implementation;
    QScopedPointer<Implementation>implementation;
signals:

};
}
}
#endif // MASTERCONTROLLER_H
MasterController.cpp:
#include "MasterController.h"
#include "NavigationController.h"
#include "CommandController.h"

namespace cm {
namespace controllers {

class MasterController::Implementation
{
public:
    Implementation(MasterController* _masterController)
        : masterController(_masterController)
    {
        commandController = new CommandController(masterController);
        navigationController = new NavigationController(masterController);
    }

    MasterController* masterController{nullptr};
    CommandController* commandController{nullptr};
    NavigationController* navigationController{nullptr};
    QString welcomeMessage = "学习Qt";
};

MasterController::MasterController(QObject* parent)
    : QObject(parent)
{
    implementation.reset(new Implementation(this));
}
MasterController::~MasterController()
{
}
NavigationController* MasterController::navigationController()
{
    return implementation->navigationController;
}
CommandController* MasterController::commandController()
{
    return implementation->commandController;
}
const QString& MasterController::welcomeMessage() const
{
    return implementation->welcomeMessage;
}
}}
Command bar
让我们首先为我们的命令组件向 Style 添加更多属性:
Style.qml:
    readonly property color colourCommandBarBackground: "#cecece"
    readonly property color colourCommandBarFont: "#131313"
    readonly property color colourCommandBarFontDisabled: "#636363"
    readonly property real heightCommandBar: heightCommandButton
    readonly property int pixelSizeCommandBarIcon: 32
    readonly property int pixelSizeCommandBarText: 12

    readonly property real widthCommandButton: 80
    readonly property real heightCommandButton: widthCommandButton
接下来,在我们的UI项目中创建两个新的QML组件:CommandBar.qml 和 CommandButton.qml在cm-ui/components文件夹中。更新 components.qrc 并将新组件移动到带有别名的 /components 前缀中。
        <file alias="CommandBar.qml">components/CommandBar.qml</file>
        <file alias="CommandButton.qml">components/CommandButton.qml</file>
编辑 qmldir 并附加新组件:
module components
NavigationButton 1.0 NavigationButton.qml
NavigationBar 1.0 NavigationBar.qml
CommandBar 1.0 CommandBar.qml
CommandButton 1.0 CommandButton.qml
对于我们的按钮设计,我们希望在图标下方布置描述。 图标应位于略高于中心的位置。 组件应该是方形的,如下所示:

CommandButton.qml:
import QtQuick 2.9
import CM 1.0
import assets 1.0

Item
{
    property Command command
    width: Style.widthCommandButton
    height: Style.heightCommandButton


    Rectangle
    {
        id: background
        anchors.fill: parent
        color: Style.colourCommandBarBackground
        Text
        {
            id: textIcon
            anchors
            {
                //我们将图标置于父 Rectangle 中心
                centerIn: parent
                //然后应用垂直偏移将其向上移动并为描述留出空间
                verticalCenterOffset: -10
            }
            font
            {
                family: Style.fontAwesome
                pixelSize: Style.pixelSizeCommandBarIcon
            }
            //我们还使用command.ui_canExecute来有选择地为我们的文本元素着色
            //如果命令被禁用,则使用浅灰色字体
            color: command.ui_canExecute ? Style.colourCommandBarFont :
                                          colourCommandBarFontDisabled
            text: command.ui_iconCharacter
            horizontalAlignment: Text.AlignHCenter
        }

        Text
        {
            id: textDescription
            anchors
            {
                //我们将描述的顶部锚定到图标的底部
                top: textIcon.bottom
                bottom: parent.bottom
                left: parent.left
                right: parent.right
            }
            //我们还使用command.ui_canExecute来有选择地为我们的文本元素着色
            //如果命令被禁用,则使用浅灰色字体
            font.pixelSize: Style.pixelSizeNavigationBarText
            color: command.ui_canExecute ? Style.colourCommandBarFont :
                                          colourCommandBarFontDisabled
            text: command.ui_description
            horizontalAlignment: Text.AlignHCenter
            verticalAlignment: Text.AlignVCenter
        }

        MouseArea
        {
            anchors.fill: parent
            cursorShape: Qt.PointingHandCursor
            hoverEnabled: true
            onEntered: background.state = "hover"
            onExited: background.state = ""
            //我们不是在按下按钮时传播信号,而是发出Command对象的executed()信号
            //首先验证该命令是否可以执行
            onClicked: if(command.ui_canExecute)
                       {
                           command.executed();
                       }
        }

        states:
        [
            State
            {
                name: "hover"
                PropertyChanges
                {
                    target: background
                    //我们只是采用默认值并使用内置的Qt.darker()方法将其变暗一些阴影
                    color: Qt.darker(Style.colourCommandBarBackground)
                }
            }
        ]
    }
}
这在很大程度上类似于我们的 NavigationButton 组件。我们传入一个 Command 对象,它是我们将在 Text 元素中显示的图标字符和描述以及按下按钮时发出的信号的地方,只要命令可以执行即可。
我们使用基于Row/Column的布局的替代方案,并使用锚点来定位我们的图标和描述。我们将图标置于父 Rectangle 中心,然后应用垂直偏移将其向上移动并为描述留出空间。我们将描述的顶部锚定到图标的底部。
我们不是在按下按钮时传播信号,而是发出 Command 对象的已执行()信号,首先验证该命令是否可以执行。我们还使用这个标志来有选择地为我们的文本元素着色,如果命令被禁用,则使用浅灰色字体。
我们使用 MouseArea 实现了更多的悬停功能,但不是公开一个属性来传递悬停颜色,我们只是采用默认值并使用内置的 Qt.darker() 方法将其变暗一些阴影。如果命令可以执行,我们也只在 MouseArea 的 onEntered() 槽中应用状态更改。
CommandBar.qml:
import QtQuick 2.9
import assets 1.0

Item
{
    //命令行的列表
    //我们使用另一个属性别名,以便调用者可以设置命令列表。
    property alias commandList: commandRepeater.model
    anchors
    {
        left: parent.left
        bottom: parent.bottom
        right: parent.right
    }
    height: Style.heightCommandBar
    Rectangle
    {
        anchors.fill: parent
        color: Style.colourCommandBarBackground
        Row
        {
            anchors
            {
                top: parent.top
                bottom: parent.bottom
                right: parent.right
            }
            //通过模型属性对象的列表
            //Repeater将为列表中的每个项目实例化一个在委托属性中定义的QML组件
            //列表中的对象通过内置的modelData变量可用
            //使用这种机制,我们可以为给定列表中的每个命令自动生成一个 CommandButton 元素。
            Repeater
            {
                id: commandRepeater
                delegate: CommandButton {
                    command: modelData
                }
            }
        }
    }
}
同样,这与 NavigationBar 大致相同,但具有动态命令列表,而不是硬编码的 QML 按钮。 我们引入了另一个新组件Repeater 通过模型属性给定一个对象列表,Repeater 将为列表中的每个项目实例化一个在委托属性中定义的 QML 组件。 列表中的对象通过内置的 modelData 变量可用。 使用这种机制,我们可以为给定列表中的每个命令自动生成一个 CommandButton 元素。 我们使用另一个属性别名,以便调用者可以设置命令列表.
让我们在 CreateClientView 中使用它。 首先,导入 components 1.0,然后在根 Item 内和 Rectangle 之后添加以下内容:
    CommandBar
    {
        commandList: masterController.ui_commandController.ui_createClientViewContextCommands
    }

关闭窗口出现
QML debugging is enabled. Only use this in a safe environment.
qrc:/views/MasterView.qml:17: TypeError: Cannot read property 'ui_navigationController' of null
qrc:/views/CreateClientView.qml:18: TypeError: Cannot read property 'ui_commandController' of null
qrc:/components/CommandButton.qml:54: TypeError: Cannot read property 'ui_canExecute' of null
qrc:/components/CommandButton.qml:56: TypeError: Cannot read property 'ui_description' of null
qrc:/components/CommandButton.qml:34: TypeError: Cannot read property 'ui_canExecute' of null
qrc:/components/CommandButton.qml:36: TypeError: Cannot read property 'ui_iconCharacter' of null
不知道什么原因
JSON
JSON 对象封装在大括号 {} 中,而属性则以 key: value 格式表示。 字符串用双引号“”分隔。 我们可以如下表示单个客户端对象:
{
    "reference": "CLIENT0001",
    "name": "Dale Cooper"
}
请注意,空格和控制字符(例如制表符和换行符)将被忽略——缩进的属性只是为了让内容更易读。
在通过网络传输时(例如,在 HTTP 请求中),从 JSON 中去除无关字符通常是一个好主意,以减少有效负载的大小; 每个字节都很重要!
属性值可以是以下类型之一:字符串、数字、JSON 对象、JSON 数组以及字面值 true、false 和 null。我们可以将供应地址和账单地址作为子 JSON 对象添加到我们的客户端,为每个对象提供一个唯一的密钥。虽然密钥可以是任何格式,只要它们是唯一的,通常的做法是使用驼峰式大小写,例如 myAwesomeJsonKey。 我们可以用 null 表示一个空的地址对象:
{
    "reference": "CLIENT0001",
    "name": "Dale Cooper",
    "supplyAddress":
    {
         "number": 7,
        "name": "White Lodge",
        "street": "Lost Highway",
        "city": "Twin Peaks",
        "postcode": "WS119"
    },
    "billingAddress": null
}
Object hierarchy
大多数实际应用程序以分层或关系方式表示数据,并将数据合理化为离散对象。 通常有一个中央“根”对象,它作为多个其他子对象的父对象,作为单个对象或集合。每个离散对象都有自己的一组数据项,可以是任意数量的类型

下表描述了每个模型的用途:
| Model | Description |
|---|---|
| Client | 这是我们对象层次结构的根,代表我们公司与例如客户或患者有关系的个人或团体。 |
| Contact | 我们可以用来联系客户的地址集合。 可能的联系类型是电话、电子邮件和传真。 每个客户可能有一个或多个联系人。 |
| Appointment | 与客户的预定约会的集合,例如,现场访问或咨询。 每个客户可能有零个或多个约会。 |
| Supply address | 与客户关系的核心地址,例如,我们公司向其提供能源的站点或患者的家庭住址。 每个客户必须有一个供应地址。 |
| Billing address | 与用于开票的供应地址不同的可选地址,例如,公司总部。 每个客户可能有零个或一个账单地址。 |
Entities
由于我们希望在数据模型之间共享许多功能,因此我们将实现一个实体基类。我们需要能够表示父/子关系,以便客户可以拥有供应地址和账单地址。我们还需要为我们的联系人和Contact支持实体集合。最后,每个实体层次结构都必须能够在 JSON 对象之间进行序列化。
在 cm-lib/source/data 中创建一个新类 Entity 基类QObject:
Entity.h
1.添加cm-lib_global.h,CMLIBSHARED_EXPORT导出库.
2.添加构造函数
public:
    Entity(QObject* parent = nullptr, const QString& key ="SomeEntityKey");
	//我们为所有实体分配一个唯一键,该键将用于JSON序列化
    Entity(QObject* parent, const QString& key, const QJsonObject& jsonObject);
	//我们还添加了一个重载的构造函数,我们可以向它传递一个QJsonObject,以便我们可以从JSON实例化一个实体
    virtual ~Entity();
3.添加实现细节 C++ Pimpl 惯用模式Pimpl idiom
protected:
    class Implementation;
    QScopedPointer<Implementation> implementation;
4.添加公用成员函数
    const QString& key() const; //用于返回键值
    void update(const QJsonObject& jsonObject);//我们还声明了一对方法来将现有实例序列化为JSON或从JSON序列化
    QJsonObject toJson() const;
5.protected方法
protected:
	//我们公开了一些受保护的方法,派生类将使用这些方法添加其数据项和子项
    Entity* addChild(Entity* entity, const QString& key);
    DataDecorator* addDataItem(DataDecorator* dataDecorator);
6.signals
signals:
    void childEntitiesChanged();
    void dataDecoratorsChanged();
Entity.cpp
1.Entity::Implementation的实现:
class Entity::Implementation
{
public:
    Implementation(Entity* _entity, const QString& _key)
        : entity(_entity)
        , key(_key)
    {
    }
    //当前实体对象的指针
    Entity* entity{nullptr};
    //当前实体的key
    QString key;
    //我们的实体将维护一些集合
    //我们将每个项目的键映射到实例
    //一个表示子项的实体映射
    std::map<QString, Entity*> childEntities;
    //一个表示模型属性的数据Decorator映射
    std::map<QString, DataDecorator*> dataDecorators;
};
2.添加子实体对象的实现
Entity* Entity::addChild(Entity* entity, const QString& key)
{
    //如果当前不存在,key对应的实体对象,向std::map<QString, Entity*> childEntities中
    //加入实体对象
    if(implementation->childEntities.find(key) == std::end(implementation->childEntities))
    {
        implementation->childEntities[key] = entity;
        emit childEntitiesChanged();
    }
    return entity;
}
3.update
void Entity::update(const QJsonObject& jsonObject)
{
    for (std::pair<QString, DataDecorator*> dataDecoratorPair :
         implementation->dataDecorators)
    {
        //我们已经在DataDecorator基类上声明了一个update()方法
        //因此我们只需遍历所有数据项并将JSON对象依次传递给每个数据项
        //每个派生的Decorator类都有自己的实现来处理解析
        dataDecoratorPair.second->update(jsonObject);
    }
    for (std::pair<QString, Entity*> childEntityPair : implementation->childEntities)
    {
        //类似地,我们对每个子实体递归调用Entity::update()
        childEntityPair.second->update(jsonObject.value(childEntityPair.first).toObject());
    }
}
4.toJson
QJsonObject Entity::toJson() const
{
    //每个数据项都可以将其值转换为 QJsonValue 对象
    QJsonObject returnValue;
    //因此我们依次获取每个值并使用每个项的键将其附加到根 JSON 对象
    for (std::pair<QString, DataDecorator*> dataDecoratorPair :
         implementation->dataDecorators)
    {
        //把dataDecorator中数据存入QJsonObject中
        returnValue.insert(dataDecoratorPair.first,
        dataDecoratorPair.second->jsonValue());
    }
    //遍历dataDecorator
    for (std::pair<QString, Entity*> childEntityPair : implementation->childEntities)
    {
        //因此我们依次获取每个值并使用每个项的键将其附加到根JSON对象
        //我们在每个子节点上递归调用 Entity::toJson()
        returnValue.insert( childEntityPair.first, childEntityPair.second->toJson());
    }
    return returnValue;
}
最终Entity对象
Entity.h
#ifndef ENTITY_H
#define ENTITY_H

#include <map>
#include <cm-lib_global.h>
#include <QScopedPointer>
#include <QJsonObject>
#include <data/DataDecorator.h>
#include <QObject>

namespace cm
{
namespace data
{
class CMLIBSHARED_EXPORT Entity : public QObject
{
    Q_OBJECT
public:
    Entity(QObject* parent = nullptr, const QString& key = "SomeEntityKey");
    Entity(QObject* parent, const QString& key, const QJsonObject& jsonObject);
    virtual ~Entity();
public:
    const QString& key() const; //我们为所有实体分配一个唯一键,该键将用于 JSON 序列化
    void update(const QJsonObject& jsonObject);//我们还声明了一对方法来将现有实例序列化为JSON或从JSON序列化
    QJsonObject toJson() const;
signals:
    void childEntitiesChanged();
    void dataDecoratorsChanged();
protected:
    Entity* addChild(Entity* entity, const QString& key);
    DataDecorator* addDataItem(DataDecorator* dataDecorator);
protected:
    class Implementation;
    QScopedPointer<Implementation> implementation;
};
}
}

#endif // ENTITY_H
Entity.cpp
#include "Entity.h"

namespace cm
{
namespace data
{
class Entity::Implementation
{
public:
    Implementation(Entity* _entity, const QString& _key)
        : entity(_entity)
        , key(_key)
    {
    }
    Entity* entity{nullptr};
    //我们为所有实体分配一个唯一键,该键将用于JSON序列化。
    QString key;
    std::map<QString, Entity*> childEntities;
    std::map<QString, DataDecorator*> dataDecorators;
};

Entity::Entity(QObject* parent, const QString& key)
    : QObject(parent)
{
    implementation.reset(new Implementation(this, key));
}

Entity::Entity(QObject* parent, const QString& key, const QJsonObject&
               jsonObject) : Entity(parent, key)
{
    update(jsonObject);
}

Entity::~Entity()
{
}

const QString& Entity::key() const
{
    return implementation->key;
}

Entity* Entity::addChild(Entity* entity, const QString& key)
{
    if(implementation->childEntities.find(key) ==
        std::end(implementation->childEntities))
    {
        implementation->childEntities[key] = entity;
        emit childEntitiesChanged();
    }
    return entity;
}

DataDecorator* Entity::addDataItem(DataDecorator* dataDecorator)
{
    if(implementation->dataDecorators.find(dataDecorator->key()) ==
            std::end(implementation->dataDecorators))
    {
        implementation->dataDecorators[dataDecorator->key()] =
        dataDecorator;
        emit dataDecoratorsChanged();
    }
    return dataDecorator;
}

void Entity::update(const QJsonObject& jsonObject)
{
    // 更新数据Decorator
    for (std::pair<QString, DataDecorator*> dataDecoratorPair :
         implementation->dataDecorators)
    {
        dataDecoratorPair.second->update(jsonObject);
    }
    // 更新子实体
    for (std::pair<QString, Entity*> childEntityPair : implementation->childEntities)
    {
        childEntityPair.second->update(jsonObject.value(childEntityPair.first).toObject());
    }
}

QJsonObject Entity::toJson() const
{
    QJsonObject returnValue;
    // 添加数据Decorator
    for (std::pair<QString, DataDecorator*> dataDecoratorPair :
                         implementation->dataDecorators)
    {
        returnValue.insert( dataDecoratorPair.first,
        dataDecoratorPair.second->jsonValue());
    }
    // 添加子实体
    for (std::pair<QString, Entity*> childEntityPair : implementation->childEntities)
    {
        returnValue.insert( childEntityPair.first, childEntityPair.second->toJson() );
    }
    return returnValue;
}
}}
DataDecorators
我们的客户端模型的 name 属性的一个简单实现是将其添加为 QString;然而,这种方法有一些缺点。每当我们在 UI 中显示此属性时,我们可能希望在文本框旁边显示一个信息标签,以便用户知道它的用途,比如“名称”或类似的东西。每当我们想要验证用户输入的名称时,我们都必须在其他地方的代码中进行管理。最后,如果我们想将值序列化为 JSON 或从 JSON 序列化同样需要一些其他组件为我们完成。为了解决所有这些问题,我们将引入 DataDecorator 的概念,它将提升给定的基本数据类型并为我们提供开箱即用的标签、验证功能和 JSON 序列化。我们的模型将维护一组 DataDecorator,允许它们通过简单地遍历数据项并执行相关操作来验证和序列化自己为 JSON。
在我们的 cm-lib 项目中,在新文件夹 cm-lib/source/data 中创建以下类:
| Class | Purpose |
|---|---|
| DataDecorator | 我们数据项的基类 |
| StringDecorator | 字符串属性的派生类 |
| IntDecorator | 整数属性的派生类 |
| DateTimeDecorator | 日期/时间属性的派生类 |
| EnumeratorDecorator | 枚举属性的派生类 |
DataDecorator.h
添加cm-lib_global.h头和命名空间CMLIBSHARED_EXPORT,我们的 DataDecorator基类将包含我们所有数据项之间共有的功能。
1.添加
private:
    class Implementation;
    QScopedPointer<Implementation> implementation;
DataDecorator.cpp中实现:
class DataDecorator::Implementation
{
public:
    Implementation(Entity* _parent, const QString& _key, const QString& _label)
        : parentEntity(_parent)
        , key(_key)
        , label(_label)
    {
    }
    //我们将这些成员隐藏在私有实现中
    Entity* parentEntity{nullptr};
    //我们所有的DataDecorator都必须有一个键
    //在与JSON之间进行序列化时将使用该键
    QString key;
    //并且它们还将共享一个标签属性
    //UI可以使用该属性在数据控件旁边显示描述性文本
    QString label;
};
2.构造函数
//因为我们是从 QObject 继承的,所以我们希望在我们的构造函数中接收一个指向父对象的指针,
//我们也知道所有数据项都将是一个Entity的子项,实体本身将从QObject派生
DataDecorator(Entity* parent = nullptr, const QString& key =
                  "SomeItemKey", const QString& label = "");
DataDecorator.h:
#ifndef DATADECORATOR_H
#define DATADECORATOR_H

#include <QJsonObject>
#include <QJsonValue>
#include <QObject>
#include <QScopedPointer>

#include <cm-lib_global.h>
namespace cm {
namespace data {
class Entity;
class CMLIBSHARED_EXPORT DataDecorator : public QObject
{
    Q_OBJECT
    Q_PROPERTY(QString ui_label READ label CONSTANT)
public:
    DataDecorator(Entity* parent = nullptr, const QString& key =
                  "SomeItemKey", const QString& label = "");

    virtual ~DataDecorator();
    const QString& key() const;
    const QString& label() const;
    Entity* parentEntity();

    virtual QJsonValue jsonValue() const = 0;
    virtual void update(const QJsonObject& jsonObject) = 0;

private:
    class Implementation;
    QScopedPointer<Implementation> implementation;
};

}}

#endif
DataDecorator.cpp:
#include "DataDecorator.h"
namespace cm
{
namespace data
{
class DataDecorator::Implementation
{
public:
    Implementation(Entity* _parent, const QString& _key, const QString&
                                                         _label)
        : parentEntity(_parent)
        , key(_key)
        , label(_label)
    {
    }
    Entity* parentEntity{nullptr};
    QString key;
    QString label;
};
DataDecorator::DataDecorator(Entity* parent, const QString& key, const QString& label)
    : QObject((QObject*)parent)
{
    implementation.reset(new Implementation(parent, key, label));
}

DataDecorator::~DataDecorator()
{
}

const QString& DataDecorator::key() const
{
    return implementation->key;
}

const QString& DataDecorator::label() const
{
    return implementation->label;
}

Entity* DataDecorator::parentEntity()
{
    return implementation->parentEntity;
}
}
}
StringDecorator类
这里没有其他事情要做——我们只是添加了一个强类型的 QString 值属性来保存我们的值。我们还override了JSON相关的虚函数方法。
StringDecorator.h:
#ifndef STRINGDECORATOR_H
#define STRINGDECORATOR_H

#include <QJsonObject>
#include <QJsonValue>
#include <QObject>
#include <QScopedPointer>
#include <QString>

#include <cm-lib_global.h>
#include <data/DataDecorator.h>

namespace cm {
namespace data {

class CMLIBSHARED_EXPORT StringDecorator : public DataDecorator
{
    Q_OBJECT
    Q_PROPERTY( QString ui_value READ value WRITE setValue NOTIFY valueChanged )
public:
    //添加QString 类型value参数
    StringDecorator(Entity* parentEntity = nullptr, const QString& key = "SomeItemKey", const QString& label = "", const QString& value = "");
    ~StringDecorator();

    //对QString的设置
    StringDecorator& setValue(const QString& value);
    //访问QString
    const QString& value() const;

    //重写序列化操作
    QJsonValue jsonValue() const override;
    void update(const QJsonObject& jsonObject) override;
signals:
    void valueChanged();
private:
    class Implementation;
    QScopedPointer<Implementation> implementation;
};

}}

#endif
StringDecorator.cpp
#include "StringDecorator.h"

#include <QVariant>

namespace cm
{
namespace data
{
class StringDecorator::Implementation
{
public:
    Implementation(StringDecorator* _stringDecorator, const QString& _value)
        : stringDecorator(_stringDecorator)
        , value(_value)
    {
    }

    StringDecorator* stringDecorator{nullptr};
    //添加的QString数据成员
    QString value;
};

//参数QString 类型的value 对内部私有成员初始化
StringDecorator::StringDecorator(Entity* parentEntity, const QString& key, const QString& label, const QString& value)
    : DataDecorator(parentEntity, key, label)
{
    implementation.reset(new Implementation(this, value));
}

StringDecorator::~StringDecorator()
{
}

const QString& StringDecorator::value() const
{
    return implementation->value;
}

StringDecorator& StringDecorator::setValue(const QString& value)
{
    if(value != implementation->value)
    {
        implementation->value = value;
        emit valueChanged();
    }
    return *this;
}
//对QString序类化
QJsonValue StringDecorator::jsonValue() const
{	//我们使用两步转换过程,先将QString值转换为QVariant,然后再将其转换为目标QJsonValue类型
    return QJsonValue::fromVariant(QVariant(implementation->value));
}
//反序列化
void StringDecorator::update(const QJsonObject& _jsonObject)
{
    if (_jsonObject.contains(key()))
    {
        setValue(_jsonObject.value(key()).toString());
    }
}
}}
另一种方法是将各种数据项的值简单地表示为 DataDecorator 基类中的 QVariant 成员,从而无需为 QString、int 等单独设置类。 这种方法的问题在于,您最终不得不编写大量令人讨厌的代码,这些代码“如果您有一个包含字符串的 QVariant,那么如果它包含一个 int,则运行此代码,然后运行此代码…”。我更喜欢编写额外类的额外开销,以换取已知类型和更清晰、更简单的代码。当我们查看数据验证时,这将变得特别有用。 验证字符串与验证数字完全不同,又与验证日期不同。
IntDecorator 和 DateTimeDecorator 实际上与 StringDecorator 相同,只是用 QString 值替换 int 或 QDateTime。
IntDecorator.h:
#ifndef INTDECORATOR_H
#define INTDECORATOR_H

#include <QJsonObject>
#include <QJsonValue>
#include <QObject>
#include <QScopedPointer>

#include <cm-lib_global.h>
#include <data/DataDecorator.h>

namespace cm {
namespace data {

class CMLIBSHARED_EXPORT IntDecorator : public DataDecorator
{
    Q_OBJECT
    //int
    Q_PROPERTY( int ui_value READ value WRITE setValue NOTIFY valueChanged )

public:
    IntDecorator(Entity* parentEntity = nullptr, const QString& key = "SomeItemKey", const QString& label = "", int value = 0); //替换为int value
    ~IntDecorator();

    //替换为int
    IntDecorator& setValue(int value);
    int value() const;
public:
    QJsonValue jsonValue() const override;
    void update(const QJsonObject& jsonObject) override;
signals:
    void valueChanged();
private:
    class Implementation;
    QScopedPointer<Implementation> implementation;
};

}}

#endif
IntDecorator.cpp
#include "IntDecorator.h"

#include <QVariant>

namespace cm {
namespace data {

class IntDecorator::Implementation
{
public:
    Implementation(IntDecorator* intDecorator, int value)
        : intDecorator(intDecorator)
        , value(value)
    {
    }

    IntDecorator* intDecorator{nullptr};
    int value; //int value
};

IntDecorator::IntDecorator(Entity* parentEntity, const QString& key, const QString& label, int value) //int value
    : DataDecorator(parentEntity, key, label)
{
    implementation.reset(new Implementation(this, value));
}

IntDecorator::~IntDecorator()
{
}

//int
int IntDecorator::value() const
{
    return implementation->value;
}

//int
IntDecorator& IntDecorator::setValue(int value)
{
    if(value != implementation->value)
    {
        implementation->value = value;
        emit valueChanged();
    }
    return *this;
}

QJsonValue IntDecorator::jsonValue() const
{
    //
    return QJsonValue::fromVariant(QVariant(implementation->value));
}

void IntDecorator::update(const QJsonObject& jsonObject)
{
    if (jsonObject.contains(key()))
    {
        auto l_value = jsonObject.value(key()).toInt();
        setValue(l_value);
    }
    else
    {
        setValue(0);
    }
}
}}
DateTimeDecorator.h:
#ifndef DATETIMEDECORATOR_H
#define DATETIMEDECORATOR_H

#include <QDateTime>
#include <QJsonObject>
#include <QJsonValue>
#include <QObject>
#include <QScopedPointer>

#include <cm-lib_global.h>
#include <data/DataDecorator.h>

namespace cm {
namespace data {
class CMLIBSHARED_EXPORT DateTimeDecorator : public DataDecorator
{
    Q_OBJECT
    //这些属性的目的是使 UI 可以轻松访问日期/时间值作为预格式化为几种不同样式的 QString。
    Q_PROPERTY( QString ui_iso8601String READ toIso8601String NOTIFY valueChanged )
    Q_PROPERTY( QString ui_prettyDateString READ toPrettyDateString NOTIFY valueChanged )
    Q_PROPERTY( QString ui_prettyTimeString READ toPrettyTimeString NOTIFY valueChanged )
    Q_PROPERTY( QString ui_prettyString READ toPrettyString NOTIFY valueChanged )
    Q_PROPERTY( QDateTime ui_value READ value WRITE setValue NOTIFY valueChanged )
public:
    DateTimeDecorator(Entity* parentEntity = nullptr, const QString& key = "SomeItemKey", const QString& label = "", const QDateTime& value = QDateTime());
    ~DateTimeDecorator();

    //QDateTime 日期格式化函数
    const QDateTime& value() const;
    DateTimeDecorator& setValue(const QDateTime& value);
    QString toIso8601String() const;
    QString toPrettyDateString() const;
    QString toPrettyTimeString() const;
    QString toPrettyString() const;

    QJsonValue jsonValue() const override;
    void update(const QJsonObject& jsonObject) override;

signals:
    void valueChanged();

private:
    class Implementation;
    QScopedPointer<Implementation> implementation;
};

}}

#endif
DateTimeDecorator.cpp:
#include "DateTimeDecorator.h"

#include <QVariant>

namespace cm {
namespace data {

class DateTimeDecorator::Implementation
{
public:
    Implementation(DateTimeDecorator* dateTimeDecorator, const QDateTime& value)
        : dateTimeDecorator(dateTimeDecorator)
        , value(value)
    {
    }

    DateTimeDecorator* dateTimeDecorator{nullptr};
    QDateTime value;
};

DateTimeDecorator::DateTimeDecorator(Entity* parentEntity, const QString& key, const QString& label, const QDateTime& value)
    : DataDecorator(parentEntity, key, label)
{
    implementation.reset(new Implementation(this, value));
}

DateTimeDecorator::~DateTimeDecorator()
{
}

const QDateTime& DateTimeDecorator::value() const
{
    return implementation->value;
}

DateTimeDecorator& DateTimeDecorator::setValue(const QDateTime& value)
{
    if(value != implementation->value)
    {
        implementation->value = value;
        emit valueChanged();
    }

    return *this;
}
//Qt内置了对ISO8601格式日期的支持
//这是在系统之间传输日期时间值时非常常见的格式例如在 HTTP 请求中
//它是一种灵活的格式,支持多种不同的表示形式,但通常遵循yyyy-MM-ddTHH:mm:ss.zt格式,其中T是字符串文字,z 是毫秒,t是时区信息:
QString DateTimeDecorator::toIso8601String() const
{
    if (implementation->value.isNull())
    {
        return "";
    }
    else
    {
        return implementation->value.toString(Qt::ISODate);
    }
}
//接下来,我们提供了一种可读的长格式显示完整日期时间的方法,例如,Sat 22 Jul 2017 @ 12:07:45:
QString DateTimeDecorator::toPrettyString() const
{
    if (implementation->value.isNull())
    {
        return "Not set";
    }
    else
    {
        return implementation->value.toString( "ddd d MMM yyyy @ HH:mm:ss" );
    }
}
//最后两种方法显示日期或时间组件,例如 22 Jul 2017 或 12:07 pm:
QString DateTimeDecorator::toPrettyDateString() const
{
    if (implementation->value.isNull())
    {
        return "Not set";
    }
    else
    {
        return implementation->value.toString( "d MMM yyyy" );
    }
}

QString DateTimeDecorator::toPrettyTimeString() const
{
    if (implementation->value.isNull())
    {
        return "Not set";
    }
    else
    {
        return implementation->value.toString( "hh:mm ap" );
    }
}

QJsonValue DateTimeDecorator::jsonValue() const
{
    return QJsonValue::fromVariant(QVariant(implementation->value.toString(Qt::ISODate)));
}

void DateTimeDecorator::update(const QJsonObject& jsonObject)
{
    if (jsonObject.contains(key()))
    {
        auto valueAsString = jsonObject.value(key()).toString();
        auto valueAsDate = QDateTime::fromString(valueAsString, Qt::ISODate);  // yyyy-MM-ddTHH:mm:ss
        setValue(valueAsDate);
    }
    else
    {
        setValue(QDateTime());
    }
}

}}
EnumeratorDecorator类
我们的最终类型 EnumeratorDecorator 与 IntDecorator 大致相同
EnumeratorDecorator.h
#ifndef ENUMERATORDECORATOR_H
#define ENUMERATORDECORATOR_H

#include <map>

#include <QJsonObject>
#include <QJsonValue>
#include <QObject>
#include <QScopedPointer>

#include <cm-lib_global.h>
#include <data/DataDecorator.h>

namespace cm {
namespace data {

class CMLIBSHARED_EXPORT EnumeratorDecorator : public DataDecorator
{
    Q_OBJECT
    Q_PROPERTY( int ui_value READ value WRITE setValue NOTIFY valueChanged )
    Q_PROPERTY( QString ui_valueDescription READ valueDescription NOTIFY valueChanged )
public:
    EnumeratorDecorator(Entity* parentEntity = nullptr, const QString& key = "SomeItemKey", const QString& label = "", int value = 0, const std::map<int, QString>& descriptionMapper = std::map<int, QString>()); //map
    ~EnumeratorDecorator();

    EnumeratorDecorator& setValue(int value);
    int value() const;
    QString valueDescription() const;

    QJsonValue jsonValue() const override;
    void update(const QJsonObject& jsonObject) override;
signals:
    void valueChanged();
private:
    class Implementation;
    QScopedPointer<Implementation> implementation;
};

}}
#endif
EnumeratorDecorator.cpp:
#include "EnumeratorDecorator.h"

#include <QVariant>

namespace cm {
namespace data {

class EnumeratorDecorator::Implementation
{
public:
    Implementation(EnumeratorDecorator* enumeratorDecorator, int value, const std::map<int, QString>& descriptionMapper)
        : enumeratorDecorator(enumeratorDecorator)
        , value(value)
        , descriptionMapper(descriptionMapper)
    {
    }

    EnumeratorDecorator* enumeratorDecorator{nullptr};
    int value;
    std::map<int, QString> descriptionMapper;
};

EnumeratorDecorator::EnumeratorDecorator(Entity* parentEntity, const QString& key, const QString& label, int value, const std::map<int, QString>& descriptionMapper)
    : DataDecorator(parentEntity, key, label)
{
    implementation.reset(new Implementation(this, value, descriptionMapper));
}

EnumeratorDecorator::~EnumeratorDecorator()
{
}

int EnumeratorDecorator::value() const
{
    return implementation->value;
}
//我们将映射作为另一个成员变量存储在我们的私有实现类中,然后使用它来提供枚举值的字符串表示
QString EnumeratorDecorator::valueDescription() const
{
    if (implementation->descriptionMapper.find(implementation->value) != implementation->descriptionMapper.end())
    {
        return implementation->descriptionMapper.at(implementation->value);
    }
    else
    {
        return {};
    }
}

EnumeratorDecorator& EnumeratorDecorator::setValue(int value)
{
    if (value != implementation->value)
    {
        implementation->value = value;
        emit valueChanged();
    }

    return *this;
}

QJsonValue EnumeratorDecorator::jsonValue() const
{
    return QJsonValue::fromVariant(QVariant(implementation->value));
}

void EnumeratorDecorator::update(const QJsonObject& jsonObject)
{
    if (jsonObject.contains(key()))
    {
        auto valueFromJson = jsonObject.value(key()).toInt();
        setValue(valueFromJson);
    }
    else
    {
        setValue(0);
    }
}

}}
Entity collections
为了实现实体集合,我们需要利用一些更高级的 C++ 技术,我们将暂时打破目前的约定,在单个头文件中实现多个类。在 cm-lib/source/data 中创建EntityCollection.h,并在其中正常添加我们的命名空间并转发声明Entity:
#ifndef ENTITYCOLLECTION_H
#define ENTITYCOLLECTION_H
namespace cm {
namespace data {
    class Entity;
}}
#endif
接下来,我们将依次介绍必要的类,每个类都必须按顺序添加到命名空间中。
我们首先定义基类EntityCollectionObject,它只是从 QObject 继承并让我们访问它带来的所有属性,例如对象所有权和信号。 这是必需的,因为直接从 QObject 派生的类不能被模板化:
class CMLIBSHARED_EXPORT EntityCollectionObject : public QObject
{
    Q_OBJECT
public:
    EntityCollectionObject(QObject* _parent = nullptr) : QObject(_parent) {}
    virtual ~EntityCollectionObject() {}
signals:
    void collectionChanged();
};
您需要包含 QObject 和导出宏的头文件,
实体对象的集合基类的接口
class EntityCollectionBase : public EntityCollectionObject
{
public:
    EntityCollectionBase(QObject* parent = nullptr, const QString& key
                                         = "SomeCollectionKey")
        : EntityCollectionObject(parent)
        , key(key)
    {}

    virtual ~EntityCollectionBase()
    {}

    QString getKey() const
    {
        return key;
    }

    virtual void clear() = 0;
    virtual void update(const QJsonArray& json) = 0;
    //包含Entity*的vector,以便迭代实体对象而无需关心实体对象的类型
    virtual std::vector<Entity*> baseEntities() = 0;

    //UI需要派生类型(例如,Client*)的QList
    //以便它可以访问特定于客户端的所有属性并显示所有数据
    template <class T>
    QList<T*>& derivedEntities();

    template <class T>
    T* addEntity(T* entity);
private:
    QString key;
};
接下来,声明一个完整的模板类,我们在其中存储派生类型的集合并实现我们的所有方法,除了我们刚刚讨论的两个模板方法。
template <typename T>
class EntityCollection : public EntityCollectionBase
{
public:
    EntityCollection(QObject* parent = nullptr, const QString& key =
             "SomeCollectionKey")
        : EntityCollectionBase(parent, key)
    {}

    ~EntityCollection()
    {}

    //清空集合并整理内存
    void clear() override
    {
        for(auto entity : collection)
        {
            entity->deleteLater();
        }
        collection.clear();
    }

    //概念上与我们在Entity中实现的JSON方法相同,添加实体对象
    //只是我们处理的是实体集合,因此我们采用JSON数组而不是对象
    void update(const QJsonArray& jsonArray) override
    {
        clear();
        for(const QJsonValue& jsonValue : jsonArray)
        {
            addEntity(new T(this, jsonValue.toObject()));
        }
    }

    //baseEntities() 根据请求创建一个新的vector并用集合中的所有项目填充它
    //它只是隐式地转换指针,所以我们不关心昂贵的对象实例化
    std::vector<Entity*> baseEntities() override
    {
        std::vector<Entity*> returnValue;
        for(T* entity : collection)
        {
            returnValue.push_back(entity);
        }
        return returnValue;
    }

    //而derivedEntities() 返回该集合
    QList<T*>& derivedEntities()
    {
        return collection;
    }

    //addEntity()将派生类的一个实例添加到集合中
    T* addEntity(T* entity)
    {
        if(!collection.contains(entity))
        {
            collection.append(entity);
            EntityCollectionObject::collectionChanged();
        }
        return entity;
    }

private:
    QList<T*> collection;
};
对于这些类,您将需要#include 和 ,
最后,我们为我们的模板方法提供了实现
template <class T>
QList<T*>& EntityCollectionBase::derivedEntities()
{
    return dynamic_cast<const EntityCollection<T>&>(*this).derivedEntities();
}
template <class T>
T* EntityCollectionBase::addEntity(T* entity)
{
    return dynamic_cast<const EntityCollection<T>&>(*this).addEntity(entity);
}
通过延迟对这些方法的实现,我们现在已经完全声明了我们的模板化 EntityCollection 类。 我们现在可以将任何对模板化方法的调用“路由”到模板化类中的实现。现在我们的实体集合准备好了,我们要到Entity里实现下面功能。
添加 #include <data/entity-collection.h>头文件,添加下面信号
void childCollectionsChanged(const QString& collectionKey);
在实现文件中,添加私有成员:
std::map<QString, EntityCollectionBase*> childCollections;
然后,添加方法:
EntityCollectionBase* Entity::addChildCollection(EntityCollectionBase* entityCollection)
{
    if(implementation->childCollections.find(entityCollection->getKey()) ==
            std::end(implementation->childCollections))
    {
        implementation->childCollections[entityCollection->getKey()] = entityCollection;
        emit childCollectionsChanged(entityCollection->getKey());
    }
    return entityCollection;
}
将集合添加到 update() 方法中
void Entity::update(const QJsonObject& jsonObject)
{
    // 更新数据装饰器
    for (std::pair<QString, DataDecorator*> dataDecoratorPair :
         implementation->dataDecorators)
    {
        dataDecoratorPair.second->update(jsonObject);
    }
    // 更新子实体
    for (std::pair<QString, Entity*> childEntityPair : implementation->childEntities)
    {
        childEntityPair.second->update(jsonObject.value(childEntityPair.first).toObject());
    }
	//添加对集合的更新
    //更新集合
    for (std::pair<QString, EntityCollectionBase*> childCollectionPair
         : implementation->childCollections)
    {
        childCollectionPair.second->
                update(jsonObject.value(childCollectionPair.first).toArray());
    }
}
添加到序列化中:
QJsonObject Entity::toJson() const
{
    QJsonObject returnValue;
    // 添加数据装饰器
    for (std::pair<QString, DataDecorator*> dataDecoratorPair :
                         implementation->dataDecorators)
    {
        returnValue.insert( dataDecoratorPair.first,
        dataDecoratorPair.second->jsonValue());
    }
    // 添加子实体
    for (std::pair<QString, Entity*> childEntityPair : implementation->childEntities)
    {
        returnValue.insert( childEntityPair.first, childEntityPair.second->toJson() );
    }

    // 添加子集合
    for (std::pair<QString, EntityCollectionBase*> childCollectionPair
        : implementation->childCollections)
    {
        QJsonArray entityArray;
        //我们使用baseEntities()方法为我们提供Entity*的集合
        //会返回实体对象指针的vector,然后我们将每个实体的 JSON 对象附加到一个 JSON 数组
        for (Entity* entity : childCollectionPair.second->baseEntities())
        {
            entityArray.append(entity->toJson());
        }
        //完成后,将该数组添加到我们的根 JSON 对象中,并使用集合的键
        returnValue.insert(childCollectionPair.first, entityArray);
    }
    return returnValue;
}
Data models
现在我们已经有了能够定义数据对象(实体和实体集合)和各种类型的属性(数据装饰器),我们已经有一个由 Qt Creator 创建的默认 Client 类,所以在 cm-lib/source/models 中补充以下新类:
| Class | Purpose |
|---|---|
| Address | 代表供应地址或账单地址 |
| Appointment | 代表与客户的约期 |
| Contact | 代表联系客户的方法 |
我们将从最简单的模型开始——Address
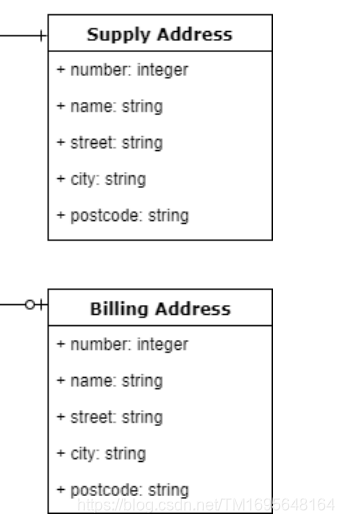
在models目录下面添加Address类:
添加CMLIBSHARED_EXPORT宏,和命名空间,继承data::Entity以便对Address进行序列化操作。
定义下列成员对象:
    data::StringDecorator* building{nullptr}; //方便对成员对象序列化操作
    data::StringDecorator* street{nullptr};
    data::StringDecorator* city{nullptr};
    data::StringDecorator* postcode{nullptr};
重载构造函数
Address(QObject* parent, const QJsonObject& json);//目的为了可以通过json对Address进行初始化
添加
QString fullAddress() const; //返回地址的QString
添加下面以便qml对地址的成员进行访问
    Q_PROPERTY(cm::data::StringDecorator* ui_building MEMBER building CONSTANT)
    Q_PROPERTY(cm::data::StringDecorator* ui_street MEMBER street CONSTANT)
    Q_PROPERTY(cm::data::StringDecorator* ui_city MEMBER city CONSTANT)
    Q_PROPERTY(cm::data::StringDecorator* ui_postcode MEMBER postcode CONSTANT)
    Q_PROPERTY(QString ui_fullAddress READ fullAddress CONSTANT)
address.cpp
添加命名空间,和using namespace cm::data;
默认构造函数
Address::Address(QObject* parent)
        : Entity(parent, "address")
{
    //我们需要对每个属性做两件事。
    //首先,我们需要一个指向派生类型(StringDecorator)的指针,我们可以将其呈现给UI以显示和编辑值
    //其次,我们需要让基实体类知道基类型(DataDecorator),以便它可以迭代数据项并为我们执行JSON序列化工作。
    //我们可以使用 addDataItem() 方法在一行语句中实现这两个目标
    building = static_cast<StringDecorator*>(addDataItem(new StringDecorator(this, "building", "Building")));
    street = static_cast<StringDecorator*>(addDataItem(new StringDecorator(this, "street", "Street")));
    city = static_cast<StringDecorator*>(addDataItem(new StringDecorator(this, "city", "City")));
    postcode = static_cast<StringDecorator*>(addDataItem(new StringDecorator(this, "postcode", "Post Code")));
}
building = static_cast<StringDecorator*>(addDataItem(new StringDecorator(this, “building”, “Building”)));
我们创建一个新的 StringDecorator*,,带有building键和building UI 标签。这会立即传递给 addDataItem(),addDataItem将其添加到实体中的 dataDecorators 集合中,并将数据项作为 DataDecorator指针返回。然后,我们可以将其转换回 StringDecorator指针,然后将其存储在 building 成员变量中。
QJson构造函数:
Address::Address(QObject* parent, const QJsonObject& json)
        : Address(parent)
{
    update(json);//另一个实现是获取一个JSON对象,通过调用默认构造函数正常构造地址,然后使用 update() 方法更新模型。
}
返回Address 的QString的函数
QString Address::fullAddress() const
{
    return building->value() + " " + street->value() + "\n" + city->value() + "\n" + postcode->value();
}
Address.h
#ifndef ADDRESS_H
#define ADDRESS_H

#include <cm-lib_global.h>
#include <data/Entity.h>
#include <data/StringDecorator.h>
namespace cm
{
namespace models
{
class CMLIBSHARED_EXPORT Address :public data::Entity
{
    Q_OBJECT
    Q_PROPERTY(cm::data::StringDecorator* ui_building MEMBER building CONSTANT)
    Q_PROPERTY(cm::data::StringDecorator* ui_street MEMBER street CONSTANT)
    Q_PROPERTY(cm::data::StringDecorator* ui_city MEMBER city CONSTANT)
    Q_PROPERTY(cm::data::StringDecorator* ui_postcode MEMBER postcode CONSTANT)
    Q_PROPERTY(QString ui_fullAddress READ fullAddress CONSTANT)
public:
    explicit Address(QObject* parent = nullptr);
    Address(QObject* parent, const QJsonObject& json);

    data::StringDecorator* building{nullptr};
    data::StringDecorator* street{nullptr};
    data::StringDecorator* city{nullptr};
    data::StringDecorator* postcode{nullptr};

    QString fullAddress() const;
};
}
}
#endif // ADDRESS_H
Address.cpp:
#include "Address.h"

using namespace cm::data;

namespace cm
{
namespace models
{
Address::Address(QObject* parent)
        : Entity(parent, "address")
{
    building = static_cast<StringDecorator*>(addDataItem(new StringDecorator(this, "building", "Building")));
    street = static_cast<StringDecorator*>(addDataItem(new StringDecorator(this, "street", "Street")));
    city = static_cast<StringDecorator*>(addDataItem(new StringDecorator(this, "city", "City")));
    postcode = static_cast<StringDecorator*>(addDataItem(new StringDecorator(this, "postcode", "Post Code")));
}

Address::Address(QObject* parent, const QJsonObject& json)
        : Address(parent)
{
    update(json);
}

QString Address::fullAddress() const
{
    return building->value() + " " + street->value() + "\n" + city->value() + "\n" + postcode->value();
}
}
}
Appointment.h 同上
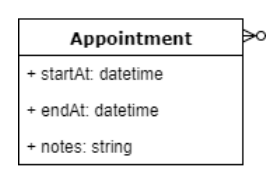
#ifndef APPOINTMENT_H
#define APPOINTMENT_H

#include <QObject>

#include <cm-lib_global.h>
#include <data/DateTimeDecorator.h>
#include <data/StringDecorator.h>
#include <data/Entity.h>

namespace cm {
namespace models {

class CMLIBSHARED_EXPORT Appointment : public data::Entity
{
    Q_OBJECT
    Q_PROPERTY(cm::data::DateTimeDecorator* ui_startAt MEMBER startAt CONSTANT)
    Q_PROPERTY(cm::data::DateTimeDecorator* ui_endAt MEMBER endAt CONSTANT)
    Q_PROPERTY(cm::data::StringDecorator* ui_notes MEMBER notes CONSTANT)
public:
    explicit Appointment(QObject* parent = nullptr);
    Appointment(QObject* parent, const QJsonObject& json);

    //几点到几点,
    data::DateTimeDecorator* startAt{nullptr};
    data::DateTimeDecorator* endAt{nullptr};
    data::StringDecorator* notes{nullptr};
};

}}

#endif
Appointment.cpp同 Address
#include "Appointment.h"
using namespace cm::data;

namespace cm {
namespace models {
Appointment::Appointment(QObject* parent)
    : Entity(parent, "address")
{
    startAt = static_cast<DateTimeDecorator*>(addDataItem(new DateTimeDecorator(this, "startAt", "Start")));
    endAt = static_cast<DateTimeDecorator*>(addDataItem(new DateTimeDecorator(this, "endAt", "End")));
    notes = static_cast<StringDecorator*>(addDataItem(new StringDecorator(this, "notes", "Notes")));
}

Appointment::Appointment(QObject* parent, const QJsonObject& json)
    : Appointment(parent)
{
    update(json);
}
}}
contactType

Contact 变化更大的地方在于它使用 EnumeratorDecorator 作为 contactType 属性。
添加联系方式的枚举类型
    enum eContactType
    {
        Unknown = 0,
        Telephone,
        Email,
        Fax
    };
我们有一个默认值 Unknown 由 0 表示。这很重要,因为它允许我们适应初始未设置值,接下来,我们定义一个map器容器,它允许我们将每个枚举类型映射到一个描述性字符串:
添加两构造函数,上面已经解释
explicit Contact(QObject* parent = nullptr);
Contact(QObject* parent, const QJsonObject& json);
添加一个map容器,对描述性字符串的访问函数和EnumeratorDecorator指针类型的contactType public成员函数
data::EnumeratorDecorator* contactType{nullptr};
data::StringDecorator* address{nullptr};
static std::map<int, QString> contactTypeMapper;
Contact.h
#ifndef CONTACT_H
#define CONTACT_H

#include <QObject>

#include <cm-lib_global.h>
#include <data/EnumeratorDecorator.h>
#include <data/StringDecorator.h>
#include <data/Entity.h>

namespace cm {
namespace models {

class CMLIBSHARED_EXPORT Contact : public data::Entity
{
    Q_OBJECT
    Q_PROPERTY(cm::data::EnumeratorDecorator* ui_contactType MEMBER contactType CONSTANT)
    Q_PROPERTY(cm::data::StringDecorator* ui_address MEMBER address CONSTANT)

public:
    enum eContactType
    {
        Unknown = 0,
        Telephone,
        Email,
        Fax
    };

public:
    explicit Contact(QObject* parent = nullptr);
    Contact(QObject* parent, const QJsonObject& json);

    data::EnumeratorDecorator* contactType{nullptr};
    data::StringDecorator* address{nullptr};
    static std::map<int, QString> contactTypeMapper;
};

}}

#endif
Contact.cpp
#include "Contact.h"

using namespace cm::data;

namespace cm {
namespace models {

std::map<int, QString> Contact::contactTypeMapper = std::map<int, QString>
{
    { Contact::eContactType::Unknown, "" }
    , { Contact::eContactType::Telephone, "Telephone" }
    , { Contact::eContactType::Email, "Email" }
    , { Contact::eContactType::Fax, "Fax" }
};

Contact::Contact(QObject* parent)
    : Entity(parent, "contact")
{
    contactType = static_cast<EnumeratorDecorator*>(addDataItem(new EnumeratorDecorator(this, "contactType", "Contact Type", 0, contactTypeMapper)));
    address = static_cast<StringDecorator*>(addDataItem(new StringDecorator(this, "address", "Address")));
}

Contact::Contact(QObject* parent, const QJsonObject& json)
    : Contact(parent)
{
    update(json);
}

}}
创建Client模型

Client.h
构造函数
    explicit Client(QObject* parent = nullptr);
    Client(QObject* parent, const QJsonObject& json);//可以Json构造Client
成员:
    data::StringDecorator* reference{nullptr};
    data::StringDecorator* name{nullptr};
    Address* supplyAddress{nullptr};
    Address* billingAddress{nullptr};
    data::EntityCollection<Appointment>* appointments{nullptr};
    data::EntityCollection<Contact>* contacts{nullptr};

    QQmlListProperty<cm::models::Appointment> ui_appointments();
    QQmlListProperty<cm::models::Contact> ui_contacts();
信号函数:
signals:
    void appointmentsChanged();
    void contactsChanged();
提供qml访问的成员:
    Q_OBJECT
    Q_PROPERTY( cm::data::StringDecorator* ui_reference MEMBER reference CONSTANT )
    Q_PROPERTY( cm::data::StringDecorator* ui_name MEMBER name CONSTANT )
    Q_PROPERTY( cm::models::Address* ui_supplyAddress MEMBER supplyAddress CONSTANT )
    Q_PROPERTY( cm::models::Address* ui_billingAddress MEMBER billingAddress CONSTANT )
    Q_PROPERTY( QQmlListProperty<Appointment> ui_appointments READ ui_appointments NOTIFY appointmentsChanged )
    Q_PROPERTY( QQmlListProperty<Contact> ui_contacts READ ui_contacts NOTIFY contactsChanged )
Client.h
#ifndef CLIENT_H
#define CLIENT_H

#include <QObject>
#include <QtQml/QQmlListProperty>

#include <cm-lib_global.h>
#include <data/StringDecorator.h>
#include <data/Entity.h>
#include <data/EntityCollection.h>
#include <models/Address.h>
#include <models/Appointment.h>
#include <models/Contact.h>

namespace cm {
namespace models {

class CMLIBSHARED_EXPORT Client : public data::Entity
{
    Q_OBJECT
    Q_PROPERTY( cm::data::StringDecorator* ui_reference MEMBER reference CONSTANT )
    Q_PROPERTY( cm::data::StringDecorator* ui_name MEMBER name CONSTANT )
    Q_PROPERTY( cm::models::Address* ui_supplyAddress MEMBER supplyAddress CONSTANT )
    Q_PROPERTY( cm::models::Address* ui_billingAddress MEMBER billingAddress CONSTANT )
    Q_PROPERTY( QQmlListProperty<Appointment> ui_appointments READ ui_appointments NOTIFY appointmentsChanged )
    Q_PROPERTY( QQmlListProperty<Contact> ui_contacts READ ui_contacts NOTIFY contactsChanged )
public:
    explicit Client(QObject* parent = nullptr);
    Client(QObject* parent, const QJsonObject& json);

    data::StringDecorator* reference{nullptr};
    data::StringDecorator* name{nullptr};
    Address* supplyAddress{nullptr};
    Address* billingAddress{nullptr};
    data::EntityCollection<Appointment>* appointments{nullptr};
    data::EntityCollection<Contact>* contacts{nullptr};

    QQmlListProperty<cm::models::Appointment> ui_appointments();
    QQmlListProperty<cm::models::Contact> ui_contacts();
signals:
    void appointmentsChanged();
    void contactsChanged();
};

}}
#endif
Client.cpp
默认构造成员的初始化
Client::Client(QObject* parent)
    : Entity(parent, "client")
{
    reference = static_cast<StringDecorator*>
        (addDataItem(new StringDecorator(this, "reference", "Client Ref")));
    name = static_cast<StringDecorator*>
        (addDataItem(new StringDecorator(this, "name", "Name")));
    supplyAddress = static_cast<Address*>
        (addChild(new Address(this), "supplyAddress"));
    billingAddress = static_cast<Address*>
        (addChild(new Address(this), "billingAddress"));
    appointments = static_cast<EntityCollection<Appointment>*>
        (addChildCollection(new EntityCollection<Appointment>(this, "appointments")));
    contacts = static_cast<EntityCollection<Contact>*>
        (addChildCollection(new EntityCollection<Contact>(this, "contacts")));
}
添加子实体遵循与数据项相同的模式,但使用 addChild() 方法。 请注意,我们添加了多个相同地址类型的子项,但要确保它们具有不同的键值以避免重复和无效的 JSON。实体集合是使用 addChildCollection() 添加的,除了被模板化之外,它们遵循相同的方法。
#include "client.h"

using namespace cm::data;

namespace cm {
namespace models {

Client::Client(QObject* parent)
    : Entity(parent, "client")
{
    reference = static_cast<StringDecorator*>(addDataItem(new StringDecorator(this, "reference", "Client Ref")));
    name = static_cast<StringDecorator*>(addDataItem(new StringDecorator(this, "name", "Name")));
    supplyAddress = static_cast<Address*>(addChild(new Address(this), "supplyAddress"));
    billingAddress = static_cast<Address*>(addChild(new Address(this), "billingAddress"));
    appointments = static_cast<EntityCollection<Appointment>*>(addChildCollection(new EntityCollection<Appointment>(this, "appointments")));
    contacts = static_cast<EntityCollection<Contact>*>(addChildCollection(new EntityCollection<Contact>(this, "contacts")));
}

Client::Client(QObject* parent, const QJsonObject& json)
    : Client(parent)
{
    update(json);
}

QQmlListProperty<Appointment> Client::ui_appointments()
{
    return QQmlListProperty<Appointment>(this, appointments->derivedEntities());
}

QQmlListProperty<Contact> Client::ui_contacts()
{
    return QQmlListProperty<Contact>(this, contacts->derivedEntities());
}

}}
在我们可以在 UI 中使用我们类型之前,我们需要在 cm-ui 中的 main.cpp 中注册类型
添加头文件
#include <controllers/MasterController.h>
#include <controllers/CommandController.h>
#include <controllers/MasterController.h>
#include <data/DataDecorator.h>
#include <data/EnumeratorDecorator.h>
#include <data/IntDecorator.h>
#include <data/StringDecorator.h>
#include <framework/Command.h>
#include <models/Address.h>
#include <models/Appointment.h>
#include <models/Contact.h>
#include <models/client.h>
注册models的类型
    qmlRegisterType<cm::data::DateTimeDecorator>("CM", 1, 0, "DateTimeDecorator");
    qmlRegisterType<cm::data::EnumeratorDecorator>("CM", 1, 0, "EnumeratorDecorator");
    qmlRegisterType<cm::data::IntDecorator>("CM", 1, 0, "IntDecorator");
    qmlRegisterType<cm::data::StringDecorator>("CM", 1, 0, "StringDecorator");

    qmlRegisterType<cm::models::Address>("CM", 1, 0, "Address");
    qmlRegisterType<cm::models::Appointment>("CM", 1, 0, "Appointment");
    qmlRegisterType<cm::models::Client>("CM", 1, 0, "Client");
    qmlRegisterType<cm::models::Contact>("CM", 1, 0, "Contact");
完成后,我们将在 MasterController 中创建一个客户端实例,我们将使用它来为新客户端填充数据。 这与我们用于添加其他控制器的模式完全相同。首先,将成员变量添加到 MasterController 的私有实现中:
MasterController.cpp中 添加
using namespace cm::models;
class MasterController::Implementation
{
public:
    Implementation(MasterController* _masterController)
        : masterController(_masterController)
    {
        newClient = new Client(masterController);//new Client
        commandController = new CommandController(masterController);
        navigationController = new NavigationController(masterController);
    }

    Client* newClient{nullptr};//添加newClient
    MasterController* masterController{nullptr};
    CommandController* commandController{nullptr};
    NavigationController* navigationController{nullptr};
    QString welcomeMessage = "学习Qt";
};
添加成员MasterController函数
Client* MasterController::newClient()
{
    return implementation->newClient;
}
最后添加Q_PROPERTY
Q_PROPERTY(cm::models::Client* ui_newClient READ newClient CONSTANT )
我们现在有一个可供 UI 使用的客户端的空实例,首先为新客户端实例添加快捷方式属性:CreateClientView中添加
property Client newClient: masterController.ui_newClient
之前添加
import CM 1.0
请记住,所有属性都应在根项目级别定义,并且您需要导入 CM 1.0 才能访问已注册的类型。这只是使我们能够使用 newClient 作为速记来访问实例,而不必每次都键入 masterController.ui_newClient。
Custom TextBox

1.要能够获取models data传入任何StringDecorator属性的值,并对他进行查看和编辑
2.查看在StringDecorator的ui_label属性中定义的控件的描述性标签
3.查看/编辑TextBox中StringDecorator的ui_value属性
4.如果窗口足够宽,则标签和文本框水平布局
5.如果窗口不够宽,则标签和文本框垂直布局
让我们在所学的基础上创建一个新的可重用组件。 像往常一样,我们将首先准备我们需要的 Style 属性:
    readonly property real sizeScreenMargin: 20
    readonly property color colourDataControlsBackground: "#ffffff"
    readonly property color colourDataControlsFont: "#131313"
    readonly property int pixelSizeDataControls: 18
    readonly property real widthDataControls: 400
    readonly property real heightDataControls: 40
接下来,在 cm/cm-ui/components 中创建 StringEditorSingleLine.qml。像之前一样编辑 components.qrc 和 qmldir,使新组件在我们的组件模块中可用。
StringEditorSingleLine.qml
先导入指定的模块
import QtQuick 2.9
import CM 1.0
import assets 1.0
添加一个公共属性StringDecorator,以便我们可以从组件外部设置它。
property StringDecorator stringDecorator
我们引入了一种新元素——Flow,来为我们布置标签和文本框,Flow item 不是总是在单个方向(如行或列)上布置内容,而是将其子元素并排布置,直到用完可用空间.然后将它们像文字一样包装在页面上。我们通过将其锚定到根 Item 来告诉它有多少可用空间。

Flow
{
    anchors.fill: parent
    //包含两个相同大小的Rectangle,不同的背景颜色
    Rectangle
    {
        width: Style.widthDataControls
        height: Style.heightDataControls
        color: Style.colourBackground
        Text
        {
            id: textLabel
            anchors
            {
                fill: parent
                margins: Style.heightDataControls / 4
            }
            text: stringDecorator.ui_label
            color: Style.colourDataControlsFont
            font.pixelSize: Style.pixelSizeDataControls
            verticalAlignment: Qt.AlignVCenter
        }
    }

    Rectangle
    {
        id: background
        width: Style.widthDataControls
        height: Style.heightDataControls
        color: Style.colourDataControlsBackground
        border
        {
            width: 1
            color: Style.colourDataControlsFont
        }
        TextInput
        {
            id: textValue
            anchors
            {
                fill: parent
                margins: Style.heightDataControls / 4
            }
            text: stringDecorator.ui_value
            color: Style.colourDataControlsFont
            font.pixelSize: Style.pixelSizeDataControls
            verticalAlignment: Qt.AlignVCenter
        }
    }
}
添加Binding 组件在两个不同对象的属性之间建立依赖关系
        Binding
        {
            target: stringDecorator
            property: "ui_value"
            value: textValue.text
        }
在我们的例子中,TextInput 控件称为 textValue,StringDecorator 实例称为 stringDecorator。target属性定义了我们要更新的对象,property是我们要设置的Q_PROPERTY,value是我们要设置的值。是一个关键元素,它为我们提供了真正的双向绑定,没有这个,我们将能够从 StringDecorator 查看值,但我们在 UI 中所做的任何更改都不会更新该值。
import QtQuick 2.9
import CM 1.0
import assets 1.0

Item {
    property StringDecorator stringDecorator

    height: width > textLabel.width + textValue.width ?
    Style.heightDataControls : Style.heightDataControls * 2

    Flow
    {
        anchors.fill: parent
        Rectangle
        {
            width: Style.widthDataControls
            height: Style.heightDataControls
            color: Style.colourBackground
            Text
            {
                id: textLabel
                anchors
                {
                    fill: parent
                    margins: Style.heightDataControls / 4
                }
                text: stringDecorator.ui_label
                color: Style.colourDataControlsFont
                font.pixelSize: Style.pixelSizeDataControls
                verticalAlignment: Qt.AlignVCenter
            }
        }

        Rectangle
        {
            id: background
            width: Style.widthDataControls
            height: Style.heightDataControls
            color: Style.colourDataControlsBackground
            border
            {
                width: 1
                color: Style.colourDataControlsFont
            }
            TextInput
            {
                id: textValue
                anchors
                {
                    fill: parent
                    margins: Style.heightDataControls / 4
                }
                text: stringDecorator.ui_value
                color: Style.colourDataControlsFont
                font.pixelSize: Style.pixelSizeDataControls
                verticalAlignment: Qt.AlignVCenter
            }
        }
        Binding
        {
            target: stringDecorator
            property: "ui_value"
            value: textValue.text
        }
    }
}
回到 CreateClientView,用我们的新组件替换旧的 Text 元素并传入 ui_name 属性:
    StringEditorSingleLine
    {
        stringDecorator: newClient.ui_name
    }
如果您切换到 Find Client 视图并再次返回,您将看到该值被保留,这表明在字符串装饰器中成功设置了更新。
CreateClientView.qml 中添加ScrollView 的新元素以便在,多条StringEditorSingleLine用完空间时,呈现滚动条
Unit testing
The default Qt approach
当我们创建我们的 cm-tests 项目时,Qt Creator 帮助我们创建了一个 ClientTests 类供我们使用一个起点,其中包含一个名为 testCase1 的测试。 让我们直接进入并执行这个默认测试,看看会发生什么.

现在在client-tests.cpp中添加一个testCase2:
#include <QString>
#include <QtTest>

//我们有一个 QObject 派生类 ClientTests
class ClientTests : public QObject
{
    Q_OBJECT
public:
    //它实现了一个空的默认构造函数
    ClientTests();
    //然后我们将一些方法声明为私有 Q_SLOTS
    //很像 Q_OBJECT,这是一个宏,它为我们注入了一堆聪明的样板代码,很像 Q_OBJECT
    //你不需要担心理解它的内部工作来使用它
    //定义为这些私有插槽之一的类中的每个方法都作为单元测试执行
    //进行单元测试的函数必须是在private Q_SLOTS:下面
private Q_SLOTS:
    void testCase1();
    void testCase2();
};

ClientTests::ClientTests()
{
}

void ClientTests::testCase1()
{
    QVERIFY2(true, "Failure");
}

void ClientTests::testCase2()
{
    QVERIFY2(false, "Failure");
}
QTEST_APPLESS_MAIN(ClientTests) //QTest的main函数
#include "client-tests.moc"
运行结果如下

这一次,你可以看到 testCase2() 试图验证 false 为真,当然它不是,我们的测试失败了,在这个过程中输出了我们的失败消息。
Custom approach
首先向源文件夹中的 cm-tests 添加一个新类 TestSuite:

TestSuite.h
#ifndef TESTSUITE_H
#define TESTSUITE_H

#include <QObject>
#include <QString>
#include <QtTest/QtTest>
#include <vector>

namespace cm
{
class TestSuite : public QObject
{
    Q_OBJECT
public:
    explicit TestSuite(const QString& _testName = "");
    virtual ~TestSuite();

    QString testName;
    static std::vector<TestSuite*>& testList();//TestSuite 的每个派生实例都将自身添加到全局vector中
};
}

#endif
TestSuite.h
#ifndef TESTSUITE_H
#define TESTSUITE_H

#include <QObject>
#include <QString>
#include <QtTest/QtTest>
#include <vector>

namespace cm
{
class TestSuite : public QObject
{
    Q_OBJECT
public:
    explicit TestSuite(const QString& _testName = "");
    virtual ~TestSuite();

    QString testName;
    static std::vector<TestSuite*>& testList();
};
}

#endif
TestSuite.cpp
#include <TestSuite.h>

#include <QDebug>

namespace cm
{
TestSuite::TestSuite(const QString& _testName)
    : QObject()
    , testName(_testName)
{
    qDebug() << "Creating test" << testName;
    testList().push_back(this);
    qDebug() << testList().size() << " tests recorded";
}

TestSuite::~TestSuite()
{
    qDebug() << "Destroying test";
}

std::vector<TestSuite*>& TestSuite::testList()
{
    static std::vector<TestSuite*> instance = std::vector<TestSuite*>();
    return instance;
}

}
在这里,我们正在创建一个基类,它将用于我们的每个测试类。常规类和测试套件类之间通常存在一对一的关系,例如 Client 和 ClientTests 类。
添加一个新的 C++ 源文件 main.cpp,再次到源文件夹
main.cpp
#include <QtTest/QtTest>
#include <QDebug>

#include "TestSuite.h"

using namespace cm;

int main(int argc, char *argv[])
{
    Q_UNUSED(argc);
    Q_UNUSED(argv);

    qDebug() << "Starting test suite...";
    qDebug() << "Accessing tests from " << &TestSuite::testList();
    qDebug() << TestSuite::testList().size() << " tests detected";

    int failedTestsCount = 0;
	//我们遍历每个注册的测试类,并使用静态 QTest::qExec() 方法来检测和运行在其中发现的所有测试
    for(TestSuite* i : TestSuite::testList())
    {
        qDebug() << "Executing test " << i->testName;
        QString filename(i->testName + ".xml");
        int result = QTest::qExec(i, QStringList() << " " << "-o" <<
                                  filename << "-xunitxml");
        qDebug() << "Test result " << result;
        if(result != 0)
        {
            failedTestsCount++;
        }
    }

    qDebug() << "Test suite complete - " <<
          QString::number(failedTestsCount) << " failures detected.";

    return failedTestsCount;
}
我们遍历每个注册的测试类,并使用静态 QTest::qExec() 方法来检测和运行在其中发现的所有测试。,我们得到一个单独的 XML 文件,其中包含我们每个测试套件的输出。
您需要重新访问 client-tests.cpp 并注释掉或删除 QTEST_APPLESS_MAIN 行,否则我们将多个 main() 方法的问题。

让我们继续实现我们的第一个 TestSuite。测试MasterController类中消息字符串:
在cm-tests.pro中添加
INCLUDEPATH += source \
        ../cm-lib/source
在 cm-tests/source/controllers 中创建一个名为 MasterControllerTests 的新配套测试类。
MasterControllerTests.h
#ifndef MASTERCONTROLLERTESTS_H
#define MASTERCONTROLLERTESTS_H
#include <QtTest>

#include <controllers/MasterController.h>
#include <TestSuite.h>

namespace cm {
namespace controllers {
class MasterControllerTests : public TestSuite
{
    Q_OBJECT

public:
    MasterControllerTests();

private slots:
    /// @brief Called before the first test function is executed
    void initTestCase();
    /// @brief Called after the last test function was executed.
    void cleanupTestCase();
    /// @brief Called before each test function is executed.
    void init();
    /// @brief Called after every test function.
    void cleanup();

private slots:
    void welcomeMessage_returnsCorrectMessage();

private:
    //我们构造一个MasterController的实例作为我们将用来测试的私有成员变量
    MasterController masterController;
};

}}
#endif
MasterControllerTests.cpp
#include "MasterControllerTests.h"

namespace cm
{
namespace controllers
{ // Instance
    //在实现中,我们通过构造函数指定了测试套件的名称,并且我们还创建了测试类的静态实例
    //该实例会在main函数调用之前调用构造函数,基类的构造会把该对象添加到static std::vector<TestSuite*> instance中
    static MasterControllerTests instance;
    //TestSuite中会testList().push_back(this);把该对向push到instance vector里面
    //
    MasterControllerTests::MasterControllerTests()
        : TestSuite( "MasterControllerTests" )
    {
    }
}
namespace controllers
{ // Scaffolding
    void MasterControllerTests::initTestCase()
    {
    }
    void MasterControllerTests::cleanupTestCase()
    {
    }
    void MasterControllerTests::init()
    {
    }
    void MasterControllerTests::cleanup()
    {
    }
}
namespace controllers
{ // Tests
    void MasterControllerTests::welcomeMessage_returnsCorrectMessage()
    {
        QCOMPARE( masterController.welcomeMessage(), QString("Welcome to the Client Management system!") );
    }
}
}
我们想要测试当我们实例化一个 MasterController 对象并访问它的welcomeMessage 方法时,它返回我们想要的消息,这将是Welcome to the Client Management system!。
基类TestSuite的构造会调用testList().push_back(this); testList()会返回静态实例对象 std::vector<TestSuite*> instance 把该对象push会把该对象push到instance 里面,main() 方法迭代注册测试套件的集合并找到一个,然后执行该套件中的所有单元测试。

最后,为了实现我们的测试,我们使用 QCOMPARE 宏测试我们的 masterController 实例的welcomeMessage 的值和我们想要的消息。注意,因为 QCOMPARE 是一个宏,你不会得到隐式类型转换,所以你需要确保预期和实际结果的类型是相同的。在这里,我们通过从文字文本构造一个 QString 对象来实现这一点。
查看我们将项目输出定向到所选配置的文件夹,在那里,您将看到 MasterControllerTests.xml:
DataDecorator tests
我们创建了从 DataDecorator 派生的各种类。 让我们为每个类创建测试类并测试以下功能:
对象构造
设置值
以 JSON 形式获取值
从 JSON 更新值
在 cm-tests/source/data 中,创建 DateTimeDecoratorTests、EnumeratorDecoratorTests、IntDecoratorTests 和 StringDecoratorTests 类。
让我们从最简单的套件 IntDecoratorTests 开始。 各个套件的测试大致相似,因此一旦我们编写了一个套件,我们就可以将其中的大部分复制到其他套件中,然后根据需要进行补充.
进入IntDecoratorTests,添加#include <TestSuite.h>头文件,添加命名空间,添加Q_OBJECT,添加判断需要测试的函数
测试函数放在private slots:下
private slots:
    void constructor_givenNoParameters_setsDefaultProperties(); //测试IntDecoratorT默认构造函数
    void constructor_givenParameters_setsProperties(); //测试IntDecorator带参构造函数
    void setValue_givenNewValue_updatesValueAndEmitsSignal();//测试IntDecorator update函数,update调用setValue,会触发emit valueChanged();
    void setValue_givenSameValue_takesNoAction(); //测试IntDecorator setValue函数
    void jsonValue_whenDefaultValue_returnsJson(); //测试IntDecorator 默认构造时的 jsonValue
    void jsonValue_whenValueSet_returnsJson();//测试IntDecorator 调用构造函数的 jsonValue
    void update_whenPresentInJson_updatesValue();//测试IntDecorator updateValue
    void update_whenNotPresentInJson_updatesValueToDefault();//测试IntDecorator updateValue
IntDecoratorTests.h:
#ifndef INTDECORATORTESTS_H
#define INTDECORATORTESTS_H

#include <QtTest>

#include <data/IntDecorator.h>
#include <TestSuite.h>

namespace cm {
namespace data {
class IntDecoratorTests : public TestSuite
{
    Q_OBJECT
public:
    IntDecoratorTests();
    //要测试函数放在slots下
private slots:
    void constructor_givenNoParameters_setsDefaultProperties();
    void constructor_givenParameters_setsProperties();
    void setValue_givenNewValue_updatesValueAndEmitsSignal();
    void setValue_givenSameValue_takesNoAction();
    void jsonValue_whenDefaultValue_returnsJson();
    void jsonValue_whenValueSet_returnsJson();
    void update_whenPresentInJson_updatesValue();
    void update_whenNotPresentInJson_updatesValueToDefault();
};

}}

#endif
IntDecoratorTests.cpp
#include "IntDecoratorTests.h"

#include <QSignalSpy>

#include <data/Entity.h>

namespace cm {
namespace data { // Instance
static IntDecoratorTests instance;
IntDecoratorTests::IntDecoratorTests()
    : TestSuite( "IntDecoratorTests" )
{
}

}

namespace data
{ // Tests
void IntDecoratorTests::constructor_givenNoParameters_setsDefaultProperties()
{
    //我们通过初始化一个新的IntDecorator而不传入任何参数来开始测试构造函数
    //然后使用QCOMPARE测试对象的各种属性是否已初始化为预期的默认值以匹配实际值与预期值。
    IntDecorator decorator;
    QCOMPARE(decorator.parentEntity(), nullptr);
    QCOMPARE(decorator.key(), QString("SomeItemKey"));
    QCOMPARE(decorator.label(), QString(""));
    QCOMPARE(decorator.value(), 0);
}

void IntDecoratorTests::constructor_givenParameters_setsProperties()
{
    Entity parentEntity;
    IntDecorator decorator(&parentEntity, "Test Key", "Test Label",
                                                       99);
    QCOMPARE(decorator.parentEntity(), &parentEntity);
    QCOMPARE(decorator.key(), QString("Test Key"));
    QCOMPARE(decorator.label(), QString("Test Label"));
    QCOMPARE(decorator.value(), 99);
}

void IntDecoratorTests::setValue_givenNewValue_updatesValueAndEmitsSignal()
{
    IntDecorator decorator;
    QSignalSpy valueChangedSpy(&decorator,
                               &IntDecorator::valueChanged);
    //如果一切正常的话,步骤 1 将值设置为 0
    //步骤 2 采取正确操作并将值更新为 99
    //步骤 3 通过,因为值是 99
    //但是,步骤 1 可能有问题,错误地将值设置为99
    //第 2 步甚至没有实现并且不采取任何行动
    //但第 3 步(和测试)通过,因为值为 99
    QCOMPARE(decorator.value(), 0); //1
    decorator.setValue(99); //2
    QCOMPARE(decorator.value(), 99);//3
    QCOMPARE(valueChangedSpy.count(), 1);
}

    //第一个 setValue() 测试确保当我们提供一个与现有值不同的新值时
    //该值被更新并且 valueChanged() 信号被发出一次
void IntDecoratorTests::setValue_givenSameValue_takesNoAction()
{
    Entity parentEntity;
    IntDecorator decorator(&parentEntity, "Test Key", "Test Label",
                                                               99);
    //我们需要检查是否发出 valueChanged() 信号
    //我们可以通过将 lambda 连接到在调用时设置标志的信号来做到这一点
    //然而,我们在这里使用的一个更简单的解决方案是使用Qt的QSignalSpy类来跟踪对指定信号的调用。
    QSignalSpy valueChangedSpy(&decorator,&IntDecorator::valueChanged);
    QCOMPARE(decorator.value(), 99);
    decorator.setValue(99);
    QCOMPARE(decorator.value(), 99);
    //然后我们可以使用 count() 方法检查信号被调用了多少次
    QCOMPARE(valueChangedSpy.count(), 0);
}

void IntDecoratorTests::jsonValue_whenDefaultValue_returnsJson()
{
    //jsonValue() 测试是简单的相等性检查。
    IntDecorator decorator;
    QCOMPARE(decorator.jsonValue(), QJsonValue(0));
}
void IntDecoratorTests::jsonValue_whenValueSet_returnsJson()
{
    IntDecorator decorator;
    decorator.setValue(99);
    QCOMPARE(decorator.jsonValue(), QJsonValue(99));
}
//
void IntDecoratorTests::update_whenPresentInJson_updatesValue()
{
    Entity parentEntity;
    IntDecorator decorator(&parentEntity, "Test Key", "Test Label", 99);
    QSignalSpy valueChangedSpy(&decorator,
                               &IntDecorator::valueChanged);
    QCOMPARE(decorator.value(), 99);
  	//我们构建了几个JSON对象
    //在一个对象中,我们添加了一个与我们的装饰器对象(“test key”)具有相同键的项目
	//并将关联的值(123)传递给 setValue()
    QJsonObject jsonObject;
    jsonObject.insert("Key 1", "Value 1");
    jsonObject.insert("Test Key", 123);
    jsonObject.insert("Key 3", 3);
    decorator.update(jsonObject);
    QCOMPARE(decorator.value(), 123);
    QCOMPARE(valueChangedSpy.count(), 1);
}

void IntDecoratorTests::update_whenNotPresentInJson_updatesValueToDefault()
{
    Entity parentEntity;
    IntDecorator decorator(&parentEntity, "Test Key", "Test Label",
                                                                99);
    QSignalSpy valueChangedSpy(&decorator,
                               &IntDecorator::valueChanged);
    QCOMPARE(decorator.value(), 99);
    QJsonObject jsonObject;
    jsonObject.insert("Key 1", "Value 1");
    jsonObject.insert("Key 2", 123);
    jsonObject.insert("Key 3", 3);
    decorator.update(jsonObject);
    QCOMPARE(decorator.value(), 0);
    QCOMPARE(valueChangedSpy.count(), 1);
}

}}
StringDecoratorTests.h
#ifndef STRINGDECORATORTESTS_H
#define STRINGDECORATORTESTS_H

#include <QtTest>

#include <data/string-decorator.h>

#include <TestSuite.h>

namespace cm {
namespace data {

class StringDecoratorTests : public TestSuite
{
    Q_OBJECT

public:
    StringDecoratorTests();

private slots:
    //测试函数根IntDecoratorTests完全一样
    void constructor_givenNoParameters_setsDefaultProperties();
    void constructor_givenParameters_setsProperties();
    void setValue_givenNewValue_updatesValueAndEmitsSignal();
    void setValue_givenSameValue_takesNoAction();
    void jsonValue_whenDefaultValue_returnsJson();
    void jsonValue_whenValueSet_returnsJson();
    void update_whenPresentInJson_updatesValue();
    void update_whenNotPresentInJson_updatesValueToDefault();
};

}}

#endif
StringDecoratorTests.cpp
#include "StringDecoratorTests.h"
#include <QSignalSpy>

#include <data/Entity.h>

namespace cm {
namespace data { // Instance

static StringDecoratorTests instance;

StringDecoratorTests::StringDecoratorTests()
    : TestSuite( "StringDecoratorTests" )
{
}
}

namespace data
{ // Tests

void StringDecoratorTests::constructor_givenNoParameters_setsDefaultProperties()
{
    StringDecorator decorator;

    QCOMPARE(decorator.parentEntity(), nullptr);
    QCOMPARE(decorator.key(), QString("SomeItemKey"));
    QCOMPARE(decorator.label(), QString(""));
    QCOMPARE(decorator.value(), QString(""));//传入QString
}

void StringDecoratorTests::constructor_givenParameters_setsProperties()
{
    Entity parentEntity;
    StringDecorator decorator(&parentEntity, "Test Key", "Test Label", "Test Value");
    //传入"Test Value"

    QCOMPARE(decorator.parentEntity(), &parentEntity);
    QCOMPARE(decorator.key(), QString("Test Key"));
    QCOMPARE(decorator.label(), QString("Test Label"));
    QCOMPARE(decorator.value(), QString("Test Value"));
}

void StringDecoratorTests::setValue_givenNewValue_updatesValueAndEmitsSignal()
{
    StringDecorator decorator;
    QSignalSpy valueChangedSpy(&decorator, &StringDecorator::valueChanged);

    QCOMPARE(decorator.value(), QString(""));

    decorator.setValue("New Value");//String

    QCOMPARE(decorator.value(), QString("New Value"));//QString
    QCOMPARE(valueChangedSpy.count(), 1);
}

void StringDecoratorTests::setValue_givenSameValue_takesNoAction()
{
    Entity parentEntity;
    StringDecorator decorator(&parentEntity, "Test Key", "Test Label", "Test Value");//String
    QSignalSpy valueChangedSpy(&decorator, &StringDecorator::valueChanged);

    QCOMPARE(decorator.value(), QString("Test Value"));//QString

    decorator.setValue("Test Value");String

    QCOMPARE(decorator.value(), QString("Test Value"));//QString
    QCOMPARE(valueChangedSpy.count(), 0);
}

void StringDecoratorTests::jsonValue_whenDefaultValue_returnsJson()
{
    StringDecorator decorator;

    QCOMPARE(decorator.jsonValue(), QJsonValue(""));//String
}

void StringDecoratorTests::jsonValue_whenValueSet_returnsJson()
{
    StringDecorator decorator;
    decorator.setValue("Test Value");//String

    QCOMPARE(decorator.jsonValue(), QJsonValue("Test Value"));//String
}

void StringDecoratorTests::update_whenPresentInJson_updatesValue()
{
    Entity parentEntity;
    StringDecorator decorator(&parentEntity, "Test Key", "Test Label", "Test Value");//String
    QSignalSpy valueChangedSpy(&decorator, &StringDecorator::valueChanged);

    QCOMPARE(decorator.value(), QString("Test Value"));//String

    QJsonObject jsonObject;
    jsonObject.insert("Key 1", "Value 1");
    jsonObject.insert("Test Key", "New Value");//String
    jsonObject.insert("Key 3", 3);

    decorator.update(jsonObject);

    QCOMPARE(decorator.value(), QString("New Value"));//QString
    QCOMPARE(valueChangedSpy.count(), 1);
}

void StringDecoratorTests::update_whenNotPresentInJson_updatesValueToDefault()
{
    Entity parentEntity;
    StringDecorator decorator(&parentEntity, "Test Key", "Test Label", "Test Value");//QString
    QSignalSpy valueChangedSpy(&decorator, &StringDecorator::valueChanged);

    QCOMPARE(decorator.value(), QString("Test Value"));//QString

    QJsonObject jsonObject;
    jsonObject.insert("Key 1", "Value 1");
    jsonObject.insert("Key 2", "New Value");
    jsonObject.insert("Key 3", 3);

    decorator.update(jsonObject);

    QCOMPARE(decorator.value(), QString(""));
    QCOMPARE(valueChangedSpy.count(), 1);
}

}}
//QString 和 String 和 上面IntDecoratorTests 地方参数不同其余地方基本一样
DateTimeDecoratorTests.h
DateTimeDecoratorTests 除了对DateTimeDecorator 上面的测试外还要添加对、日期转换的函数
void toIso8601String_whenDefaultValue_returnsString();
void toIso8601String_whenValueSet_returnsString();
void toPrettyDateString_whenDefaultValue_returnsString();
void toPrettyDateString_whenValueSet_returnsString();
void toPrettyTimeString_whenDefaultValue_returnsString();
void toPrettyTimeString_whenValueSet_returnsString();
void toPrettyString_whenDefaultValue_returnsString();
void toPrettyString_whenValueSet_returnsString();
添加一个日期的private 成员以便方便传入测试函数
QDateTime testDate{QDate(2017, 8, 19), QTime(16, 40, 32)};
DateTimeDecoratorTests.h
#ifndef DATETIMEDECORATORTESTS_H
#define DATETIMEDECORATORTESTS_H

#include <QtTest>

#include <data/DateTimeDecorator.h>

#include <TestSuite.h>

namespace cm {
namespace data {

class DateTimeDecoratorTests : public TestSuite
{
    Q_OBJECT

public:
    DateTimeDecoratorTests();

private slots:
    void constructor_givenNoParameters_setsDefaultProperties();
    void constructor_givenParameters_setsProperties();
    void setValue_givenNewValue_updatesValueAndEmitsSignal();
    void setValue_givenSameValue_takesNoAction();
    void jsonValue_whenDefaultValue_returnsJson();
    void jsonValue_whenValueSet_returnsJson();
    void update_whenPresentInJson_updatesValue();
    void update_whenNotPresentInJson_updatesValueToDefault();

    //添加对日期转换函数的测试
    void toIso8601String_whenDefaultValue_returnsString();
    void toIso8601String_whenValueSet_returnsString();
    void toPrettyDateString_whenDefaultValue_returnsString();
    void toPrettyDateString_whenValueSet_returnsString();
    void toPrettyTimeString_whenDefaultValue_returnsString();
    void toPrettyTimeString_whenValueSet_returnsString();
    void toPrettyString_whenDefaultValue_returnsString();
    void toPrettyString_whenValueSet_returnsString();
private:
    QDateTime testDate{QDate(2017, 8, 19), QTime(16, 40, 32)};
};

}}

#endif
DateTimeDecoratorTests.cpp
#include "DateTimeDecoratorTests.h"

#include <QSignalSpy>

#include <data/Entity.h>

namespace cm {
namespace data { // Instance

static DateTimeDecoratorTests instance;

DateTimeDecoratorTests::DateTimeDecoratorTests()
    : TestSuite( "DateTimeDecoratorTests" )
{
}

}

namespace data
{ // Tests
//与前面相同函数里面的只与前面函数的参不同。传入的是testDate
void DateTimeDecoratorTests::constructor_givenNoParameters_setsDefaultProperties()
{
    DateTimeDecorator decorator;

    QCOMPARE(decorator.parentEntity(), nullptr);
    QCOMPARE(decorator.key(), QString("SomeItemKey"));
    QCOMPARE(decorator.label(), QString(""));
    QCOMPARE(decorator.value(), QDateTime());
}

void DateTimeDecoratorTests::constructor_givenParameters_setsProperties()
{
    Entity parentEntity;
    DateTimeDecorator decorator(&parentEntity, "Test Key", "Test Label", testDate);

    QCOMPARE(decorator.parentEntity(), &parentEntity);
    QCOMPARE(decorator.key(), QString("Test Key"));
    QCOMPARE(decorator.label(), QString("Test Label"));
    QCOMPARE(decorator.value(), testDate);
}

void DateTimeDecoratorTests::setValue_givenNewValue_updatesValueAndEmitsSignal()
{
    DateTimeDecorator decorator;
    QSignalSpy valueChangedSpy(&decorator, &DateTimeDecorator::valueChanged);

    QCOMPARE(decorator.value(), QDateTime());

    decorator.setValue(testDate);

    QCOMPARE(decorator.value(), testDate);
    QCOMPARE(valueChangedSpy.count(), 1);
}

void DateTimeDecoratorTests::setValue_givenSameValue_takesNoAction()
{
    Entity parentEntity;
    DateTimeDecorator decorator(&parentEntity, "Test Key", "Test Label", testDate);
    QSignalSpy valueChangedSpy(&decorator, &DateTimeDecorator::valueChanged);

    QCOMPARE(decorator.value(), testDate);

    decorator.setValue(testDate);

    QCOMPARE(decorator.value(), testDate);
    QCOMPARE(valueChangedSpy.count(), 0);
}

void DateTimeDecoratorTests::jsonValue_whenDefaultValue_returnsJson()
{
    DateTimeDecorator decorator;

    QCOMPARE(decorator.jsonValue(), QJsonValue(QDateTime().toString(Qt::ISODate)));
}

void DateTimeDecoratorTests::jsonValue_whenValueSet_returnsJson()
{
    DateTimeDecorator decorator;
    decorator.setValue(testDate);

    QCOMPARE(decorator.jsonValue(), QJsonValue(testDate.toString(Qt::ISODate)));
}

void DateTimeDecoratorTests::update_whenPresentInJson_updatesValue()
{
    Entity parentEntity;
    DateTimeDecorator decorator(&parentEntity, "Test Key", "Test Label", testDate);
    QSignalSpy valueChangedSpy(&decorator, &DateTimeDecorator::valueChanged);

    QCOMPARE(decorator.value(), testDate);

    QJsonObject jsonObject;
    jsonObject.insert("Key 1", "Value 1");
    jsonObject.insert("Test Key", QDateTime(QDate(2016, 4, 18), QTime(10, 37, 14)).toString(Qt::ISODate));
    jsonObject.insert("Key 3", 3);

    decorator.update(jsonObject);

    QCOMPARE(decorator.value(), QDateTime(QDate(2016, 4, 18), QTime(10, 37, 14)));
    QCOMPARE(valueChangedSpy.count(), 1);
}

void DateTimeDecoratorTests::update_whenNotPresentInJson_updatesValueToDefault()
{
    Entity parentEntity;
    DateTimeDecorator decorator(&parentEntity, "Test Key", "Test Label", testDate);
    QSignalSpy valueChangedSpy(&decorator, &DateTimeDecorator::valueChanged);

    QCOMPARE(decorator.value(), testDate);

    QJsonObject jsonObject;
    jsonObject.insert("Key 1", "Value 1");
    jsonObject.insert("Key 2", QDateTime(QDate(2016, 4, 18), QTime(10, 37, 14)).toString(Qt::ISODate));
    jsonObject.insert("Key 3", 3);

    decorator.update(jsonObject);

    QCOMPARE(decorator.value(), QDateTime());
    QCOMPARE(valueChangedSpy.count(), 1);
}

void DateTimeDecoratorTests::toIso8601String_whenDefaultValue_returnsString()
{
    DateTimeDecorator decorator;

    QCOMPARE(decorator.toIso8601String(), QString(""));
}

void DateTimeDecoratorTests::toIso8601String_whenValueSet_returnsString()
{
    DateTimeDecorator decorator;
    decorator.setValue(testDate);

    QCOMPARE(decorator.toIso8601String(), QString("2017-08-19T16:40:32"));
}

void DateTimeDecoratorTests::toPrettyDateString_whenDefaultValue_returnsString()
{
    DateTimeDecorator decorator;

    QCOMPARE(decorator.toPrettyDateString(), QString("Not set"));
}

void DateTimeDecoratorTests::toPrettyDateString_whenValueSet_returnsString()
{
    DateTimeDecorator decorator;
    decorator.setValue(testDate);

    QCOMPARE(decorator.toPrettyDateString(), QString("19 Aug 2017"));
}

void DateTimeDecoratorTests::toPrettyTimeString_whenDefaultValue_returnsString()
{
    DateTimeDecorator decorator;

    QCOMPARE(decorator.toPrettyTimeString(), QString("Not set"));
}

void DateTimeDecoratorTests::toPrettyTimeString_whenValueSet_returnsString()
{
    DateTimeDecorator decorator;
    decorator.setValue(testDate);

    QCOMPARE(decorator.toPrettyTimeString(), QString("04:40 pm"));
}

void DateTimeDecoratorTests::toPrettyString_whenDefaultValue_returnsString()
{
    DateTimeDecorator decorator;

    QCOMPARE(decorator.toPrettyString(), QString("Not set"));
}

void DateTimeDecoratorTests::toPrettyString_whenValueSet_returnsString()
{
    DateTimeDecorator decorator;
    decorator.setValue(testDate);

    QCOMPARE(decorator.toPrettyString(), QString("Sat 19 Aug 2017 @ 16:40:32"));
}

}}
EnumeratorDecoratorTests.h
#ifndef ENUMERATORDECORATORTESTS_H
#define ENUMERATORDECORATORTESTS_H
#include <QtTest>
#include <data/EnumeratorDecorator.h>
#include <TestSuite.h>

namespace cm {
namespace data {

class EnumeratorDecoratorTests : public TestSuite
{
    Q_OBJECT
public:
    EnumeratorDecoratorTests();
private slots:
    void constructor_givenNoParameters_setsDefaultProperties();
    void constructor_givenParameters_setsProperties();
    void setValue_givenNewValue_updatesValueAndEmitsSignal();
    void setValue_givenSameValue_takesNoAction();
    void jsonValue_whenDefaultValue_returnsJson();
    void jsonValue_whenValueSet_returnsJson();
    void update_whenPresentInJson_updatesValue();
    void update_whenNotPresentInJson_updatesValueToDefault();

private:
    enum eTestEnum {
        Unknown = 0,
        Value1,
        Value2,
        Value3
    };

    const std::map<int, QString> descriptionMapper{
        {static_cast<int>(eTestEnum::Unknown), ""},
        {static_cast<int>(eTestEnum::Value1), "Value 1"},
        {static_cast<int>(eTestEnum::Value2), "Value 2"},
        {static_cast<int>(eTestEnum::Value3), "Value 3"}
    };
};

}}

#endif
EnumeratorDecoratorTests.cpp
#include "EnumeratorDecoratorTests.h"

#include <QSignalSpy>

#include <data/Entity.h>

namespace cm {
namespace data { // Instance

static EnumeratorDecoratorTests instance;

EnumeratorDecoratorTests::EnumeratorDecoratorTests()
    : TestSuite( "EnumeratorDecoratorTests" )
{
}

}

namespace data { // Tests

void EnumeratorDecoratorTests::constructor_givenNoParameters_setsDefaultProperties()
{
    EnumeratorDecorator decorator;

    QCOMPARE(decorator.parentEntity(), nullptr);
    QCOMPARE(decorator.key(), QString("SomeItemKey"));
    QCOMPARE(decorator.label(), QString(""));
    QCOMPARE(decorator.value(), 0);
    QCOMPARE(decorator.valueDescription(), QString(""));
}

void EnumeratorDecoratorTests::constructor_givenParameters_setsProperties()
{
    Entity parentEntity;
    EnumeratorDecorator decorator(&parentEntity, "Test Key", "Test Label", static_cast<int>(eTestEnum::Value2), descriptionMapper);

    QCOMPARE(decorator.parentEntity(), &parentEntity);
    QCOMPARE(decorator.key(), QString("Test Key"));
    QCOMPARE(decorator.label(), QString("Test Label"));
    QCOMPARE(decorator.value(), static_cast<int>(eTestEnum::Value2));
    QCOMPARE(decorator.valueDescription(), QString("Value 2"));
}

void EnumeratorDecoratorTests::setValue_givenNewValue_updatesValueAndEmitsSignal()
{
    Entity parentEntity;
    EnumeratorDecorator decorator(&parentEntity, "Test Key", "Test Label", static_cast<int>(eTestEnum::Unknown), descriptionMapper);
    QSignalSpy valueChangedSpy(&decorator, &EnumeratorDecorator::valueChanged);

    QCOMPARE(decorator.value(), static_cast<int>(eTestEnum::Unknown));
    QCOMPARE(decorator.valueDescription(), QString(""));

    decorator.setValue(static_cast<int>(eTestEnum::Value2));

    QCOMPARE(decorator.value(), static_cast<int>(eTestEnum::Value2));
    QCOMPARE(decorator.valueDescription(), QString("Value 2"));
    QCOMPARE(valueChangedSpy.count(), 1);
}

void EnumeratorDecoratorTests::setValue_givenSameValue_takesNoAction()
{
    Entity parentEntity;
    EnumeratorDecorator decorator(&parentEntity, "Test Key", "Test Label", static_cast<int>(eTestEnum::Value2), descriptionMapper);
    QSignalSpy valueChangedSpy(&decorator, &EnumeratorDecorator::valueChanged);

    QCOMPARE(decorator.value(), static_cast<int>(eTestEnum::Value2));
    QCOMPARE(decorator.valueDescription(), QString("Value 2"));

    decorator.setValue(static_cast<int>(eTestEnum::Value2));

    QCOMPARE(decorator.value(), static_cast<int>(eTestEnum::Value2));
    QCOMPARE(decorator.valueDescription(), QString("Value 2"));
    QCOMPARE(valueChangedSpy.count(), 0);
}

void EnumeratorDecoratorTests::jsonValue_whenDefaultValue_returnsJson()
{
    EnumeratorDecorator decorator;

    QCOMPARE(decorator.jsonValue(), QJsonValue(static_cast<int>(eTestEnum::Unknown)));
}

void EnumeratorDecoratorTests::jsonValue_whenValueSet_returnsJson()
{
    EnumeratorDecorator decorator;
    decorator.setValue(static_cast<int>(eTestEnum::Value2));

    QCOMPARE(decorator.jsonValue(), QJsonValue(static_cast<int>(eTestEnum::Value2)));
}

void EnumeratorDecoratorTests::update_whenPresentInJson_updatesValue()
{
    Entity parentEntity;
    EnumeratorDecorator decorator(&parentEntity, "Test Key", "Test Label", static_cast<int>(eTestEnum::Value2), descriptionMapper);
    QSignalSpy valueChangedSpy(&decorator, &EnumeratorDecorator::valueChanged);

    QCOMPARE(decorator.value(), static_cast<int>(eTestEnum::Value2));
    QCOMPARE(decorator.valueDescription(), QString("Value 2"));

    QJsonObject jsonObject;
    jsonObject.insert("Key 1", "Value 1");
    jsonObject.insert("Test Key", static_cast<int>(eTestEnum::Value3));
    jsonObject.insert("Key 3", 3);

    decorator.update(jsonObject);

    QCOMPARE(decorator.value(), static_cast<int>(eTestEnum::Value3));
    QCOMPARE(decorator.valueDescription(), QString("Value 3"));
    QCOMPARE(valueChangedSpy.count(), 1);
}

void EnumeratorDecoratorTests::update_whenNotPresentInJson_updatesValueToDefault()
{
    Entity parentEntity;
    EnumeratorDecorator decorator(&parentEntity, "Test Key", "Test Label", static_cast<int>(eTestEnum::Value2), descriptionMapper);
    QSignalSpy valueChangedSpy(&decorator, &EnumeratorDecorator::valueChanged);

    QCOMPARE(decorator.value(), static_cast<int>(eTestEnum::Value2));
    QCOMPARE(decorator.valueDescription(), QString("Value 2"));

    QJsonObject jsonObject;
    jsonObject.insert("Key 1", "Value 1");
    jsonObject.insert("Key 2", 123);
    jsonObject.insert("Key 3", 3);

    decorator.update(jsonObject);

    QCOMPARE(decorator.value(), static_cast<int>(eTestEnum::Unknown));
    QCOMPARE(decorator.valueDescription(), QString(""));
    QCOMPARE(valueChangedSpy.count(), 1);
}

}}
单元测试倾向于遵循排列 > 操作 > 断言模式。首先满足测试的先决条件:初始化变量,配置类,等等。然后,执行一个动作,通常调用被测试的函数。最后,检查动作的结果。有时,这些步骤中的一个或多个步骤不是必需的,或者可能与另一个步骤合并,但这是一般模式。
Entity Tests
添加一个client-tests.h的头文件
先看一下client函数需要进行哪些测试,现在我们对我们的数据装饰器按预期工作有了一些信心,让我们向上移动一个级别并测试我们的数据实体。Client 类是我们模型层次结构的根通过测试它,我们可以在这个过程中测试我们的其他模型。
我们要在这里测试三个主要部分:
对象构造
序列化为 JSON
从 JSON 反序列化
#ifndef CLIENTTESTS_H
#define CLIENTTESTS_H

#include <QtTest>
#include <QJsonObject>

#include <models/client.h>
#include <TestSuite.h>

namespace cm {
namespace models {

class ClientTests : public TestSuite
{
    Q_OBJECT

public:
    ClientTests();

private slots:
    void constructor_givenParent_setsParentAndDefaultProperties();
    void constructor_givenParentAndJsonObject_setsParentAndProperties();
    void toJson_withDefaultProperties_constructsJson();
    void toJson_withSetProperties_constructsJson();
    void update_givenJsonObject_updatesProperties();
    void update_givenEmptyJsonObject_updatesPropertiesToDefaults();

private:
    void verifyBillingAddress(const QJsonObject& jsonObject);
    void verifyDefaultBillingAddress(const QJsonObject& jsonObject);
    void verifyBillingAddress(Address* address);
    void verifyDefaultBillingAddress(Address* address);
    void verifySupplyAddress(const QJsonObject& jsonObject);
    void verifyDefaultSupplyAddress(const QJsonObject& jsonObject);
    void verifySupplyAddress(Address* address);
    void verifyDefaultSupplyAddress(Address* address);
    void verifyAppointments(const QJsonObject& jsonObject);
    void verifyDefaultAppointments(const QJsonObject& jsonObject);
    void verifyAppointments(const QList<Appointment*>& appointments);
    void verifyDefaultAppointments(const QList<Appointment*>& appointments);
    void verifyContacts(const QJsonObject& jsonObject);
    void verifyDefaultContacts(const QJsonObject& jsonObject);
    void verifyContacts(const QList<Contact*>& contacts);
    void verifyDefaultContacts(const QList<Contact*>& contacts);

    QByteArray jsonByteArray = R"(
    {
        "reference": "CM0001",
        "name": "Mr Test Testerson",
        "billingAddress": {
            "building": "Billing Building",
            "city": "Billing City",
            "postcode": "Billing Postcode",
            "street": "Billing Street"
        },
        "appointments": [
         {"startAt": "2017-08-20T12:45:00", "endAt": "2017-08-20T13:00:00", "notes": "Test appointment 1"},
         {"startAt": "2017-08-21T10:30:00", "endAt": "2017-08-21T11:30:00", "notes": "Test appointment 2"}
        ],
        "contacts": [
            {"contactType": 2, "address":"email@test.com"},
            {"contactType": 1, "address":"012345678"}
        ],
        "supplyAddress": {
            "building": "Supply Building",
            "city": "Supply City",
            "postcode": "Supply Postcode",
            "street": "Supply Street"
        }
    })";
};

}}

#endif
与之前的套件一样,我们对每个区域都有几种不同风格的测试——一种使用默认数据,另一种使用指定数据。 在私有部分,您将看到许多验证方法。 它们将封装测试特定数据子集所需的功能。 这样做的优点与使用常规代码相同:它们使单元测试更加简洁和可读,并且它们允许轻松重用验证规则。 此外,在私有部分,我们定义了一个 JSON 块,我们可以使用它来构建我们的 Client 实例。 顾名思义,QByteArray 只是一个字节数组,带有许多相关的有用函数:
实现部分
    void constructor_givenParent_setsParentAndDefaultProperties();
    void constructor_givenParentAndJsonObject_setsParentAndProperties();
void ClientTests::constructor_givenParent_setsParentAndDefaultProperties()
{
    //不带json的构造函数,从构造函数测试开始,我们实例化一个新的 Client
    //client需要QObject 参数因此传入this指针
    Client testClient(this);
	//一旦我们初始化了客户端,我们就会检查 name 属性并使用 verify 方法来为我们测试子对象的状态。
    QCOMPARE(testClient.parent(), this);
    QCOMPARE(testClient.reference->value(), QString(""));
    QCOMPARE(testClient.name->value(), QString(""));
	//无论我们是否通过 JSON 对象提供任何初始数据,我们都希望为我们自动创建 supplyAddress 和 billingAddress 对象以及约会和联系人集合
    verifyDefaultBillingAddress(testClient.billingAddress);
    verifyDefaultSupplyAddress(testClient.supplyAddress);
    verifyDefaultAppointments(testClient.appointments->derivedEntities());
    verifyDefaultContacts(testClient.contacts->derivedEntities());
}

void ClientTests::constructor_givenParentAndJsonObject_setsParentAndProperties()
{
     //带json的构造函数,从构造函数测试开始,我们实例化一个新的 Client
    //为了将我们的 JSON 字节数组转换为 QJsonObject,我们需要通过 QJsonDocument 传递它
    Client testClient(this, QJsonDocument::fromJson(jsonByteArray).object());
	//一旦我们初始化了客户端,我们就会检查 name 属性并使用 verify 方法来为我们测试子对象的状态。
    QCOMPARE(testClient.parent(), this);
    QCOMPARE(testClient.reference->value(), QString("CM0001"));
    QCOMPARE(testClient.name->value(), QString("Mr Test Testerson"));
	//无论我们是否通过 JSON 对象提供任何初始数据,我们都希望为我们自动创建 supplyAddress 和 billingAddress 对象以及约会和联系人集合
    verifyBillingAddress(testClient.billingAddress);
    verifySupplyAddress(testClient.supplyAddress);
    verifyAppointments(testClient.appointments->derivedEntities());
    verifyContacts(testClient.contacts->derivedEntities());
}
    void toJson_withDefaultProperties_constructsJson();
    void toJson_withSetProperties_constructsJson();
void ClientTests::toJson_withDefaultProperties_constructsJson()
{
    //同上
    Client testClient(this);
    //然后我们立即使用构造函数中对 toJson() 的调用构造一个 QJsonDocument 来为我们获取序列化的 JSON 对象
    QJsonDocument jsonDoc(testClient.toJson());
    QVERIFY(jsonDoc.isObject());
    QJsonObject jsonObject = jsonDoc.object();
    QVERIFY(jsonObject.contains("reference"));
    QCOMPARE(jsonObject.value("reference").toString(), QString(""));
    QVERIFY(jsonObject.contains("name"));
    QCOMPARE(jsonObject.value("name").toString(), QString(""));
    //测试 name 属性,然后我们再次使用 verify 方法。
    verifyDefaultBillingAddress(jsonObject);
    verifyDefaultSupplyAddress(jsonObject);
    verifyDefaultAppointments(jsonObject);
    verifyDefaultContacts(jsonObject);
}
void ClientTests::toJson_withSetProperties_constructsJson()
{
    //同上
    Client testClient(this, QJsonDocument::fromJson(jsonByteArray).object());
    QCOMPARE(testClient.reference->value(), QString("CM0001"));
    QCOMPARE(testClient.name->value(), QString("Mr Test Testerson"));

    //测试 name 属性,然后我们再次使用 verify 方法。
    verifyBillingAddress(testClient.billingAddress);
    verifySupplyAddress(testClient.supplyAddress);
    verifyAppointments(testClient.appointments->derivedEntities());
    verifyContacts(testClient.contacts->derivedEntities());
    QJsonDocument jsonDoc(testClient.toJson());
    QVERIFY(jsonDoc.isObject());
    QJsonObject jsonObject = jsonDoc.object();
    QVERIFY(jsonObject.contains("reference"));
    QCOMPARE(jsonObject.value("reference").toString(), QString("CM0001"));
    QVERIFY(jsonObject.contains("name"));
    QCOMPARE(jsonObject.value("name").toString(), QString("Mr Test                                                   Testerson"));
    //使用 JSON 构建客户端时,我们添加了前提条件检查,以确保在再次调用 toJson() 并测试结果之前已正确设置我们的属性
    verifyBillingAddress(jsonObject);
    verifySupplyAddress(jsonObject);
    verifyAppointments(jsonObject);
    verifyContacts(jsonObject);
}
    void update_givenJsonObject_updatesProperties();
    void update_givenEmptyJsonObject_updatesPropertiesToDefaults();
void ClientTests::update_givenJsonObject_updatesProperties()
{
    Client testClient(this);
	//update() 测试与 toJson() 相同,但相反。 这一次,我们使用我们的字节数组构造一个 JSON 对象并将其传递给 update(),然后检查模型的状态。
    testClient.update(QJsonDocument::fromJson(jsonByteArray).object());

    QCOMPARE(testClient.reference->value(), QString("CM0001"));
    QCOMPARE(testClient.name->value(), QString("Mr Test Testerson"));

    verifyBillingAddress(testClient.billingAddress);
    verifySupplyAddress(testClient.supplyAddress);
    verifyAppointments(testClient.appointments->derivedEntities());
    verifyContacts(testClient.contacts->derivedEntities());
}

void ClientTests::update_givenEmptyJsonObject_updatesPropertiesToDefaults()
{
    //update() 测试与 toJson() 相同,但相反。 这一次,我们使用我们的字节数组构造一个 JSON 对象并将其传递给 update(),然后检查模型的状态。
    Client testClient(this, QJsonDocument::fromJson(jsonByteArray).object());

    QCOMPARE(testClient.reference->value(), QString("CM0001"));
    QCOMPARE(testClient.name->value(), QString("Mr Test Testerson"));

    verifyBillingAddress(testClient.billingAddress);
    verifySupplyAddress(testClient.supplyAddress);
    verifyAppointments(testClient.appointments->derivedEntities());
    verifyContacts(testClient.contacts->derivedEntities());

    testClient.update(QJsonObject());

    QCOMPARE(testClient.reference->value(), QString(""));
    QCOMPARE(testClient.name->value(), QString(""));

    verifyDefaultBillingAddress(testClient.billingAddress);
    verifyDefaultSupplyAddress(testClient.supplyAddress);
    verifyDefaultAppointments(testClient.appointments->derivedEntities());
    verifyDefaultContacts(testClient.contacts->derivedEntities());
}
各种私有验证方法都是简单的检查集
client-tests.cpp
#include "client-tests.h"

#include <QString>
#include <QtTest>

#include <QJsonArray>
#include <QJsonDocument>

#include <models/client.h>

using namespace cm::models;

namespace cm {
namespace models { // Structors

static ClientTests instance;

ClientTests::ClientTests()
    : TestSuite( "ClientTests" )
{
}

}

namespace models { // Tests

void ClientTests::constructor_givenParent_setsParentAndDefaultProperties()
{
    Client testClient(this);

    QCOMPARE(testClient.parent(), this);
    QCOMPARE(testClient.reference->value(), QString(""));
    QCOMPARE(testClient.name->value(), QString(""));

    verifyDefaultBillingAddress(testClient.billingAddress);
    verifyDefaultSupplyAddress(testClient.supplyAddress);
    verifyDefaultAppointments(testClient.appointments->derivedEntities());
    verifyDefaultContacts(testClient.contacts->derivedEntities());
}

void ClientTests::constructor_givenParentAndJsonObject_setsParentAndProperties()
{
    Client testClient(this, QJsonDocument::fromJson(jsonByteArray).object());

    QCOMPARE(testClient.parent(), this);
    QCOMPARE(testClient.reference->value(), QString("CM0001"));
    QCOMPARE(testClient.name->value(), QString("Mr Test Testerson"));

    verifyBillingAddress(testClient.billingAddress);
    verifySupplyAddress(testClient.supplyAddress);
    verifyAppointments(testClient.appointments->derivedEntities());
    verifyContacts(testClient.contacts->derivedEntities());
}

void ClientTests::toJson_withDefaultProperties_constructsJson()
{
    Client testClient(this);

    QJsonDocument jsonDoc(testClient.toJson());

    QVERIFY(jsonDoc.isObject());

    QJsonObject jsonObject = jsonDoc.object();

    QVERIFY(jsonObject.contains("reference"));
    QCOMPARE(jsonObject.value("reference").toString(), QString(""));
    QVERIFY(jsonObject.contains("name"));
    QCOMPARE(jsonObject.value("name").toString(), QString(""));

    verifyDefaultBillingAddress(jsonObject);
    verifyDefaultSupplyAddress(jsonObject);
    verifyDefaultAppointments(jsonObject);
    verifyDefaultContacts(jsonObject);
}

void ClientTests::toJson_withSetProperties_constructsJson()
{
    Client testClient(this, QJsonDocument::fromJson(jsonByteArray).object());

    QCOMPARE(testClient.reference->value(), QString("CM0001"));
    QCOMPARE(testClient.name->value(), QString("Mr Test Testerson"));

    verifyBillingAddress(testClient.billingAddress);
    verifySupplyAddress(testClient.supplyAddress);
    verifyAppointments(testClient.appointments->derivedEntities());
    verifyContacts(testClient.contacts->derivedEntities());

    QJsonDocument jsonDoc(testClient.toJson());

    QVERIFY(jsonDoc.isObject());

    QJsonObject jsonObject = jsonDoc.object();

    QVERIFY(jsonObject.contains("reference"));
    QCOMPARE(jsonObject.value("reference").toString(), QString("CM0001"));
    QVERIFY(jsonObject.contains("name"));
    QCOMPARE(jsonObject.value("name").toString(), QString("Mr Test Testerson"));

    verifyBillingAddress(jsonObject);
    verifySupplyAddress(jsonObject);
    verifyAppointments(jsonObject);
    verifyContacts(jsonObject);
}

void ClientTests::update_givenJsonObject_updatesProperties()
{
    Client testClient(this);

    testClient.update(QJsonDocument::fromJson(jsonByteArray).object());

    QCOMPARE(testClient.reference->value(), QString("CM0001"));
    QCOMPARE(testClient.name->value(), QString("Mr Test Testerson"));

    verifyBillingAddress(testClient.billingAddress);
    verifySupplyAddress(testClient.supplyAddress);
    verifyAppointments(testClient.appointments->derivedEntities());
    verifyContacts(testClient.contacts->derivedEntities());
}

void ClientTests::update_givenEmptyJsonObject_updatesPropertiesToDefaults()
{
    Client testClient(this, QJsonDocument::fromJson(jsonByteArray).object());

    QCOMPARE(testClient.reference->value(), QString("CM0001"));
    QCOMPARE(testClient.name->value(), QString("Mr Test Testerson"));

    verifyBillingAddress(testClient.billingAddress);
    verifySupplyAddress(testClient.supplyAddress);
    verifyAppointments(testClient.appointments->derivedEntities());
    verifyContacts(testClient.contacts->derivedEntities());

    testClient.update(QJsonObject());

    QCOMPARE(testClient.reference->value(), QString(""));
    QCOMPARE(testClient.name->value(), QString(""));

    verifyDefaultBillingAddress(testClient.billingAddress);
    verifyDefaultSupplyAddress(testClient.supplyAddress);
    verifyDefaultAppointments(testClient.appointments->derivedEntities());
    verifyDefaultContacts(testClient.contacts->derivedEntities());
}

void ClientTests::verifyBillingAddress(const QJsonObject& jsonObject)
{
    QVERIFY(jsonObject.contains("billingAddress"));
    QJsonObject billingAddress = jsonObject.value("billingAddress").toObject();

    QVERIFY(billingAddress.contains("building"));
    QCOMPARE(billingAddress.value("building").toString(), QString("Billing Building"));
    QVERIFY(billingAddress.contains("street"));
    QCOMPARE(billingAddress.value("street").toString(), QString("Billing Street"));
    QVERIFY(billingAddress.contains("city"));
    QCOMPARE(billingAddress.value("city").toString(), QString("Billing City"));
    QVERIFY(billingAddress.contains("postcode"));
    QCOMPARE(billingAddress.value("postcode").toString(), QString("Billing Postcode"));
}

void ClientTests::verifyDefaultBillingAddress(const QJsonObject& jsonObject)
{
    QVERIFY(jsonObject.contains("billingAddress"));
    QJsonObject billingAddress = jsonObject.value("billingAddress").toObject();

    QVERIFY(billingAddress.contains("building"));
    QCOMPARE(billingAddress.value("building").toString(), QString(""));
    QVERIFY(billingAddress.contains("street"));
    QCOMPARE(billingAddress.value("street").toString(), QString(""));
    QVERIFY(billingAddress.contains("city"));
    QCOMPARE(billingAddress.value("city").toString(), QString(""));
    QVERIFY(billingAddress.contains("postcode"));
    QCOMPARE(billingAddress.value("postcode").toString(), QString(""));
}

void ClientTests::verifyBillingAddress(Address* address)
{
    QVERIFY(address != nullptr);

    QCOMPARE(address->building->value(), QString("Billing Building"));
    QCOMPARE(address->street->value(), QString("Billing Street"));
    QCOMPARE(address->city->value(), QString("Billing City"));
    QCOMPARE(address->postcode->value(), QString("Billing Postcode"));
}

void ClientTests::verifyDefaultBillingAddress(Address* address)
{
    QVERIFY(address != nullptr);

    QCOMPARE(address->building->value(), QString(""));
    QCOMPARE(address->street->value(), QString(""));
    QCOMPARE(address->city->value(), QString(""));
    QCOMPARE(address->postcode->value(), QString(""));
}

void ClientTests::verifySupplyAddress(const QJsonObject& jsonObject)
{
    QVERIFY(jsonObject.contains("supplyAddress"));
    QJsonObject billingAddress = jsonObject.value("supplyAddress").toObject();

    QVERIFY(billingAddress.contains("building"));
    QCOMPARE(billingAddress.value("building").toString(), QString("Supply Building"));
    QVERIFY(billingAddress.contains("street"));
    QCOMPARE(billingAddress.value("street").toString(), QString("Supply Street"));
    QVERIFY(billingAddress.contains("city"));
    QCOMPARE(billingAddress.value("city").toString(), QString("Supply City"));
    QVERIFY(billingAddress.contains("postcode"));
    QCOMPARE(billingAddress.value("postcode").toString(), QString("Supply Postcode"));
}

void ClientTests::verifyDefaultSupplyAddress(const QJsonObject& jsonObject)
{
    QVERIFY(jsonObject.contains("supplyAddress"));
    QJsonObject billingAddress = jsonObject.value("supplyAddress").toObject();

    QVERIFY(billingAddress.contains("building"));
    QCOMPARE(billingAddress.value("building").toString(), QString(""));
    QVERIFY(billingAddress.contains("street"));
    QCOMPARE(billingAddress.value("street").toString(), QString(""));
    QVERIFY(billingAddress.contains("city"));
    QCOMPARE(billingAddress.value("city").toString(), QString(""));
    QVERIFY(billingAddress.contains("postcode"));
    QCOMPARE(billingAddress.value("postcode").toString(), QString(""));
}

void ClientTests::verifySupplyAddress(Address* address)
{
    QVERIFY(address != nullptr);

    QCOMPARE(address->building->value(), QString("Supply Building"));
    QCOMPARE(address->street->value(), QString("Supply Street"));
    QCOMPARE(address->city->value(), QString("Supply City"));
    QCOMPARE(address->postcode->value(), QString("Supply Postcode"));
}

void ClientTests::verifyDefaultSupplyAddress(Address* address)
{
    QVERIFY(address != nullptr);

    QCOMPARE(address->building->value(), QString(""));
    QCOMPARE(address->street->value(), QString(""));
    QCOMPARE(address->city->value(), QString(""));
    QCOMPARE(address->postcode->value(), QString(""));
}

void ClientTests::verifyAppointments(const QJsonObject& jsonObject)
{
    QVERIFY(jsonObject.contains("appointments"));
    QJsonArray appointments = jsonObject.value("appointments").toArray();

    QCOMPARE(appointments.size(), 2);
    QVERIFY(appointments.at(0).isObject());
    QVERIFY(appointments.at(1).isObject());

    QJsonObject appointment1 = (appointments.at(0).toObject());
    QVERIFY(appointment1.contains("startAt"));
    QCOMPARE(appointment1.value("startAt").toString(), QString("2017-08-20T12:45:00"));
    QVERIFY(appointment1.contains("endAt"));
    QCOMPARE(appointment1.value("endAt").toString(), QString("2017-08-20T13:00:00"));
    QVERIFY(appointment1.contains("notes"));
    QCOMPARE(appointment1.value("notes").toString(), QString("Test appointment 1"));

    QJsonObject appointment2 = (appointments.at(1).toObject());
    QVERIFY(appointment2.contains("startAt"));
    QCOMPARE(appointment2.value("startAt").toString(), QString("2017-08-21T10:30:00"));
    QVERIFY(appointment2.contains("endAt"));
    QCOMPARE(appointment2.value("endAt").toString(), QString("2017-08-21T11:30:00"));
    QVERIFY(appointment2.contains("notes"));
    QCOMPARE(appointment2.value("notes").toString(), QString("Test appointment 2"));
}

void ClientTests::verifyDefaultAppointments(const QJsonObject& jsonObject)
{
    QVERIFY(jsonObject.contains("appointments"));
    QJsonArray appointments = jsonObject.value("appointments").toArray();

    QCOMPARE(appointments.size(), 0);
}

void ClientTests::verifyAppointments(const QList<Appointment*>& appointments)
{
    QCOMPARE(appointments.size(), 2);

    QCOMPARE(appointments.size(), 2);
    QCOMPARE(appointments.at(0)->startAt->value(), QDateTime(QDate(2017, 8, 20), QTime(12, 45)));
    QCOMPARE(appointments.at(0)->endAt->value(), QDateTime(QDate(2017, 8, 20), QTime(13, 0)));
    QCOMPARE(appointments.at(0)->notes->value(), QString("Test appointment 1"));
    QCOMPARE(appointments.at(1)->startAt->value(), QDateTime(QDate(2017, 8, 21), QTime(10, 30)));
    QCOMPARE(appointments.at(1)->endAt->value(),QDateTime(QDate(2017, 8, 21), QTime(11, 30)));
    QCOMPARE(appointments.at(1)->notes->value(), QString("Test appointment 2"));
}

void ClientTests::verifyDefaultAppointments(const QList<Appointment*>& appointments)
{
    QCOMPARE(appointments.size(), 0);
}

void ClientTests::verifyContacts(const QJsonObject& jsonObject)
{
    QVERIFY(jsonObject.contains("contacts"));
    QJsonArray contacts = jsonObject.value("contacts").toArray();

    QCOMPARE(contacts.size(), 2);
    QVERIFY(contacts.at(0).isObject());
    QVERIFY(contacts.at(1).isObject());

    QJsonObject contact1 = (contacts.at(0).toObject());
    QVERIFY(contact1.contains("address"));
    QCOMPARE(contact1.value("address").toString(), QString("email@test.com"));
    QVERIFY(contact1.contains("contactType"));
    QCOMPARE(contact1.value("contactType").toInt(), static_cast<int>(Contact::eContactType::Email));

    QJsonObject contact2 = (contacts.at(1).toObject());
    QVERIFY(contact2.contains("address"));
    QCOMPARE(contact2.value("address").toString(), QString("012345678"));
    QVERIFY(contact2.contains("contactType"));
    QCOMPARE(contact2.value("contactType").toInt(), static_cast<int>(Contact::eContactType::Telephone));
}

void ClientTests::verifyDefaultContacts(const QJsonObject& jsonObject)
{
    QVERIFY(jsonObject.contains("contacts"));
    QJsonArray contacts = jsonObject.value("contacts").toArray();

    QCOMPARE(contacts.size(), 0);
}

void ClientTests::verifyContacts(const QList<Contact*>& contacts)
{
    QCOMPARE(contacts.size(), 2);

    QCOMPARE(contacts.size(), 2);
    QCOMPARE(contacts.at(0)->address->value(), QString("email@test.com"));
    QCOMPARE(contacts.at(0)->contactType->value(), static_cast<int>(Contact::eContactType::Email));
    QCOMPARE(contacts.at(1)->address->value(), QString("012345678"));
    QCOMPARE(contacts.at(1)->contactType->value(), static_cast<int>(Contact::eContactType::Telephone));
}

void ClientTests::verifyDefaultContacts(const QList<Contact*>& contacts)
{
    QCOMPARE(contacts.size(), 0);
}

}
}
Persistence
我们创建了一个用于在内存中捕获和保存数据的框架。 然而,这只是故事的一半,因为如果没有将数据持久化到某个外部目的地,一旦我们关闭应用程序,它就会丢失。我们将建立在我们之前的工作的基础上,并将我们的数据保存到 SQLite 数据库中的磁盘,以便它可以在应用程序的生命周期之后继续存在。保存后,我们还将构建用于查找、编辑和删除数据的方法。为了在我们的各种数据模型中免费获得所有这些操作,我们将扩展我们的数据实体,以便它们可以自动加载并保存到我们的数据库中,而无需在每个类中编写样板代码。 我们将涵盖以下主题:
SQLite
主键
创建客户端
寻找客户
编辑客户
删除客户端
SQLite
我们需要做的第一件事是将 SQL 模块添加到我们的库项目中在 cm-lib.pro 中,添加以下内容:
QT += sql
在cm-lib/source/controllers:中添加 IDatabaseController.h
数据库操作的接口类在这里,我们正在实现(创建、读取、更新和删除)CRUD 的四个基本功能
#ifndef IDATABASECONTROLLER_H
#define IDATABASECONTROLLER_H

#include <QJsonArray>
#include <QJsonObject>
#include <QList>
#include <QObject>
#include <QString>

#include <cm-lib_global.h>

namespace cm
{
namespace controllers
{
class CMLIBSHARED_EXPORT IDatabaseController : public QObject
{
    Q_OBJECT
public:
    IDatabaseController(QObject* parent) : QObject(parent){}
    virtual ~IDatabaseController(){}
    //创建
    virtual bool createRow(const QString& tableName, const QString& id,const QJsonObject& jsonObject) const = 0;
    //删除
    virtual bool deleteRow(const QString& tableName, const QString& id) const = 0;
    //查找
    virtual QJsonArray find(const QString& tableName, const QString& searchText) const = 0;
    //读
    virtual QJsonObject readRow(const QString& tableName, const QString& id) const = 0;
    //更新
    virtual bool updateRow(const QString& tableName, const QString& id, const QJsonObject& jsonObject) const = 0;
};

}
}
#endif // IDATABASECONTROLLER_H
现在,让我们创建接口的具体实现
在 cm-lib/source/controllers 中创建一个新的 DatabaseController 类
#ifndef DATABASECONTROLLER_H
#define DATABASECONTROLLER_H

#include <QObject>
#include <QScopedPointer>

#include <controllers/IDatabaseController.h>
#include <cm-lib_global.h>

namespace cm
{
namespace controllers
{
class DatabaseController : public IDatabaseController
{
    Q_OBJECT
public:
    explicit DatabaseController(QObject* parent = nullptr);
    ~DatabaseController();
    bool createRow(const QString& tableName, const QString& id, const QJsonObject& jsonObject) const override;
    bool deleteRow(const QString& tableName, const QString& id) const override;
    QJsonArray find(const QString& tableName, const QString& searchText) const override;
    QJsonObject readRow(const QString& tableName, const QString& id) const override;
    bool updateRow(const QString& tableName, const QString& id, const QJsonObject& jsonObject) const override;
private:
    class Implementation;
    QScopedPointer<Implementation> implementation;
};
}
}

#endif // DATABASECONTROLLER_H
DatabaseController.cpp
#include "DatabaseController.h"

#include <QDebug>
#include <QJsonDocument>
#include <QSqlDatabase>
#include <QSqlQuery>

namespace cm
{
namespace controllers
{
class DatabaseController::Implementation
{
public:
    Implementation(DatabaseController* _databaseController)
    : databaseController(_databaseController)
    {
        //从私有实现开始,我们将初始化分为两个操作:
        if (initialise())
        {
            qDebug() << "Database created using Sqlite version: " + sqliteVersion();
            if (createTables())
            {
                qDebug() << "Database tables created";
            }
            else
            {
                qDebug() << "ERROR: Unable to create database tables";
            }
        }
        else
        {
            qDebug() << "ERROR: Unable to open database";
        }
    }
    DatabaseController* databaseController{nullptr};
    QSqlDatabase database;

private:
    bool initialise()
    {
        //initialise() 使用名为 cm.sqlite 的文件实例化到 SQLite 数据库的连接
        //如果没有,此操作将首先为我们创建数据库文件
        database = QSqlDatabase::addDatabase("QSQLITE", "cm");
        database.setDatabaseName( "cm.sqlite" );
        return database.open();
    }
	//该文件将在与应用程序可执行文件 createTables() 相同的文件夹中创建,
    //创建我们需要但数据库中不存在的表
    //最初,我们只需要一个名为 client 的表
    bool createTables()
    {
        //我们将创建命名表的实际工作委托给 createJsonTable() 方法
        //以便我们可以将其重用于多个表
        return createJsonTable( "client" );
    }
	//传统的规范化关系数据库方法是将我们的每个数据模型保存在它们自己的表中,并具有与类的属性匹配的字段。
    bool createJsonTable(const QString& tableName) const
    {
        QSqlQuery query(database);
        QString sqlStatement = "CREATE TABLE IF NOT EXISTS " + tableName + " (id text primary key, json text not null)";
        if (!query.prepare(sqlStatement)) return false;
        return query.exec();
    }
	//我们还添加了一个 sqliteVersion() 实用方法来识别数据库正在使用哪个版本的 SQLite
    QString sqliteVersion() const
    {
        QSqlQuery query(database);
        query.exec("SELECT sqlite_version()");
        if (query.next()) return query.value(0).toString();
        return QString::number(-1);
    }
};
}

namespace controllers {

DatabaseController::DatabaseController(QObject* parent)
    : IDatabaseController(parent)
{
    implementation.reset(new Implementation(this));
}

DatabaseController::~DatabaseController()
{
}
//CRUD 操作都是基于QSqlQuery类和准备好的sqlStatements在所有情况下
bool DatabaseController::createRow(const QString& tableName, const QString& id, const QJsonObject& jsonObject) const
{
    //我们首先对参数进行一些检查
    if (tableName.isEmpty()) return false;
    if (id.isEmpty()) return false;
    if (jsonObject.isEmpty()) return false;
    QSqlQuery query(implementation->database);
    //然后我们将表名连接成一个 SQL 字符串用 :myParameter 语法表示参数
    QString sqlStatement = "INSERT OR REPLACE INTO " + tableName + " (id, json) VALUES (:id, :json)";
    if (!query.prepare(sqlStatement)) return false;
    //prepare后,随后使用查询对象上的bindValue()方法替换参数。
    query.bindValue(":id", QVariant(id));
    query.bindValue(":json", QVariant(QJsonDocument(jsonObject).toJson(QJsonDocument::Compact)));
    if(!query.exec()) return false;
    return query.numRowsAffected() > 0;
}
//
bool DatabaseController::deleteRow(const QString& tableName, const QString& id) const
{
    if (tableName.isEmpty()) return false;
    if (id.isEmpty()) return false;
    QSqlQuery query(implementation->database);
    QString sqlStatement = "DELETE FROM " + tableName + " WHERE id=:id";
    if (!query.prepare(sqlStatement)) return false;
    query.bindValue(":id", QVariant(id));
    if(!query.exec()) return false;
    return query.numRowsAffected() > 0;
}

QJsonArray DatabaseController::find(const QString& tableName, const QString& searchText) const
{
    if (tableName.isEmpty()) return {};
    if (searchText.isEmpty()) return {};
    QSqlQuery query(implementation->database);
    //我们在 SQL 语句中使用了 like 关键字
    //并结合了 % 通配符来查找包含搜索文本的任何 JSON

    QString sqlStatement = "SELECT json FROM " + tableName + " where lower(json) like :searchText";
    //find() 方法与 CRUD 操作基本相同
    //但编译一组 JSON 对象,因为可能有多个匹配项
    //我们还将比较的两边都转换为小写字母
    //,以使搜索有效地不区分大小写
    if (!query.prepare(sqlStatement)) return {};
    query.bindValue(":searchText", QVariant("%" + searchText.toLower() + "%"));
    if (!query.exec()) return {};
        QJsonArray returnValue;
    while ( query.next() ) {
        auto json = query.value(0).toByteArray();
        auto jsonDocument = QJsonDocument::fromJson(json);
        if (jsonDocument.isObject()) {
            returnValue.append(jsonDocument.object());
        }
    }

    return returnValue;
}

QJsonObject DatabaseController::readRow(const QString& tableName, const QString& id) const
{
    //读取操作返回从匹配记录中存储的 JSON 文本解析的 JSON 对象
    //如果没有找到记录或者 JSON 无法解析,那么我们返回一个默认的 JSON 对象
    if (tableName.isEmpty()) return {};
    if (id.isEmpty()) return {};
    QSqlQuery query(implementation->database);
    QString sqlStatement = "SELECT json FROM " + tableName + " WHERE id=:id";
    if (!query.prepare(sqlStatement)) return {};
    query.bindValue(":id", QVariant(id));
    if (!query.exec()) return {};
    if (!query.first()) return {};
    auto json = query.value(0).toByteArray();
    auto jsonDocument = QJsonDocument::fromJson(json);
    if (!jsonDocument.isObject()) return {};
    return jsonDocument.object();
}

bool DatabaseController::updateRow(const QString& tableName, const QString& id, const QJsonObject& jsonObject) const
{
    if (tableName.isEmpty()) return false;
    if (id.isEmpty()) return false;
    if (jsonObject.isEmpty()) return false;
    QSqlQuery query(implementation->database);
    QString sqlStatement = "UPDATE " + tableName + " SET json=:json WHERE id=:id";
    if (!query.prepare(sqlStatement)) return false;
    query.bindValue(":id", QVariant(id));
    query.bindValue(":json", QVariant(QJsonDocument(jsonObject).toJson(QJsonDocument::Compact)));
    if(!query.exec()) return false;
    return query.numRowsAffected() > 0;
}

}}

我们可以创建一个包含“reference”和“name”字段的客户表,一个包含“type”、“address”和其他字段的联系人表。但是,我们将改为利用我们已经实现的 JSON 序列化代码并实现一个伪文档样式的数据库。我们将使用单个客户端表,该表将存储客户端的唯一 ID 以及序列化为 JSON 的整个客户端对象层次结构。
Primary keys
大多数这些操作的组成部分是一个 ID 参数,用作我们表中的主键。为了使用这个新的数据库控制器支持实体的持久性,我们需要向我们的 Entity 类添加一个属性,该属性唯一标识该实体的实例。在 entity.cpp 中,向 Entity::Implementation 添加成员变量:
QString id;
当我们实例化一个新的 Entity 时,我们需要生成一个新的唯一 ID,我们使用 QUuid 类通过 createUuid() 方法为我们做到这一点。通用唯一标识符 (UUID) 本质上是一个随机生成的数字,然后我们将其转换为“{xxxxxxxx-xxxx-xxxx-xxxx-xxxxxxxxxxxx}”格式的字符串,其中“x”是十六进制数字。您需要 #include 。
接下来,为它提供一个公共访问器方法:
const QString& Entity::id() const
{
    return implementation->id;
}
如果我们正在创建一个已经有 ID 的实体(例如,从数据库加载客户端),我们需要某种机制来用已知值覆盖生成的 ID 值。 我们将在 update() 方法中执行此操作:
    if(jsonObject.contains("id"))
    {
        implementation->id = jsonObject.value("id").toString();
    }
同样,当我们将对象序列化为 JSON 时,我们也需要包含 ID:
    QJsonObject returnValue;
    returnValue.insert("id",implementation->id);
然后我们可以调整我们的 id() 方法以在适当的情况下返回主键值,否则默认为生成的 UUID 值:
const QString& Entity::id() const
{
    //然后我们可以调整我们的 id() 方法以在适当的情况下返回主键值,否则默认为生成的 UUID 值:
    if(implementation->primaryKey != nullptr && !implementation->primaryKey->value().isEmpty())
    {
        return implementation->primaryKey->value();
    }
    return implementation->id;
}
然后,在 client.cpp 构造函数中,在我们实例化所有数据装饰器之后,我们可以指定我们要使用引用字段作为我们的主键:
Client::Client(QObject* parent)
    : Entity(parent, "client")
{
    reference = static_cast<StringDecorator*>(addDataItem(new StringDecorator(this, "reference", "Client Ref")));
    name = static_cast<StringDecorator*>(addDataItem(new StringDecorator(this, "name", "Name")));
    supplyAddress = static_cast<Address*>(addChild(new Address(this), "supplyAddress"));
    billingAddress = static_cast<Address*>(addChild(new Address(this), "billingAddress"));
    appointments = static_cast<EntityCollection<Appointment>*>(addChildCollection(new EntityCollection<Appointment>(this, "appointments")));
    contacts = static_cast<EntityCollection<Contact>*>(addChildCollection(new EntityCollection<Contact>(this, "contacts")));
    setPrimaryKey(reference);
}
setPrimaryKey(reference);之前在Entity.h中添加
void setPrimaryKey(StringDecorator* primaryKey);
在 cm-tests 项目的 client-tests.h 中,在私有插槽作用域中添加两个新测试:
    void id_givenPrimaryKeyWithNoValue_returnsUuid();
    void id_givenPrimaryKeyWithValue_returnsPrimaryKey();
void ClientTests::id_givenPrimaryKeyWithNoValue_returnsUuid()
{
    Client testClient(this);

    //请注意,检查在第一次测试中有效执行了两次
    //只是为了演示您可以采用的几种不同方法。
    //首先,我们使用单个字符匹配(‘{‘、‘-’和‘}’)进行检查,这很冗长但易于其他开发人员阅读和理解。
    // Using individual character checks
    QCOMPARE(testClient.id().left(1), QString("{"));
    QCOMPARE(testClient.id().mid(9, 1), QString("-"));
    QCOMPARE(testClient.id().mid(14, 1), QString("-"));
    QCOMPARE(testClient.id().mid(19, 1), QString("-"));
    QCOMPARE(testClient.id().mid(24, 1), QString("-"));
    QCOMPARE(testClient.id().right(1), QString("}"));

    // Using regular expression pattern matching
    //然后,我们使用 Qt 的正则表达式助手类再次执行检查。
    //对于不会说正则表达式语法的普通人来说,这要短得多,但更难解析。
    QVERIFY(QRegularExpression("\{.{8}-(.{4})-(.{4})-(.{4})-(.{12})\}").match(testClient.id()).hasMatch());
}


void ClientTests::id_givenPrimaryKeyWithValue_returnsPrimaryKey()
{
    Client testClient(this, QJsonDocument::fromJson(jsonByteArray).object());
    QCOMPARE(testClient.reference->value(), QString("CM0001"));
    QCOMPARE(testClient.id(), testClient.reference->value());
}
Creating clients
让我们使用我们的新基础设施并连接 CreateClientView。如果您还记得,我们提供了一个保存命令,当单击该命令时,会调用 CommandController 上的 onCreateClientSaveExecuted()。为了能够执行任何有用的操作,CommandController 需要对要序列化和保存的客户端实例的可见性,以及 IDatabaseController 接口的实现来为我们执行创建操作。
将它们注入CommandController.h中的构造函数,包括任何必要的头文件:
    explicit CommandController(QObject* _parent = nullptr,
                               IDatabaseController* databaseController = nullptr,
                               models::Client* newClient = nullptr);
正如我们现在看到的那样,将成员变量添加到实现中:
    IDatabaseController* databaseController{nullptr};
    Client* newClient{nullptr};
将它们通过 CommandController 构造函数传递给 Implementation 构造函数:
Implementation(CommandController* _commandController, IDatabaseController* _databaseController, Client* _newClient)
    : commandController(_commandController)
    , databaseController(_databaseController)
    , newClient(_newClient)
{
    ...
}
CommandController::CommandController(QObject* parent, IDatabaseController* databaseController, Client* newClient)
    : QObject(parent)
{
    implementation.reset(new Implementation(this, databaseController, newClient));
}
现在我们可以更新 onCreateClientSaveExecuted() 方法来创建我们的新客户端:
void CommandController::onCreateClientSaveExecuted()
{
    qDebug() << "You executed the Save command!";
    implementation->databaseController->createRow(implementation->newClient->key(), implementation->newClient->id(), implementation->newClient->toJson());
    qDebug() << "New client saved.";
}
我们的客户端实例为我们提供了将其保存到数据库所需的所有信息,并且数据库控制器执行数据库交互。我们的 CommandController 现在已经准备好了,但我们实际上还没有注入数据库控制器或新客户端,所以转到 MasterController.cpp 并添加一个 DatabaseController 的实例,就像我们对 CommandController 和 NavigationController 所做的一样。 添加私有成员、访问器方法和 Q_PROPERTY。在Implementation构造函数中,我们需要确保在初始化CommandController之前先初始化新的client和DatabaseController,然后通过指针传递:
class MasterController::Implementation
{
public:
    Implementation(MasterController* _masterController)
        : masterController(_masterController)
    {
        databaseController = new DatabaseController(masterController);
        newClient = new Client(masterController); //创建Client
        //把创建的databaseController newClient传到CommandController中
        //在CommandController中当点击按钮时会触发onCreateClientSaveExecuted槽函数
        //调用implementation->databaseController->createRow(implementation->newClient->key(), implementation->newClient->id(), implementation->newClient->toJson());
         //把newClient中的值来创建数据库
        commandController = new CommandController(masterController, databaseController, newClient);

        navigationController = new NavigationController(masterController);
    }

    DatabaseController* databaseController{nullptr};
    Client* newClient{nullptr};
    MasterController* masterController{nullptr};
    CommandController* commandController{nullptr};
    NavigationController* navigationController{nullptr};
    QString welcomeMessage = "学习Qt";
};
构建并运行 cm-ui,您应该会在新实例化的 DatabaseController 的 Application Output 中看到消息,告诉您它已创建数据库和表

终端输入sudo apt-cache search sqlite 查找库;会出现很多有关sqlite的包

安装sudo apt install sqlitebrowser
安装完成 终端 打开sqlitebrowser 选择执行目录下生成的cm.sqlite

    bool initialise()
    {
        database = QSqlDatabase::addDatabase("QSQLITE", "cm");
        database.setDatabaseName( "cm.sqlite" );//数据库文件名cm.sqlite
        return database.open();
    }
    bool createTables()
    {
        return createJsonTable( "client" ); //表名client
    }
bool DatabaseController::createRow(const QString& tableName, const QString& id, const QJsonObject& jsonObject) const
{
    if (tableName.isEmpty()) return false;
    if (id.isEmpty()) return false;
    if (jsonObject.isEmpty()) return false;
    QSqlQuery query(implementation->database);
    //插入的值id,json
    QString sqlStatement = "INSERT OR REPLACE INTO " + tableName + " (id, json) VALUES (:id, :json)";
    if (!query.prepare(sqlStatement)) return false;
    query.bindValue(":id", QVariant(id));
    query.bindValue(":json", QVariant(QJsonDocument(jsonObject).toJson(QJsonDocument::Compact)));
    if(!query.exec()) return false;
    return query.numRowsAffected() > 0;
}
您将看到我们有一个客户端表,正如我们所要求的,有两个字段:id 和 json。举例在name框里输入龚建波

点击保存
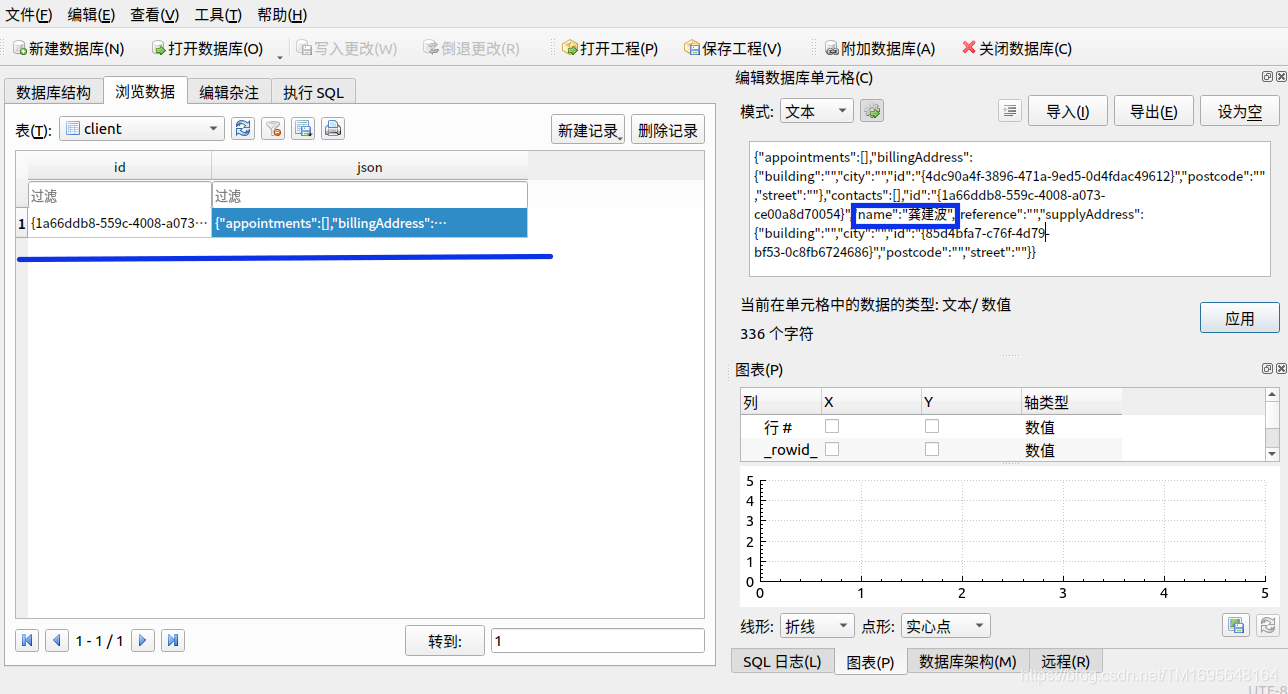
数据库创建成功
让我们快速调整以添加客户端的引用属性。 在 CreateClientView 中,复制绑定到 ui_name 的 StringEditorSingleLine 组件,并将新控件绑定到 ui_reference。 构建、运行并创建一个新客户端:
import QtQuick 2.9
import assets 1.0
import components 1.0
import CM 1.0
import QtQuick.Controls 2.5

Item
{
    property Client newClient: masterController.ui_newClient
    Rectangle
    {
        anchors.fill: parent
        color: Style.colourBackground
    }

    ScrollView
    {
        id: scrollView
        anchors
        {
            left: parent.left
            right: parent.right
            top: parent.top
            bottom: CommandBar.top
            margins: Style.sizeScreenMargin
        }
        clip: true

        Column
        {
            spacing: Style.sizeScreenMargin
            width: scrollView.width
			//添加reference newClient
            StringEditorSingleLine
            {
                //newClient 即是 masterController.ui_newClient
                stringDecorator: newClient.ui_reference
                anchors
                {
                    left: parent.left
                    right: parent.right
                }
            }

            StringEditorSingleLine
            {
                stringDecorator: newClient.ui_name
                anchors
                {
                    left: parent.left
                    right: parent.right
                }
            }
        }
    }

    CommandBar
    {
        commandList: masterController.ui_commandController.ui_createClientViewContextCommands
    }
}

会出现id:法师 ui_reference 作为主见传了进去
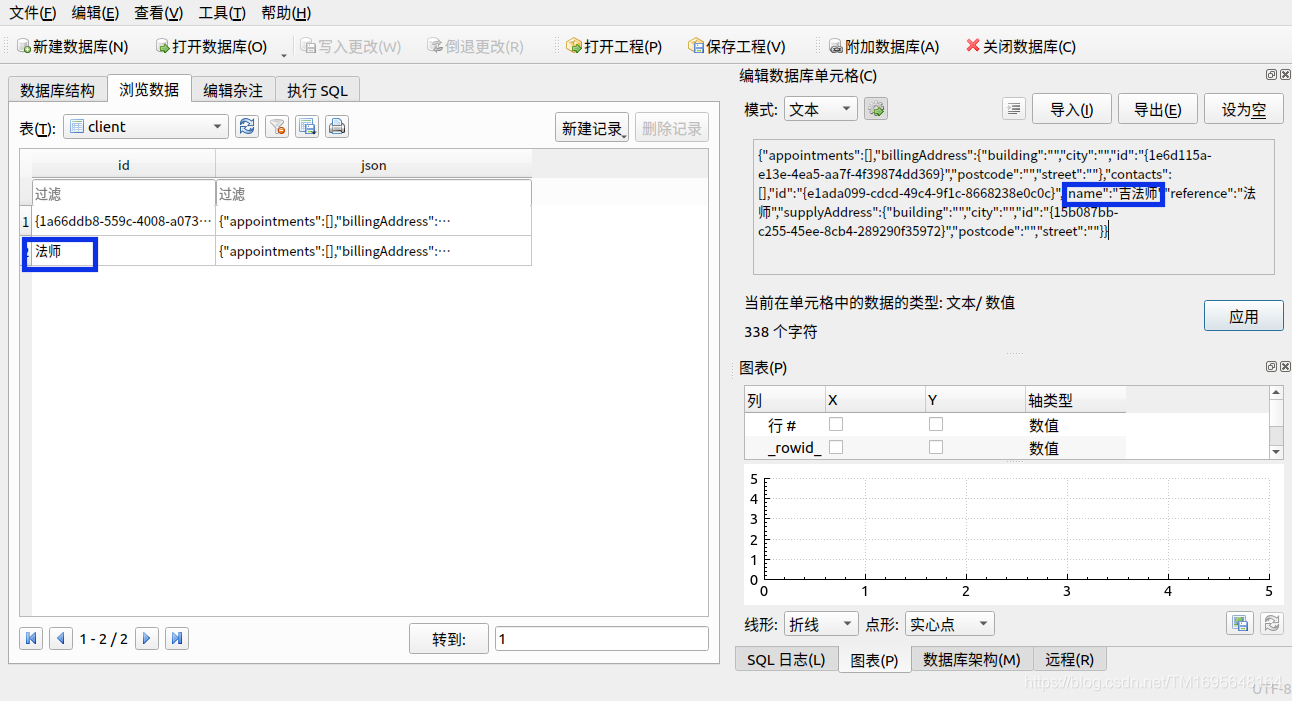
Panels
现在,让我们稍微充实一下我们的 CreateClientView,这样我们就可以真正保存一些有意义的数据,而不仅仅是一堆空字符串。 我们仍然有很多字段要添加,所以我们会稍微分解一下,并在视觉上将数据与不同模型分开,方法是将它们封装在带有描述性标题和阴影的谨慎面板中。
我们将首先创建一个通用面板组件。 在 cm-ui/components 中创建一个名为 Panel.qml 的新 QML 文件。 更新 components.qrc 和 qmldir,就像我们对所有其他组件所做的那样:
Panel.qml
import QtQuick 2.9
import assets 1.0

Item
{
    //由于加载动态的组件 我们无法将组件设置为固定大小
    //因此我们利用了implicitWidth 和implicitHeight 属性来告诉父元素根据标题栏的大小加上组件想要多大动态内容的大小
    implicitWidth: parent.width
    implicitHeight: headerBackground.height +
    contentLoader.implicitHeight + (Style.sizeControlSpacing * 2)
    property alias headerText: title.text
    property alias contentComponent: contentLoader.sourceComponent

    //为了渲染阴影,我们绘制了一个简单的矩形,然后我们使用 x 和 y 属性将它从其余元素偏移,稍微上下移动。
    //然后在阴影的顶部绘制标题条和面板背景的其余矩形元素。
    Rectangle
    {
        id: shadow
        width: parent.width
        height: parent.height
        x: Style.sizeShadowOffset
        y: Style.sizeShadowOffset
        color: Style.colourShadow
    }

    Rectangle
    {
        id: headerBackground
        anchors
        {
            top: parent.top
            left: parent.left
            right: parent.right
        }
        height: Style.heightPanelHeader
        color: Style.colourPanelHeaderBackground

        Text
        {
            id: title
            text: "Set Me!"
            anchors
            {
                fill: parent
                margins: Style.heightDataControls / 4
            }
            color: Style.colourPanelHeaderFont
            font.pixelSize: Style.pixelSizePanelHeader
            verticalAlignment: Qt.AlignVCenter
        }
    }

    Rectangle
    {
        id: contentBackground
        anchors
        {
            top: headerBackground.bottom
            left: parent.left
            right: parent.right
            bottom: parent.bottom
        }
        color: Style.colourPanelBackground
        Loader
        {
            id: contentLoader
            anchors
            {
                left: parent.left
                right: parent.right
                top: parent.top
                margins: Style.sizeControlSpacing
            }
        }
    }
}
这是一个动态的组件。与我们的其他组件不同,我们可以传递的是一个字符串甚至一个自定义类,这里我们传递的是面板的全部内容。我们使用 Loader 组件实现这一点,该组件按需加载 QML 子树。我们给 sourceComponent 属性取别名,以便调用元素可以在运行时注入他们想要的内容。
由于内容的动态性,我们无法将组件设置为固定大小,因此我们利用了implicitWidth 和implicitHeight 属性来告诉父元素根据标题栏的大小加上组件想要多大动态内容的大小。
为了渲染阴影,我们绘制了一个简单的矩形,通过将其放置在文件顶部附近来确保首先渲染它。然后我们使用 x 和 y 属性将它从其余元素偏移,稍微上下移动。然后在阴影的顶部绘制标题条和面板背景的其余矩形元素。
为了支持这里的样式,我们需要添加一组新的 Style 属性:
接下来,让我们添加一个用于地址编辑的组件,以便我们可以将其重用于供应地址和账单地址。 在 cm-ui/components 中创建一个名为 AddressEditor.qml 的新 QML 文件。 像之前一样更新 components.qrc 和 qmldir。
我们将使用我们新的 Panel 组件作为根元素并添加一个 Address 属性,以便我们可以传入任意数据模型来绑定到:
import QtQuick 2.9
import CM 1.0
import assets 1.0

Panel {
    property Address address
    contentComponent:
    Column
    {
        id: column
        spacing: Style.sizeControlSpacing
        StringEditorSingleLine
        {
            stringDecorator: address.ui_building
            anchors
            {
                left: parent.left
                right: parent.right
            }
        }
        StringEditorSingleLine
        {
            stringDecorator: address.ui_street
            anchors
            {
                left: parent.left
                right: parent.right
            }
        }
        StringEditorSingleLine
        {
            stringDecorator: address.ui_city
            anchors
            {
                left: parent.left
                right: parent.right
            }
        }
        StringEditorSingleLine
        {
            stringDecorator: address.ui_postcode
            anchors
            {
                left: parent.left
                right: parent.right
            }
        }
    }
}
在这里,您可以看到我们新面板组件的灵活性,这要归功于嵌入的 Loader 元素。 我们可以传入任何我们想要的 QML 内容,它将在面板中呈现。
最后,我们可以更新我们的 CreateClientView 以添加我们新的重构地址组件。 我们还将客户端控件移动到他们自己的面板上:
在我们构建和运行之前,我们只需要调整 StringEditorSingleLine textLabel 的背景颜色,使其与现在显示的面板相匹配:
Rectangle
{
    width: Style.widthDataControls
    height: Style.heightDataControls
    color: Style.colourPanelBackground
    Text
    {
        id: textLabel
        …
    }
}

Finding clients
我们刚刚成功地将我们的第一个客户端保存到数据库中,现在让我们看看如何查找和查看该数据。我们将搜索功能封装在 cm-lib 中的专用类中,因此继续在 cm-lib/source/models 中创建一个名为 ClientSearch 的新类。
我们需要从用户那里获取一些文本,使用该文本搜索数据库,并将结果显示为匹配客户端的列表。我们使用 StringDecorator 来容纳文本,实现一个 search() 方法来为我们执行搜索,,最后,添加一个 EntityCollection 来存储结果。
ClientSearch类继承Entity, ClientSearch 是一个实体对象,因为是数据库搜索,因此需要数据库,要搜索的文本,保存搜索结果的对象。
#ifndef CLIENTSEARCH_H
#define CLIENTSEARCH_H
#include <QScopedPointer>
#include <cm-lib_global.h>
#include <controllers/IDatabaseController.h>
#include <data/StringDecorator.h>
#include <data/Entity.h>
#include <data/EntityCollection.h>
#include <models/client.h>
namespace cm {
namespace models {
class CMLIBSHARED_EXPORT ClientSearch : public data::Entity
{
Q_OBJECT
//要完成对 MasterController 的更改,请添加 clientSearch() 访问器方法和名为 ui_clientSearch 的 Q_PROPERTY
Q_PROPERTY( cm::data::StringDecorator* ui_searchText READ searchText CONSTANT )
Q_PROPERTY( QQmlListProperty<cm::models::Client> ui_searchResults READ ui_searchResults NOTIFY searchResultsChanged )
public:
//初始化私有成员
ClientSearch(QObject* parent = nullptr,
controllers::IDatabaseController* databaseController = nullptr);
~ClientSearch();
data::StringDecorator* searchText();
//返回查找到的结果
QQmlListProperty<Client> ui_searchResults();
//搜索函数
void search();
signals:
void searchResultsChanged();
private:
class Implementation;
QScopedPointer<Implementation> implementation;
};
}}
#endif // CLIENTSEARCH_H
ClientSearch.cpp
#include "ClientSearch.h"
#include <QDebug>
using namespace cm::controllers;
using namespace cm::data;
namespace cm {
namespace models {
class ClientSearch::Implementation
{
public:
Implementation(ClientSearch* _clientSearch, IDatabaseController*
_databaseController)
: clientSearch(_clientSearch)
, databaseController(_databaseController)
{
}
ClientSearch* clientSearch{nullptr};
IDatabaseController* databaseController{nullptr};
data::StringDecorator* searchText{nullptr};
data::EntityCollection<Client>* searchResults{nullptr};
};
ClientSearch::ClientSearch(QObject* parent, IDatabaseController* databaseController)
: Entity(parent, "ClientSearch")
{
implementation.reset(new Implementation(this, databaseController));
implementation->searchText = static_cast<StringDecorator*>(addDataItem(new StringDecorator(this, "searchText", "Search Text")));
implementation->searchResults = static_cast<EntityCollection<Client>*>(addChildCollection(new EntityCollection<Client>(this, "searchResults")));
connect(implementation->searchResults, &EntityCollection<Client>::collectionChanged, this, &ClientSearch::searchResultsChanged);
}
ClientSearch::~ClientSearch()
{
}
StringDecorator* ClientSearch::searchText()
{
return implementation->searchText;
}
QQmlListProperty<Client> ClientSearch::ui_searchResults()
{
return QQmlListProperty<Client>(this, implementation->searchResults->derivedEntities());
}
void ClientSearch::search()
{
qDebug() << "Searching for " << implementation->searchText->value() << "...";
}
}}
当我们在 CommandController 中实现我们的搜索命令时,它将依赖于 ClientSearch。所以请确保在 ClientSearch 之前初始化 DatabaseController 并且 CommandController 在它们之后。
class MasterController::Implementation
{
public:
Implementation(MasterController* _masterController)
: masterController(_masterController)
{
databaseController = new DatabaseController(masterController);
navigationController = new NavigationController(masterController);
newClient = new Client(masterController);
clientSearch = new ClientSearch(masterController, databaseController);
commandController = new CommandController(masterController, databaseController, newClient);
}
DatabaseController* databaseController{nullptr};
Client* newClient{nullptr};
ClientSearch* clientSearch{nullptr};
MasterController* masterController{nullptr};
CommandController* commandController{nullptr};
NavigationController* navigationController{nullptr};
QString welcomeMessage = "学习Qt";
};
MasterController.h 对请添加 clientSearch() 访问器方法和名为 ui_clientSearch 的 Q_PROPERTY。像往常一样,我们需要在 QML 子系统中注册新类,然后才能在 UI 中使用它。在 main.cpp 中,#include <models/client-search.h> 并注册新类型:
MasterController.h
#ifndef MASTERCONTROLLER_H
#define MASTERCONTROLLER_H
#include <QObject>
#include <cm-lib_global.h>
#include <controllers/NavigationController.h>
#include <controllers/CommandController.h>
#include <controllers/DatabaseController.h>
#include <models/client.h>
#include <models/ClientSearch.h>
using namespace cm::models;
namespace cm
{
namespace controllers
{
class CMLIBSHARED_EXPORT MasterController : public QObject
{
Q_OBJECT
Q_PROPERTY(cm::models::Client* ui_newClient READ newClient CONSTANT )
Q_PROPERTY(QString ui_welcomeMessage READ welcomeMessage CONSTANT)
Q_PROPERTY(cm::controllers::NavigationController* ui_navigationController READ navigationController CONSTANT)
Q_PROPERTY(cm::controllers::CommandController* ui_commandController READ commandController CONSTANT)
Q_PROPERTY(cm::controllers::DatabaseController* ui_databaseController READ databaseController CONSTANT )//注册ui_databaseController
Q_PROPERTY(cm::models::Client* ui_newClient READ newClient CONSTANT )
Q_PROPERTY(cm::models::ClientSearch* ui_clientSearch READ clientSearch CONSTANT ) //请添加 clientSearch() 访问器方法和名为 ui_clientSearch 的 Q_PROPERTY
public:
explicit MasterController(QObject *parent = nullptr);
~MasterController();
DatabaseController* databaseController();
ClientSearch* clientSearch(); //定义clientSearch函数
Client* newClient();
CommandController* commandController();
NavigationController* navigationController();
const QString& welcomeMessage() const;
private:
class Implementation;
QScopedPointer<Implementation>implementation;
signals:
};
}
}
#endif // MASTERCONTROLLER_H
MasterController.cpp
ClientSearch *MasterController::clientSearch() //实现clientSearch函数
{
return implementation->clientSearch;
}
main.cpp
qmlRegisterType<cm::models::ClientSearch>("CM",1,0,"ClientSearch");
FindClientView.qml中添加搜索框

import QtQuick 2.9
import assets 1.0
import CM 1.0
import components 1.0
Item {
property ClientSearch clientSearch: masterController.ui_clientSearch
Rectangle
{
anchors.fill: parent
color: Style.colourBackground
Panel
{
id: searchPanel
anchors
{
left: parent.left
right: parent.right
top: parent.top
margins: Style.sizeScreenMargin
}
headerText: "Find Clients"
contentComponent:
StringEditorSingleLine
{
stringDecorator: clientSearch.ui_searchText
anchors
{
left: parent.left
right: parent.right
}
}
}
}
}
我们通过 MasterController 访问 ClientSearch 实例并使用属性创建它的快捷方式。我们还再次使用了我们的新面板组件,它为我们提供了一个很好的一致的外观和感觉。
下一步是添加一个命令按钮,以便我们能够发起搜索。类似于CreateClientView.qml 我们在 CommandController 中重新执行此操作。 需要对CommandController传入ClientSearch 对象的实例以便在点击搜索按钮执行搜索操作 打开CommandController.cpp:添加#include <models/client-search.h> 头文件,给构造函数添加一个参数:models::ClientSearch* clientSearch = nullptr,添加 ClientSearch* clientSearch{nullptr};私有成员,给CommandController的构造函数后面添加ClientSearch* clientSearch;
将参数传递给 Implementation 类并将其存储在私有成员变量中,就像我们对 newClient 所做的一样。 简单地跳回到 MasterController 并将 clientSearch 实例添加到 CommandController 初始化中:
//成员对象的具体实现
class CommandController::Implementation
{
public:
Implementation(CommandController* _commandController, IDatabaseController* _databaseController, Client* _newClient, ClientSearch* _clientSearch)
: commandController(_commandController)
, databaseController(_databaseController)
, newClient(_newClient)
, clientSearch(_clientSearch)
{
/*
* 创建命令时,explicit Command(QObject* parent = nullptr,
const QString& iconCharacter = "",
const QString& description = "",
std::function<bool()> canExecute = [](){ return true; });
*/
//parent参数commandController 我们将它作为commandController的父级,这样我们就不必担心内存管理。
//我们为其分配一个软盘图标(unicode f0c7)和 Save 标签
//我们暂时将 canExecute 函数保留为默认值
//因此它将始终处于启用状态
Command* createClientSaveCommand = new Command( commandController, QChar( 0xf0c7 ), "Save" );
QObject::connect( createClientSaveCommand, &Command::executed, commandController, &CommandController::onCreateClientSaveExecuted );
createClientViewContextCommands.append( createClientSaveCommand );
}
CommandController* commandController{nullptr};
IDatabaseController* databaseController{nullptr};
Client* newClient{nullptr};
ClientSearch* clientSearch{nullptr};
QList<Command*> createClientViewContextCommands{};
};
CommandController::CommandController(QObject *parent, IDatabaseController* databaseController, Client* newClient, ClientSearch* clientSearch) : QObject(parent)
{
implementation.reset(new Implementation(this, databaseController, newClient, clientSearch));
}
接下来,在 CommandController 中,复制并重命名我们为创建客户端视图添加的私有成员变量、访问器和 Q_PROPERTY,以便您最终获得可供 UI 使用的 ui_findClientViewContextCommands 属性。
Q_PROPERTY(QQmlListProperty<cm::framework::Command> ui_findClientViewContextCommands READ ui_findClientViewContextCommands CONSTANT);
QQmlListProperty<framework::Command> ui_findClientViewContextCommands();
master.cpp
commandController = new CommandController(masterController, databaseController, newClient, clientSearch);
创建一个额外的公共槽,onFindClientSearchExecuted(),当我们点击搜索按钮时将调用它:
void CommandController::onFindClientSearchExecuted()
{
qDebug() << "You executed the Search command!";
implementation->clientSearch->search();
}
现在我们的 find 视图有一个空的命令列表和一个当我们点击按钮时调用的委托; 我们现在需要做的就是向实现构造函数添加一个搜索按钮:

输入一些搜索文本并单击按钮,您将在 Application Output 控制台中看到一切都按预期触发
QML debugging is enabled. Only use this in a safe environment.
"Database created using Sqlite version: 3.31.1"
Database tables created
You executed the Search command!
Searching for "test" ...
太好了,现在我们需要做的是获取搜索文本,在 SQLite 数据库中查询结果列表,然后在屏幕上显示这些结果。 幸运的是,我们已经完成了查询数据库的基础工作,因此我们可以轻松实现:
void ClientSearch::search()
{
qDebug() << "Searching for " << implementation->searchText->value() << "...";
auto resultsArray = implementation->databaseController->find("client", implementation->searchText->value());
implementation->searchResults->update(resultsArray);//添加这行才行不知道为什么
qDebug() << "Found " << implementation->searchResults->baseEntities().size() << " matches";
}
在 UI 方面还有一些工作要做以显示结果。 我们需要绑定到 ui_searchResults 属性并为列表中的每个客户端动态显示某种 QML 子树。 我们将使用一个新的 QML 组件 ListView 来为我们完成繁重的工作。 让我们从简单的演示原理开始,然后从那里开始构建。 在 FindClientView 中,紧跟在 Panel 元素之后,添加以下内容:
import QtQuick 2.9
import assets 1.0
import CM 1.0
import components 1.0
Item {
property ClientSearch clientSearch: masterController.ui_clientSearch
Rectangle
{
anchors.fill: parent
color: Style.colourBackground
Panel
{
id: searchPanel
anchors
{
left: parent.left
right: parent.right
top: parent.top
margins: Style.sizeScreenMargin
}
headerText: "Find Clients"
contentComponent:
StringEditorSingleLine
{
stringDecorator: clientSearch.ui_searchText
anchors
{
left: parent.left
right: parent.right
}
}
}
ListView
{
id: itemsView
anchors
{
top: searchPanel.bottom
left: parent.left
right: parent.right
bottom: parent.bottom
margins: Style.sizeScreenMargin
}
clip: true
model: clientSearch.ui_searchResults
delegate:Text
{
text: modelData.ui_reference.ui_label + ": " +
modelData.ui_reference.ui_value
font.pixelSize: Style.pixelSizeDataControls
color: Style.colourPanelFont
}
}
}
CommandBar
{
commandList: masterController.ui_commandController.ui_findClientViewContextCommands
}
}
ListView 的两个关键属性如下所示:
模型,这是您要显示的项目列表
委托,这是您希望如何直观地表示每个项目
在我们的例子中,我们将模型绑定到我们的 ui_searchResults 并用一个简单的 Text 元素表示每个项目,该元素显示客户端参考编号。 这里特别重要的是 modelData 属性,它为我们神奇地注入到委托中并公开底层项目(在这种情况下是客户端对象)。
构建、运行并搜索一段您知道在 JSON 中存在的文本,用于您迄今为止创建的一个测试客户端,您将看到每个结果都显示了参考编号。 如果您得到多个结果并且它们的布局不正确,请不要担心,因为无论如何我们都会替换委托:

为了保持整洁,我们将编写一个新的自定义组件用作委托。 在cm-ui/components中创建SearchResultDelegate,照常更新components.qrc和qmldir:
SearchResultDelegate.qml
import QtQuick 2.9
import assets 1.0
import CM 1.0
Item {
property Client client
implicitWidth: parent.width
implicitHeight: Math.max(clientColumn.implicitHeight,
textAddress.implicitHeight) + (Style.heightDataControls / 2)
Rectangle
{
id: background
width: parent.width
height: parent.height
color: Style.colourPanelBackground
Column
{
id: clientColumn
width: parent / 2
anchors
{
left: parent.left
top: parent.top
margins: Style.heightDataControls / 4
}
spacing: Style.heightDataControls / 2
Text
{
id: textReference
anchors.left: parent.left
text: client.ui_reference.ui_label + ": " +
client.ui_reference.ui_value
font.pixelSize: Style.pixelSizeDataControls
color: Style.colourPanelFont
}
Text
{
id: textName
anchors.left: parent.left
text: client.ui_name.ui_label + ": " +
client.ui_name.ui_value
font.pixelSize: Style.pixelSizeDataControls
color: Style.colourPanelFont
}
}
Text
{
id: textAddress
anchors
{
top: parent.top
right: parent.right
margins: Style.heightDataControls / 4
}
text: client.ui_supplyAddress.ui_fullAddress
font.pixelSize: Style.pixelSizeDataControls
color: Style.colourPanelFont
horizontalAlignment: Text.AlignRight
}
Rectangle
{
id: borderBottom
anchors
{
bottom: parent.bottom
left: parent.left
right: parent.right
}
height: 1
color: Style.colourPanelFont
}
MouseArea
{
anchors.fill: parent
cursorShape: Qt.PointingHandCursor
hoverEnabled: true
onEntered: background.state = "hover"
onExited: background.state = ""
onClicked: masterController.selectClient(client)
}
states: [
State
{
name: "hover"
PropertyChanges
{
target: background
color: Style.colourPanelBackgroundHover
}
}
]
}
}
这里没有什么新东西,我们只是结合了其他组件中涵盖的技术。 请注意,MouseArea 元素将触发我们尚未实现的 masterController 上的一个方法,因此如果您运行该方法并在单击其中一个客户端时出现错误,请不要担心。
用我们的新组件替换 FindClientView 中的旧文本委托,使用 modelData 属性设置客户端:
ListView
{
id: itemsView
...
delegate:
SearchResultDelegate
{
client: modelData
}
}

现在,让我们在 MasterController 上实现 selectClient() 方法:
我们可以直接从 SearchResultDelegate 发出 goEditClientView() 信号并完全绕过 MasterController。 这是一种完全有效的方法,而且确实更简单; 然而,我更喜欢通过业务逻辑层路由所有交互,即使所有业务逻辑所做的都是发出导航信号。 这意味着如果您稍后需要添加任何进一步的逻辑,一切都已经连接好,您无需更改任何管道。 调试 C++ 也比 QML 容易得多。
在MasterController.h 中,我们需要将我们的新方法添加为公共槽,因为它将直接从 UI 调用:
public slots:
void selectClient(cm::models::Client* client);
在MasterController.cpp中提供实现,只需在导航协调器上调用相关信号,通过客户端即可:
void MasterController::selectClient(Client* client)
{
implementation->navigationController->goEditClientView(client);
}
搜索和选择到位后,我们现在可以将注意力转向编辑client。
Editing clients
现在找到一个现有的客户端并从数据库加载,我们需要一种能够查看和编辑数据的机制。 让我们首先创建我们将在编辑视图中使用的上下文命令。 重复我们为 Find Client 视图执行的步骤,并在 CommandController 中添加一个名为 editClientViewContextCommands 的新命令列表,以及一个访问器方法和 Q_PROPERTY。
创建一个新的槽,当用户在编辑视图上保存他们的更改时调用:
void CommandController::onEditClientSaveExecuted()
{
qDebug() << "You executed the Save command!";
}
在执行时调用插槽的列表中添加一个新的保存命令:
Command* editClientSaveCommand = new Command( commandController, QChar( 0xf0c7 ), "Save" );
QObject::connect( editClientSaveCommand, &Command::executed, commandController, &CommandController::onEditClientSaveExecuted );
editClientViewContextCommands.append( editClientSaveCommand );
我们现在有一个可以呈现给编辑客户端视图的命令列表; 然而,我们现在需要克服的一个挑战是,当我们执行这个命令时,CommandController 不知道它需要使用哪个客户端实例。 我们不能像处理新客户端那样将所选客户端作为依赖项传递给构造函数,因为我们不知道用户将选择哪个客户端。 一种选择是将编辑命令列表从 CommandController 移到客户端模型中。 然后,每个客户端实例都可以向 UI 呈现自己的命令。 然而,这意味着命令功能被破坏了,我们失去了命令控制器给我们的良好封装。 它还使用它不应该关心的功能来膨胀客户端模型。 相反,我们会将当前选定的客户端添加为 CommandController 中的成员,并在用户导航到 editClientView 时设置它。 在 CommandController::Implementation 中,添加以下内容:
Client* selectedClient{nullptr};
添加一个新的公共槽:
void CommandController::setSelectedClient(cm::models::Client* client)
{
implementation->selectedClient = client;
}
现在我们已经选择了可用的客户端,我们可以继续完成save槽的实现。 同样,我们已经在 DatabaseController 和 client 类中完成,所以这个方法非常简单:
void CommandController::onEditClientSaveExecuted()
{
qDebug() << "You executed the Save command!";
implementation->databaseController->updateRow(implementation->selectedClient->key(), implementation->selectedClient->id(), implementation->selectedClient->toJson());
qDebug() << "Updated client saved.";
}
从 UI 的角度来看,编辑现有客户端基本上与创建新客户端相同。 事实上,我们甚至可以使用相同的视图,并在每种情况下传入不同的客户端对象。 但是,我们会将这两个函数分开,只需复制和调整我们已经为创建客户端编写的 QML。 更新 EditClientView:
import QtQuick 2.9
import QtQuick.Controls 2.2
import CM 1.0
import assets 1.0
import components 1.0
Item
{
property Client selectedClient
Component.onCompleted: masterController.ui_commandController.setSelectedClient(selectedClient)
Rectangle
{
anchors.fill: parent
color: Style.colourBackground
}
ScrollView
{
id: scrollView
anchors
{
left: parent.left
right: parent.right
top: parent.top
bottom: commandBar. top
margins: Style.sizeScreenMargin
}
clip: true
Column
{
spacing: Style.sizeScreenMargin
width: scrollView.width
Panel
{
headerText: "Client Details"
contentComponent:
Column
{
spacing: Style.sizeControlSpacing
StringEditorSingleLine
{
stringDecorator:
selectedClient.ui_reference
anchors
{
left: parent.left
right: parent.right
}
}
StringEditorSingleLine
{
stringDecorator: selectedClient.ui_name
anchors
{
left: parent.left
right: parent.right
}
}
}
}
AddressEditor
{
address: selectedClient.ui_supplyAddress
headerText: "Supply Address"
}
AddressEditor
{
address: selectedClient.ui_billingAddress
headerText: "Billing Address"
}
}
}
CommandBar
{
id: commandBar
commandList: masterController.ui_commandController.ui_editClientViewContextCommands
}
}
我们更改客户端属性以匹配 Connections 元素中的 selectedClient 属性 MasterView 设置。 我们使用 Component.onCompleted 插槽调用 CommandController 并设置当前选定的客户端。 最后,我们更新 CommandBar 以引用我们刚刚添加的新上下文命令列表。
构建并运行,您现在应该能够对选定的客户端进行更改并使用 Save 按钮更新数据库。
发现之前CreateClientView.qml忘记加滚动条:CreateClientView.qml添加滚动条
import QtQuick 2.9
import assets 1.0
import components 1.0
import CM 1.0
import QtQuick.Controls 2.5
Item
{
property Client newClient: masterController.ui_newClient
Rectangle
{
anchors.fill: parent
color: Style.colourBackground
}
ScrollView
{
id: scrollView
anchors
{
left: parent.left
right: parent.right
top: parent.top
bottom: commandBar.top
margins: Style.sizeScreenMargin
}
clip: true
Column
{
spacing: Style.sizeScreenMargin
width: scrollView.width
Panel
{
headerText: "Client Details"
contentComponent:
Column
{
spacing: Style.sizeControlSpacing
StringEditorSingleLine
{
stringDecorator: newClient.ui_reference
anchors
{
left: parent.left
right: parent.right
}
}
StringEditorSingleLine
{
stringDecorator: newClient.ui_name
anchors
{
left: parent.left
right: parent.right
}
}
}
}
AddressEditor
{
address: newClient.ui_supplyAddress
headerText: "Supply Address"
}
AddressEditor
{
address: newClient.ui_billingAddress
headerText: "Billing Address"
}
}
}
CommandBar
{
id:commandBar
commandList: masterController.ui_commandController.ui_createClientViewContextCommands
}
}

Deleting clients
我们 CRUD 操作的最后一部分是删除现有客户端。让我们通过 EditClientView 上的一个新按钮来触发它。 我们将首先添加将在按下按钮时调用的槽函数到 CommandController:
void CommandController::onEditClientDeleteExecuted()
{
qDebug()<<"You executed the Delete command!";
implementation->databaseController->deleteRow(implementation->selectedClient->key(),implementation->selectedClient->id());
implementation->selectedClient = nullptr;
qDebug()<<"Client deleted.";
implementation->clientSearch->search();
}
这遵循与其他槽相同的模式,除了这次我们还清除了 selectedClient 属性,尽管客户端实例仍然存在于应用程序内存中,但它已被用户从语义上删除。我们还会刷新搜索,以便从搜索结果中删除已删除的客户端。就这种方法而言,我们已经执行了正确的数据库交互,但用户将被留在 editClientView 上,以获取他们刚刚要求删除的客户端。我们想要的是让用户导航回仪表板。
CommandController 添加navigationController私有成员,构造函数添加NavigationController* navigationController参数以便对navigationController初始化,以便能通过navigationController 导航到主面板
void CommandController::onEditClientDeleteExecuted()
{
...
implementation->navigationController->goDashboardView();
}
现在我们有了可用的导航控制器,我们还可以改善创建新客户端时的体验。与其将用户留在新的客户端视图上,不如让我们搜索新创建的客户端 ID 并将它们导航到结果。然后,如果他们希望查看或编辑,他们可以轻松选择新客户:
void CommandController::onCreateClientSaveExecuted()
{
...
implementation->clientSearch->searchText()->setValue(implementation->newClient->id());
implementation->clientSearch->search();
implementation->navigationController->goFindClientView();
}
删除槽完成后,我们现在可以向 CommandController 中的 editClientContextCommands 列表添加一个新的删除命令
如果删除客户端,您将看到该行已从数据库中删除,并且用户已成功导航回仪表板。 但是,您还会看到“应用程序输出”窗口中充满了 qrc:/views/EditClientView:62: TypeError: Cannot read property ‘ui_billingAddress’ of null 的 QML 警告。
[外链图片转存失败,源站可能有防盗链机制,建议将图片保存下来直接上传(img-mIkUxWcI-1627700293932)(/home/xz/study/qt_collect_pro/blog/end_to_end_qt/CM/md/img/59.png)]
之前遇到好多这种问题,这样做的原因是编辑视图绑定到作为搜索结果一部分的客户端实例。 当我们刷新搜索时,我们删除了旧的搜索结果,这意味着编辑视图现在绑定到 nullptr 并且无法再访问数据。 即使您在刷新搜索之前导航到仪表板,这种情况也会继续发生,因为用于执行导航的信号/槽的异步性质。 修复这些警告的一种方法是在视图中的所有绑定上添加空检查,如果主对象为空,则绑定到本地临时对象。 考虑以下示例:
StringEditorSingleLine
{
property StringDecorator temporaryObject
stringDecorator: selectedClient ? selectedClient.ui_reference : temporaryObject
anchors
{
left: parent.left
right: parent.right
}
}
因此,如果 selectedClient 不为 null,则绑定到它的 ui_reference 属性,否则绑定到临时对象。 您甚至可以向根 Client 属性添加一个间接级别并替换整个客户端对象:
property Client selectedClient
property Client localTemporaryClient
property Client clientToBindTo: selectedClient ? selectedClient : localTemporaryClient
在这里, selectedClient 将由父级正常设置; localTemporaryClient 将不会被设置,因此将在本地创建一个默认实例。 clientToBindTo 然后将选择要使用的适当对象,并且所有子控件都可以绑定到该对象。 由于这些绑定是动态的,如果 selectedClient 在加载视图后被删除(如我们的例子),那么 clientToBindTo 将自动切换。
由于这只是一个演示项目,我们可以安全地忽略警告,因此我们不会在此处采取任何措施以保持简单。
Web Requests
Network access
如果您以前没有使用过 HTTP 协议,那么它归结为客户端和服务器之间的对话,由请求和响应组成。例如,我们可以在我们最喜欢的网络浏览器中向 www.bbc.co.uk 发出请求,我们将收到包含各种新闻项目和文章的响应。在 NetworkAccessManager 包装器的 get() 方法中,我们引用了 QNetworkRequest(我们对服务器的请求)和 QNetworkReply(服务器返回给我们的响应)。 虽然我们不会直接将 QNetworkRequest 和 QNetworkReply 隐藏在它们自己独立的接口后面,但我们将采用 Web 请求和相应响应的概念,并为该交互创建接口和实现。 还是在cm-lib/source/networking,创建接口头文件IWebRequest.h:
IWebRequest.h
#ifndef IWEBREQUEST_H
#define IWEBREQUEST_H
#include <QUrl>
namespace cm {
namespace networking {
class IWebRequest
{
public:
IWebRequest(){}
virtual ~IWebRequest(){}
virtual void execute() = 0;
virtual bool isBusy() const = 0;
virtual void setUrl(const QUrl& url) = 0;
virtual QUrl url() const = 0;
};
}}
#endif // IWEBREQUEST_H
HTTP 请求的关键信息是请求要发送到的 URL,由 QUrl Qt 类表示。我们为该属性提供了一个 url() 访问器和 setUrl() mutator。另外两个方法是检查 isBusy() 网络请求对象是在发出请求还是在接收响应,以及 execute() 或将请求发送到网络。 同样,在接口就位后,让我们直接进入在同一文件夹中使用新 WebRequest 类的实现。
新建一个网络访问类INetworkAccessManager,对网络执行请求的封装。
INetworkAccessManager.h
#ifndef INETWORKACCESSMANAGER_H
#define INETWORKACCESSMANAGER_H
#include <QtNetwork/QNetworkReply>
#include <QtNetwork/QNetworkRequest>
namespace cm
{
namespace networking
{
class INetworkAccessManager
{
public:
INetworkAccessManager(){}
virtual ~INetworkAccessManager(){}
virtual QNetworkReply* get(const QNetworkRequest& request) = 0;
virtual bool isNetworkAccessible() const = 0;
};
}
}
#endif // INETWORKACCESSMANAGER_H
WebRequest.h
#ifndef WEBREQUEST_H
#define WEBREQUEST_H
#include <QList>
#include <QObject>
#include <networking/IWebRequest.h>
#include <networking/INetworkAccessManager.h>
namespace cm
{
namespace networking
{
class WebRequest : public QObject,public IWebRequest
{
Q_OBJECT
public:
WebRequest(QObject* parent,INetworkAccessManager* networkAccessManager, const QUrl& url);
WebRequest(QObject* parent = nullptr) = delete;
~WebRequest();
public:
void execute() override;
bool isBusy() const override;
void setUrl(const QUrl &url) override;
QUrl url() const override;
signals:
void error(QString message);
void isBusyChanged();
void requestComplete(int statusCode, QByteArray body);
void urlChanged();
private slots:
//我们还有几个私有插槽,它们将作为处理回复和处理任何 SSL 错误的代表。
void replyDelegate();
void sslErrorsDelegate( const QList<QSslError>& _errors );
private:
class Implementation;
QScopedPointer<Implementation> implementation;
};
}
}
#endif // WEBREQUEST_H
由于冗长的错误代码映射,实现看起来比它更复杂。如果出现某种问题,Qt 将使用枚举器报告错误。映射的目的只是将枚举器与人类可读的错误描述相匹配,我们可以将其呈现给用户或写入控制台或日志文件。除了接口方法之外,我们还有一些信号可以用来告诉任何感兴趣的观察者已经发生的事件:
#include "WebRequest.h"
#include <QMap>
#include <QtNetwork/QNetworkReply>
#include <QtNetwork/QNetworkRequest>
#include <QObject>
namespace cm
{
namespace networking
{
static const QMap<QNetworkReply::NetworkError, QString> networkErrorMapper = {
{QNetworkReply::ConnectionRefusedError, "The remote server refused the connection (the server is not accepting requests)."},
{QNetworkReply::RemoteHostClosedError, "The remote server closed the connection prematurely, before the entire reply was received and processed."},
{QNetworkReply::HostNotFoundError, "The remote host name was not found (invalid hostname)."},
{QNetworkReply::TimeoutError, "The connection to the remote server timed out."},
{QNetworkReply::OperationCanceledError, "The operation was canceled via calls to abort() or close() before it was finished."},
{QNetworkReply::SslHandshakeFailedError, "The SSL/TLS handshake failed and the encrypted channel could not be established. The sslErrors() signal should have been emitted."},
{QNetworkReply::TemporaryNetworkFailureError, "The connection was broken due to disconnection from the network, however the system has initiated roaming to another access point. The request should be resubmitted and will be processed as soon as the connection is re-established."},
{QNetworkReply::NetworkSessionFailedError, "The connection was broken due to disconnection from the network or failure to start the network."},
{QNetworkReply::BackgroundRequestNotAllowedError, "The background request is not currently allowed due to platform policy."},
{QNetworkReply::ProxyConnectionRefusedError, "The connection to the proxy server was refused (the proxy server is not accepting requests)."},
{QNetworkReply::ProxyConnectionClosedError, "The proxy server closed the connection prematurely, before the entire reply was received and processed."},
{QNetworkReply::ProxyNotFoundError, "The proxy host name was not found (invalid proxy hostname)."},
{QNetworkReply::ProxyTimeoutError, "The connection to the proxy timed out or the proxy did not reply in time to the request sent."},
{QNetworkReply::ProxyAuthenticationRequiredError, "The proxy requires authentication in order to honour the request but did not accept any credentials offered (if any)."},
{QNetworkReply::ContentAccessDenied, "The access to the remote content was denied (similar to HTTP error 401)."},
{QNetworkReply::ContentOperationNotPermittedError, "The operation requested on the remote content is not permitted."},
{QNetworkReply::ContentNotFoundError, "The remote content was not found at the server (similar to HTTP error 404)."},
{QNetworkReply::AuthenticationRequiredError, "The remote server requires authentication to serve the content but the credentials provided were not accepted (if any)."},
{QNetworkReply::ContentReSendError, "The request needed to be sent again, but this failed for example because the upload data could not be read a second time."},
{QNetworkReply::ContentConflictError, "The request could not be completed due to a conflict with the current state of the resource."},
{QNetworkReply::ContentGoneError, "The requested resource is no longer available at the server."},
{QNetworkReply::InternalServerError, "The server encountered an unexpected condition which prevented it from fulfilling the request."},
{QNetworkReply::OperationNotImplementedError, "The server does not support the functionality required to fulfill the request."},
{QNetworkReply::ServiceUnavailableError, "The server is unable to handle the request at this time."},
{QNetworkReply::ProtocolUnknownError, "The Network Access API cannot honor the request because the protocol is not known."},
{QNetworkReply::ProtocolInvalidOperationError, "The requested operation is invalid for this protocol."},
{QNetworkReply::UnknownNetworkError, "An unknown network-related error was detected."},
{QNetworkReply::UnknownProxyError, "An unknown proxy-related error was detected."},
{QNetworkReply::UnknownContentError, "An unknown error related to the remote content was detected."},
{QNetworkReply::ProtocolFailure, "A breakdown in protocol was detected (parsing error, invalid or unexpected responses, etc.)."},
{QNetworkReply::UnknownServerError, "An unknown error related to the server response was detected."}
};
class WebRequest::Implementation
{
public:
Implementation(WebRequest* _webRequest, INetworkAccessManager* _networkAccessManager, const QUrl& _url)
:webRequest(_webRequest)
,networkAccessManager(_networkAccessManager)
,url(_url)
{
}
WebRequest* webRequest{nullptr};
INetworkAccessManager* networkAccessManager{nullptr};
QUrl url{};
QNetworkReply* reply{nullptr};
public:
bool isBusy() const
{
return isBusy_;
}
void setIsBusy(bool value)
{
if(value != isBusy_)
{
isBusy_ = value;
//isBusyChanged() 在请求开始或完成并且请求变得忙碌或空闲时被触发
emit webRequest->isBusyChanged();
}
}
private:
bool isBusy_{false};
};
WebRequest::WebRequest(QObject* parent, INetworkAccessManager* networkAccessManager, const QUrl& url)
:QObject(parent),
IWebRequest()
{
implementation.reset(new WebRequest::Implementation(this,networkAccessManager,url));
}
WebRequest::~WebRequest()
{}
void WebRequest::execute()
{
//我们首先确保我们还没有忙于执行另一个请求
if(implementation->isBusy())
{
return;
}
//然后与网络访问管理器检查我们是否有可用的连接
if(!implementation->networkAccessManager->isNetworkAccessible())
{
emit error("Network not accessible");
return;
}
//假设我们这样做了,然后我们设置忙碌标志并使用当前设置的 URL 构造一个 QNetworkRequest
implementation->setIsBusy(true);
QNetworkRequest request;
request.setUrl(implementation->url);
//然后我们将请求传递给我们的网络访问管理器(作为接口注入,因此我们可以改变它的行为)
implementation->reply = implementation->networkAccessManager->get(request);
//最后,我们连接我们的委托槽并等待响应
if(implementation->reply != nullptr)
{
connect(implementation->reply,&QNetworkReply::finished,this,&WebRequest::replyDelegate);
connect(implementation->reply,&QNetworkReply::sslErrors,this,&WebRequest::sslErrorsDelegate);
}
}
bool WebRequest::isBusy() const
{
return implementation->isBusy();
}
void WebRequest::setUrl(const QUrl &url)
{
if(url != implementation->url)
{
implementation->url = url;
//urlChanged() 将在 URL 更新时触发
emit urlChanged();
}
}
QUrl WebRequest::url() const
{
return implementation->url;
}
//
void WebRequest::replyDelegate()
{
//当我们收到回复时,我们会在读取我们感兴趣的响应详细信息
//主要是 HTTP 状态代码和响应正文)之前取消设置 busy 标志并断开我们的插槽。
implementation->setIsBusy(false);
if(implementation->reply == nullptr)
{
emit error("Unexpected error - reply object is null");
return;
}
disconnect(implementation->reply, &QNetworkReply::finished, this, &WebRequest::replyDelegate);
disconnect(implementation->reply, &QNetworkReply::sslErrors, this, &WebRequest::sslErrorsDelegate);
auto statusCode = implementation->reply->attribute(QNetworkRequest::HttpStatusCodeAttribute).toInt();
auto responseBody = implementation->reply->readAll();
auto replyStatus = implementation->reply->error();
implementation->reply->deleteLater();
//我们检查回复是否成功完成(请注意,在此上下文中,范围 4xx 或 5xx 中的“否定”HTTP 响应代码仍算作成功完成请求)
//并发出详细信息供任何感兴趣的各方捕获和处理
if (replyStatus != QNetworkReply::NoError)
{
//error() 将在出现问题时发出,并将错误描述作为参数传递
emit error(networkErrorMapper[implementation->reply->error()]);
}
//requestComplete() 在收到并处理响应时发出,将包含 HTTP 状态代码和表示响应正文的字节数组
emit requestComplete(statusCode, responseBody);
}
void WebRequest::sslErrorsDelegate(const QList<QSslError>& errors)
{
QString sslError;
for (const auto& error : errors)
{
sslError += error.errorString() + "n";
}
emit error(sslError);
}
}
}
几个私有插槽,它们将作为处理回复和处理任何 SSL 错误。当我们执行新请求时,它们连接到 QNetworkReply 对象上的信号,并在我们收到回复时再次断开连接。
实现的核心实际上是两个方法——execute() 发送请求和replyDelegate() 处理响应。
执行时,我们首先确保我们还没有忙于执行另一个请求,然后与网络访问管理器检查我们是否有可用的连接。假设我们这样做了,然后我们设置忙碌标志并使用当前设置的 URL 构造一个 QNetworkRequest。然后我们将请求传递给我们的网络访问管理器(作为接口注入,因此我们可以改变它的行为),最后,我们连接我们的委托槽并等待响应。
INetworkAccessManager.h的派生实例对象NetworkAccessManager.h
NetworkAccessManager.h
#ifndef NETWORKACCESSMANAGER_H
#define NETWORKACCESSMANAGER_H
#include <QObject>
#include <networking/INetworkAccessManager.h>
namespace cm
{
namespace networking
{
class NetworkAccessManager : public QObject,public INetworkAccessManager
{
Q_OBJECT
public:
explicit NetworkAccessManager(QObject *parent = nullptr);
~NetworkAccessManager();
QNetworkReply* get(const QNetworkRequest& request) override;
bool isNetworkAccessible() const override;
signals:
private:
class Implementation;
QScopedPointer<Implementation> implementation;
};
}
}
#endif // NETWORKACCESSMANAGER_H
只派生接口的get 函数和isNetworkAccessible函数
get函数调用QNetworkAccessManager的get函数,
QNetworkReply* NetworkAccessManager::get(const QNetworkRequest& request)
{
return implementation->networkAccessManager.get(request);
}
isNetworkAccessible函数
bool NetworkAccessManager::isNetworkAccessible() const
{
return implementation->networkAccessManager.networkAccessible() == QNetworkAccessManager::Accessible;
}
#include "NetworkAccessManager.h"
namespace cm
{
namespace networking
{
class NetworkAccessManager::Implementation
{
public:
Implementation(){}
QNetworkAccessManager networkAccessManager;
};
NetworkAccessManager::NetworkAccessManager(QObject *parent)
: QObject(parent),
INetworkAccessManager()
{
implementation.reset(new Implementation);
}
NetworkAccessManager::~NetworkAccessManager()
{
}
QNetworkReply* NetworkAccessManager::get(const QNetworkRequest& request)
{
return implementation->networkAccessManager.get(request);
}
bool NetworkAccessManager::isNetworkAccessible() const
{
return implementation->networkAccessManager.networkAccessible() == QNetworkAccessManager::Accessible;
}
}
}
RSS View
让我们向我们的应用程序添加一个新视图,我们可以在其中使用我们的新类显示来自 Web 服务的一些信息。这里没有什么新的或复杂的东西,所以我不会展示所有的代码,但有几个步骤需要记住:
在 cm-ui/views 中创建一个新的 RssView.qml 视图并暂时从 SplashView 复制 QML,将“Splash View”文本替换为“Rss View”将视图添加到 /views 前缀块中的 views.qrc 并使用别名 RssView.qml
接下来,我们需要创建 NetworkAccessManager 和 WebRequest 类的实例。像往常一样,我们将这些添加到 MasterController 并将依赖项注入到 CommandController。
在 MasterController 中,添加两个新的私有成员:
NetworkAccessManager* networkAccessManager{nullptr};
WebRequest* rssWebRequest{nullptr};
请记住包含相关标题。 在 Implementation 构造函数中实例化这些新成员,确保它们在 commandController 之前创建:
networkAccessManager = new NetworkAccessManager(masterController);
rssWebRequest = new WebRequest(masterController, networkAccessManager, QUrl("http://www.baidu.com"));
接下来,将 rssWebRequest 作为新参数传递给 commandController 构造函数:
commandController = new CommandController(masterController, databaseController, navigationController, newClient, clientSearch, rssWebRequest);
这里我们使用的是与英国相关的 BBC RSS 提要的 URL; 只需替换超链接文本,即可随意将其替换为您选择的另一个提要。接下来,编辑 CommandController 以将此新参数作为指向接口的指针:
explicit CommandController(QObject* _parent = nullptr, IDatabaseController* databaseController = nullptr, NavigationController* navigationController = nullptr, models::Client* newClient = nullptr, models::ClientSearch* clientSearch = nullptr, networking::IWebRequest* rssWebRequest = nullptr);
通过实现构造函数传递这个指针并将其存储在私有成员变量中,就像我们对所有其他依赖项所做的那样:
IWebRequest* rssWebRequest{nullptr};
我们现在可以更新 onRssRefreshExecuted() 槽来执行 Web 请求:
void CommandController::onRssRefreshExecuted()
{
qDebug() << "You executed the Rss Refresh command!";
implementation->rssWebRequest->execute();
}
命令控制器现在对用户按下刷新按钮做出反应并执行 Web 请求。 但是,当我们收到响应时,我们目前不会做任何事情。 让我们在公共槽部分向 MasterController 添加一个委托:
void MasterController::onRssReplyReceived(int statusCode, QByteArray body)
{
qDebug() << "Received RSS request response code " << statusCode << ":";
qDebug() << body;
}
打开RssView.qml添加
CommandBar
{
commandList: masterController.ui_commandController.ui_rssViewContextCommands
}
[外链图片转存失败,源站可能有防盗链机制,建议将图片保存下来直接上传(img-hNKqtsfR-1627700317875)(/home/xz/study/qt_collect_pro/blog/end_to_end_qt/CM/md/img/60.png)]
点击刷新后
[外链图片转存失败,源站可能有防盗链机制,建议将图片保存下来直接上传(img-MNYTEuMg-1627700317877)(/home/xz/study/qt_collect_pro/blog/end_to_end_qt/CM/md/img/61.png)]
执行完成
RSS
丰富的站点摘要 (RSS) 是一种用于提供定期更改的 Web 内容的格式,本质上是一个完整的网站、新闻广播、博客或类似的内容,浓缩为要点。 每个项目都包含诸如日期和描述性标题之类的基本信息,并提供指向包含完整文章的网站页面的超链接。
数据从 XML 扩展而来,并且必须遵守 http://www.rssboard.org/rss-specification 中描述的定义标准。
为了本示例的目的,将其归结为基础,XML 如下所示:
<rss>
<channel>
<title></title>
<description></description>
<link></link>
<image>
<url></url>
<title></title>
<link></link>
<width></width>
<height></height>
</image>
<item>
<title></title>
<description></description>
<link></link>
<pubDate></pubDate>
</item>
<item>
…
</item>
</channel>
</rss>
在根 节点内,我们有一个 节点,该节点又包含一个 节点和一个或多个 节点的集合。
我们将这些节点建模为类,但首先我们需要引入 XML 模块并编写一个小的帮助类来为我们做一些解析。 在cm-lib.pro和cm-ui.pro中,将xml模块添加到QT变量中的modules中; :QT += sql network xml
接下来,在新文件夹 cm-lib/source/utilities 中创建一个新的 XmlHelper 类。
void XmlHelper::appendNode(const QDomNode &domNode, QString &output)
{
if(domNode.nodeType() == QDomNode::TextNode)
{
output.append(domNode.nodeValue());
return;
}
if(domNode.nodeType() == QDomNode::AttributeNode)
{
output.append(" ");
output.append(domNode.nodeName());
output.append("=");
output.append(domNode.nodeValue());
output.append("");
return;
}
if(domNode.nodeType() == QDomNode::ElementNode)
{
output.append("<");
output.append(domNode.nodeName());
// Add attributes
for(auto i = 0; i < domNode.attributes().size(); ++i)
{
QDomNode subNode = domNode.attributes().item(i);
appendNode(subNode, output);
}
output.append(">");
for(auto i = 0; i < domNode.childNodes().size(); ++i)
{
QDomNode subNode = domNode.childNodes().at(i);
appendNode(subNode, output);
}
output.append("</" + domNode.nodeName() + ">");
}
}
但本质上,如果我们收到一个包含 HTML 标记的 XML 节点(这在 RSS 中很常见),XML 解析器 有点困惑,也将 HTML 分解为 XML 节点,这不是我们想要的。 考虑这个例子:
<xmlNode>
Here is something from a website that has a <a href=”http://www.bbc.co.uk”>hyperlink</a> in it.
</xmlNode>
在这种情况下,XML 解析器会将 视为 XML,并将内容分解为三个类似于以下内容的子节点:
<xmlNode>
<textNode1>Here is something from a website that has a </textNode1>
<a href=”http://www.bbc.co.uk”>hyperlink</a>
<textNode2>in it.</textNode2>
</xmlNode>
这使得很难在 UI 上向用户显示 xmlNode 的内容。 相反,我们使用 XmlHelper 手动解析内容并构造单个字符串,这样更容易使用。
现在,让我们继续学习 RSS 类。 在新的 cm-lib/source/rss 文件夹中,创建新的 RssChannel、RssImage 和 RssItem 类。
#ifndef RSSIMAGE_H
#define RSSIMAGE_H
#include <QObject>
#include <QScopedPointer>
#include <QtXml/QDomNode>
#include <cm-lib_global.h>
namespace cm
{
namespace rss
{
//这个类只是一个普通的普通数据模型
class CMLIBSHARED_EXPORT RssImage : public QObject
{
Q_OBJECT
Q_PROPERTY(quint16 ui_height READ height CONSTANT)
Q_PROPERTY(QString ui_link READ link CONSTANT)
Q_PROPERTY(QString ui_title READ title CONSTANT)
Q_PROPERTY(QString ui_url READ url CONSTANT)
Q_PROPERTY(quint16 ui_width READ width CONSTANT)
public:
//除了它将由 Qt 的 QDomNode 类表示的 XML <image> 节点构造
explicit RssImage(QObject* parent = nullptr,const QDomNode& domNode = QDomNode());
~RssImage();
quint16 height() const;
const QString& link() const;
const QString& title() const;
const QString& url() const;
quint16 width() const;
private:
class Implementation;
QScopedPointer<Implementation> implementation;
};
}
}
#endif // RSSIMAGE_H
RssImage.cpp
#include "RssImage.h"
namespace cm
{
namespace rss
{
class RssImage::Implementation
{
public:
QString url; //表示频道的 GIF、JPEG 或 PNG 的 URL
QString title; //描述图像
QString link; //网站的网址
//<width> 和 <height> 节点是可选的,如果它们不存在,我们使用 88 x 31 像素的默认图像大小
quint16 width; //以像素为单位的宽度。 最大 144,默认88
quint16 height; //以像素为单位的高度。 最大 400,默认 31
void update(const QDomNode& domNode)
{
//除了它将由 Qt 的 QDomNode 类表示的 XML <image> 节点构造
//我们使用 firstChildElement() 方法定位 <url>、<title> 和 <link> 强制子节点,然后通过 text() 方法访问每个节点的值。
QDomElement imageUrl = domNode.firstChildElement("url");
if(!imageUrl.isNull())
{
url = imageUrl.text();
}
QDomElement imageTitle = domNode.firstChildElement("title");
if(!imageTitle.isNull())
{
title = imageTitle.text();
}
QDomElement imageLink = domNode.firstChildElement("link");
if(!imageLink.isNull())
{
link = imageLink.text();
}
QDomElement imageWidth = domNode.firstChildElement("width");
if(!imageWidth.isNull())
{
width = static_cast<quint16>(imageWidth.text().toShort());
}
else
{
width = 88;
}
QDomElement imageHeight = domNode.firstChildElement("height");
if(!imageHeight.isNull())
{
height = static_cast<quint16>(imageHeight.text().toShort());
}
else
{
height = 31;
}
}
};
RssImage::RssImage(QObject* parent, const QDomNode& domNode)
: QObject(parent)
{
implementation.reset(new Implementation());
implementation->update(domNode);
}
RssImage::~RssImage()
{
}
quint16 RssImage::height() const
{
return implementation->height;
}
const QString& RssImage::link() const
{
return implementation->link;
}
const QString& RssImage::title() const
{
return implementation->title;
}
const QString& RssImage::url() const
{
return implementation->url;
}
quint16 RssImage::width() const
{
return implementation->width;
}
}
}


 1516
1516


 被折叠的 条评论
为什么被折叠?
被折叠的 条评论
为什么被折叠?
 到【灌水乐园】发言


