


从PyCharm安装到模型实现,从零开始实现VGG在Cifar10上的分类任务
本文主要针对想要快速实现vgg模型的初学者,描述从零开始实现vgg-cifar10任务
1.PyCharm的安装与配置:
首先需要在Python官网下载python,具体步骤请参考以下网址:
https://www.runoob.com/w3cnote/pycharm-windows-install.html
注意一定要把python添加到环境变量。下面是PyCharm安装包,参考“火耳软件安装”公众号中的安装教程和pj。
[64位下载链接]: https://pan.baidu.com/s/1JUMVR3UM-caxYD3theBkEw
[提取码]: ajn7
再次参考该网址,完成PyCharm的配置:
https://www.runoob.com/w3cnote/pycharm-windows-install.html
2.Python依赖包安装: 对于PyCharm,安装依赖包步骤十分简单:
(1)选择File(文件)-Settings(设置)-Project(项目)-Project Interperter(项目解释器)
(2)点击“+”,搜索以下依赖包进行安装:tensorflow(分为CPU版本和GPU版本,我使用的版本为2.4.1(cpu)),numpy,matplotlib,pandas,scipy,imutils,Keras(有的装了可能现在没用,但以后可能用得上)
对于tensorflow,要注意有cpu和gpu版本,对于小规模的网络验证,cpu版本即可,对于大规模的网络,建议使用gpu版本,但需要额外安装一些东西如cuda。本次我们采用cpu版本,直接在interpreter中搜索tensorflow的2.4.1安装即可。
3.测试tensorflow是否安装成功:
在Pycharm中新建python项目,在项目文件夹中新建test.py:
import tensorflow as tf
from tensorflow.python.client import device_lib
tf.compat.v1.disable_eager_execution()
hello = tf.constant("Hello World")
sess = tf.compat.v1.Session()

print(sess.run(hello))

print(device_lib.list_local_devices())
能够得到以下输出:

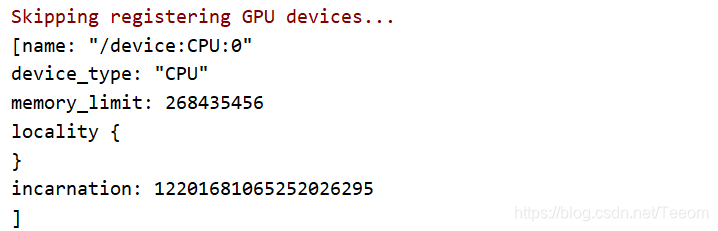
图2中表明运算设备为CPU,至此可以确认tensorflow基本安装成功。
4.Cifar数据集的准备:
Cifar数据集是一个非常著名的数据集,被广泛应用于图像分类领域,可以以下网址下载:
http://www.cs.toronto.edu/~kriz/cifar-10-python.tar.gz(科学上网会快一点)
百度网盘下载:
链接:https://pan.baidu.com/s/1ruSqAwTpuOT7LaOgSzMhCQ
提取码:jvco
需要注意,VGG模型处理的图像为三通道224x224的大小,而cifar数据集中图像为三通道32x32,在代码中需要注意。
5.运行Vgg+Cifar10代码:
准备好1-4步之后,我们终于可以运行vgg的代码了,vgg模型的设计和理解此处不再赘述,以下给出带有注释的代码,整个代码直接就可以运行(前面没出错的话),只需要注意cifar10数据集文件夹的路径是否正确。
cifar_dir = './cifar-10-batches-py'
前面几步失败了的同学,可以通过这个网站来实现cifar10数据集的训练:
https://cs.stanford.edu/people/karpathy/convnetjs/demo/cifar10.html
同时这也是一个可视化的卷积神经网络训练过程,可以帮助大家理解模型的训练(推荐玩一玩)。
完整代码:
import tensorflow.compat.v1 as tf
tf.disable_v2_behavior()
import os
import pickle
import numpy as np
import matplotlib.pyplot as plt
'''
Application project of Convolution
Homework of Signal and System
Deep Convolutional Networks
Name: Chen Juncheng
Date: 2021/3/27
Source:
"Very Deep Convolutional Networks for Large-Scale Image Recognition"
Visual Geometry Group: ILSVRC 2014
arXiv: [1409.1556] Very Deep Convolutional Networks for Large-Scale Image Recognition
Code Reference:
https://blog.csdn.net/qq872890060/article/details/100927057
Dataset: Cifar 10
Feature:
On the one hand, the parameters can be reduced by replacing a convolution layer with a larger convolution core with multiple smaller convolution cores,
On the other hand, the author thinks that more nonlinear mapping is carried out, which can increase the ability of fitting / expressing network.
'''
cifar_dir = './cifar-10-batches-py'
print(os.listdir(cifar_dir))
# Construct the path of documents
train_filenames = [os.path.join(cifar_dir,'data_batch_%d'%i)for i in range(1,6)]
test_filenames = [os.path.join(cifar_dir,'test_batch')]
# Data input function
def load_data(filename):
with open(filename,'rb') as f:
data = pickle.load(f,encoding='bytes')
return data[b'data'],data[b'labels']
# Class of data processing
class CifarData:
def __init__(self,filenames,need_shuffle):
all_data = []
all_labels = []
for filename in filenames:
data, labels = load_data(filename)
all_data.append(data)
all_labels.append(labels)
self._data = np.vstack(all_data) / 127.5 - 1
self._labels = np.hstack(all_labels)
self._num_examples = self._data.shape[0]
self._index = 0
self._need_shuffle = need_shuffle
if self._need_shuffle:
self.shuffle_data()
def shuffle_data(self):
o = np.random.permutation(self._num_examples)
self._data = self._data[o]
self._labels = self._labels[o]
def next_batch(self,batch_size):
end_index = self._index + batch_size
if end_index > self._num_examples:
if self._need_shuffle:
self.shuffle_data()
self._index = 0
end_index = batch_size
else:
raise Exception('There is no more examples')
if end_index > self._num_examples:
raise Exception('The scale is too large')
batch_data = self._data[self._index:end_index]
batch_labels = self._labels[self._index:end_index]
self._index = end_index
return batch_data,batch_labels
# Instantiate Class of data processing
train_data = CifarData(train_filenames,True)
test_data = CifarData(test_filenames,False)
# Construct the model
X = tf.placeholder(dtype=tf.float32,shape=[None,3072])
Y = tf.placeholder(dtype=tf.int64,shape=[None])
X_img = tf.reshape(X,[-1,3,32,32]) #vgg is for 224*224*3 image, now we need to adjust the image size for cifar10
X_img = tf.transpose(X_img,perm=[0,2,3,1])
# Construct Neural Network
'''
VGG 卷积核尺寸:3*3
最大池化尺寸:2*2
激活单元:ReLU
'''
# 卷积一
conv1_1 = tf.layers.conv2d(X_img,8,kernel_size=(3,3),padding='same',activation=tf.nn.relu,name='conv1_1')
# 池化
pooling1 = tf.layers.max_pooling2d(conv1_1,(2,2),(2,2),name='pool1')
# 卷积二
conv2_1 = tf.layers.conv2d(pooling1,16,(3,3),padding='same',name='conv2_1',activation=tf.nn.relu)
# 池化
pooling2 = tf.layers.max_pooling2d(conv2_1,(2,2),(2,2),name='pool2')
# 卷积三
conv3_1 = tf.layers.conv2d(pooling2,32,(3,3),padding='same',activation=tf.nn.relu,name='conv3_1')
conv3_2 = tf.layers.conv2d(conv3_1,32,(3,3),padding='same',activation=tf.nn.relu,name='conv3_2')
# 池化
pooling3 = tf.layers.max_pooling2d(conv3_2,(2,2),(2,2),name='pool3')
# 卷积四
conv4_1 = tf.layers.conv2d(pooling3,64,(3,3),padding='same',activation=tf.nn.relu,name='conv4_1')
conv4_2 = tf.layers.conv2d(conv4_1,64,(3,3),padding='same',activation=tf.nn.relu,name='conv4_2')
# 池化
pooling4 = tf.layers.max_pooling2d(conv4_2,(2,2),(2,2),name='pool4')
# 展平
flatten = tf.layers.flatten(pooling4,name='flaten')
# 全连接层
fc7 = tf.layers.dense(flatten,64,activation=tf.nn.tanh,name='fc7')
fc8 = tf.layers.dense(fc7,64,activation=tf.nn.tanh,name='fc8')
y_ = tf.layers.dense(fc8,10)
# 损失
loss = tf.losses.sparse_softmax_cross_entropy(labels=Y,logits=y_)
# 预测
predict = tf.argmax(y_,1)
accuracy = tf.reduce_mean(tf.cast(tf.equal(predict,Y),dtype=tf.float32))
# 优化器 Backward & Adaptive optimize learning rate
train_op = tf.train.AdamOptimizer(learning_rate=1e-3).minimize(loss)
# 超参数
batch_size = 20 #一次训练选取的样本数
train_steps = 10000 #训练次数
test_steps = 100
# 开启会话
with tf.Session() as sess:
sess.run(tf.global_variables_initializer())
steps=[]
_loss=[]
_accuracy=[]
for i in range(train_steps):
x_train,y_train = train_data.next_batch(batch_size)
los,acc,_ = sess.run([loss,accuracy,train_op],feed_dict={
X:x_train,Y:y_train
})
if (i + 1) % 500 == 0:
print('批次',i+1)
print('代价:',los)
print('准确率: ',acc)
steps.append(i+1)
_loss.append(los)
_accuracy.append(acc)
if (i + 1) % 5000 == 0:
test_data = CifarData(test_filenames,False)
all_acc = []
for j in range(test_steps):
x_test,y_test = test_data.next_batch(batch_size)
accs = sess.run(accuracy,feed_dict={
X:x_test,Y:y_test
})
all_acc.append(accs)
print('测试集准确率: ',sess.run(tf.reduce_mean(all_acc)))
#plt.subplot(220+int((i + 1)/5000))
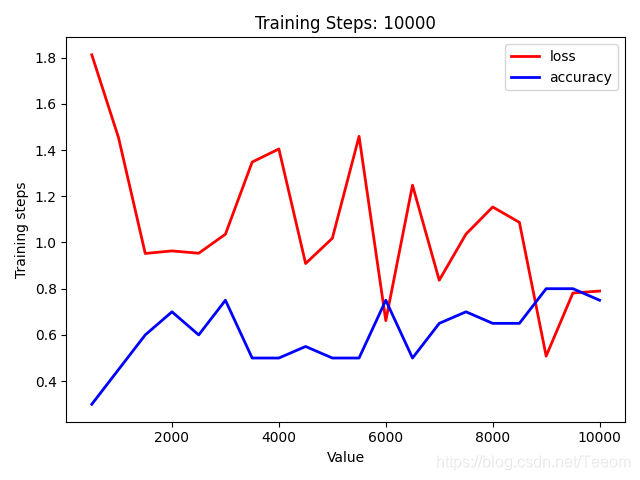
plt.plot(steps, _loss, ls="-", lw=2, label="loss",color='r')
plt.plot(steps, _accuracy, ls="-", lw=2, label="accuracy",color='b')
plt.xlabel("Value")
plt.ylabel("Training steps")
plt.title("Training Steps: "+str(train_steps))
plt.legend()
plt.show()
#print(_accuracy)
训练过程:
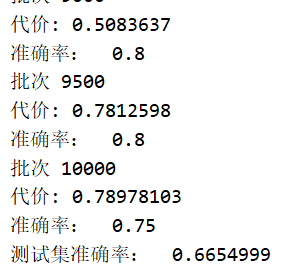
输出结果:


 1037
1037

 被折叠的 条评论
为什么被折叠?
被折叠的 条评论
为什么被折叠?
 到【灌水乐园】发言


