


久等了,终于到了"手写promise原理系列"的正篇。

在这篇文章中,我们将封装一个 Promise 构造函数,给 Promise 构造函数的原型对象 prototype 添加一个 then 方法。
在 Promise 构造函数中,将实现:
- excutor
[执行器函数]的自动执行; - 改变 promise 状态的三种方式:resolve()、reject() 以及 throw ;
- 状态只能变更一次;即 pending --> fulfilled 或者 pending --> rejected;fulfilled 与 rejected 之间不能转换。
Promise 的使用方式:
new Promise((resolve, reject) => {
	resolve("OK");
})
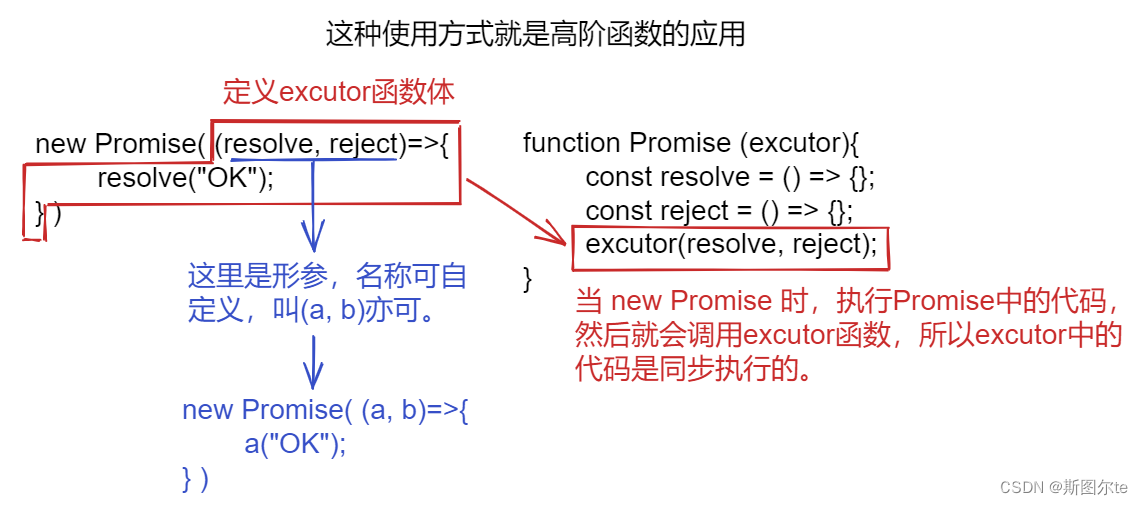
(1)先来封装函数体:
function Promise (excutor){
	// 定义resolve函数
	const resolve = () => {};
	// 定义reject函数
	const reject = () => {};
	// 调用[执行器函数]
	excutor(resolve, reject);
}
Promise.prototype.then = function(){}
上面如果理解费力,可以看下面这张图片,方便理解。
(2)改变promise的状态:
第一篇文章说过,promise有两个实例属性,分别为 PromiseState、PromiseResult;然后resolve()时,将状态变更为成功,reject()时,将状态变更为失败,throw抛出错误时,状态也变更为失败。
function Promise (excutor){
// 定义初始状态
this.PromiseState = "pending";
this.PromiseResult = undefined;
// 定义resolve函数(第一种改变状态方式)
const resolve = (value) => {
// 更改状态为成功并保存结果
this.PromiseState = "fulfilled";
this.PromiseResult = value;
};
// 定义reject函数(第二种改变状态方式)
const reject = (reason) => {
// 更改状态为失败并保存结果
this.PromiseState = "rejected";
this.PromiseResult = reason;
};
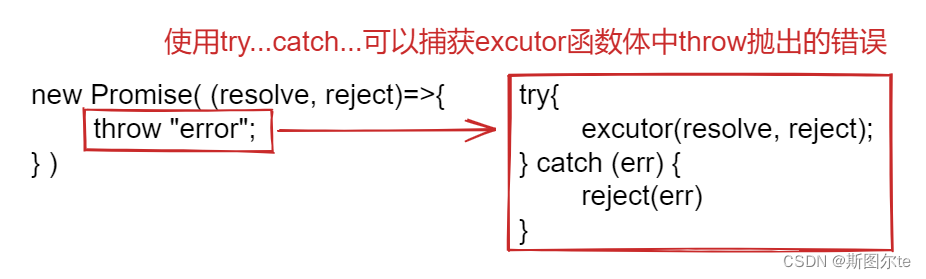
// throw抛错,使用try...catch...捕获错误(第三种改变状态方式)
try {
// 调用[执行器函数]
excutor(resolve, reject);
} catch (err) {
reject(err)
}
}
Promise.prototype.then = function(){}
(3)状态如何只变更一次后就不再改变:
因为初始状态为 pending ,当状态不为 pending 时,那说明状态被变更过了,所以就不再进行任何操作;所以只需要在变更状态前添加一下逻辑判断就可以。代码如下:
// 定义resolve函数(第一种改变状态方式)
const resolve = (value) => {
	// 如果状态不为pending,说明状态被变更过,所以不再进行任何操作
	if(this.PromiseState !== "pending") return;
	// 更改状态为成功并传值
	this.PromiseState = "fulfilled";
	this.PromiseResult = value;
};
// 定义reject函数(第二种改变状态方式)
const reject = (reason) => {
	// 如果状态不为pending,说明状态被变更过,所以不再进行任何操作
	if(this.PromiseState !== "pending") return;
	// 更改状态为失败并传值
	this.PromiseState = "rejected";
	this.PromiseResult = reason;
};
Promise 构造函数的完整代码:
function Promise(excutor){
	this.PromiseState = "pending";
	this.promiseResult = undefined;
	const resolve = (value) => {
		if (this.PromiseState !== "pending") return;
		this.PromiseState = "fulfilled";
		this.PromiseResult = value;
	}
	const reject = (reason) => {
		if (this.PromiseState !== "pending") return;
		this.PromiseState = "rejected";
		this.PromiseResult = reason;
	}
	try {
		excutor(resolve, reject);
	} catch (err) {
		reject(err);
	}
}
Promise.prototype.then = function(){}
至于 then 方法咱们在下一篇文章再来封装,then 方法涉及的知识点以及逻辑比较多,比较复杂。
目前咱们封装完成了 Promise 构造函数,这只是一个19行代码的简单版本,只处理了三个问题点,但对于小白理解 promise 源码以及 promise 的工作方式有深刻意义,至少我在初窥门径时眼前是豁然开朗。
好了,话不多说,撸起袖子接着干。


 334
334


 被折叠的 条评论
为什么被折叠?
被折叠的 条评论
为什么被折叠?
 到【灌水乐园】发言


