Android使用Spinner实现下拉选功能(死数据填充)(学习笔记 (一))
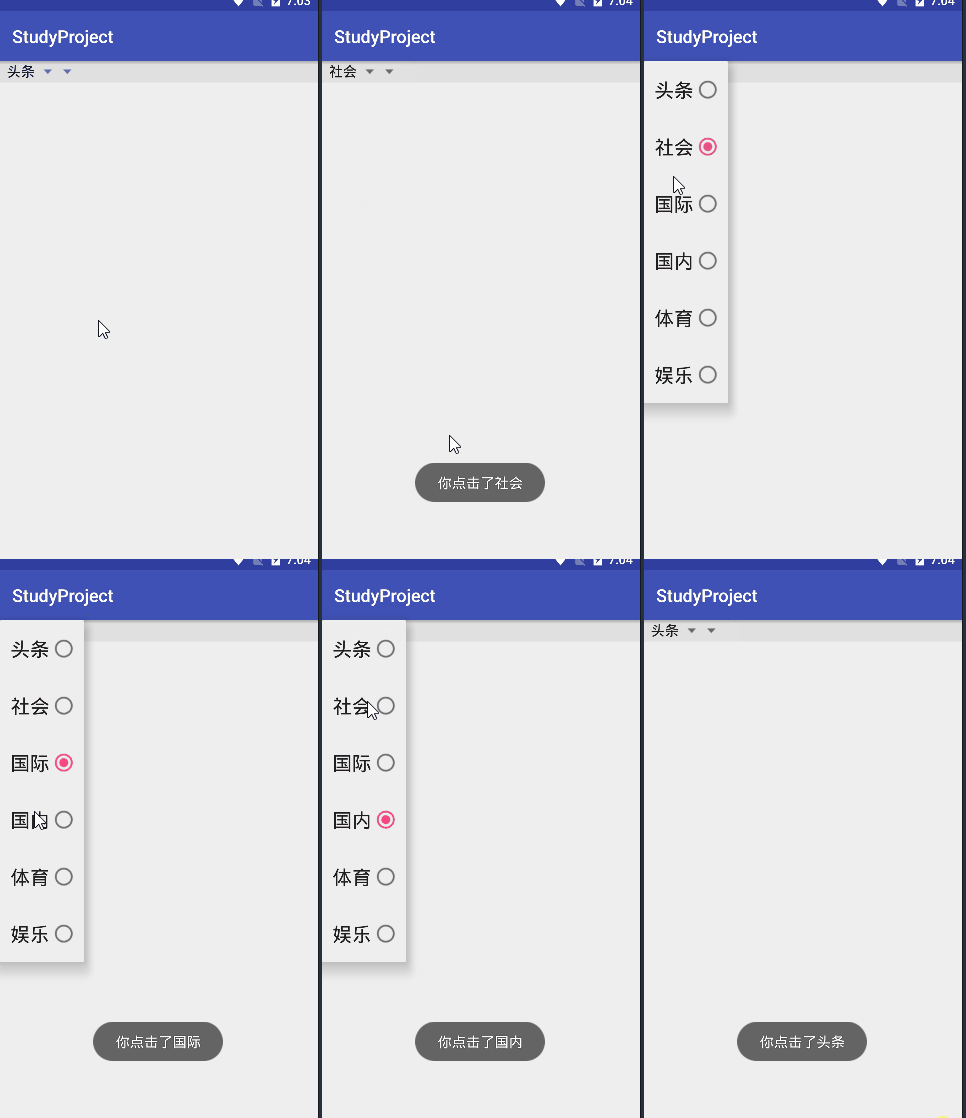
实现效果

实现第一步,修改activity_main.xml
<?xml version="1.0" encoding="utf-8"?>
<LinearLayout xmlns:android="http://schemas.android.com/apk/res/android"
    xmlns:app="http://schemas.android.com/apk/res-auto"
    xmlns:tools="http://schemas.android.com/tools"
    android:layout_width="match_parent"
    android:layout_height="match_parent"
    android:orientation="vertical"
    tools:context=".MainActivity">
    <LinearLayout
        android:layout_width="match_parent"
        android:orientation="horizontal"
        android:layout_height="wrap_content"
        android:background="@color/colorbackground">
        <Spinner
            android:id="@+id/spinner_test_one"
            android:layout_width="wrap_content"
            android:layout_height="wrap_content"
            android:layout_gravity="center_vertical"
            android:layout_marginLeft="2dp"
            android:layout_marginRight="2dp"
            android:src="@drawable/next"
            />
        <Spinner
            android:id="@+id/spinner_test_two"
            android:layout_width="wrap_content"
            android:layout_height="wrap_content"
            android:layout_gravity="center_vertical"
            android:layout_marginLeft="2dp"
            android:layout_marginRight="2dp"
            android:src="@drawable/next"
            />
    </LinearLayout>

</LinearLayout>
第二步,添加(Butterknife引用),也可以不用
修改工程的build.gradle:
buildscript {

    repositories {
        google()
        jcenter()
    }
    dependencies {
        classpath 'com.android.tools.build:gradle:3.1.2'
        classpath 'com.jakewharton:butterknife-gradle-plugin:8.8.1'

        // NOTE: Do not place your application dependencies here; they belong
        // in the individual module build.gradle files
    }
}

allprojects {
    repositories {
        google()
        jcenter()
        maven { url 'https://www.jitpack.io' }
    }
}
修改项目下的build.gradle:
 implementation 'com.jakewharton:butterknife:8.8.1'
 annotationProcessor 'com.jakewharton:butterknife-compiler:8.8.1'
第三步,修改MainActivity.java
package com.example.studyproject;

import android.content.Context;
import android.support.v7.app.AppCompatActivity;
import android.os.Bundle;
import android.view.View;
import android.widget.AdapterView;
import android.widget.ArrayAdapter;
import android.widget.Spinner;
import android.widget.Toast;

import java.util.ArrayList;
import java.util.List;

import butterknife.BindViews;
import butterknife.ButterKnife;

public class MainActivity extends AppCompatActivity {
  @BindViews({R.id.spinner_test_one,R.id.spinner_test_two})
    List<Spinner> spinnerList;
    String item_name;
    Context mContext;
    @Override
    protected void onCreate(Bundle savedInstanceState) {
        super.onCreate(savedInstanceState);
        setContentView(R.layout.activity_main);
        mContext = MainActivity.this;
      ButterKnife.bind(this);
      initView();
  }

    private void initView() {
        final List<String> item = new ArrayList<>();
        item.add("头条"); //0
        item.add("社会");
        item.add("国际");//2
        item.add("国内");
        item.add("体育");
        item.add("娱乐");
        ArrayAdapter<String> adapter = new ArrayAdapter<>(mContext,R.layout.simple_spinner_item,item);
       adapter.setDropDownViewResource(android.R.layout.select_dialog_singlechoice);  //选中的样式
        spinnerList.get(0).setAdapter(adapter);
        //这里别选成了ItemClickListener
        spinnerList.get(0).setOnItemSelectedListener(new AdapterView.OnItemSelectedListener() {
            @Override
            public void onItemSelected(AdapterView<?> adapterView, View view, int arg, long l) {
                   if (arg ==0){
                       item_name = "头条";
                   }else if (arg ==1){
                       item_name = "社会";

                   }else if (arg ==2){
                       item_name = "国际";
                   }
                   else if (arg ==3){
                       item_name = "国内";
                   }
                Toast.makeText(mContext,"你点击了"+item_name,Toast.LENGTH_SHORT).show();
            }
            @Override
            public void onNothingSelected(AdapterView<?> adapterView) {

            }
        });
    }
}
下拉的样式:
<?xml version="1.0" encoding="utf-8"?><!--
/* //device/apps/common/assets/res/any/layout/simple_spinner_item.xml
**
** Copyright 2006, The Android Open Source Project
**
** Licensed under the Apache License, Version 2.0 (the "License");
** you may not use this file except in compliance with the License.
** You may obtain a copy of the License at
**
**     http://www.apache.org/licenses/LICENSE-2.0
**
** Unless required by applicable law or agreed to in writing, software
** distributed under the License is distributed on an "AS IS" BASIS,
** WITHOUT WARRANTIES OR CONDITIONS OF ANY KIND, either express or implied.
** See the License for the specific language governing permissions and
** limitations under the License.
*/
-->
<TextView xmlns:android="http://schemas.android.com/apk/res/android"
    android:id="@android:id/text1"
    style="?android:attr/spinnerItemStyle"
    android:singleLine="true"
    android:layout_width="match_parent"
    android:layout_height="wrap_content"
    android:ellipsize="marquee" />
这篇对于spinner的使用不多,只是基本使用,后续将会补上当第一个下拉后,第二个会对应刷新数据下拉。
第二篇:Android使用Spinner实现下拉选功能(获取远程数据并根据下拉刷新) (学习笔记 (二))


 2865
2865


 被折叠的 条评论
为什么被折叠?


