


引言
CUDA(Compute Unified Device Architecture,统一计算架构)是由NVIDIA所推出的一种集成技术,是其对于GPGPU(A General-Purpose Graphics Processing Unit)的正式名称。通过该技术,开发者可以利用NVIDIA的GeForce 8以后的GPU进行计算。极大加速计算型应用的效率。通常用于游戏开发、视频编解码、图像处理等领域。

CUDA is a parallel computing platform and programming model developed by NVIDIA for general computing on graphical processing units (GPUs).
With CUDA, developers can dramatically speed up computing applications by harnessing the power of GPUs.

“Hello World”版使用
当我们使用Windows上的Visual Studio进行开发时,如果选择CUDA应用开发,IDE会自动生成一个“Hello World”版核函数,内容如下:
#include "cuda_runtime.h"
#include "device_launch_parameters.h"

#include <stdio.h>
#include <iostream>

cudaError_t addWithCuda(int *c, const int *a, const int *b, unsigned int size);

__global__ void addKernel(int *c, const int *a, const int *b)
{
    int i = threadIdx.x;
    c[i] = a[i] + b[i];
}

int main()
{
    const int arraySize = 5;
    const int a[arraySize] = { 1, 2, 3, 4, 5 };
    const int b[arraySize] = { 10, 20, 30, 40, 50 };
    int c[arraySize] = { 0 };

    // Add vectors in parallel.
    cudaError_t cudaStatus = addWithCuda(c, a, b, arraySize);
    if (cudaStatus != cudaSuccess) {
        fprintf(stderr, "addWithCuda failed!");
        return 1;
    }

    printf("{1,2,3,4,5} + {10,20,30,40,50} = {%d,%d,%d,%d,%d}\n",
        c[0], c[1], c[2], c[3], c[4]);

    // cudaDeviceReset must be called before exiting in order for profiling and
    // tracing tools such as Nsight and Visual Profiler to show complete traces.
    cudaStatus = cudaDeviceReset();
    if (cudaStatus != cudaSuccess) {
        fprintf(stderr, "cudaDeviceReset failed!");
        return 1;
    }

    return 0;
}

// Helper function for using CUDA to add vectors in parallel.
cudaError_t addWithCuda(int *c, const int *a, const int *b, unsigned int size)
{
    int *dev_a = 0;
    int *dev_b = 0;
    int *dev_c = 0;
    cudaError_t cudaStatus;

    // Choose which GPU to run on, change this on a multi-GPU system.
    cudaStatus = cudaSetDevice(0);
    if (cudaStatus != cudaSuccess) {
        fprintf(stderr, "cudaSetDevice failed!  Do you have a CUDA-capable GPU installed?");
        goto Error;
    }

    // Allocate GPU buffers for three vectors (two input, one output)    .
    cudaStatus = cudaMalloc((void**)&dev_c, size * sizeof(int));
    if (cudaStatus != cudaSuccess) {
        fprintf(stderr, "cudaMalloc failed!");
        goto Error;
    }

    cudaStatus = cudaMalloc((void**)&dev_a, size * sizeof(int));
    if (cudaStatus != cudaSuccess) {
        fprintf(stderr, "cudaMalloc failed!");
        goto Error;
    }

    cudaStatus = cudaMalloc((void**)&dev_b, size * sizeof(int));
    if (cudaStatus != cudaSuccess) {
        fprintf(stderr, "cudaMalloc failed!");
        goto Error;
    }

    // Copy input vectors from host memory to GPU buffers.
    cudaStatus = cudaMemcpy(dev_a, a, size * sizeof(int), cudaMemcpyHostToDevice);
    if (cudaStatus != cudaSuccess) {
        fprintf(stderr, "cudaMemcpy failed!");
        goto Error;
    }

    cudaStatus = cudaMemcpy(dev_b, b, size * sizeof(int), cudaMemcpyHostToDevice);
    if (cudaStatus != cudaSuccess) {
        fprintf(stderr, "cudaMemcpy failed!");
        goto Error;
    }

    // Launch a kernel on the GPU with one thread for each element.
    addKernel<<<1, size>>>(dev_c, dev_a, dev_b);

    // Check for any errors launching the kernel
    cudaStatus = cudaGetLastError();
    if (cudaStatus != cudaSuccess) {
        fprintf(stderr, "addKernel launch failed: %s\n", cudaGetErrorString(cudaStatus));
        goto Error;
    }

    // cudaDeviceSynchronize waits for the kernel to finish, and returns
    // any errors encountered during the launch.
    cudaStatus = cudaDeviceSynchronize();
    if (cudaStatus != cudaSuccess) {
        fprintf(stderr, "cudaDeviceSynchronize returned error code %d after launching addKernel!\n", cudaStatus);
        goto Error;
    }

    // Copy output vector from GPU buffer to host memory.
    cudaStatus = cudaMemcpy(c, dev_c, size * sizeof(int), cudaMemcpyDeviceToHost);
    if (cudaStatus != cudaSuccess) {
        fprintf(stderr, "cudaMemcpy failed!");
        goto Error;
    }

Error:
    cudaFree(dev_c);
    cudaFree(dev_a);
    cudaFree(dev_b);

    return cudaStatus;
}
实现了一个数组相加的功能,使用CUDA基本功能需要导入相应头文件:
#include "cuda_runtime.h"
#include "device_launch_parameters.h"
CUDA编程需要清楚基本的Host和Device的概念,其中Host为主机(一般指CPU),Device为设备(GPU)。以__global__开头的函数表示一个核函数,只能在Device上运行,必须由CPU调用。以__host__开头的函数与C/C++中的普通函数相同,由CPU调用及执行的函数 ,一般可以省略。
另外在__global__ void addKernel(int *c, const int *a, const int *b)函数中我们可以看到threadIdx.x的身影,这就涉及到CUDA编程中threadIdx, blockIdx, blockDim, gridDim等概念,主要是线程集束的分配和索引所需要的概念。在实际使用时会有1D/2D/3D等区别。可以参考官方教程手册《CUDA_C_Programming_Guide》。

借用参考资料[2]中的图,可以很形象的看出关系。

函数cudaError_t addWithCuda(int *c, const int *a, const int *b, unsigned int size){}是CPU调用核函数addKernel(int *c, const int *a, const int *b)的主机函数,有cudaSetDevice、cudaMalloc、cudaMemcpy、cudaGetLastError、cudaDeviceSynchronize、cudaFree等操作,用于GPU内存分配、拷贝与释放、设备设置、错误处理以及数据同步等。代码addKernel<<<1, size>>>(dev_c, dev_a, dev_b);是真正启动核函数的操作。
NVIDIA有一个比较好的入门博客《An Easy Introduction to CUDA C and C++》,概念讲的比较全面。
OpenCV+CUDA核函数
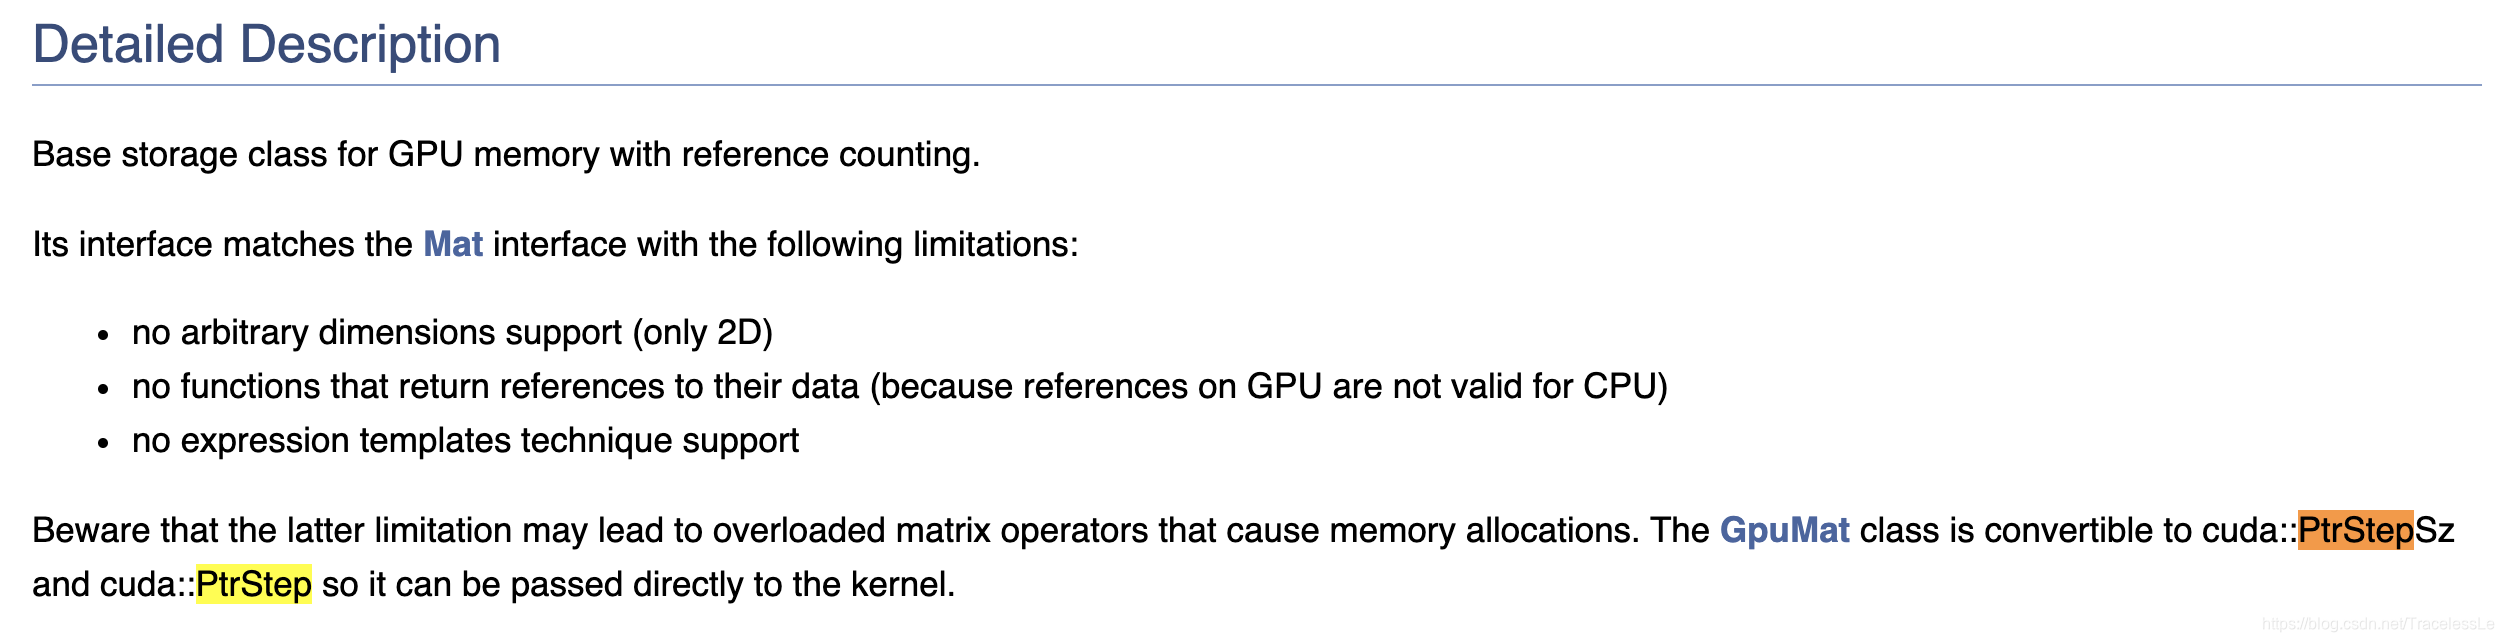
OpenCV从3.0版后集成了关于CUDA相关操作的高级封装,其中GpuMat数据类型可以看做Mat的GPU版本,有极好的数据属性封装,且能够内部隐式转化成可以直接作为核函数参数的PtrStepSz、PtrStep。
以下以一个3通道图像与1通道图像数据点乘操作作为示例:
核函数部分代码(.cu文件):
#include <stdio.h>
#include "cuda.h"
#include "cuda_runtime.h"
#include "device_launch_parameters.h"
#include <opencv2/opencv.hpp>
#include <opencv2/core/cuda/common.hpp>
#include <opencv2/core/cuda/vec_traits.hpp>
#include <opencv2/core/cuda/vec_math.hpp>
#include <opencv2/cudev/common.hpp>


using namespace std;
using namespace cv;
using namespace cv::cuda;

typedef unsigned char uchar;

__global__ void mutiply_kernel(const PtrStepSz<uchar3> input1_c3, const PtrStepSz<uchar> input2_c1, PtrStep<uchar3> dst)
{
    int x = threadIdx.x + blockIdx.x * blockDim.x;
    int y = threadIdx.y + blockIdx.y * blockDim.y;

    if (x >= input2_c1.cols || y >= input2_c1.rows)
        return;

    if (x < input2_c1.cols && y < input2_c1.rows)
    {
        dst(x, y).x = input1_c3(x, y).x * input2_c1(x, y) / 255;
        dst(x, y).y = input1_c3(x, y).y * input2_c1(x, y) / 255;
        dst(x, y).z = input1_c3(x, y).z * input2_c1(x, y) / 255;
    }
}

void cu_mul(const PtrStepSz<uchar3>& input1_c3, const PtrStepSz<uchar>& input2_c1, PtrStepSz<uchar3> dst, cudaStream_t stream)
{
    dim3 block(32, 8);
    dim3 grid(divUp(input2_c1.cols, block.x), divUp(input2_c1.rows, block.y));

    mutiply_kernel <<<grid, block, 0, stream>>> (input1_c3, input2_c1, dst);
    cudaSafeCall(cudaGetLastError());

    if (stream == 0)
        cudaSafeCall(cudaDeviceSynchronize());
}
main函数部分代码:
#include <stdio.h>
#include "cuda_runtime.h"
#include "device_launch_parameters.h"
#include <iostream>
#include <opencv2/core.hpp>
#include <opencv2/imgcodecs.hpp>
#include <opencv2/imgproc.hpp>
#include <opencv2/highgui.hpp>
#include <opencv2/core/cuda.hpp>
#include <opencv2/photo.hpp>
#include <opencv2/core/cuda/common.hpp>
#include <opencv2/core/cuda/vec_traits.hpp>
#include <opencv2/core/cuda_stream_accessor.hpp>

#define CV_LOAD_IMAGE_GRAYSCALE 0
#define CV_LOAD_IMAGE_COLOR 1
#define CV_LOAD_IMAGE_KEEP -1

using namespace std;
using namespace cv;
using namespace cv::cuda;

void cu_mul(const PtrStepSz<uchar3>& input1_c3, const PtrStepSz<uchar>& input2_c1, PtrStepSz<uchar3> dst, cudaStream_t stream);

int main()
{
    std::string input_src_path = "src.jpg";
    std::string input_mask_path = "mask.png";
    cv::Mat src = cv::imread(input_src_path, CV_LOAD_IMAGE_COLOR);
    cv::Mat mask = cv::imread(input_mask_path, CV_LOAD_IMAGE_COLOR);
    cv::Mat result;
    cv::cuda::GpuMat src_gpu;
    cv::cuda::GpuMat mask_gpu;
    cv::cuda::GpuMat r_gpu;
    r_gpu.create(src.size(), src.type());
    cv::cuda::Stream stream;
    double time1 = static_cast<double>(cv::getTickCount());
    src_gpu.upload(src);
    mask_gpu.upload(mask);
    //cu kernel launch to do dot cal
    cu_mul(src_gpu, mask_gpu, r_gpu, StreamAccessor::getStream(stream));
    r_gpu.download(result);
    double time2 = static_cast<double>(cv::getTickCount());
    double time_cuda = (time2 - time1) / cv::getTickFrequency();
    std::cout << "Time use: " << time_cuda << "s" << std::endl;//输出运行时间
    cv::imwrite("out-cu.png", result);
}

参考资料
[1] CUDA - 维基百科,自由的百科全书
[2] GPU CUDA编程中threadIdx, blockIdx, blockDim, gridDim之间的区别与联系
[3] NVIDIA CUDA ZONE
[4] cuda 函数前缀:__device__、__global__、__host__ 相关问题
[5] An Easy Introduction to CUDA C and C++
[6] github - oeip/oeip-win-cuda/CudaWrapper.cu
[7] github - 3DVisionUnit/GuidedFitlerOptimzation_CUDA/GuidedFilter.cu
[8] Bilateral-Filter-CUDA/kernel.cu
[9] OpenCV CUDA-accelerated Computer Vision » Core part » Data Structures - cv::cuda::GpuMat Class Reference
[10] Accelerating OpenCV with CUDA streams in Python - James Bowley
[11] 知乎 - 详解CUDA的Context、Stream、Warp、SM、SP、Kernel、Block、Grid
[12] 知乎 - CUDA随笔之Stream的使用
[13] Cuda Streams Context MPS
[14] CUDA加opencv复现导向滤波算法
[15] Nvidia GPU架构 - Cuda Core,SM,SP等等傻傻分不清?
[16] Nvidia GPU 基本概念
[17] github - opencv_contrib/modules/cudaimgproc/src/bilateral_filter.cpp
[18] github - opencv_contrib/modules/cudaimgproc/src/cuda/bilateral_filter.cu
[19] OpenCV with CUDA Acceleration Test


 154
154


 被折叠的 条评论
为什么被折叠?
被折叠的 条评论
为什么被折叠?
 到【灌水乐园】发言


