


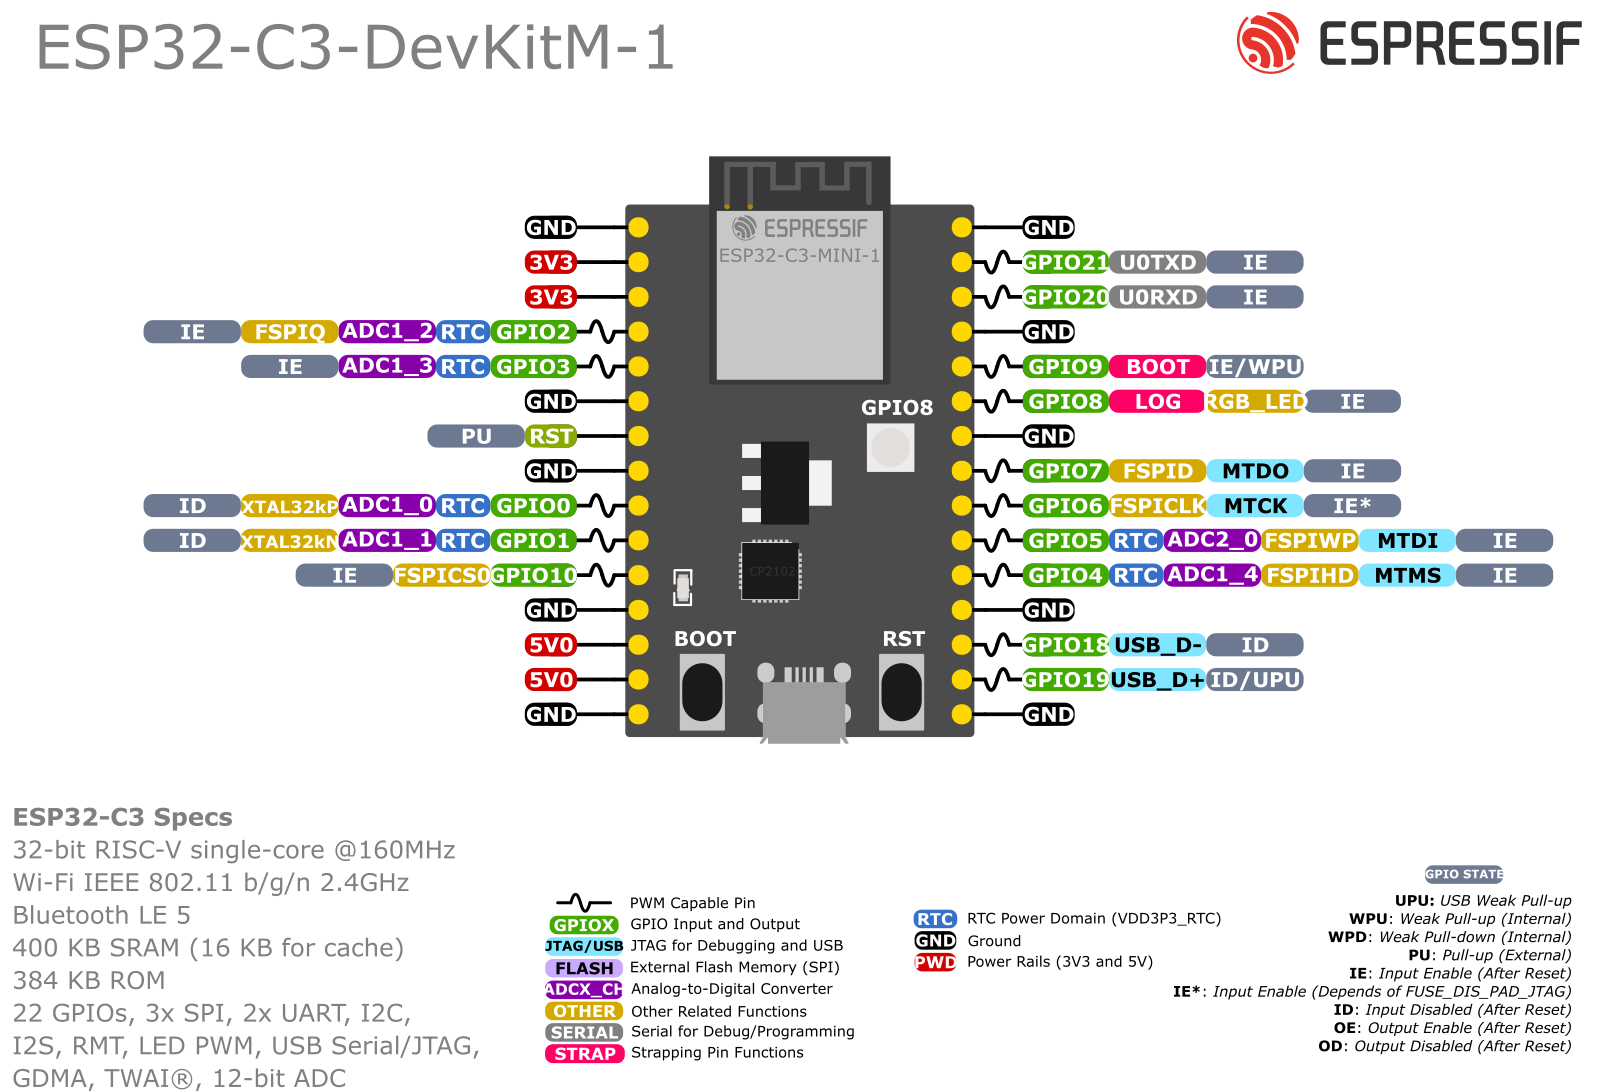
附ESP32C3的GPIO一览:
vscode选择Jtag烧录,终端输出esp_usb_jtag: could not find or open device:
D:\Devtools\Espressif\tools\openocd-esp32\v0.12.0-esp32-20230921\openocd-esp32\bin\openocd.exe -f board/esp32s3-builtin.cfg

Open On-Chip Debugger v0.12.0-esp32-20230921 (2023-09-21-13:40)
Licensed under GNU GPL v2
For bug reports, read
        http://openocd.org/doc/doxygen/bugs.html
Info : only one transport option; autoselecting 'jtag'
Info : esp_usb_jtag: VID set to 0x303a and PID to 0x1001
Info : esp_usb_jtag: capabilities descriptor set to 0x2000
Info : Listening on port 6666 for tcl connections
Info : Listening on port 4444 for telnet connections
Error: esp_usb_jtag: could not find or open device!
按照Configure ESP32-C3 Built-in JTAG Interface尝试解决,下了驱动:
Invoke-WebRequest 'https://dl.espressif.com/dl/idf-env/idf-env.exe' -OutFile .\idf-env.exe; .\idf-env.exe driver install --espressif
发现仍旧无法烧录,设备管理器一看没有相关的jtag unit驱动,只好尝试改用esp prog。
用esp prog烧录
参考了:https://blog.csdn.net/Marchtwentytwo/article/details/122071442
首先用espefuse查看芯片配置:
espefuse.py -p COM7 summary
参考的文章是直接不指定串口执行的,我这边执行会报找不到串口的错误,原因是espefuse是通过串口来识别板子的,建议指定串口。
关于efuse设置可以参考esp官方c3的技术手册:https://www.espressif.com/sites/default/files/documentation/esp32-c3_technical_reference_manual_cn.pdf#iomuxgpio
我手上的这块c3版DIS_USB_SERIAL_JTAG已经被置位了,难怪装驱动时找不到JTAG unit.
espefuse.py v4.7.0
Connecting....
Detecting chip type... ESP32-C3

=== Run "summary" command ===
EFUSE_NAME (Block) Description  = [Meaningful Value] [Readable/Writeable] (Hex Value)
----------------------------------------------------------------------------------------
Calibration fuses:
K_RTC_LDO (BLOCK1)                                 BLOCK1 K_RTC_LDO                                   = 4 R/W (0b0000001)
。。。

Usb fuses:
DIS_USB_JTAG (BLOCK0)                              Set this bit to disable function of usb switch to  = False R/W (0b0)
                                                   jtag in module of usb device
DIS_USB_SERIAL_JTAG (BLOCK0)                       USB-Serial-JTAG                                    = Enable R/W (0b0)
USB_EXCHG_PINS (BLOCK0)                            Set this bit to exchange USB D+ and D- pins        = False R/W (0b0)
DIS_USB_SERIAL_JTAG_ROM_PRINT (BLOCK0)             USB printing                                       = Enable R/W (0b0)
DIS_USB_SERIAL_JTAG_DOWNLOAD_MODE (BLOCK0)         Disable UART download mode through USB-Serial-JTAG = False R/W (0b0)

Vdd fuses:
VDD_SPI_AS_GPIO (BLOCK0)                           Set this bit to vdd spi pin function as gpio       = False R/W (0b0)

Wdt fuses:
WDT_DELAY_SEL (BLOCK0)                             RTC watchdog timeout threshold; in unit of slow cl = 40000 R/W (0b00)
                                                   ock cycle
esp prog烧录参考下文:
由于 ESP32-C3 默认选用 内置的 USB_SERIAL_JTAG 外设。此时需要烧录 efuse 来选择外接 JTAG 适配器,有以下两种方式:
烧毁 DIS_USB_JTAG eFuse: 将永久禁用 USB_SERIAL_JTAG 和 CPU 的 JTAG 端口之间的连接。 然后可以将 JTAG 接口连接到 GPIO4 - GPIO7。 请注意,USB_SERIAL_JTAG 的 USB CDC 功能仍然可用,即仍然可以通过 USB CDC 进行烧录和 log 查看。
烧毁 JTAG_SEL_ENABLE eFuse: 将启用由 Strapping 引脚 GPIO10 选择的 JTAG 接口。 如果 ESP32-C3 复位时 Strapping 引脚为低电平,则 JTAG 接口将使用 GPIO4 - GPIO7。 如果 Strapping 引脚为高电平,则 USB_SERIAL_JTAG 将用作 JTAG 接口。
我这边summary没有看到JTAG_SEL_ENABLE 选项,看来只能用DIS_USB_JTAG 方法了。
python -m espefuse -p COM7 burn_efuse DIS_USB_JTAG

espefuse.py v4.7.0
Connecting....
Detecting chip type... ESP32-C3

=== Run "burn_efuse" command ===
The efuses to burn:
  from BLOCK0
     - DIS_USB_JTAG

Burning efuses:

    - 'DIS_USB_JTAG' (Set this bit to disable function of usb switch to jtag in module of usb device) 0b0 -> 0b1


Check all blocks for burn...
idx, BLOCK_NAME,          Conclusion
[00] BLOCK0               is not empty
        (written ): 0x000000008000000000000000000000000000000000000000
        (to write): 0x000000000000000000000000000000000000020000000000
        (coding scheme = NONE)
.
This is an irreversible operation!
Type 'BURN' (all capitals) to continue.
BURN
BURN BLOCK0  - OK (all write block bits are set)
Reading updated efuses...
Checking efuses...
Successful
烧录完成后将esp prog连接至esp32c3对应引脚,用vscode的esp-idf扩展打开blink例子,测试烧录:
idf.py build
或者
vscode ctrl+e然后b
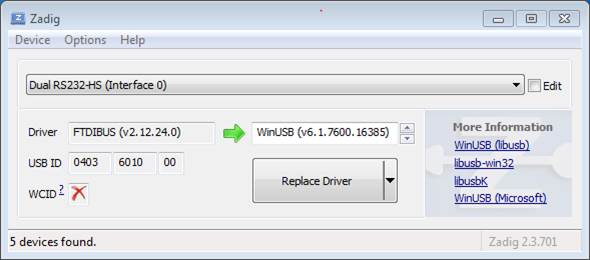
若出现LIBUSB_ERROR_NOT_xxx错误,记得用Zadig将esp prog的对应interface0驱动更新:
经测试,烧录成功!
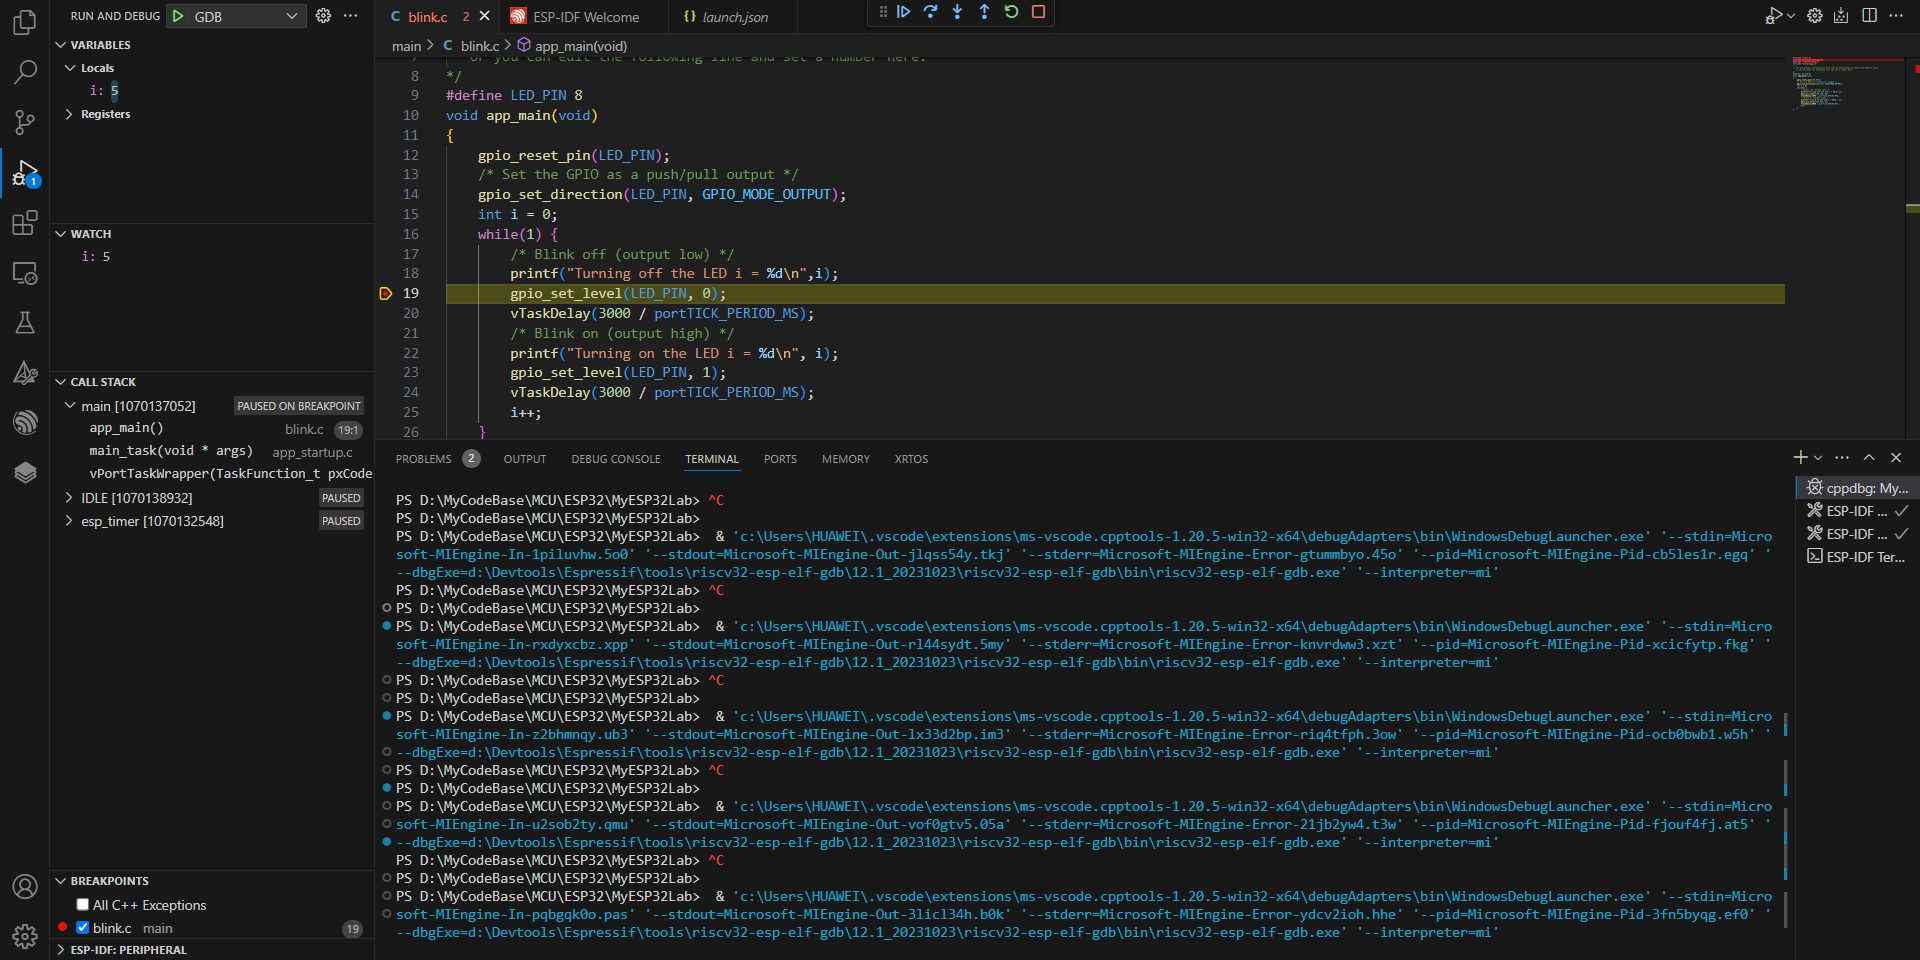
然后F5, 测试gdb调试功能,毕竟花费这么久时间和心思用JTAG,不就是为了用gdb吗?
首先写好launch.json
{
    "version": "0.2.0",
    "configurations": [
      {
        "name": "GDB",
        "type": "cppdbg",
        "request": "launch",
        "MIMode": "gdb",
        "miDebuggerPath": "${command:espIdf.getXtensaGdb}",
        "program": "${workspaceFolder}/build/${command:espIdf.getProjectName}.elf",
        "windows": {
          "program": "${workspaceFolder}\\build\\${command:espIdf.getProjectName}.elf"
        },
        "cwd": "${workspaceFolder}",
        "environment": [{ "name": "PATH", "value": "${config:idf.customExtraPaths}" }],
        "setupCommands": [
          { "text": "target remote :3333" },
          { "text": "set remote hardware-watchpoint-limit 2"},
          { "text": "mon reset halt" },
          { "text": "thb app_main" },
          { "text": "flushregs" }
        ],
        "externalConsole": false,
        "logging": {
          "engineLogging": true
        }
      }
    ]
  }
发现openocd server能正常启动,很快就进入到熟悉的界面:


 6642
6642

 被折叠的 条评论
为什么被折叠?
被折叠的 条评论
为什么被折叠?
 到【灌水乐园】发言


