


通过SpringBoot后端项目,mybatis plus,和前端Vue来实现前后端分离技术
第一步:
1、准备sql
本项目主要实现两张表的增删改查(老师+专业)+分页
CREATE TABLE `teacher` (
  `id` int(11) NOT NULL AUTO_INCREMENT,
  `name` varchar(255) DEFAULT NULL,
  `age` int(11) DEFAULT NULL,
  `sex` int(255) DEFAULT NULL,
  `hobby` varchar(255) DEFAULT NULL,
  `birthday` date DEFAULT NULL,
  `mid` int(11) DEFAULT NULL,
  PRIMARY KEY (`id`)
) ENGINE=InnoDB AUTO_INCREMENT=9 DEFAULT CHARSET=utf8;

CREATE TABLE `major` (
  `id` int(11) NOT NULL AUTO_INCREMENT,
  `name` varchar(255) DEFAULT NULL,
  PRIMARY KEY (`id`)
) ENGINE=InnoDB AUTO_INCREMENT=4 DEFAULT CHARSET=utf8;
2、sql准备完毕
添加数据即可
第二步:
搭建后端项目
后端项目还是跟我们之前编写的代码一样
1、创建项目
这是之前讲解的使用SpringBoot开发的详细步骤(可以参考)
使用SpringBoot开发(完整项目)_java spring boot 项目开发-CSDN博客
2、加入依赖
你需要什么你就拿什么依赖
 <properties>
        <java.version>8</java.version>
        <project.build.sourceEncoding>UTF-8</project.build.sourceEncoding>
        <mybatis-plus.version>3.5.2</mybatis-plus.version>
        <mysql.version>8.0.30</mysql.version>
        <junit.version>4.12</junit.version>
        <swagger.version>3.0.0</swagger.version>
        <lombok.version>1.18.24</lombok.version>
        <hutool.version>5.8.5</hutool.version>
        <druid.version>1.2.11</druid.version>
        <jackson.version>2.13.4</jackson.version>
        <fastjson2.version>2.0.23</fastjson2.version>
        <commonsio.version>2.11.0</commonsio.version>
        <aspectj-weaver.version>1.9.7</aspectj-weaver.version>
        <commons-fileupload.version>1.3.1</commons-fileupload.version>
        <commons-lang3.version>3.12.0</commons-lang3.version>
        <hibernate-validator.version>6.2.3.Final</hibernate-validator.version>        <pagehelper.version>5.2.0</pagehelper.version>


    </properties>
    <dependencies>

        <!--junit-->
        <dependency>
            <groupId>junit</groupId>
            <artifactId>junit</artifactId>
            <version>${junit.version}</version>
            <scope>test</scope>
        </dependency>

        <!--lombok-->
        <dependency>
            <groupId>org.projectlombok</groupId>
            <artifactId>lombok</artifactId>
            <version>${lombok.version}</version>
            <scope>provided</scope>
        </dependency>

        <!--spring-boot-web相关依赖-->
        <dependency>
            <groupId>org.springframework.boot</groupId>
            <artifactId>spring-boot-starter-web</artifactId>
        </dependency>

        <!--hutool-->
        <dependency>
            <groupId>cn.hutool</groupId>
            <artifactId>hutool-all</artifactId>
            <version>${hutool.version}</version>
        </dependency>

        <!--mysql-->
        <dependency>
            <groupId>mysql</groupId>
            <artifactId>mysql-connector-java</artifactId>
            <version>${mysql.version}</version>
        </dependency>

        <!--mybatis-plus-->
        <dependency>
            <groupId>com.baomidou</groupId>
            <artifactId>mybatis-plus-boot-starter</artifactId>
            <version>${mybatis-plus.version}</version>
        </dependency>

        <!--代码生成器-->
        <dependency>
            <groupId>com.baomidou</groupId>
            <artifactId>mybatis-plus-generator</artifactId>
            <version>3.4.0</version>
        </dependency>
        <!--mybatis-plus-generator需要此依赖-->
        <dependency>
            <groupId>org.apache.velocity</groupId>
            <artifactId>velocity</artifactId>
            <version>1.7</version>
        </dependency>

        <!--fastjson 工具-->
        <dependency>
            <groupId>com.alibaba.fastjson2</groupId>
            <artifactId>fastjson2</artifactId>
            <version>${fastjson2.version}</version>
        </dependency>

        <!--aop相关-->
        <dependency>
            <groupId>org.aspectj</groupId>
            <artifactId>aspectjweaver</artifactId>
            <version>${aspectj-weaver.version}</version>
        </dependency>
        <dependency>
            <groupId>org.springframework.boot</groupId>
            <artifactId>spring-boot-starter-aop</artifactId>
        </dependency>

        <!--加解密、编码-->
        <dependency>
            <groupId>commons-codec</groupId>
            <artifactId>commons-codec</artifactId>
        </dependency>

        <dependency>
            <groupId>org.apache.commons</groupId>
            <artifactId>commons-lang3</artifactId>
            <version>${commons-lang3.version}</version>
        </dependency>
        <dependency>
            <groupId>commons-io</groupId>
            <artifactId>commons-io</artifactId>
            <version>${commonsio.version}</version>
        </dependency>

        <!-- <dependency>
                <groupId>io.springfox</groupId>
                <artifactId>springfox-boot-starter</artifactId>
                <version>${swagger.version}</version>
            </dependency>-->
        <dependency>
            <groupId>org.springframework.boot</groupId>
            <artifactId>spring-boot-starter-data-redis</artifactId>
        </dependency>

        <dependency>
            <groupId>org.springframework.boot</groupId>
            <artifactId>spring-boot-starter-test</artifactId>
        </dependency>
        <dependency>
            <groupId>org.hibernate.validator</groupId>
            <artifactId>hibernate-validator</artifactId>
            <version>6.2.3.Final</version>
        </dependency>
        <!--pagehelper-->
        <dependency>
            <groupId>com.github.pagehelper</groupId>
            <artifactId>pagehelper-spring-boot-starter</artifactId>
            <version>1.4.0</version>
        </dependency>
        <!--阿里云短信-->
        <dependency>
            <groupId>com.aliyun</groupId>
            <artifactId>tea-openapi</artifactId>
            <version>0.2.5</version>
        </dependency>

        <dependency>
            <groupId>com.aliyun</groupId>
            <artifactId>dysmsapi20170525</artifactId>
            <version>2.0.20</version>
        </dependency>

        <dependency>
            <groupId>com.aliyun.oss</groupId>
            <artifactId>aliyun-sdk-oss</artifactId>
            <version>3.15.1</version>
        </dependency>

        <!--文件上传-->
        <dependency>
            <groupId>commons-fileupload</groupId>
            <artifactId>commons-fileupload</artifactId>
            <version>${commons-fileupload.version}</version>
        </dependency>

        <!-- https://mvnrepository.com/artifact/org.apache.poi/poi -->
        <dependency>
            <groupId>org.apache.poi</groupId>
            <artifactId>poi</artifactId>
            <version>3.14</version>
        </dependency>

        <!-- https://mvnrepository.com/artifact/org.apache.poi/poi-ooxml -->
        <dependency>
            <groupId>org.apache.poi</groupId>
            <artifactId>poi-ooxml</artifactId>
            <version>3.14</version>
        </dependency>

        <dependency>
            <groupId>org.freemarker</groupId>
            <artifactId>freemarker</artifactId>
            <version>2.3.31</version>
        </dependency>
        <!--定时任务-->
        <dependency>
            <groupId>org.springframework.boot</groupId>
            <artifactId>spring-boot-starter-quartz</artifactId>
        </dependency>
        <!--rabbitmq-->
        <dependency>
            <groupId>org.springframework.boot</groupId>
            <artifactId>spring-boot-starter-amqp</artifactId>
        </dependency>
        <!--热部署-->
        <dependency>
            <groupId>org.springframework.boot</groupId>
            <artifactId>spring-boot-devtools</artifactId>
        </dependency>
    </dependencies>

    <build>
        <plugins>
            <!--springboot打包插件-->
            <plugin>
                <groupId>org.springframework.boot</groupId>
                <artifactId>spring-boot-maven-plugin</artifactId>
            </plugin>
        </plugins>
    </build>
3、创建启动类
package cn.jiyun;

import org.mybatis.spring.annotation.MapperScan;
import org.springframework.boot.SpringApplication;
import org.springframework.boot.autoconfigure.SpringBootApplication;

@SpringBootApplication
@MapperScan("cn.jiyun.mapper")
public class Application {
    public static void main(String[] args) {
        SpringApplication.run(Application.class,args);
        System.out.println("启动成功");
    }
}
之前的博客中也讲到了SpringBootApplication注解的作用
SpringBoot运行原理(超详细!!!面试必考)-CSDN博客
4、添加application.yml配置文件
server:
  port: 82 #端口号
spring:
  mvc:
    pathmatch:
      matching-strategy: ant_path_matcher
  rabbitmq:
    host: 127.0.0.1        #rabbitmq的ip地址
    username: guest        #用户名
    password: guest        #密码
    virtual-host: /        #空间
  redis:
    host: 127.0.0.1
    port: 6379
    # password: 123456
    # 连接超时时间(毫秒)
    timeout: 5000ms
    # 连接池配置
    jedis:
      pool:
        # 连接池最大连接数(使用负值表示没有限制)
        max-active: 8
        # 连接池最大阻塞等待时间(使用负值表示没有限制)
        max-wait: 1ms
        # 连接池中的最大空闲连接
        max-idle: 8
        # 连接池中的最小空闲连接
        min-idle: 0
  datasource:
    driver-class-name: com.mysql.cj.jdbc.Driver #驱动
    url: jdbc:mysql://127.0.0.1:3306/qizhongb?useSSL=false #数据库地址
    username: root #用户名
    password: aaaa #密码
  # 允许循环依赖
  main:
    allow-circular-references: true

# mybatis-plus配置
mybatis-plus:
  configuration:
    # 打印sql
    log-impl: org.apache.ibatis.logging.stdout.StdOutImpl
  # mapper xml路径
  mapper-locations: classpath:mapper/*.xml
这里面配置了redis,rabbitmq
(注意!!!前后端项目的端口号尽量不一样)
5、编写controller层,service层,mapper层
1、controller层
package cn.jiyun.controller;

import cn.jiyun.mapper.MajorMapper;
import cn.jiyun.pojo.Major;
import cn.jiyun.pojo.Teacher;
import cn.jiyun.service.TeacherService;
import com.baomidou.mybatisplus.extension.plugins.pagination.Page;
import org.springframework.beans.factory.annotation.Autowired;
import org.springframework.web.bind.annotation.CrossOrigin;
import org.springframework.web.bind.annotation.RequestBody;
import org.springframework.web.bind.annotation.RequestMapping;
import org.springframework.web.bind.annotation.RestController;

import javax.rmi.CORBA.Stub;
import java.util.List;

@RestController
@CrossOrigin
@RequestMapping("teacher")
public class TeacherController {
    @Autowired
    private TeacherService teacherService;
    @Autowired
    private MajorMapper majorMapper;
    @RequestMapping("teacherList")
    public Page<Teacher> teacherList(int current , int size, @RequestBody Teacher teacher){
        System.out.println(teacher.getName());
        return teacherService.teacherList(current,size,teacher);
    }
    @RequestMapping("findById")
    public Teacher findById(Integer id){
        return teacherService.findById(id);

    }
    @RequestMapping("findAll")
    public List<Major> findAll(){
        return majorMapper.selectList(null);
    }
    @RequestMapping("addTeacher")
    public Boolean addTeacher(@RequestBody Teacher teacher){
        return teacherService.addTeacher(teacher);
    }
    @RequestMapping("delById")
    public Boolean delById(Integer id){

        return teacherService.delById(id);
    }
    @RequestMapping("updateTeacher")
    public Boolean updateTeacher(@RequestBody Teacher teacher){
        return teacherService.updateTeacher(teacher);
    }

}
2、service层
1、service接口层
package cn.jiyun.service;

import cn.jiyun.pojo.Teacher;
import com.baomidou.mybatisplus.extension.plugins.pagination.Page;

public interface TeacherService {
    Page<Teacher> teacherList(int current, int size, Teacher teacher);

    Boolean addTeacher(Teacher teacher);

    Boolean updateTeacher(Teacher teacher);

    Teacher findById(Integer id);

    Boolean delById(Integer id);
}
2、service实现类层
package cn.jiyun.service.impl;

import cn.jiyun.mapper.TeacherMapper;
import cn.jiyun.pojo.Teacher;
import cn.jiyun.service.TeacherService;
import com.baomidou.mybatisplus.extension.plugins.pagination.Page;
import org.springframework.beans.factory.annotation.Autowired;
import org.springframework.stereotype.Service;

import javax.xml.ws.Action;

@Service
public class TeacherServiceImpl implements TeacherService {
    @Autowired
    private TeacherMapper teacherMapper;
    @Override
    public Page<Teacher> teacherList(int current, int size, Teacher teacher) {
        Page<Teacher> page = new Page<>(current, size);
        page=teacherMapper.teacherList(page,teacher);
        return page;
    }

    @Override
    public Boolean addTeacher(Teacher teacher) {
         teacherMapper.insert(teacher);
        return true;
    }

    @Override
    public Boolean updateTeacher(Teacher teacher) {
        teacherMapper.updateById(teacher);
        return true;
    }

    @Override
    public Teacher findById(Integer id) {
        Teacher teacher = teacherMapper.selectById(id);
        return teacher;
    }

    @Override
    public Boolean delById(Integer id) {
        teacherMapper.deleteById(id);
        return true;
    }
}
3、mapper层
package cn.jiyun.mapper;

import cn.jiyun.pojo.Teacher;
import com.baomidou.mybatisplus.core.mapper.BaseMapper;
import com.baomidou.mybatisplus.extension.plugins.pagination.Page;
import org.apache.ibatis.annotations.Param;

public interface TeacherMapper extends BaseMapper<Teacher> {
    Page<Teacher> teacherList(Page<Teacher> page,@Param("vo") Teacher teacher);
}
6、编写mapper.xml文件
<?xml version="1.0" encoding="UTF-8" ?>
<!DOCTYPE mapper PUBLIC "-//mybatis.org//DTD Mapper 3.0//EN"
        "http://mybatis.org/dtd/mybatis-3-mapper.dtd">
<mapper namespace="cn.jiyun.mapper.TeacherMapper">
    <select id="teacherList" resultType="cn.jiyun.pojo.Teacher">
        select t.*,m.name mname from teacher t join major m on m.id=t.mid
        <if test="vo.name!=null and vo.name!=''">
            and t.name like '%${vo.name}%'
        </if>
    </select>
</mapper>
7、整体后端项目就是这样的

第三步:
搭建前端项目
前端项目搭建好之后,开始编写代码
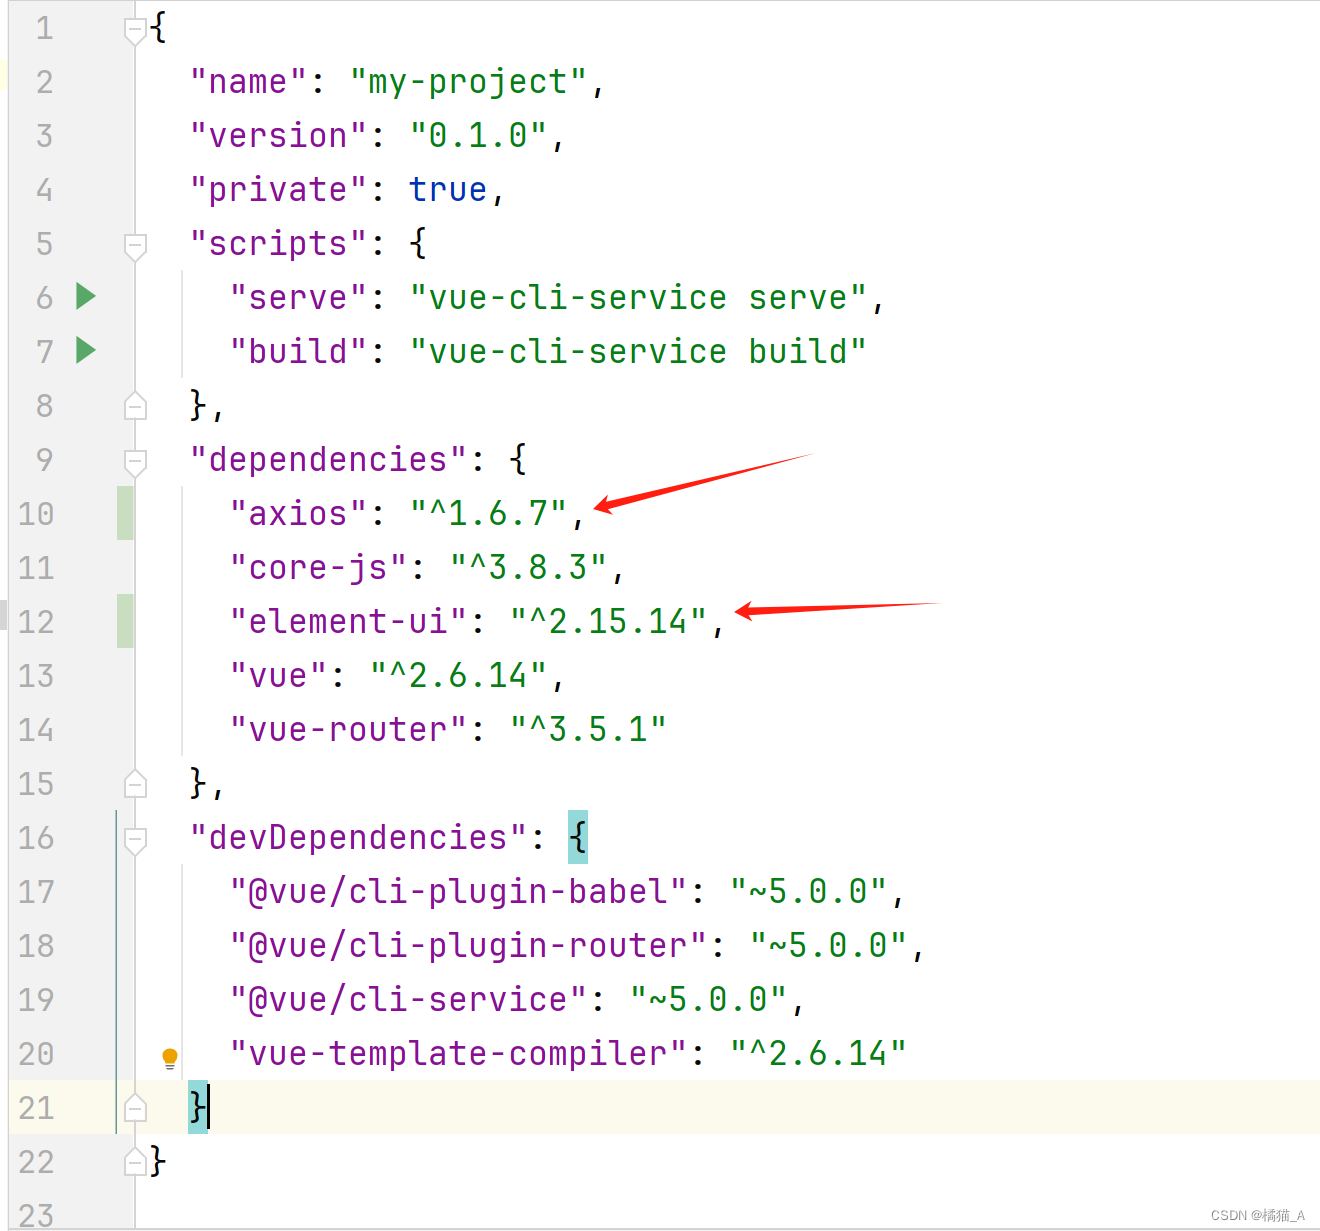
1、首先我们要先用两个命令来下载axios和elelementUI
1、npm i element-ui
2、npm i axios
当上面两个命令执行之后,我们看package.json里面的内容(相当于后端项目的maven依赖),有了这两个就证明是下载成功了
3、成功之后我们需要在main.js中添加相应的包
import axios from 'axios'
//Vue对象使用axios
Vue.prototype.axios = axios;
//导入组件库
import ElementUI from 'element-ui'
//导入组件相关样式
import 'element-ui/lib/theme-chalk/index.css'
//配置Vue插件 将El安装到Vue上
Vue.use(ElementUI);
2、接下来我们编写相关的页面(展示所有+分页、添加、修改)
.vue页面中包含的是
<template></template> (前端代码)和 <script></script>(js代码)
我们之前写的普通项目中定义全局变量和方法是通过Vue对象来实现的,现在用了前后端fen'li'ji我们也有一种方式是通过 export default{}来实现
1、展示所有的前端代码
<script>
export default {
  data() {
    return {
      page: {},
      pageParam: {
        current: 1,
        size: 4
      },
      requestParam: {},
      majorList:[],
    }
  },
  methods: {
    initData() {
      axios.post(`http://localhost:82/teacher/teacherList?current=${this.pageParam.current}&size=${this.pageParam.size}`, this.requestParam).then(res => {
        this.page = res.data;
      })
    },
    //当每页最大展示条数发生改变的时候执行-->
    handleSizeChange(val) {
      this.pageParam.size = val;
      this.initData();
    },
    handleCurrentChange(val) {
      this.pageParam.current = val;
      this.initData();
    },
    toAddPage(){
      this.$router.push("/add");
    },
    initMajorData(){
      axios.post(`http://localhost:82/teacher/findAll`).then(res => {
        this.majorList = res.data;
      })
    },
    handleEdit(id){
      this.$router.push({
        path: '/update',
        query:{id:id}
      })
    },
    handleDel(id){
      this.$confirm('此操作将永久删除该文件, 是否继续?', '提示', {
        confirmButtonText: '确定',
        cancelButtonText: '取消',
        type: 'warning'
      }).then(() => {
        axios.post("http://localhost:82/teacher/delById?id="+id).then(res=>{
          if(res.data){
            this.$message.success("成功")
            this.initData();
          }
        })
      }).catch(() => {
        this.$message({
          type: 'info',
          message: '已取消删除'
        });
      });

    }

  },
  created() {
    this.initData();
    this.initMajorData();
  }
}
import axios from "axios";
</script>

<template>
  <div>
    姓名:
    <el-input v-model="requestParam.name" style="width: 200px" placeholder="请输入内容"></el-input>

    <el-button type="primary" size="mini" @click="initData">搜索</el-button>
    <el-button type="primary" size="mini" @click="toAddPage">添加</el-button>
    <el-table
        :data="page.records"
        stripe
        style="width: 100%">
      <el-table-column
          prop="id"
          label="编号">
      </el-table-column>
      <el-table-column
          prop="name"
          label="姓名">
      </el-table-column>
      <el-table-column
          prop="sex"
          label="性别">
        <!--template:模板 自定义展示内容-->
        <template slot-scope="scope">
          {{ scope.row.sex == 1 ? '男' : '女' }}
        </template>
      </el-table-column>
      <el-table-column
          prop="age"
          label="年龄">
      </el-table-column>
      <el-table-column
          prop="hobby"
          label="爱好">
      </el-table-column>
      <el-table-column
          prop="birthday"
          label="创建日期">
        <template slot-scope="scope">
          {{ scope.row.birthday|format('yyyy-MM-dd') }}
        </template>
      </el-table-column>
      <el-table-column
          prop="mname"
          label="专业">
      </el-table-column>
      <el-table-column label="操作">
        <template slot-scope="scope">
          <el-button
              size="mini"
              @click="handleEdit(scope.row.id)">编辑
          </el-button>
          <el-button
              type="danger"
              size="mini"
              @click="handleDel(scope.row.id)">删除
          </el-button>
        </template>
      </el-table-column>
    </el-table>
    <!--分页-->
    <el-pagination
        @size-change="handleSizeChange"
        @current-change="handleCurrentChange"
        :current-page="page.current"
        :page-sizes="[2, 200, 300, 400]"
        :page-size="page.size"
        layout="total, sizes, prev, pager, next, jumper"
        :total="page.total">
    </el-pagination>
  </div>
</template>
(另外axios我是在show页面又导了包,所以在上面才能直接使用axios.post(),否则只能通过this.axios.post())
2、添加的前端代码
<script>
import axios from "axios";

export default {
  data() {
    return {
      hobbyArr: [],
      majorList: [],
      form: {},
      formLabelWidth: "200px",
      dialogFormVisible: true,
    }
  },
  methods: {
    addTeacher() {
      this.form.hobby=this.hobbyArr.join(",");
      axios.post(`http://localhost:82/teacher/addTeacher`, this.form).then(res => {
        if (res.data) {
          this.$message.success("成功")
          this.dialogFormVisible = false;
          this.$router.push("/");
        }
      })
    },
    initMajorData() {
      axios.post(`http://localhost:82/teacher/findAll`).then(res => {
        this.majorList = res.data;
      })
    },
    quxiao(){
      this.dialogFormVisible=false;
      this.$router.push("/");
    }
  },
  created() {
    this.initMajorData();
  }
}
</script>

<template>
  <div>
    <el-dialog title="添加" :visible.sync="dialogFormVisible" :show-close="false">
      <el-form :model="form">
        <el-form-item label="姓名" :label-width="formLabelWidth">
          <el-input v-model="form.name" autocomplete="off"></el-input>
        </el-form-item>
        <el-form-item label="年龄" :label-width="formLabelWidth">
          <el-input v-model="form.age" autocomplete="off"></el-input>
        </el-form-item>
        <el-form-item label="性别" :label-width="formLabelWidth">
          <el-radio-group v-model="form.sex">
            <el-radio :label="1">男</el-radio>
            <el-radio :label="2">女</el-radio>
          </el-radio-group>
        </el-form-item>
        <el-form-item label="爱好" :label-width="formLabelWidth">
          <el-checkbox-group v-model="hobbyArr">
            <el-checkbox label="篮球"></el-checkbox>
            <el-checkbox label="足球"></el-checkbox>
            <el-checkbox label="乒乓球"></el-checkbox>
          </el-checkbox-group>
        </el-form-item>

        <el-form-item label="生日" :label-width="formLabelWidth">
          <el-date-picker
              v-model="form.birthday"
              type="date"
              placeholder="日期">
          </el-date-picker>
        </el-form-item>
        <el-form-item label="专业" :label-width="formLabelWidth">
          <el-select v-model="form.mid" placeholder="请选择">
            <el-option
                v-for="item in majorList"
                :key="item.id"
                :label="item.name"
                :value="item.id">
            </el-option>
          </el-select>
        </el-form-item>
      </el-form>
      <el-button  @click="quxiao()">取消</el-button>
      <el-button type="primary" @click="addTeacher">确 定</el-button>
    </el-dialog>
  </div>
</template>
3、修改的前端代码
<script>
import axios from "axios";
export default {
  data() {
    return {
      hobbyArr: [],
      majorList: [],
      form: {},
      formLabelWidth: "200px",
      dialogFormVisible: true,
    }
  },
  methods: {
    addTeacher() {
      this.form.hobby=this.hobbyArr.join(",");
      axios.post(`http://localhost:82/teacher/updateTeacher`, this.form).then(res => {
        if (res.data) {
          this.$message.success("成功")
          this.dialogFormVisible = false;
          this.$router.push("/");
        }
      })
    },
    quxiao(){
      this.dialogFormVisible=false;
      this.$router.push("/");
    },
    initMajorData() {
      axios.post(`http://localhost:82/teacher/findAll`).then(res => {
        this.majorList = res.data;
      })
    },
    findById(id) {
      this.form.hobby=this.hobbyArr.join(",");
      axios.post(`http://localhost:82/teacher/findById?id=`+id).then(res => {

        this.form = res.data;
        this.hobbyArr=this.form.hobby.split(",");
      })
    }
  },
  created() {
    // this.initData();
    var id = this.$route.query.id;
    this.initMajorData();
    this.findById(id);
  }
}
</script>
<template>
  <div>
    <el-dialog title="修改" :visible.sync="dialogFormVisible" :show-close="false">
      <el-form :model="form">
        <el-form-item label="姓名" :label-width="formLabelWidth">
          <el-input v-model="form.name" autocomplete="off"></el-input>
        </el-form-item>
        <el-form-item label="年龄" :label-width="formLabelWidth">
          <el-input v-model="form.age" autocomplete="off"></el-input>
        </el-form-item>
        <el-form-item label="性别" :label-width="formLabelWidth">
          <el-radio-group v-model="form.sex">
            <el-radio :label="1">男</el-radio>
            <el-radio :label="2">女</el-radio>
          </el-radio-group>
        </el-form-item>
        <el-form-item label="爱好" :label-width="formLabelWidth">
          <el-checkbox-group v-model="hobbyArr">
            <el-checkbox label="篮球"></el-checkbox>
            <el-checkbox label="足球"></el-checkbox>
            <el-checkbox label="乒乓球"></el-checkbox>
          </el-checkbox-group>
        </el-form-item>
        <el-form-item label="生日" :label-width="formLabelWidth">
          <el-date-picker
              v-model="form.birthday"
              type="date"
              placeholder="日期">
          </el-date-picker>
        </el-form-item>
        <el-form-item label="专业" :label-width="formLabelWidth">
          <el-select v-model="form.mid" placeholder="请选择">
            <el-option
                v-for="item in majorList"
                :key="item.id"
                :label="item.name"
                :value="item.id">
            </el-option>
          </el-select>
        </el-form-item>
      </el-form>
      <el-button @click="quxiao">取消</el-button>
      <el-button type="primary" @click="addTeacher">确 定</el-button>
    </el-dialog>
  </div>

</template>
添加和修改没啥区别,修改就是多了一个数据的回显,在show页面将id传递到update页面,然后axios向后台发送请求,返回一个对象,然后赋值给form表单,就完成了回显,需要特别注意的是hobby爱好是复选框,需要单独处理,以上代码中有处理方法
3、页面写好了,但是会不会跳转呢?以及如何解决?
答:不会的,因为我们前端项目主要是靠路由来实现的,我们到目前为止并没有配置路由
解决方案:
1、找到router包下的index.js
2、给文件中添加相应的路径以及改路径会跳转到的页面
import Vue from 'vue'
import VueRouter from 'vue-router'
import HomeView from '../views/HomeView.vue'
import LoginView from '../views/LoginView.vue'
import HelloView from '../views/HelloView.vue'
import ShowView from '../views/ShowView.vue'
import AddView from '../views/AddView.vue'
import UpdateView from '../views/UpdateView.vue'

Vue.use(VueRouter)

const routes = [
  {
    path: '/home',
    name: 'home',
    component: HomeView
  },
  {
    path: '/update',
    name: 'update',
    component: UpdateView
  },
  {
    path: '/add',
    name: 'add',
    component: AddView
  },
  {
    path: '/login',
    name: 'login',
    component: LoginView
  },
  {
    path: '/',
    name: 'show',
    component: ShowView
  },
  {
    path: '/hello',
    name: 'hello',
    component: HelloView
  },
  {
    path: '/about',
    name: 'about',
    // route level code-splitting
    // this generates a separate chunk (about.[hash].js) for this route
    // which is lazy-loaded when the route is visited.
    component: () => import(/* webpackChunkName: "about" */ '../views/AboutView.vue')
  }
]
const router = new VueRouter({
  routes
})

export default router
4、前端项目整体

(注意!!!前后端项目的端口号尽量不一样)
前端项目额端口号默认是8080
第四步
运行项目
1、运行前端项目
可以在idea上控制台通过npm run -serve,也可以点击package.json里面的
2、运行后端项目
点击启动类的三角


 763
763


 被折叠的 条评论
为什么被折叠?
被折叠的 条评论
为什么被折叠?
 到【灌水乐园】发言


