


Spring 简介:
Spring 是一个轻量级的容器框架,它帮助我门去管理对象的生命周期。
For example:spring就是一个托管中心,bean就是小baby,早上我们把小baby送到托管中心,晚上就接回来。中间吃饭,睡觉,上课,我们都不用操心。在spring中也是如此,我们只需要把bean在配置文件定义好,spring就会帮我们创建好对象,管理对象的生命周期,而我们只需要摸摸蹭亮蹭亮的脑阔直接拿对象用就行了。是不是瞬间就觉得spring so easy 呀,确实spring不过如此。

咳咳,逼装完了,下面我们就来说道说道Spring的核心 Ioc 和 Aop。
要整咋就整大的,Spring Ioc 整体实现走一走:
工欲善其事必先利其器,在走代码之前,我们必须先了解spring ioc 管理Bean的整个流程。来呀,小二上图:

这就来!!!
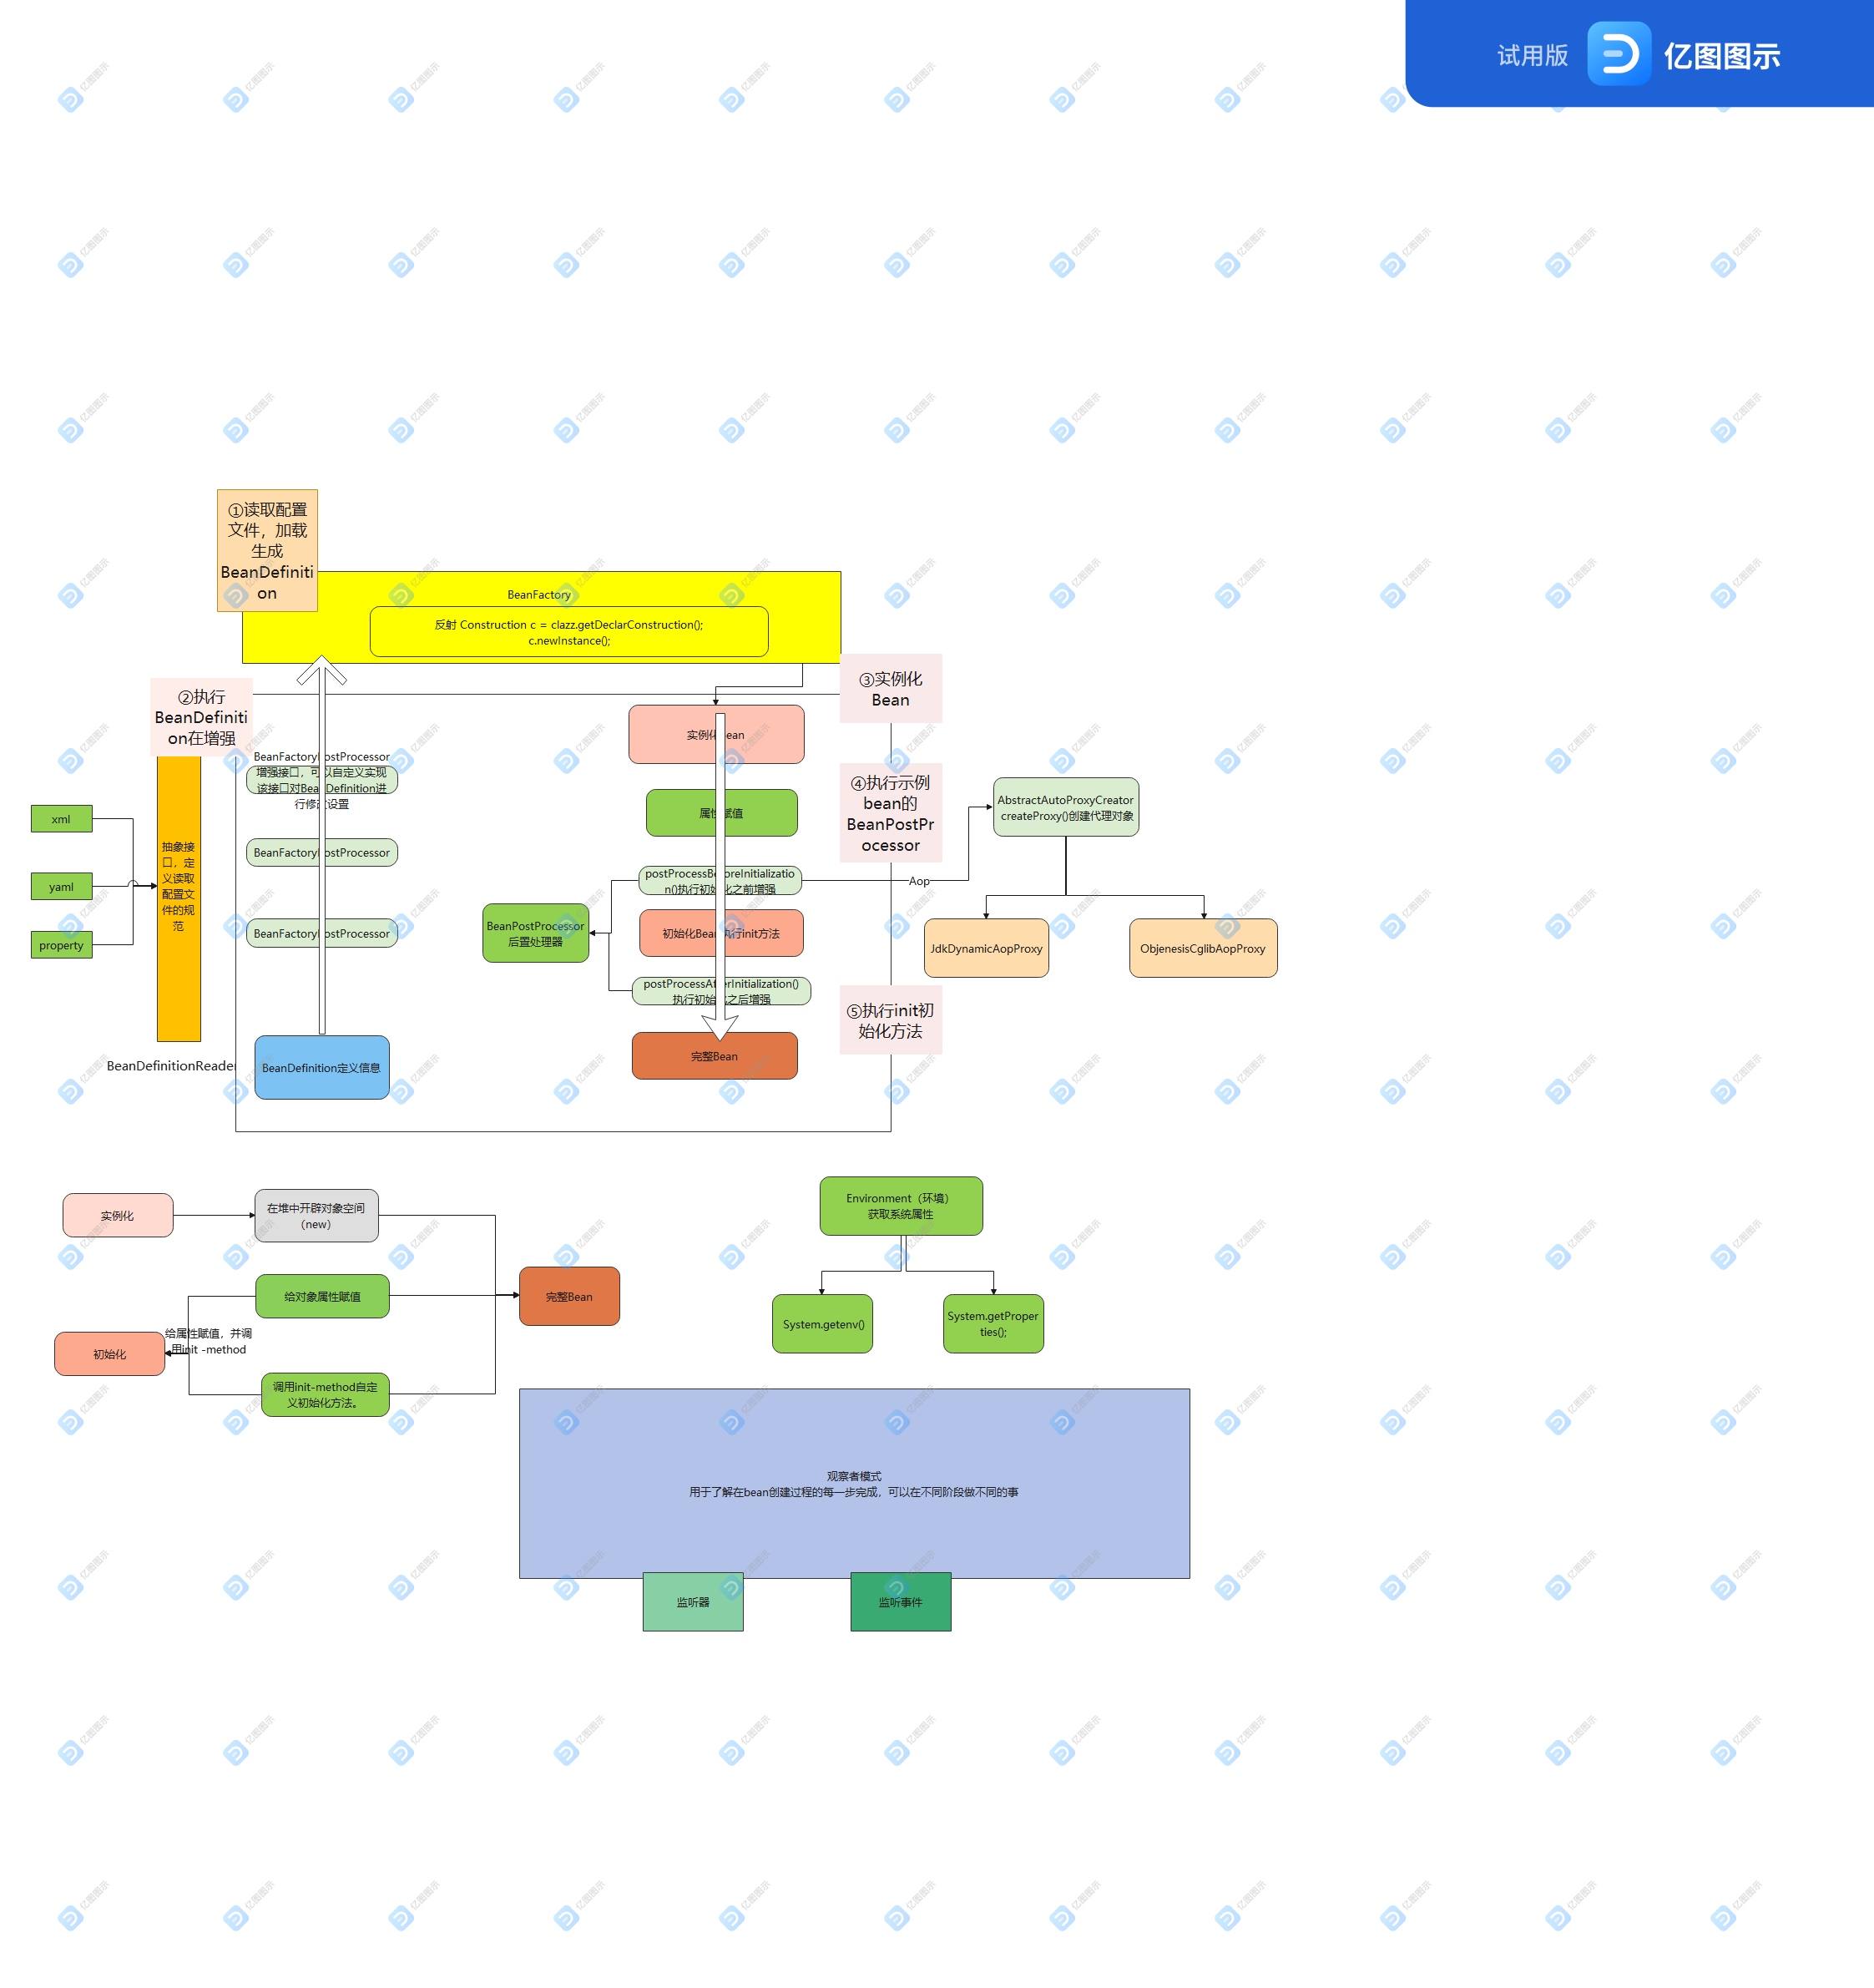
从上面的图我们可以清晰的知道Spring ico 的一整套流程了,下面我们就来开始盘它吧!
从创建容器走起:
从容器中拿Bean,我们首先要创建Spring容器对象,ApplicationContext两个具体实现类是ClassPathXmlApplciationContext和FileSystemXmlApplicationContext,前面是根据ClassPath路径加载文件,后者是系统绝对路径,后者换环境还要改路径不方便。
//1.查看ClassPathXmlApplicationContext 构造时做了什么
ApplicationContext applicationContext = new ClassPathXmlApplicationContext("service.xml");
ServiceA serviceA = applicationContext.getBean("serviceA",ServiceA.class);


//ClassPathXmlApplicationCOntext容器构造是接受多个String 文件路径
public ClassPathXmlApplicationContext(String... configLocations) throws BeansException {
        //this方法是调用了另外一个构造
        this(configLocations, true, (ApplicationContext)null);
    }

 //接受了一个路径数组,一个标志位,还有一个空值
public ClassPathXmlApplicationContext(String[] configLocations, boolean refresh, ApplicationContext parent) throws BeansException {
        //查看下父类做了什么操作
        super(parent);
        this.setConfigLocations(configLocations);
        if (refresh) {
            this.refresh();
        }

    }
//跑到AbstractApplicationContext这个抽象容器父类来实现一些操作
 public AbstractApplicationContext(ApplicationContext parent) {
        //看下this()做了哪些初始化
        this();
        this.setParent(parent);
    }
public AbstractApplicationContext() {
        this.logger = LogFactory.getLog(this.getClass());
        this.id = ObjectUtils.identityToString(this);
        this.displayName = ObjectUtils.identityToString(this);
        //初始化一个beanFactory工厂扩展的集合
        this.beanFactoryPostProcessors = new ArrayList();
        //创建两个原子标志位
        this.active = new AtomicBoolean();
        this.closed = new AtomicBoolean();
        //创建一个观察者
        this.startupShutdownMonitor = new Object();
        //创建一个事件监听者集合
        this.applicationListeners = new LinkedHashSet();
        //创建资源匹配解析器
        this.resourcePatternResolver =       this.getResourcePatternResolver();
    }
//
public void setParent(ApplicationContext parent) {
  //传过来的ApplicationContext是null,所以这里没有加载spring的环境Environment
        this.parent = parent;
        if (parent != null) {
            Environment parentEnvironment = parent.getEnvironment();
            if (parentEnvironment instanceof ConfigurableEnvironment) {
                this.getEnvironment().merge((ConfigurableEnvironment)parentEnvironment);
            }
        }
    }
//那此时我们就回到了AbstractApplicationContext构造的方法里面继续往下跳
//这时,让我们see this.setConfigLocations(configLocations);做了什么
public void setConfigLocations(String... locations) {
        if (locations != null) {
            Assert.noNullElements(locations, "Config locations must not be null");
            this.configLocations = new String[locations.length];

            for(int i = 0; i < locations.length; ++i) {
            //调用resolvePath()将配置文件进行解析,加入到Spring环境中
                this.configLocations[i] = this.resolvePath(locations[i]).trim();
            }
        } else {
            this.configLocations = null;
        }
    }
    //解析文件
    protected String resolvePath(String path) {
        //获取环境对象解析文件
        return this.getEnvironment().resolveRequiredPlaceholders(path);
    }
    public ConfigurableEnvironment getEnvironment() {
    //环境对象为null时,创建一个环境对象
        if (this.environment == null) {
            this.environment = this.createEnvironment();
        }

        return this.environment;
    }
    protected ConfigurableEnvironment createEnvironment() {
    //生成一个标准的环境对象
        return new StandardEnvironment();
    }

    //标准环境对象就定义了几个常量
    public class StandardEnvironment extends AbstractEnvironment {
    public static final String SYSTEM_ENVIRONMENT_PROPERTY_SOURCE_NAME = "systemEnvironment";
    public static final String SYSTEM_PROPERTIES_PROPERTY_SOURCE_NAME = "systemProperties";

    public StandardEnvironment() {
    }
}

 //接下来回到resolveRequiredPlaceholders()方法
 public String resolveRequiredPlaceholders(String text) throws IllegalArgumentException {
        if (this.strictHelper == null) {
            //创建一个文件属性占位符辅助对象,听起来咋还有点懵,来,盘它,看下它是做什么的。
            this.strictHelper = this.createPlaceholderHelper(false);
        }

        return this.doResolvePlaceholders(text, this.strictHelper);
    }
//创建PropertyPlaceholderHelper对象
private PropertyPlaceholderHelper createPlaceholderHelper(boolean ignoreUnresolvablePlaceholders) {
//咦,PorpertyPlaceholderHelper构造还接受了四个参数,让我们see有什么名堂,来,盘它。
//仔细一看属性,wc发现不得了的事情。下面的前缀和后缀是不是很有印象,不错就是我们取系统定义变量时所用的占位符呀
//private String placeholderPrefix = "${";
//private String placeholderSuffix = "}";
//private String valueSeparator = ":";
//ignoreUnresolvablePlaceholders  这个是用来标记是否忽略不能解析的占位符。
return new PropertyPlaceholderHelper(this.placeholderPrefix, this.placeholderSuffix, this.valueSeparator, ignoreUnresolvablePlaceholders);
    }
//看到这是不是非常的亢奋呀,是不是瞬间就觉得自己发现了个大宝贝。没错,下面就是有大宝贝,来,接着盘。

//这里就是做了一些简单的初始化
public PropertyPlaceholderHelper(String placeholderPrefix, String placeholderSuffix, String valueSeparator, boolean ignoreUnresolvablePlaceholders) {
        Assert.notNull(placeholderPrefix, "'placeholderPrefix' must not be null");
        Assert.notNull(placeholderSuffix, "'placeholderSuffix' must not be null");
        this.placeholderPrefix = placeholderPrefix;
        this.placeholderSuffix = placeholderSuffix;
        String simplePrefixForSuffix = (String)wellKnownSimplePrefixes.get(this.placeholderSuffix);
        if (simplePrefixForSuffix != null && this.placeholderPrefix.endsWith(simplePrefixForSuffix)) {
            this.simplePrefix = simplePrefixForSuffix;
        } else {
            this.simplePrefix = this.placeholderPrefix;
        }

        this.valueSeparator = valueSeparator;
        this.ignoreUnresolvablePlaceholders = ignoreUnresolvablePlaceholders;
    }
// 上面已经创建了文件属性的解析的对象,接下来就到了见证奇迹的时候了
//回到 doResolvePlaceholders()方法,在spring中do开头的方法才是真正干活的方法
 private String doResolvePlaceholders(String text, PropertyPlaceholderHelper helper) {
        return helper.replacePlaceholders(text, new PlaceholderResolver() {
            public String resolvePlaceholder(String placeholderName) {
                return AbstractPropertyResolver.this.getPropertyAsRawString(placeholderName);
            }
        });
    }
 //下面就是把文件的属性解析出来
public String replacePlaceholders(String value, PropertyPlaceholderHelper.PlaceholderResolver placeholderResolver) {
        Assert.notNull(value, "'value' must not be null");
        return this.parseStringValue(value, placeholderResolver, new HashSet());
    }
    protected String parseStringValue(String strVal, PropertyPlaceholderHelper.PlaceholderResolver placeholderResolver, Set<String> visitedPlaceholders) {
        StringBuilder result = new StringBuilder(strVal);
        int startIndex = strVal.indexOf(this.placeholderPrefix);

        while(startIndex != -1) {
            int endIndex = this.findPlaceholderEndIndex(result, startIndex);
            if (endIndex != -1) {
                String placeholder = result.substring(startIndex + this.placeholderPrefix.length(), endIndex);
                String originalPlaceholder = placeholder;
                if (!visitedPlaceholders.add(placeholder)) {
                    throw new IllegalArgumentException("Circular placeholder reference '" + placeholder + "' in property definitions");
                }

                placeholder = this.parseStringValue(placeholder, placeholderResolver, visitedPlaceholders);
                String propVal = placeholderResolver.resolvePlaceholder(placeholder);
                if (propVal == null && this.valueSeparator != null) {
                    int separatorIndex = placeholder.indexOf(this.valueSeparator);
                    if (separatorIndex != -1) {
                        String actualPlaceholder = placeholder.substring(0, separatorIndex);
                        String defaultValue = placeholder.substring(separatorIndex + this.valueSeparator.length());
                        propVal = placeholderResolver.resolvePlaceholder(actualPlaceholder);
                        if (propVal == null) {
                            propVal = defaultValue;
                        }
                    }
                }

                if (propVal != null) {
                    propVal = this.parseStringValue(propVal, placeholderResolver, visitedPlaceholders);
                    result.replace(startIndex, endIndex + this.placeholderSuffix.length(), propVal);
                    if (logger.isTraceEnabled()) {
                        logger.trace("Resolved placeholder '" + placeholder + "'");
                    }

                    startIndex = result.indexOf(this.placeholderPrefix, startIndex + propVal.length());
                } else {
                    if (!this.ignoreUnresolvablePlaceholders) {
                        throw new IllegalArgumentException("Could not resolve placeholder '" + placeholder + "'" + " in string value \"" + strVal + "\"");
                    }

                    startIndex = result.indexOf(this.placeholderPrefix, endIndex + this.placeholderSuffix.length());
                }

                visitedPlaceholders.remove(originalPlaceholder);
            } else {
                startIndex = -1;
            }
        }

        return result.toString();
    }

//接下来就是spring最核心的部分,上面已经把环境创建好了。setConfigLocations其实就是解析配置文件,创建好spring环境。下面我们来瞧一瞧spring的核心方法refresh();
public void refresh() throws BeansException, IllegalStateException {
        synchronized(this.startupShutdownMonitor) {
            this.prepareRefresh();
            //创建默认工厂对象(核心)
            ConfigurableListableBeanFactory beanFactory = this.obtainFreshBeanFactory();
            //设置工厂需要的属性
            this.prepareBeanFactory(beanFactory);

            try {
                //扩展方法
                this.postProcessBeanFactory(beanFactory);
                //执行BeanFactoryPostProecessor扩展(核心)
                this.invokeBeanFactoryPostProcessors(beanFactory);
                //执行BeanPostProcessor扩展(核心)
                this.registerBeanPostProcessors(beanFactory);
                //国际化
                this.initMessageSource();
                //spring广播事件
                this.initApplicationEventMulticaster();
                //扩展
                this.onRefresh();
                //注册监听
                this.registerListeners();
                //实例化Bean(核心)
                this.finishBeanFactoryInitialization(beanFactory);
               //容器的收尾工作
                this.finishRefresh();
            } catch (BeansException var5) {
                if (this.logger.isWarnEnabled()) {
                    this.logger.warn("Exception encountered during context initialization - cancelling refresh attempt: " + var5);
                }
                this.destroyBeans();
                this.cancelRefresh(var5);
                throw var5;
            }

        }
    }

//先看prepareRefresh()方法
protected void prepareRefresh() {
//这里只是获取了下系统事件,设置了下原子变量值
        this.startupDate = System.currentTimeMillis();
        this.closed.set(false);
        this.active.set(true);
        if (this.logger.isInfoEnabled()) {
            this.logger.info("Refreshing " + this);
        }

        //这里就是上面画图BeanFactoryPostPorcessor,工厂BeanFactory进行自定义扩展的地方。可以进行一些自己的增强
        this.initPropertySources();
        //验证一下环境的必要属性。
        this.getEnvironment().validateRequiredProperties();
    }
    protected void initPropertySources() {
    }
书到用时方恨少,spring果然博大精深。refresh()方法里实现细节颇多,这里就不一一走下去了。上面如果我的理解有误,欢迎大佬指点!果然人还是不能装逼,越往深处走,越感觉spring的强大。
原创不易,白嫖容易,各位看官给个 呗!!
呗!!
接下来学习继续盘它,


 1902
1902


 被折叠的 条评论
为什么被折叠?
被折叠的 条评论
为什么被折叠?
 到【灌水乐园】发言


