


在今天的文章里,我是继上一篇文章 “Elasticsearch:介绍 retrievers - 搜索一切事物” 来使用一个可以在本地设置的 Elasticsearch 集群来展示 Retrievers 的使用。在本篇文章中,你将学到如下的内容:
- 从 Kaggle 下载 IMDB 数据集
- 创建两个推理服务
- 部署 ELSER
- 部署 e5-small
- 创建摄取管道
- 创建映射
- 摄取 IMDB 数据,在摄取过程中创建嵌入
- 缩小查询负载模型
- 运行示例检索器
安装
Elasticsearch 及 Kibana
如果你还没有安装好自己的 Elasticsearch 及 Kibana,请参考如下的链接来进行安装:
在安装的时候,我们选择 Elastic Stack 8.x 来进行安装。在首次启动 Elasticsearch 的时候,我们可以看到如下的输出:
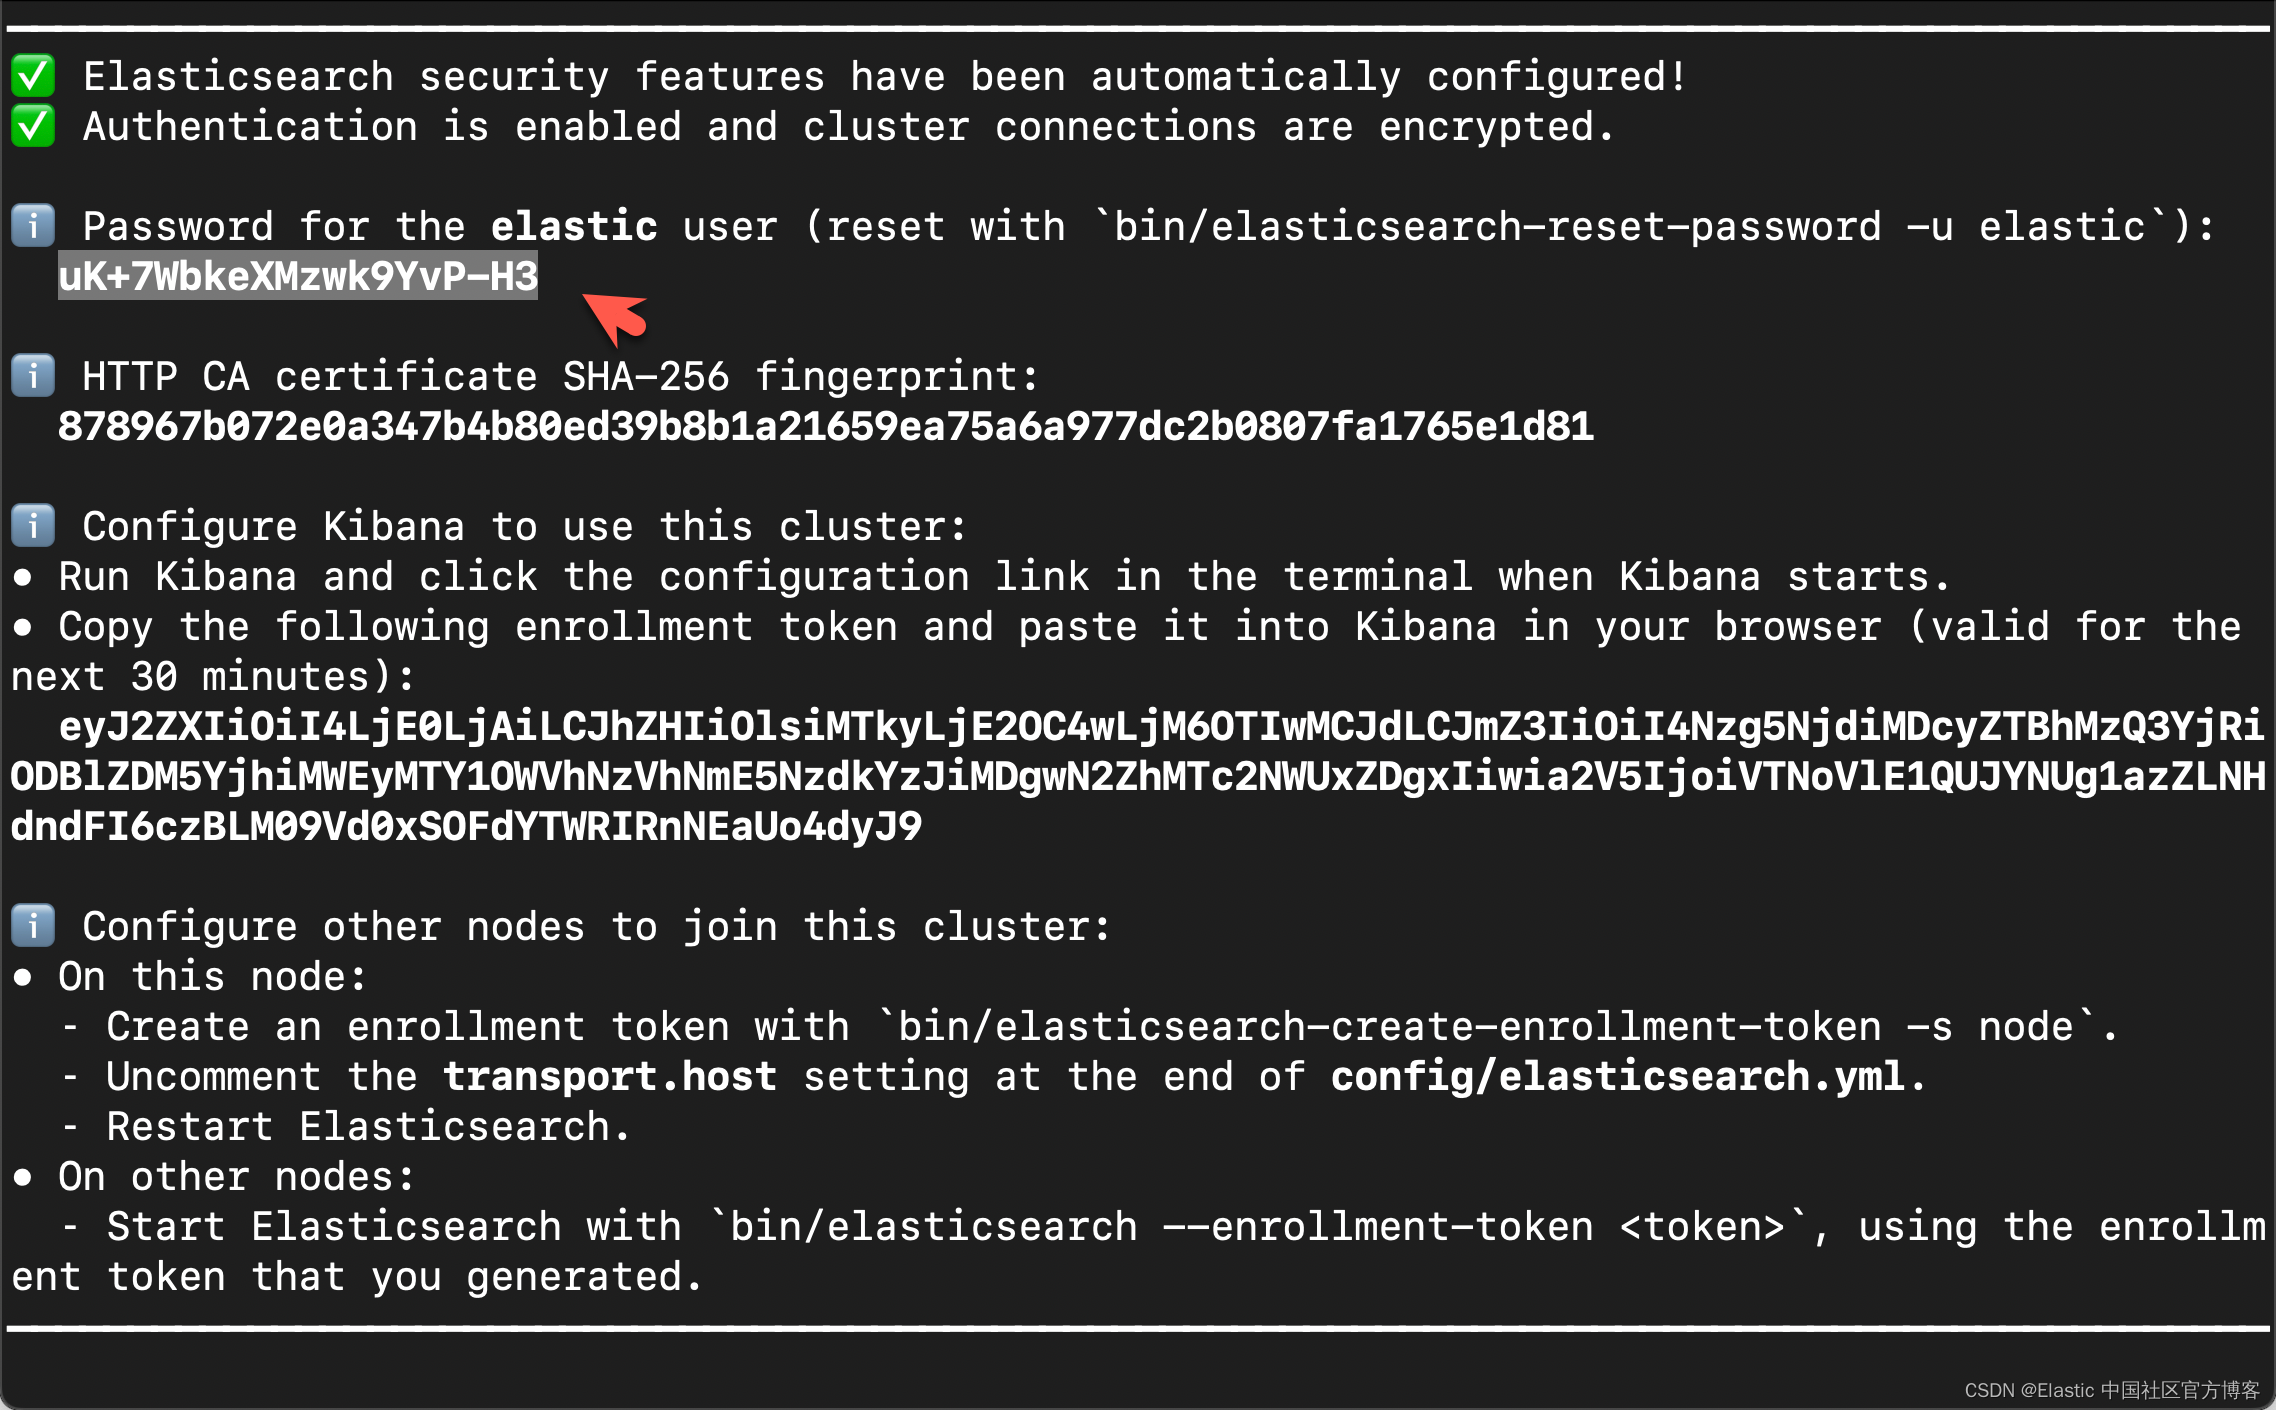
在上面,我们可以看到 elastic 超级用户的密码。我们记下它,并将在下面的代码中进行使用。
我们还可以在安装 Elasticsearch 目录中找到 Elasticsearch 的访问证书:
$ pwd
/Users/liuxg/elastic/elasticsearch-8.14.1/config/certs
$ ls
http.p12      http_ca.crt   transport.p12
在上面,http_ca.crt 是我们需要用来访问 Elasticsearch 的证书。
我们首先克隆已经写好的代码:
git clone https://github.com/liu-xiao-guo/elasticsearch-labs我们然后进入到该项目的根目录下:
$ pwd
/Users/liuxg/python/elasticsearch-labs/supporting-blog-content/introducing-retrievers
$ ls
retrievers_intro_notebook.ipynb
如上所示,retrievers_intro_notebook.ipynb 就是我们今天想要工作的 notebook。
我们通过如下的命令来拷贝所需要的证书:
$ pwd
/Users/liuxg/python/elasticsearch-labs/supporting-blog-content/introducing-retrievers
$ cp ~/elastic/elasticsearch-8.14.1/config/certs/http_ca.crt .
$ ls
http_ca.crt                     retrievers_intro_notebook.ipynb
安装所需要的 python 依赖包
pip3 install -qqq pandas elasticsearch python-dotenv我们可以使用如下的方法来查看 elasticsearch 的版本:
$ pip3 list | grep elasticsearch
elasticsearch                           8.14.0
创建环境变量
为了能够使得下面的应用顺利执行,在项目当前的目录下运行如下的命令:
export ES_ENDPOINT="localhost"
export ES_USER="elastic"
export ES_PASSWORD="uK+7WbkeXMzwk9YvP-H3"
你需要根据自己的 Elasticsearch 设置进行相应的修改。
下载数据集
我们去到地址 IMDB movies dataset | Kaggle 下载数据集并解压缩。
$ pwd
/Users/liuxg/python/elasticsearch-labs/supporting-blog-content/introducing-retrievers
$ ls
archive (13).zip                http_ca.crt                     retrievers_intro_notebook.ipynb
$ unzip archive\ \(13\).zip
Archive:  archive (13).zip
  inflating: imdb_movies.csv
$ mkdir -p content
$ mv imdb_movies.csv content/
$ tree -L 2
.
├── archive\ (13).zip
├── content
│ └── imdb_movies.csv
├── http_ca.crt
└── retrievers_intro_notebook.ipynb
如上所示,我们吧 imdb_movies.csv 文件置于当前工作目录下的 content 目录下。
代码展示
我们在当前项目的根目录下打入如下的命令:
设置
import os
import zipfile
import pandas as pd
from elasticsearch import Elasticsearch, helpers
from elasticsearch.exceptions import ConnectionTimeout
from elastic_transport import ConnectionError
from time import sleep
import time
import logging

# Get the logger for 'elastic_transport.node_pool'
logger = logging.getLogger("elastic_transport.node_pool")

# Set its level to ERROR
logger.setLevel(logging.ERROR)

# Suppress warnings from the elastic_transport module
logging.getLogger("elastic_transport").setLevel(logging.ERROR)
连接到 Elasticsearch
from dotenv import load_dotenv

load_dotenv()

ES_USER = os.getenv("ES_USER")
ES_PASSWORD = os.getenv("ES_PASSWORD")
ES_ENDPOINT = os.getenv("ES_ENDPOINT")
COHERE_API_KEY = os.getenv("COHERE_API_KEY")

url = f"https://{ES_USER}:{ES_PASSWORD}@{ES_ENDPOINT}:9200"
print(url)

es = Elasticsearch(url, ca_certs = "./http_ca.crt", verify_certs = True)
print(es.info())
如上所示,我们的客户端连接到 Elasticsearch 是成功的。
部署 ELSER 及 E5
下面的两个代码块将部署嵌入模型并自动扩展 ML 容量。
部署及启动 ELSER
from elasticsearch.exceptions import BadRequestError

try:
    resp = es.options(request_timeout=5).inference.put_model(
        task_type="sparse_embedding",
        inference_id="my-elser-model",
        body={
            "service": "elser",
            "service_settings": {"num_allocations": 64, "num_threads": 1},
        },
    )
except ConnectionTimeout:
    pass
except BadRequestError as e:
    print(e)
如果你之前已经部署过 ELSER,你可能会得到一个 resource already exists 这样的错误。你可以使用如下的命令来删除之前的 inference_id。
DELETE /_inference/my-elser-model在运行完上面的命令后,需要经过一定的时间下载 ELSER 模型。这个依赖于你的网络速度。我们可以在 Kibana 中进行查看:

部署及启动 es-small
try:
    resp = es.inference.put_model(
        task_type="text_embedding",
        inference_id="my-e5-model",
        body={
            "service": "elasticsearch",
            "service_settings": {
                "num_allocations": 8,
                "num_threads": 1,
                "model_id": ".multilingual-e5-small",
            },
        },
    )
except ConnectionTimeout:
    pass
except BadRequestError as e:
    print(e)
在运行完上面的代码后,我们可以在 Kibana 界面中:

点击上面的 "Add trained model" 来安装 .multilingual-e5-small 模型。

我们到最后能看到这个:

整个下载及部署需要很长的时间,需要你耐心等待!
提示:如果你的机器是在 x86 架构的机器上运行的话,那么你在上面可以选择 .multilingual-e5-small_linux-x86_64 作为其 model_id。
检查模型部署状态
这将循环检查,直到 ELSER 和 e5 都已完全部署。如果你在上面已经等了足够久的话,那么下面的代码讲很快地执行。
如果需要分配额外容量来运行模型,这可能需要几分钟
from time import sleep
from elasticsearch.exceptions import ConnectionTimeout


def wait_for_models_to_start(es, models):
    model_status_map = {model: False for model in models}

    while not all(model_status_map.values()):
        try:
            model_status = es.ml.get_trained_models_stats()
        except ConnectionTimeout:
            print("A connection timeout error occurred.")
            continue

        for x in model_status["trained_model_stats"]:
            model_id = x["model_id"]
            # Skip this model if it's not in our list or it has already started
            if model_id not in models or model_status_map[model_id]:
                continue
            if "deployment_stats" in x:
                if (
                    "nodes" in x["deployment_stats"]
                    and len(x["deployment_stats"]["nodes"]) > 0
                ):
                    if (
                        x["deployment_stats"]["nodes"][0]["routing_state"][
                            "routing_state"
                        ]
                        == "started"
                    ):
                        print(f"{model_id} model deployed and started")
                        model_status_map[model_id] = True

        if not all(model_status_map.values()):
            sleep(0.5)


models = [".elser_model_2", ".multilingual-e5-small"]
wait_for_models_to_start(es, models)
.elser_model_2 model deployed and started
.multilingual-e5-small model deployed and started创建索引模板并链接到摄取管道
template_body = {
    "index_patterns": ["imdb_movies*"],
    "template": {
        "settings": {"index": {"default_pipeline": "elser_e5_embed"}},
        "mappings": {
            "properties": {
                "budget_x": {"type": "double"},
                "country": {"type": "keyword"},
                "crew": {"type": "text"},
                "date_x": {"type": "date", "format": "MM/dd/yyyy||MM/dd/yyyy[ ]"},
                "genre": {"type": "keyword"},
                "names": {"type": "text"},
                "names_sparse": {"type": "sparse_vector"},
                "names_dense": {"type": "dense_vector"},
                "orig_lang": {"type": "keyword"},
                "orig_title": {"type": "text"},
                "overview": {"type": "text"},
                "overview_sparse": {"type": "sparse_vector"},
                "overview_dense": {"type": "dense_vector"},
                "revenue": {"type": "double"},
                "score": {"type": "double"},
                "status": {"type": "keyword"},
            }
        },
    },
}

# Create the template
es.indices.put_index_template(name="imdb_movies", body=template_body)
创建采集管道
# Define the pipeline configuration
pipeline_body = {
    "processors": [
        {
            "inference": {
                "model_id": ".multilingual-e5-small",
                "description": "embed names with e5 to names_dense nested field",
                "input_output": [
                    {"input_field": "names", "output_field": "names_dense"}
                ],
            }
        },
        {
            "inference": {
                "model_id": ".multilingual-e5-small",
                "description": "embed overview with e5 to names_dense nested field",
                "input_output": [
                    {"input_field": "overview", "output_field": "overview_dense"}
                ],
            }
        },
        {
            "inference": {
                "model_id": ".elser_model_2",
                "description": "embed overview with .elser_model_2 to overview_sparse nested field",
                "input_output": [
                    {"input_field": "overview", "output_field": "overview_sparse"}
                ],
            }
        },
        {
            "inference": {
                "model_id": ".elser_model_2",
                "description": "embed names with .elser_model_2 to names_sparse nested field",
                "input_output": [
                    {"input_field": "names", "output_field": "names_sparse"}
                ],
            }
        },
    ],
    "on_failure": [
        {
            "append": {
                "field": "_source._ingest.inference_errors",
                "value": [
                    {
                        "message": "{{ _ingest.on_failure_message }}",
                        "pipeline": "{{_ingest.pipeline}}",
                        "timestamp": "{{{ _ingest.timestamp }}}",
                    }
                ],
            }
        }
    ],
}


# Create the pipeline
es.ingest.put_pipeline(id="elser_e5_embed", body=pipeline_body)
提取文档
这将
- 进行一些预处理
- 批量提取 10,178 条 IMDB 记录
- 使用 ELSER 模型为 overview 和 name 字段生成稀疏向量嵌入
- 使用 ELSER 模型为 overview 和 name 字段生成密集向量嵌入
使用上述分配设置通常需要一定的时间才能完成。这个依赖于你自己电脑的配置。
# Load CSV data into a pandas DataFrame
df = pd.read_csv("./content/imdb_movies.csv")

# Replace all NaN values in DataFrame with None
df = df.where(pd.notnull(df), None)

# Convert DataFrame into a list of dictionaries
# Each dictionary represents a document to be indexed
documents = df.to_dict(orient="records")


# Define a function to generate actions for bulk API
def generate_bulk_actions(documents):
    for doc in documents:
        yield {
            "_index": "imdb_movies",
            "_source": doc,
        }


# Use the bulk helper to insert documents, 200 at a time
start_time = time.time()
helpers.bulk(es, generate_bulk_actions(documents), chunk_size=200)
end_time = time.time()

print(f"The function took {end_time - start_time} seconds to run")
我们可以在 Kibana 中进行查看:


我们需要等一定的时间来完成上面的摄取工作。值得注意的是:在上面的代码中我把 chunk_size 设置为 20。这个是为了避免 "Connection timeout" 错误。如果我们把这个值设置很大,那么摄取的时间可能过长,那么就会发生 "Connection timeout" 这样的错误。我们在批量处理时,选择比较少的文档来完成摄取工作。有关如何设置这个 timeout 的时间,我们可以参考文章 “在 Elasticsearch 中扩展 ML 推理管道:如何避免问题并解决瓶颈”。
针对我的电脑,它花费了如下的时间来完成 10,178 个文档的摄取:
The function took 1292.8102316856384 seconds to run这个将近20分钟。
缩小 ELSER 和 e5 模型
我们不需要大量的模型分配来进行测试查询,因此我们将每个模型分配缩小到 1 个
for model_id in [".elser_model_2","my-e5-model"]:
    result = es.perform_request(
        "POST",
        f"/_ml/trained_models/{model_id}/deployment/_update",
        headers={"content-type": "application/json", "accept": "application/json"},
        body={"number_of_allocations": 1},
    )
Retriever 测试
我们将使用搜索输入 clueless slackers 在数据集中的 overview 字段(文本或嵌入)中搜索电影
请随意将下面的 movie_search 变量更改为其他内容
movie_search = "clueless slackers"Standard - 搜索所有文本! - bm25
response = es.search(
    index="imdb_movies",
    body={
        "query": {"match": {"overview": movie_search}},
        "size": 3,
        "fields": ["names", "overview"],
        "_source": False,
    },
)

for hit in response["hits"]["hits"]:
print(f"{hit['fields']['names'][0]}\n- {hit['fields']['overview'][0]}\n") 
kNN-搜索所有密集向量!
response = es.search(
    index="imdb_movies",
    body={
        "retriever": {
            "knn": {
                "field": "overview_dense",
                "query_vector_builder": {
                    "text_embedding": {
                        "model_id": "my-e5-model",
                        "model_text": movie_search,
                    }
                },
                "k": 5,
                "num_candidates": 5,
            }
        },
        "size": 3,
        "fields": ["names", "overview"],
        "_source": False,
    },
)

for hit in response["hits"]["hits"]:
print(f"{hit['fields']['names'][0]}\n- {hit['fields']['overview'][0]}\n") 
text_expansion - 搜索所有稀疏向量! - elser
response = es.search(
    index="imdb_movies",
    body={
        "retriever": {
            "standard": {
                "query": {
                    "text_expansion": {
                        "overview_sparse": {
                            "model_id": ".elser_model_2",
                            "model_text": movie_search,
                        }
                    }
                }
            }
        },
        "size": 3,
        "fields": ["names", "overview"],
        "_source": False,
    },
)

for hit in response["hits"]["hits"]:
print(f"{hit['fields']['names'][0]}\n- {hit['fields']['overview'][0]}\n") 
rrf — 将所有事物结合起来!
response = es.search(
    index="imdb_movies",
    body={
        "retriever": {
            "rrf": {
                "retrievers": [
                    {"standard": {"query": {"term": {"overview": movie_search}}}},
                    {
                        "knn": {
                            "field": "overview_dense",
                            "query_vector_builder": {
                                "text_embedding": {
                                    "model_id": "my-e5-model",
                                    "model_text": movie_search,
                                }
                            },
                            "k": 5,
                            "num_candidates": 5,
                        }
                    },
                    {
                        "standard": {
                            "query": {
                                "text_expansion": {
                                    "overview_sparse": {
                                        "model_id": ".elser_model_2",
                                        "model_text": movie_search,
                                    }
                                }
                            }
                        }
                    },
                ],
                "window_size": 5,
                "rank_constant": 1,
            }
        },
        "size": 3,
        "fields": ["names", "overview"],
        "_source": False,
    },
)

for hit in response["hits"]["hits"]:
print(f"{hit['fields']['names'][0]}\n- {hit['fields']['overview'][0]}\n") 
下载。


 821
821

 被折叠的 条评论
为什么被折叠?
被折叠的 条评论
为什么被折叠?
 到【灌水乐园】发言


