


 超级会员免费看


1.图片的读取

1.1 使用opencv
cv2.imread(filename[, flags])
以读取一张tif图片为例:
img="D:\\***.tif"
data2=cv2.imread(img,2)
opencv 官方文献中给出的不同flags代表的读取类型,如下:
filename – Name of file to be loaded.
flags –
Flags specifying the color type of a loaded image:
◦>0 Return a 3-channel color image
◦=0 Return a grayscale image
◦<0 Return the loaded image as is. Note that in the current implementation the alpha channel, if any, is stripped from the output image. For example, a 4-channel RGBA image is loaded as RGB if flags\ge0 .
另外,在c++代码中可以看到:
//! Imread flags
enum ImreadModes {
       IMREAD_UNCHANGED            = -1, //!< If set, return the loaded image as is (with alpha channel, otherwise it gets cropped). Ignore EXIF orientation.
       IMREAD_GRAYSCALE            = 0,  //!< If set, always convert image to the single channel grayscale image (codec internal conversion).
       IMREAD_COLOR                = 1,  //!< If set, always convert image to the 3 channel BGR color image.
       IMREAD_ANYDEPTH             = 2,  //!< If set, return 16-bit/32-bit image when the input has the corresponding depth, otherwise convert it to 8-bit.
       IMREAD_ANYCOLOR             = 4,  //!< If set, the image is read in any possible color format.
       IMREAD_LOAD_GDAL            = 8,  //!< If set, use the gdal driver for loading the image.
       IMREAD_REDUCED_GRAYSCALE_2  = 16, //!< If set, always convert image to the single channel grayscale image and the image size reduced 1/2.
       IMREAD_REDUCED_COLOR_2      = 17, //!< If set, always convert image to the 3 channel BGR color image and the image size reduced 1/2.
       IMREAD_REDUCED_GRAYSCALE_4  = 32, //!< If set, always convert image to the single channel grayscale image and the image size reduced 1/4.
       IMREAD_REDUCED_COLOR_4      = 33, //!< If set, always convert image to the 3 channel BGR color image and the image size reduced 1/4.
       IMREAD_REDUCED_GRAYSCALE_8  = 64, //!< If set, always convert image to the single channel grayscale image and the image size reduced 1/8.
       IMREAD_REDUCED_COLOR_8      = 65, //!< If set, always convert image to the 3 channel BGR color image and the image size reduced 1/8.
       IMREAD_IGNORE_ORIENTATION   = 128 //!< If set, do not rotate the image according to EXIF's orientation flag.
     };
1.2 使用PIL.Image
PIL.Image.open(fp, mode='r', formats=None)
示例:
from PIL import Image
im = Image.open('lena.jpg')
# im.show()
im_array = np.asarray(im)
可以看出,相比cv2.imread()在有些情况下需要设置一些参数,使用PIL.Image读取图片是很方便的。同时使用 np.asarray()可以很方便地将其转为np.array格式,以进行后续数据处理。
1.3 使用matplotlib
matplotlib.image.imread(fname, format=None)
参数:
fnamestr:文件名/url地址等
formatstr:文件格式('png', 'pdf', 'svg'等)
           如果不设置,自动通过文件名获取;获取不了的话,默认为"PNG"。
返回值:格式为numpy.array
(M, N) for grayscale images.
(M, N, 3) for RGB images.
(M, N, 4) for RGBA images.
例子:
import matplotlib.image as mpimg
img= mpimg.imread('1.jpg')
2.图片的保存
2.1 使用opencv
Image.save(fp, format=None, **params)
cv2.imwrite(filename, image[, params])
params中给出的是图像保存的特定类型(图像质量,压缩级别之类),一般应该也不需要~
cv2.imwrite(f"D:\\2.tif",data.astype(np.uint16))
注意:数据类型要设置为整型;若有小于0的值,应进行处理,否则会产生溢出。
2.2 使用PIL.Image
首先通过Image.fromarray()将数据转成 PIL image,然后再进行保存。
im = Image.fromarray(im_array)
im.save('1.png')
2.3 使用matplotlib.pyplot
savefig(fname, dpi=None, facecolor='w', edgecolor='w',
        orientation='portrait', papertype=None, format=None,
        transparent=False, bbox_inches=None, pad_inches=0.1,
        frameon=None, metadata=None)
以lena女神为例:
import matplotlib.pyplot as plt
import matplotlib.image as mpimg

lena = mpimg.imread('lena.jpg')
plt.imshow(lena)
plt.axis('off')
plt.savefig("lena_1.jpg")
plt.show()
但是需要注意的是,plt主要作用还是显示数据结果,因此它保存的数据会带上坐标轴/空白等,在保存正常的图片时,不建议使用。
3.文件的保存
3.1 文件操作模式
对文件操作的模式,可参照下表:

3.2 将数据写入txt
3.2.1 直接使用python方法
例如,将数据data保存到 1.txt。
注意:需要将数据类型设置为“str”,才能进行write。
res=open(r'D:\\1.txt','w')
res.write(str(data))
res.close()
3.2.2 使用numpy
numpy.savetxt("XXX.txt", data , fmt='%.18e', delimiter=' ', ...)
3.3 文件保存成csv格式
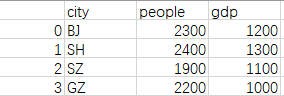
设有下列表格数据,将其保存成csv文件。
city people gdp
BJ   2300   1200
SH   2400   1300
SZ   1900   1100
GZ   2200   1000
首先将数据保存到python list变量中。
column=["city","people","gdp"]
content=[]
content.append(["BJ","2300","1200"])
content.append(["SH","2400","1300"])
content.append(["SZ","1900","1100"])
content.append(["GZ","2200","1000"])
3.3.1 使用python自带文件操作功能
res=",".join(column)+'\n'
for item in content:
    res+=",".join(item)+'\n'
f=open('D://stat.csv','w')
f.write(res)
f.close()

需要注意的是:
CSV英文全称为:Comma-Separated Values,逗号分隔值。
在计算机里默认是','分隔的(如果想修改,可参考如何修改CSV文件的分隔符)。
如果写成'\t'之内,保存格式会有问题。
3.3.2 使用pandas
import pandas as pd
tbl=pd.DataFrame(data=content,columns=column)
tbl.to_csv("D://stats.csv")
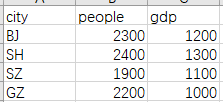
此时保存的文件内容为:
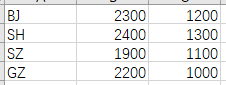
如果不想显示左侧一列,即index列:
最后一个语句可修改为:
tbl.to_csv("stats.csv",index=False)
如果标题也不想要:
tbl.to_csv("stats.csv",index=False,header=None)
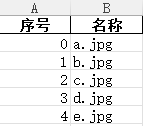
3.3.2.1 一个更直观的例子
import pandas as pd
df = pd.DataFrame()
inds=range(5)
pic_names=[f'{chr(97+i)}.jpg' for i in inds]
keys=["序号","名称"]
contents=[inds,pic_names]

for i in range(len(keys)):
    df[keys[i]]=pd.Series(contents[i])

df.to_excel("图片.xlsx", sheet_name="sheet1", index=False, header=True)
print(df)
输出内容为:
这种方法是把表格中的内容先整体保存,再赋值保存。
3.4 文件保存成excel
3.4.1 使用openpyxl
import openpyxl
def write_excel(file_name, contents, sheet_name,header=None,is_create_sheet=False):
    '''
    contens: list
    header:list
    '''
    if os.path.exists(file_name):
        wb = openpyxl.load_workbook(file_name)
    else:
        wb = openpyxl.Workbook()
    # sheet对象
    if is_create_sheet:
        ws = wb.create_sheet(sheet_name)
    else:
        ws = wb.active
        ws.title = sheet_name
    if header:
        ws.append(header)
    for r, content in enumerate(contents, 1):
        ws.append(content)
    wb.save(file_name)
    print(f"{os.path.abspath(file_name)} saved!")
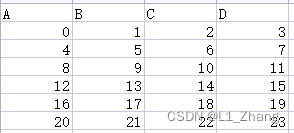
例子:
file_name="demo.xlsx"
header="A,B,C,D".split(",")
sheet_name='sheet1'
content=np.arange(24).reshape(6,4).tolist()
write_excel(file_name, content, is_create_sheet=True, sheet_name=sheet_name, header=header)
4.文件的读取
4.1 使用python自带readline函数
with open(file,'r') as f:
    for line in f.readlines():
        *******
f.close()
4.2 使用numpy
使用numpy一键读取,很是方便。
numpy.loadtxt("XXX.txt", dtype=<class 'float'>, delimiter=' ', skiprows=0, usecols=None, ...)
5.使用os.system打开/关闭文件
5.1 打开excel文件
os.system(f"start EXCEL.EXE {file_name.csv}")
5.2 关闭打开的excel文件
os.system('TASKKILL /F /IM excel.exe')
参考文献
[1] opencv cv2 imread
[2] Python3 File(文件) 方法
[3] numpy 保存 csv 文件


 1049
1049


 被折叠的 条评论
为什么被折叠?
被折叠的 条评论
为什么被折叠?
 到【灌水乐园】发言


