


在之前的文章中已经熟悉了coco2d-x的基本用法,这个系列主要分析它的一些类,结合官网提供coco2d-x Programmers Guide v3.12.pdf
pdf下载地址
https://pan.baidu.com/s/1bp3UDP1
看完了一大半左右,感觉没有实际写代码好,所以只是走马观花匆匆地扫过去。另外在github上提供更适合新手学习的代码,programmers-guide-samples-3.10.zip,操作性比coco2d-x源文件自带的CppTest强一点,因为都是一些基本操作的。看它的名字应该是基于version 3.12的。
里面的内容分成十几个章节,这个系列就是学习这些小代码的,可能会分得更细一些,一下子给太多容易掌握不住,每次进步一点点,累积起来就是巨大的进步。
很多的地方会加上自己的注释,或者查看官网提供的API手册,不懂的地方还希望见谅,毕竟在游戏上我也是新手。
源码demo下载地址
https://pan.baidu.com/s/1pKWwjcJ
第一篇创建只有一个退出按钮的demo,代替原来提供的HelloWorldScene.cpp类。
先把那四个类的源码粘贴出来
AppDelegate.h
Delegate的字面的意思就是代表的意思,现在我们需要知道的大概是applicationDidFinishLaunching, applicationDidEnterBackground, applicationWillEnterForeground
根据字面意思就可以推断出来,第一个表示程序需要完成的内容,第二个表示程序进入后台,第三个表示程序讲进入前台。
这几个大概意思知道就可以了,写coco2d-x engine的人都替我们写好了。
#ifndef  _APP_DELEGATE_H_
#define  _APP_DELEGATE_H_

#include "cocos2d.h"

/**
@brief    The cocos2d Application.

Private inheritance here hides part of interface from Director.
*/
class  AppDelegate : private cocos2d::Application
{
public:
    AppDelegate();
    virtual ~AppDelegate();

    virtual void initGLContextAttrs();

    /**
    @brief    Implement Director and Scene init code here.
    @return true    Initialize success, app continue.
    @return false   Initialize failed, app terminate.
    */
    virtual bool applicationDidFinishLaunching();

    /**
    @brief  Called when the application moves to the background
    @param  the pointer of the application
    */
    virtual void applicationDidEnterBackground();

    /**
    @brief  Called when the application reenters the foreground
    @param  the pointer of the application
    */
    virtual void applicationWillEnterForeground();
};

#endif // _APP_DELEGATE_H_
AppDelegate.cpp
这里对新手来说比较疑惑的是GL是什么,就是一组图像渲染的接口,还没到学习OpenGL的地步,有兴趣可以自己查阅资料。
需要弄清楚几个尺寸,这里选用的是mediumResolutionSize 1024 × 768
后面还有对象的尺寸,基点等,对我们计算物体的位置十分重要。
真正需要关注的是auto scene = MainScene::createScene(); 创建一个场景,大概可以翻译成场景,
编程手册上打了一个比方说Driector类似于拍电影的导演,Scene类似于场景。
Animation就是动画吧,英语都比较直白,比较好理解。
#include "AppDelegate.h"
#include "MainScene.h"

USING_NS_CC;

static cocos2d::Size designResolutionSize = cocos2d::Size(480, 320);
static cocos2d::Size smallResolutionSize = cocos2d::Size(480, 320);
static cocos2d::Size mediumResolutionSize = cocos2d::Size(1024, 768);
static cocos2d::Size largeResolutionSize = cocos2d::Size(2048, 1536);

AppDelegate::AppDelegate()
{
}

AppDelegate::~AppDelegate()
{
}

// if you want a different context, modify the value of glContextAttrs
// it will affect all platforms
void AppDelegate::initGLContextAttrs()
{
	/* GLContextAttrs Struct
	 * set OpenGL context attributes:
	 * redBits, greenBits, blueBits, alphaBits, depthBits, stencilBits
	 * /SourceCode/cocos/platform/CCLView.h
	 */
    GLContextAttrs glContextAttrs = {8, 8, 8, 8, 24, 8};

    GLView::setGLContextAttrs(glContextAttrs);
}

// if you want to use the package manager to install more packages,
// don't modify or remove this function
static int register_all_packages()
{
    return 0; //flag for packages manager
}

bool AppDelegate::applicationDidFinishLaunching() {
    // initialize director
    auto director = Director::getInstance();
    auto glview = director->getOpenGLView();
    if(!glview) {
#if (CC_TARGET_PLATFORM == CC_PLATFORM_WIN32) || (CC_TARGET_PLATFORM == CC_PLATFORM_MAC) || (CC_TARGET_PLATFORM == CC_PLATFORM_LINUX)
        glview = GLViewImpl::createWithRect("GameDemo", cocos2d::Rect(0, 0, mediumResolutionSize.width, mediumResolutionSize.height));
#else
        glview = GLViewImpl::create("GameDemo");
#endif
        director->setOpenGLView(glview);
    }

    // turn on display FPS
    // director->setDisplayStats(true);

    // set FPS. the default value is 1.0/60 if you don't call this
    // director->setAnimationInterval(1.0f / 60);

    // Set the design resolution
    glview->setDesignResolutionSize(designResolutionSize.width, designResolutionSize.height, ResolutionPolicy::NO_BORDER);
    auto frameSize = glview->getFrameSize();
    // if the frame's height is larger than the height of medium size.
    if (frameSize.height > mediumResolutionSize.height)
    {
        director->setContentScaleFactor(MIN(largeResolutionSize.height/designResolutionSize.height, largeResolutionSize.width/designResolutionSize.width));
    }
    // if the frame's height is larger than the height of small size.
    else if (frameSize.height > smallResolutionSize.height)
    {
        director->setContentScaleFactor(MIN(mediumResolutionSize.height/designResolutionSize.height, mediumResolutionSize.width/designResolutionSize.width));
    }
    // if the frame's height is smaller than the height of medium size.
    else
    {
        director->setContentScaleFactor(MIN(smallResolutionSize.height/designResolutionSize.height, smallResolutionSize.width/designResolutionSize.width));
    }

    register_all_packages();

    // create a scene. it's an autorelease object
    auto scene = MainScene::createScene();

    // run
    director->runWithScene(scene);

    return true;
}

// This function will be called when the app is inactive. Note, when receiving a phone call it is invoked.
void AppDelegate::applicationDidEnterBackground() {
    Director::getInstance()->stopAnimation();

    // if you use SimpleAudioEngine, it must be paused
    // SimpleAudioEngine::getInstance()->pauseBackgroundMusic();
}

// this function will be called when the app is active again
void AppDelegate::applicationWillEnterForeground() {
    Director::getInstance()->startAnimation();

    // if you use SimpleAudioEngine, it must resume here
    // SimpleAudioEngine::getInstance()->resumeBackgroundMusic();
}
开始创建我们自己的场景,命名为
MainScene.h
英文注释已经说的很清楚了,CREATE_FUNC是一个宏,我觉得没有必要在现在就进行深入理解,除非你的C++功底特别深厚。
我猜大概的意思是向系统注册这个MainScene.
#ifndef MAINSCENE_H
#define MAINSCENE_H

#include "cocos2d.h"

class MainScene : public cocos2d::Node {
public:
	// There's no 'id' in cpp, so we recommend returning the class
	// instance pointer
	static cocos2d::Scene *createScene();

	// Here's a difference. Method 'init' in cocos2d-x return bool,
	// instead of returning 'id' in cocos2d-iphone
	virtual bool init();

	// a selector callback
	void onMenuCloseCallback(cocos2d::Ref *sender);
	CREATE_FUNC(MainScene);
};
#endif
MainScene.cpp
MenuItemImage和Menu是应该是被包含的关系,一个Menu中可以创建好多的Item,最后以NULL结尾,C++11是用nullptr,不过表达的意思是一样的。
origin.x指的是可见尺寸的原点,在坐下角,visibleSize.width是指屏幕的宽度,closeItem->getContentSize()是指物体的尺寸。
Item的原点是在图片的正中间(0.5, 0.5),那么根据这么计算就可以得出是把Item放在右下角了。
点按钮回调相应的函数安卓中很多,知道怎么注册怎么用就可以了。
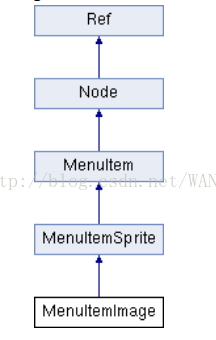
MenuItemImage的继承关系图
#include "MainScene.h"

USING_NS_CC;

Scene *MainScene::createScene() {
	// 'scene' is an autorelease object

	auto scene = Scene::create();

	// 'layer' is an autorelease object
	auto layer = MainScene::create();

	// add layer as a child to scene
	scene->addChild(layer);

	// return the scene
	return scene;
}

// On "init" you need to initialize your instance
bool MainScene::init()
{
	// Super init first
	if (!Node::init())
		return false;

	Size visibleSize = Director::getInstance()->getVisibleSize();
	// Return visible origin coordinate of the OpenGL view in points
	Vec2 origin = Director::getInstance()->getVisibleOrigin();

	// Add a menu item with "X" image, which is clicked to quit the program
	// Add a "close" icon to exit the progress, it's an autorelease object
	auto closeItem = MenuItemImage::create("CloseNormal.png",
			"CloseSelected.png", CC_CALLBACK_1(MainScene::onMenuCloseCallback, this));

	// getContentsSize()
	// Returns the untransoformed size of the node

	// default value (0.5, 0.5)
	closeItem->setPosition(Vec2(origin.x + visibleSize.width - closeItem->getContentSize().width/2,
		origin.y + closeItem->getContentSize().height/2));

	// create menu, it's an autorelease object
	auto closeMenu = Menu::create(closeItem, NULL);
	closeMenu->setPosition(Vec2::ZERO);
	this->addChild(closeMenu, 1);

	return true;
}

void MainScene::onMenuCloseCallback(Ref *sender) {
	Director::getInstance()->end();
}
差不多就可以编译运行。

手机上运行也是相同的效果,点击按钮会退出。


 4171
4171

 被折叠的 条评论
为什么被折叠?
被折叠的 条评论
为什么被折叠?
 到【灌水乐园】发言


